The Samsung Frame TV is more than just a television; it’s a revolutionary blend of technology and design, engineered to transform your living space into a gallery. When turned off, it artfully displays museum-quality artwork or personal photos, seamlessly integrating into your decor. When on, it delivers a stunning 4K QLED viewing experience. Installing this masterpiece, however, requires a thoughtful approach to truly unlock its potential for both aesthetic appeal and technological prowess. This comprehensive guide will walk you through every step, ensuring your Frame TV installation is not only successful but also maximizes its unique brand promise – to elevate your home with art-inspired tech.
Preparation is Key: Unboxing and Planning Your Frame TV Installation
A successful Frame TV installation begins long before you pick up a drill. Proper preparation ensures you have all the necessary components, understand your space, and have the right tools at hand. This initial phase is crucial for a smooth process, preventing common pitfalls and ensuring the final result lives up to the Frame TV’s sophisticated design.
What’s in the Box? Essential Components
Upon unboxing your Frame TV, you’ll discover several key components, each integral to its unique functionality and minimalist aesthetic. Familiarize yourself with these items:
- The Frame TV Display: The main screen itself, designed to be remarkably thin.
- Slim Fit Wall Mount: Samsung’s proprietary mount system designed to minimize the gap between the TV and the wall, giving it that flush, picture-frame look.
- One Connect Box: This external hub houses all the TV’s ports (HDMI, USB, Ethernet, etc.), keeping clutter away from the TV itself.
- Invisible Connection Cable: A single, translucent cable that connects the One Connect Box to the TV, transmitting both power and data. This is a hallmark of the Frame TV’s clean design, reducing visible wires to almost nothing.
- Remote Control: A sleek, minimalist remote often featuring voice control capabilities.
- Documentation: User manuals, installation guides, and warranty information.
- Optional (Purchased Separately): Customizable Bezels: These magnetic frames clip onto the TV, allowing you to match its appearance to your room’s decor. While not in the box, planning for these early can influence your overall design vision.
Before proceeding, visually confirm all components are present and undamaged. This crucial check prevents delays and potential frustration later in the installation process.
Choosing the Perfect Location and Height
The Frame TV’s purpose is to act as a piece of art, so its placement is paramount. Consider the following:
- Viewing Angle and Glare: While the Frame TV has anti-reflective properties, direct sunlight can still impact viewing quality. Choose a wall that minimizes direct glare, especially if it’s a primary viewing area.
- Aesthetic Integration: Where would a piece of art look best in your room? Over a console table, above a fireplace, or as a focal point on a blank wall? The Frame TV should complement your existing decor.
- Wall Type: The Slim Fit Wall Mount requires secure anchoring. Identify if your wall is drywall over wood studs, metal studs, brick, or concrete. This will dictate the type of fasteners you’ll need.
- Proximity to Power Outlets and Cable Management: While the Invisible Connection Cable minimizes visible wires, the One Connect Box still needs power. Plan the location of the One Connect Box – ideally in a cabinet or on a shelf nearby – and consider how you’ll route its power cable and any other device cables discreetly. Many users opt to run the Invisible Connection Cable and power to the One Connect Box through the wall for a truly wire-free appearance.
- Optimal Height: For art mode, the TV should be at an eye-level height when standing. For comfortable viewing, the center of the screen is typically recommended to be at eye level when seated. A common guideline is to have the bottom of the TV about 24-30 inches above the floor, but this can vary based on your furniture and personal preference. Use painter’s tape to mock up the TV’s dimensions on the wall to visualize its placement before drilling.
Tools You’ll Need
Gathering the right tools beforehand will streamline the installation process:
- Stud Finder: Essential for locating wood or metal studs behind drywall for secure mounting.
- Level: A long level (24-inch or longer) is highly recommended for ensuring the mount is perfectly horizontal.
- Drill and Drill Bits: Appropriate for your wall type (wood bits for studs, masonry bits for brick/concrete).
- Phillips Head Screwdriver: For assembling mount components and securing screws.
- Measuring Tape: For accurate placement and height measurements.
- Pencil: For marking drill points and outlines.
- Painter’s Tape: Useful for temporarily marking positions and protecting surfaces.
- Safety Glasses: Always protect your eyes when drilling.
- Vacuum Cleaner: For quick cleanup of dust after drilling.
- (Optional) Utility Knife/Cable Ties: For tidying up cables if not running them through the wall.
- (Recommended) Second Person: The Frame TV, while thin, can be large and awkward to handle alone, especially during mounting.
By meticulously completing these preparatory steps, you lay a solid foundation for a seamless and aesthetically pleasing installation, setting the stage for your Frame TV to truly shine as a piece of modern “Tech” and “Brand” statement in your home.
The Art of Mounting: Securing Your Frame TV to the Wall
Mounting the Frame TV with its Slim Fit Wall Mount is a critical step that dictates how flush and integrated your TV will appear. This section provides a detailed walkthrough, focusing on precision and security to achieve that signature gallery-like finish.
Locating Studs and Marking Drill Points
The stability of your mounted TV depends entirely on securing the wall mount to solid anchors, typically wall studs.
- Locate Studs: Use your stud finder to pinpoint the center of at least two, preferably three, adjacent studs in your chosen mounting area. Mark these centers lightly with a pencil. The Slim Fit Wall Mount is designed to attach to two studs.
- Determine Mount Height: Based on your earlier planning for TV height, hold the wall mount bracket against the wall. The Frame TV’s unique mount allows for slight horizontal adjustment after drilling, but vertical placement needs to be precise. Use your measuring tape to determine the desired height for the top or bottom of the TV, then translate that to where the wall mount holes should align.
- Level and Mark: Once you’ve determined the vertical placement and aligned the mount with your marked stud centers, use your long level to ensure the mount is perfectly horizontal. Mark the exact drill points through the mount’s designated holes. Double-check all measurements and markings before drilling. Accuracy here is paramount to ensure your “art” hangs straight.
Attaching the Wall Mount Brackets
With your drill points accurately marked, you can now proceed to secure the wall mount.
- Drill Pilot Holes: Using an appropriate drill bit (typically 1/8 to 3/16 inch for wood studs, or as recommended by the mount’s instructions for other wall types), drill pilot holes at each marked point. Ensure the holes are deep enough to accommodate the lag bolts without resistance. If you’re not drilling into studs (e.g., brick, concrete, or using heavy-duty drywall anchors), follow the specific instructions for those anchors.
- Secure the Mount: Position the Slim Fit Wall Mount bracket over the pilot holes and use the provided lag bolts (or appropriate heavy-duty screws/anchors) to secure it tightly to the wall. Use a socket wrench or a drill with a socket adapter for a firm, secure fit. Do not overtighten, but ensure there’s no wobble. Re-check with the level after tightening to confirm it remains perfectly horizontal. The Slim Fit mount typically comes in two pieces; ensure they are spaced correctly according to your TV’s size and the instructions.
Mounting the TV onto the Brackets
This step often requires a second person due to the size and delicate nature of the TV.
- Attach TV Brackets: On the back of the Frame TV, locate the mounting points. Attach the specific TV-side brackets that come with the Slim Fit Wall Mount to these points using the provided screws. Ensure they are tightened securely.
- Route the Invisible Connection Cable: Before lifting the TV onto the wall, carefully route the Invisible Connection Cable into its designated channel on the back of the TV and secure it. This cable will be delicate, so handle it with care.
- Lift and Hang: With assistance, carefully lift the Frame TV, aligning the TV-side brackets with the wall-mounted bracket. The Slim Fit Wall Mount has a clever design that allows you to hang the TV and then push the bottom in towards the wall until it clicks into place, achieving that flush, no-gap look. It may require a firm but gentle push. Listen for the clicks to confirm it’s securely latched.
- Final Adjustments: Once mounted, the Slim Fit Wall Mount allows for minor horizontal and even tilt adjustments (depending on the specific model). Use these to perfect the TV’s alignment and level. Ensure the anti-fall clips are engaged, if applicable, to prevent the TV from accidentally being knocked off the wall.
This meticulous approach to mounting not only ensures the physical security of your “Tech” investment but also perfects the “Brand” promise of the Frame TV – a television that truly looks like a piece of art seamlessly integrated into your home.
Connecting and Concealing: Wiring Your Frame TV for a Clean Look
The Frame TV’s design philosophy hinges on minimalism, particularly when it comes to visible cables. The ingenious One Connect Box and Invisible Connection Cable are central to achieving this clean aesthetic. This section guides you through connecting your TV while maintaining a clutter-free environment.
Understanding the One Connect Box
The One Connect Box is a cornerstone of the Frame TV’s design innovation. Rather than having a mess of ports on the back of the slim display itself, all inputs and outputs are consolidated into this single, external unit.
- Functionality: It houses all your HDMI ports (for gaming consoles, Blu-ray players, soundbars), USB ports, Ethernet, optical audio, and even the power input. This means you only run one cable (the Invisible Connection Cable) to the TV itself.
- Placement: The beauty of the One Connect Box is its flexibility in placement. It can be hidden in a nearby cabinet, on a shelf below the TV, or even in a media closet in another room (with a sufficiently long Invisible Connection Cable, often sold separately for longer runs). Its placement should be convenient for connecting all your peripheral devices without being an eyesore. Think strategically about where it will live, considering accessibility for future device hookups.
Routing the Invisible Connection Cable
The Invisible Connection Cable is perhaps the most distinctive feature of the Frame TV, enabling its virtually gapless wall mount and clean aesthetic.

- Connect to the TV: Ensure the Invisible Connection Cable is securely plugged into the dedicated port on the back of the Frame TV. It’s usually a proprietary connector that clicks firmly into place.
- Route to the One Connect Box: Carefully run the cable from the TV to your chosen location for the One Connect Box. The cable is very thin and semi-transparent, making it easy to disguise.
- Through the Wall (Recommended for ultimate concealment): For the cleanest look, many users opt to run the Invisible Connection Cable (and potentially the power cable for the One Connect Box) inside the wall. This typically involves using a low-voltage cable pass-through kit. Consult an electrician if you’re uncomfortable with in-wall wiring, especially for power. This method requires cutting two small holes in the drywall – one behind the TV and one where the One Connect Box will reside.
- External Routing: If in-wall routing isn’t feasible, you can run the cable along the baseboard or behind furniture. Use cable clips or raceways painted to match your wall to minimize its visibility. The cable’s translucent nature helps it blend in more than traditional black cables.
- Connect to the One Connect Box: Plug the other end of the Invisible Connection Cable into the designated “One Connect” port on the One Connect Box.
Important Note on the Invisible Connection Cable: This cable is delicate and proprietary. Do not bend it sharply, crimp it, or put excessive strain on it, as this can damage the internal optical fibers or power lines. Replacement cables can be expensive, impacting your “Money” investment.
Powering Up and Organizing Cables
With the Invisible Connection Cable in place, it’s time to bring everything to life.
- Connect Peripherals: Plug all your external devices (cable box, streaming stick, game console, soundbar) into the appropriate HDMI, USB, or optical ports on the One Connect Box.
- Connect Power: Plug the One Connect Box’s power cable into a wall outlet or surge protector.
- Organize Cables: Even with the One Connect Box, you’ll have multiple cables converging there. Use cable ties, Velcro straps, or a cable management box to neatly bundle and organize these cables. This not only improves aesthetics but also makes it easier to troubleshoot or add new devices later. If the One Connect Box is in a cabinet, ensure adequate ventilation to prevent overheating, especially if many devices are connected.
- Initial Power On: With everything connected, plug the One Connect Box into the power outlet and turn on the TV using the remote. The TV should power up, and you’ll be greeted by the initial setup screen.
By meticulously managing the connections and embracing the design principles of the One Connect Box, you ensure your Frame TV’s “Tech” seamlessly integrates into your home without compromising its “Brand” aesthetic, providing a truly art-like experience free from visual clutter.
First Power-Up and Software Setup: Activating Your Frame TV’s Potential
With your Frame TV physically installed and connected, the next crucial step is to power it on and navigate through the software setup. This phase unlocks the full range of features, from its stunning picture quality to its transformative Art Mode, making it a true centerpiece of your smart home.
Initial Configuration and Smart Hub Navigation
When you first power on your Frame TV, you’ll be guided through a series of initial setup screens. This process is intuitive and designed to get you up and running quickly.
- Language and Region: Select your preferred language and country/region.
- Network Connection: Connect your Frame TV to your home Wi-Fi network. This is essential for accessing streaming apps, software updates, and the Art Store. If you prefer a wired connection, plug an Ethernet cable into the One Connect Box. A stable internet connection is vital for the TV’s “Smart TV” capabilities, aligning with its “Tech” identity.
- Samsung Account: You’ll be prompted to sign in or create a Samsung Account. While not strictly mandatory for basic TV viewing, a Samsung Account unlocks personalized recommendations, access to the Art Store, synchronization with other Samsung devices, and cloud services, significantly enhancing the “Brand” experience.
- Agree to Terms and Conditions: Review and accept the various terms, conditions, and privacy policies.
- SmartThings App Integration (Optional but Recommended): Samsung’s SmartThings app allows you to control your TV from your smartphone, simplify initial setup by transferring Wi-Fi and account info, and integrate the TV into your broader smart home ecosystem. Download the app and follow the on-screen prompts for seamless integration.
- Channel Scan (if using an antenna): If you’re using an over-the-air antenna for local broadcasts, the TV will guide you through scanning for channels.
Once the initial configuration is complete, you’ll land on the Smart Hub – Samsung’s user interface. Take some time to explore its layout, which typically features a bottom bar with quick access to apps, inputs, and settings.
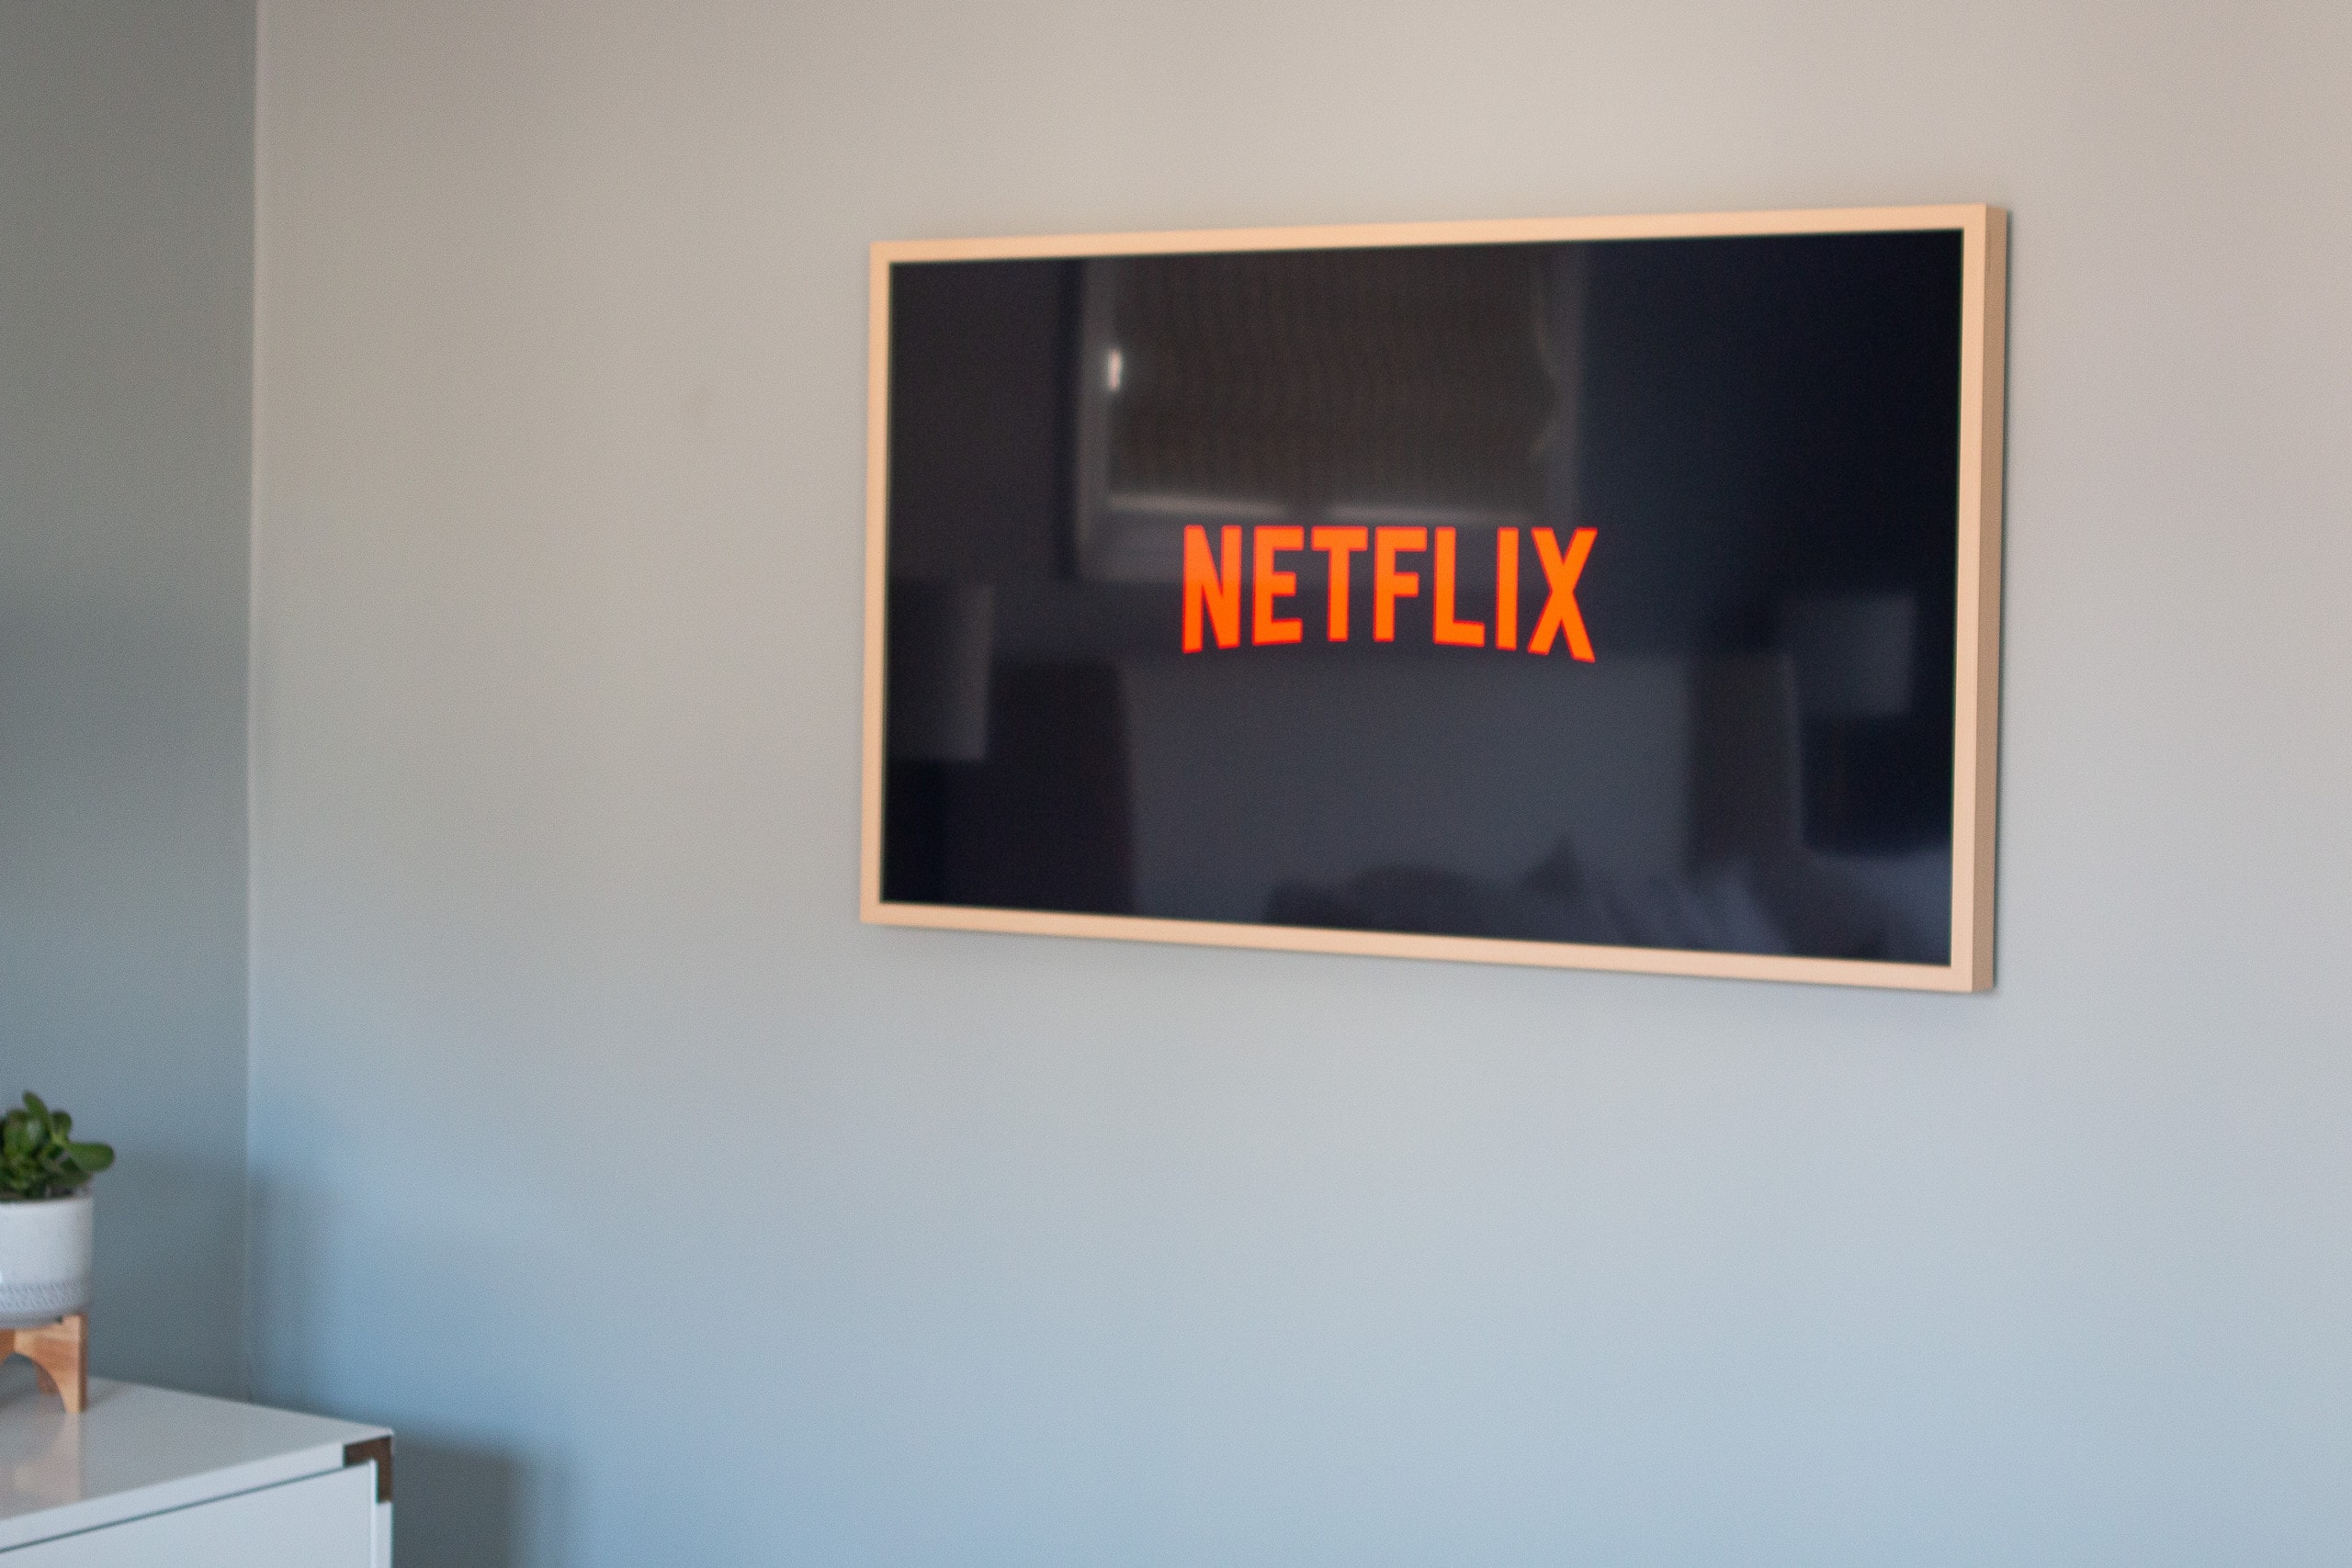
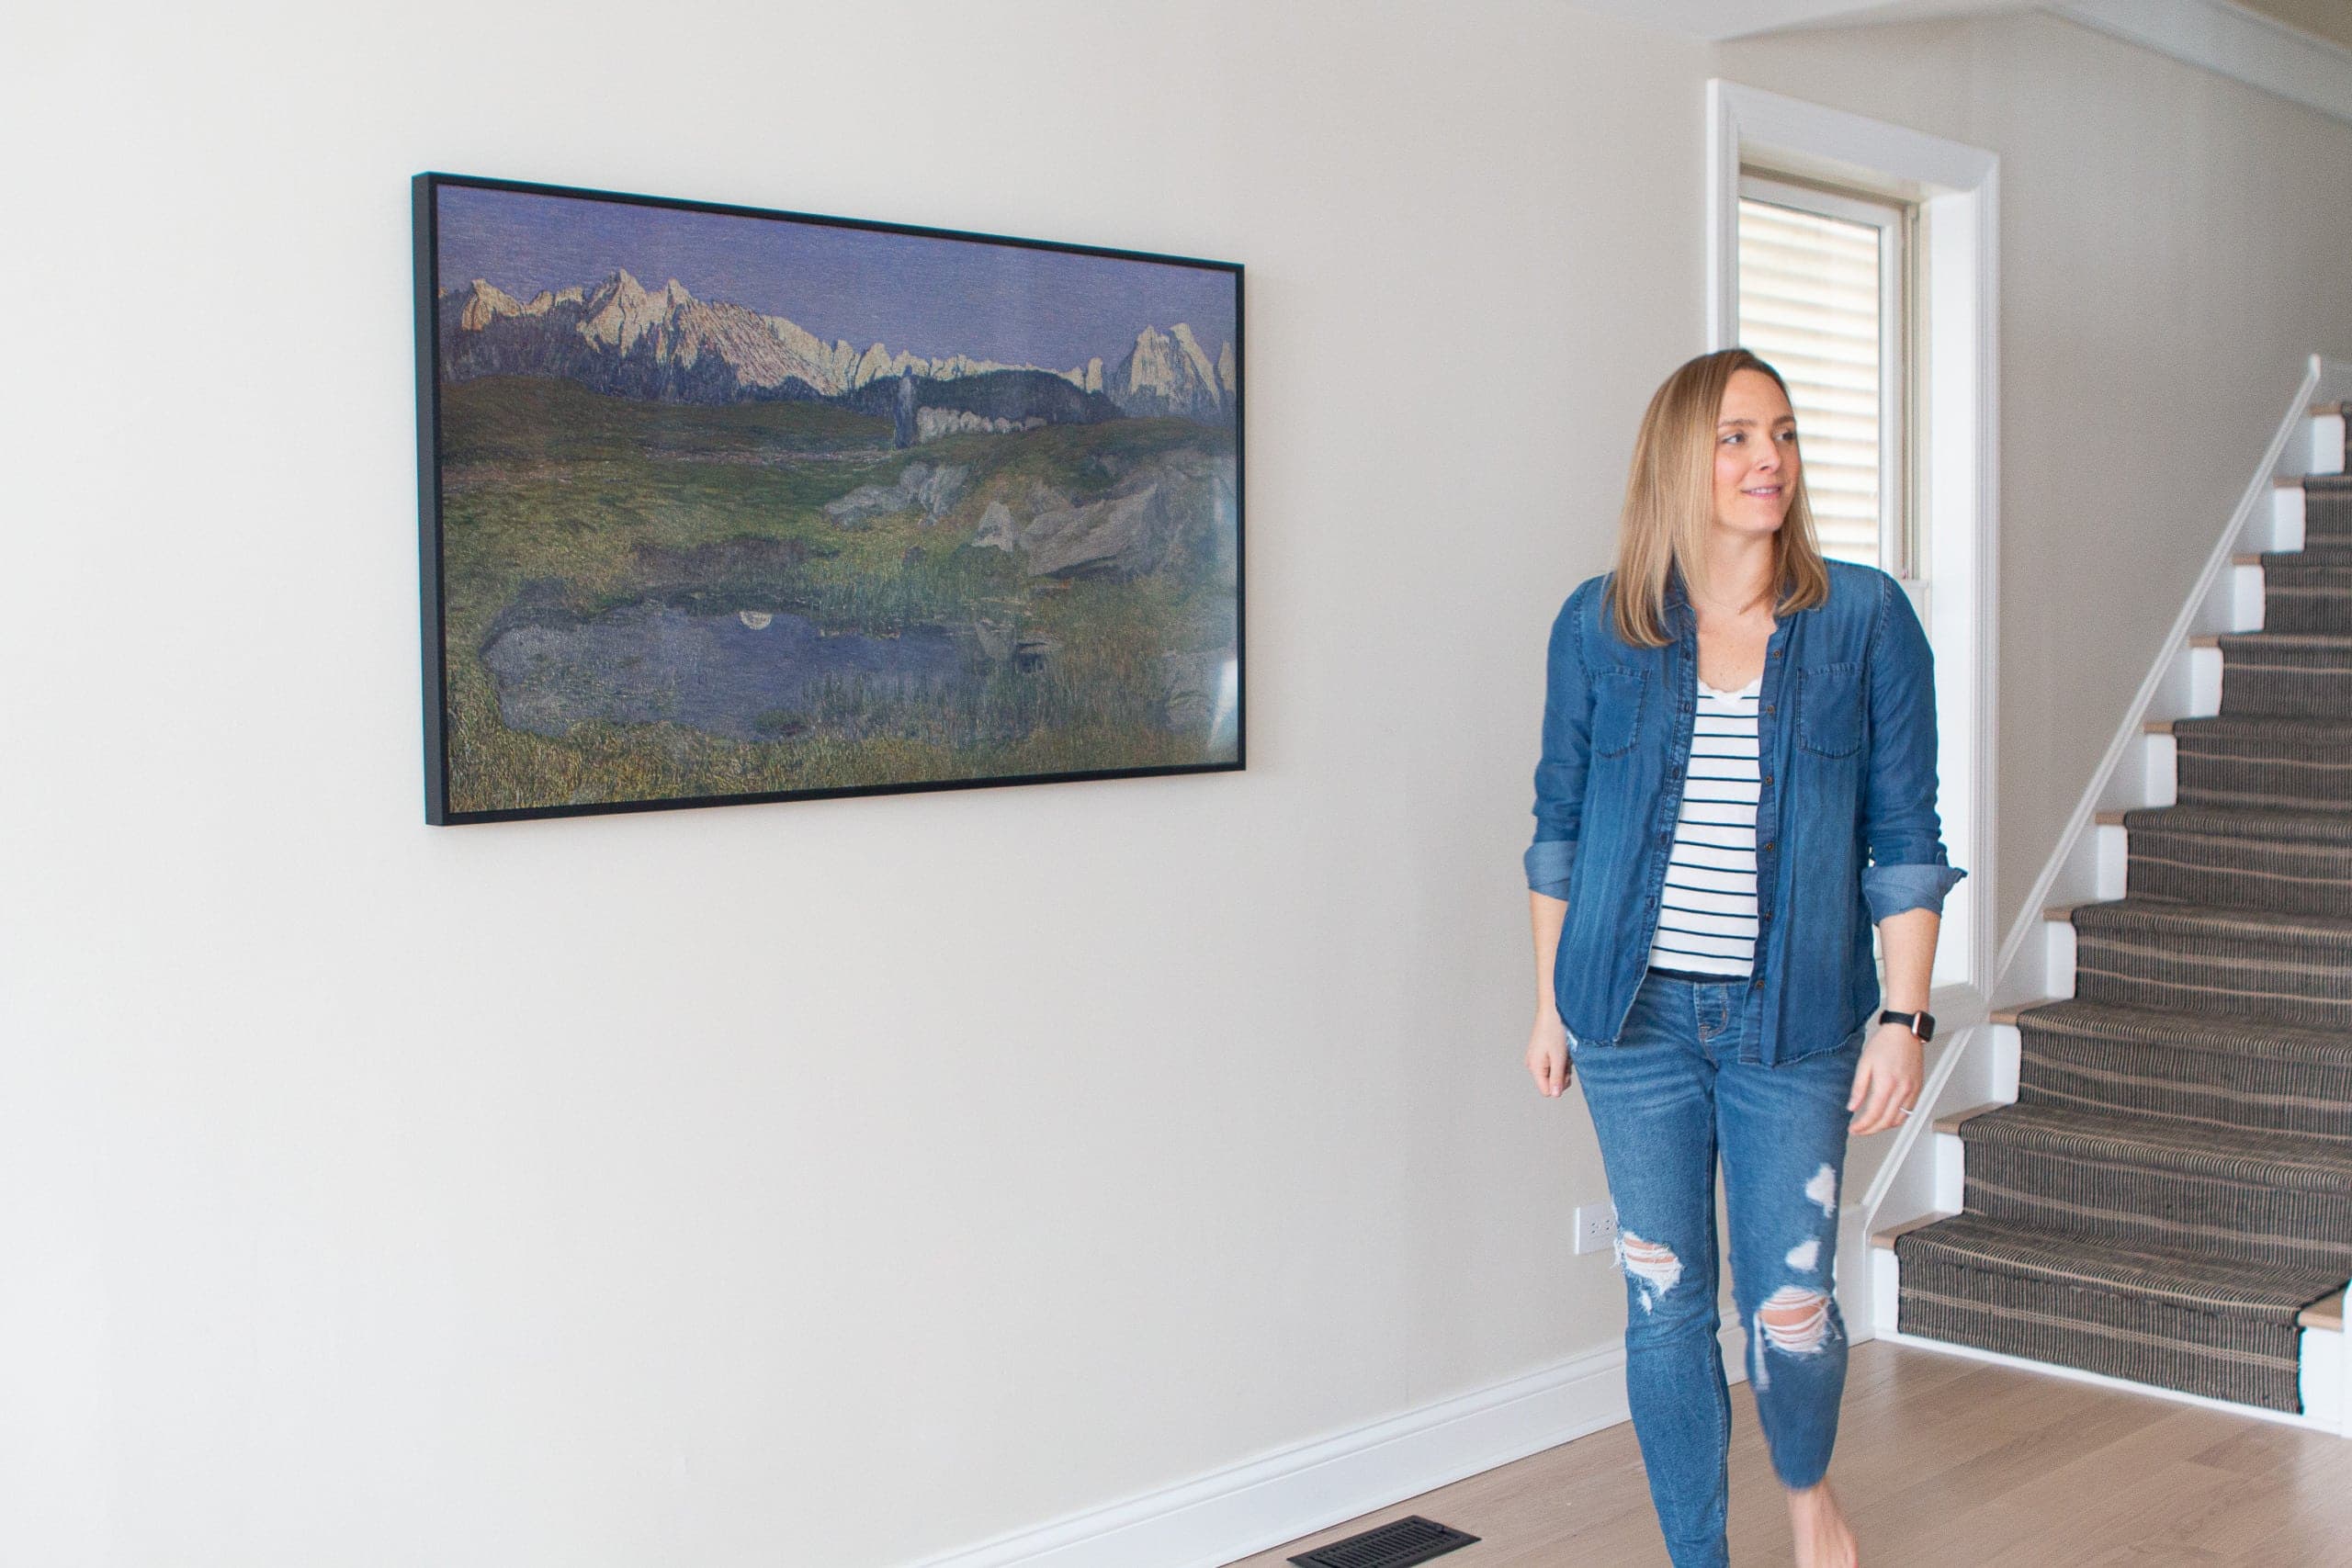
Activating and Customizing Art Mode
Art Mode is the signature feature that distinguishes The Frame TV. When the TV is off, it transitions into a beautiful display of artwork or photos, blending seamlessly into your room.
- Accessing Art Mode: You can switch to Art Mode by pressing the dedicated Art button on your remote or by simply turning off the TV (it will automatically enter Art Mode if configured to do so).
- Exploring the Art Store: The Frame TV comes with a selection of free artworks. For a wider, curated collection of world-renowned art, you can subscribe to the Samsung Art Store. This subscription offers access to thousands of pieces from galleries and museums globally. Consider this a “Money” investment that continuously refreshes your home’s aesthetic without needing physical art purchases, emphasizing the “Brand” value of the Frame TV.
- Uploading Personal Photos: You can display your own photos by uploading them via the SmartThings app or a USB drive connected to the One Connect Box. The TV offers various matting and layout options to make your photos look professional.
- Customizing Art Mode Settings:
- Brightness and Color Tone: Adjust these to match your room’s ambient light. The Frame TV has a built-in brightness sensor that automatically adjusts to mimic real artwork, but you can fine-tune it.
- Motion Sensor: The TV can be set to turn off Art Mode (and thus save power) when no one is detected in the room, activating again when movement is sensed. This is a smart “Tech” feature that helps manage your “Money” by reducing energy consumption.
- Sleep Timer: Set a specific time for Art Mode to turn off, for example, overnight.
- Favorite Artworks: Curate your own gallery of favorite pieces to rotate through.
Essential Settings for Optimal Viewing
Beyond Art Mode, optimize your Frame TV for an exceptional viewing experience.
- Picture Settings: Dive into the picture settings menu. Experiment with different picture modes (Standard, Dynamic, Movie, Filmmaker Mode) to find what suits your content and preferences. For a cinematic experience, “Movie” or “Filmmaker Mode” are often recommended for their color accuracy.
- Sound Settings: Adjust sound modes (Standard, Adaptive Sound), equalizer settings, and consider connecting a soundbar or external audio system for a more immersive audio experience.
- Input Naming: Rename your HDMI inputs (e.g., “Xbox,” “Blu-ray,” “Cable Box”) for easier navigation in the Smart Hub.
- Software Updates: Ensure your TV’s software is always up-to-date. Regular updates often bring new features, performance improvements, and security patches, enhancing the longevity and capability of your “Tech” investment.
- Accessibility Settings: Explore options for those with visual or hearing impairments, demonstrating Samsung’s commitment to inclusive “Tech” design.
By thoroughly setting up your Frame TV’s software, you transform it from a mere display into an interactive portal of art and entertainment, fully realizing the “Brand” vision and “Tech” innovation that makes it unique.
Maximizing Your Frame TV Experience: Tips, Troubleshooting, and Brand Value
Once your Samsung Frame TV is perfectly installed and configured, the journey doesn’t end. To truly maximize your investment and appreciate its unique position at the intersection of “Tech,” “Brand,” and “Money,” consider these advanced tips, potential troubleshooting scenarios, and a deeper understanding of its long-term value.
Enhancing Aesthetics: Bezels and Art Store Subscriptions
The Frame TV’s core appeal is its ability to blend seamlessly into your home. Two key elements further enhance this aesthetic:
- Customizable Bezels: These magnetic frames are designed to snap onto your Frame TV, instantly changing its look. Available in various colors (e.g., beige, brown, white, black, teak, brick red) and styles (modern, beveled), they allow you to match the TV to your room’s decor, your existing art collection, or even your seasonal themes. Investing in a few different bezels (a “Money” decision) allows for significant stylistic flexibility, reinforcing the “Brand’s” promise of personalized art integration. Consider them as interchangeable frames for a piece of art, offering endless possibilities for interior design.
- Samsung Art Store Subscription: While the Frame TV offers a selection of free art and the ability to display your own photos, the Art Store subscription (an ongoing “Money” investment) unlocks a vast, curated library of world-class art from renowned institutions. This continually refreshes your art collection, keeping your home decor dynamic and engaging. It’s a cost-effective way to experience a diverse range of artistic styles without the expense or hassle of acquiring physical artworks. This constant access to new and diverse content keeps the “Tech” fresh and the “Brand” experience premium.
Smart Home Integration and Voice Control
The Frame TV is a central component of a modern smart home ecosystem. Leveraging its smart features enhances convenience and functionality.
- SmartThings Integration: If you haven’t already, fully integrate your Frame TV with the Samsung SmartThings app. This allows you to control the TV from your smartphone, create routines (e.g., “Good Morning” routine turns on the TV to a news channel, “Good Night” routine turns on Art Mode with a dim setting), and connect it with other compatible smart devices like lights, thermostats, and cameras. This deep “Tech” integration elevates the user experience beyond a simple television.
- Voice Assistants: The Frame TV supports multiple voice assistants, including Bixby (Samsung’s own), Amazon Alexa, and Google Assistant. You can use voice commands via the remote (or a compatible external smart speaker) to:
- Change channels or inputs.
- Adjust volume.
- Open apps.
- Search for content.
- Control Art Mode (e.g., “Show landscapes in Art Mode”).
- Get weather updates or answer general questions.
This hands-free control significantly enhances the user experience, making interaction with your “Tech” more fluid.
Protecting Your Investment: Maintenance and Care
A premium “Tech” product like the Frame TV is a significant “Money” investment, and proper care ensures its longevity and sustained performance.
- Screen Cleaning: Use a soft, lint-free microfiber cloth specifically designed for electronics. For stubborn smudges, lightly dampen the cloth with distilled water or a dedicated screen cleaner (never spray directly onto the screen). Avoid harsh chemicals, paper towels, or abrasive materials, which can damage the delicate anti-reflective coating.
- Invisible Connection Cable Care: As mentioned earlier, this cable is proprietary and delicate. Avoid bending it sharply, stepping on it, or placing heavy objects on it. Handle it with care if you ever need to disconnect or reconnect it. A damaged cable can be costly to replace.
- Dusting: Regularly dust the TV frame, bezels, and the One Connect Box to prevent dust buildup, which can affect performance and aesthetics.
- Software Updates: Keep your TV’s firmware updated. Samsung regularly releases updates that improve performance, add features, and patch security vulnerabilities. This is crucial for maintaining the “Tech” integrity and ensuring you get the most out of your “Money” spent.
- Power Protection: Connect your One Connect Box to a surge protector to guard against power fluctuations, which can potentially damage sensitive electronics.
Troubleshooting Common Issues
While Frame TVs are reliable, occasionally you might encounter minor issues.
- No Picture/Power:
- Check if the One Connect Box is plugged in and receiving power.
- Ensure the Invisible Connection Cable is securely connected at both ends (TV and One Connect Box).
- Try a different power outlet for the One Connect Box.
- Art Mode Not Working/Displaying Correctly:
- Verify the ambient light sensor isn’t obstructed.
- Check Art Mode settings (brightness, motion sensor, sleep timer).
- Ensure your Samsung Account is logged in if trying to access Art Store content.
- Remote Not Responding:
- Replace batteries.
- Ensure there are no obstructions between the remote and the TV/One Connect Box.
- Try re-pairing the remote if it’s a Bluetooth model.
- Wi-Fi Connection Issues:
- Restart your home router and the TV.
- Check your Wi-Fi password.
- Move the One Connect Box closer to your router if possible, or consider a wired Ethernet connection.
By proactively managing your Frame TV’s aesthetic, integrating it into your smart home, diligently maintaining it, and knowing how to address minor issues, you ensure that this remarkable piece of “Tech” continues to deliver on its “Brand” promise, offering enduring value for your “Money” and transforming your home into a sophisticated space where technology and art coexist harmoniously.
aViewFromTheCave is a participant in the Amazon Services LLC Associates Program, an affiliate advertising program designed to provide a means for sites to earn advertising fees by advertising and linking to Amazon.com. Amazon, the Amazon logo, AmazonSupply, and the AmazonSupply logo are trademarks of Amazon.com, Inc. or its affiliates. As an Amazon Associate we earn affiliate commissions from qualifying purchases.