
FFmpeg is a powerful and versatile command-line tool that serves as the backbone for a vast array of multimedia processing tasks. Whether you’re a video editor, a content creator, a developer working with audio and video, or simply someone looking to convert file formats, FFmpeg is an indispensable piece of software. Its ability to handle virtually any audio or video codec, perform complex manipulations, and integrate seamlessly with other applications makes it a cornerstone of modern digital media workflows.
While FFmpeg’s prowess is undeniable, its installation on Windows can sometimes be a source of confusion for users unfamiliar with command-line interfaces or the nuances of software compilation. This guide aims to demystify the process, providing a clear, step-by-step walkthrough to get FFmpeg up and running on your Windows machine. We’ll cover everything from understanding what FFmpeg is, why you’d need it, to the actual installation and verification, ensuring you can harness its full potential for your projects.

The main topics of this website often revolve around leveraging technology for various purposes. FFmpeg fits perfectly within the “Tech” category, specifically under “Software” and “Tutorials.” It’s a prime example of a powerful open-source tool that can significantly boost productivity for individuals and businesses alike. Understanding how to install and use such tools is fundamental to staying ahead in today’s rapidly evolving digital landscape.
Understanding FFmpeg: The Multimedia Powerhouse
Before we dive into the installation process, it’s crucial to grasp what FFmpeg is and why it’s so widely adopted. FFmpeg is not a single program but rather a comprehensive suite of libraries and programs for handling multimedia data. At its core are the ffmpeg executable (for conversion, streaming, and processing), ffplay (a simple media player), and ffprobe (a tool for analyzing media streams).
The name “FFmpeg” itself is derived from “Fast Forward” (FF) and “MPEG” (Moving Picture Experts Group), hinting at its origins and primary focus. However, its capabilities extend far beyond just MPEG formats. It supports an astonishing number of audio and video formats, codecs, and protocols, making it a universal solution for almost any multimedia task.
Why You Might Need FFmpeg
The applications of FFmpeg are incredibly diverse. Here are just a few common scenarios where FFmpeg proves invaluable:
- Video Conversion: Converting videos between different formats (e.g., MP4 to AVI, MOV to WebM) and resolutions.
- Audio Extraction and Conversion: Extracting audio tracks from videos, converting audio formats (e.g., MP3 to WAV, AAC to OGG), or changing audio bitrates.
- Video Editing and Manipulation: Trimming, concatenating, resizing, rotating, flipping, applying filters, and watermarking videos.
- Screen Recording: Capturing your screen and saving it as a video file.
- Streaming: Encoding and decoding streams for live broadcasting or on-demand playback.
- Thumbnail Generation: Creating preview images from video files.
- Batch Processing: Automating repetitive multimedia tasks across a large number of files.
- Integration into Applications: Developers often use FFmpeg libraries to add multimedia capabilities to their own software.
Given its open-source nature and extensive feature set, FFmpeg is a go-to solution for individuals and businesses looking for a robust, flexible, and cost-effective way to manage their multimedia assets.
Installing FFmpeg on Windows: A Step-by-Step Guide
Installing FFmpeg on Windows typically involves downloading pre-built binaries and then configuring your system to recognize the command-line tool. There are two primary ways to approach this: downloading a static build or using a package manager like Chocolatey. We’ll focus on the more direct method of downloading static builds first, as it’s universally applicable.
Method 1: Downloading Static Builds
This method involves downloading the compiled FFmpeg executables directly from the official FFmpeg website or a trusted mirror.
Step 1: Download FFmpeg Binaries
- Visit the Official FFmpeg Download Page: Open your web browser and navigate to the official FFmpeg download page: https://ffmpeg.org/download.html.
- Locate Windows Builds: Scroll down to the “Get packages & executable files” section. You will see options for various operating systems. Click on the “Windows builds” link.
- Choose a Build Type: You’ll typically find a few options:
- Release Builds (Recommended): These are stable versions.
- Development Builds: These are the latest, potentially less stable versions.
- Windows 64-bit (or 32-bit) Shared/Static: For most modern systems, you’ll want the 64-bit version. The choice between “shared” and “static” is important:
- Shared: FFmpeg relies on external DLL files (libraries) which need to be present. This can lead to smaller download sizes.
- Static: FFmpeg is compiled with all necessary libraries included, making it self-contained. This is generally easier for beginners as it avoids potential dependency issues. For ease of installation, we recommend the static build.
- Download the ZIP File: Click on the link for a “release build” and then choose a “Windows 64-bit static” version. A ZIP archive will start downloading. Look for builds provided by reputable sources like
gyan.devorBtbN, which are commonly linked from the official site.
Step 2: Extract the Downloaded Files
- Locate the Downloaded ZIP File: Once the download is complete, find the ZIP file in your Downloads folder.
- Extract to a Permanent Location: It’s best to extract FFmpeg to a location that won’t be accidentally deleted and is easily accessible. A common and recommended location is
C:Program Files.- Create a new folder named
FFmpeginsideC:Program Files(orC:Program Files (x86)if you downloaded a 32-bit version). - Right-click on the downloaded ZIP file and select “Extract All…”
- Browse to the
C:Program FilesFFmpegfolder you just created and extract the contents there.
- Create a new folder named
- Verify the Structure: After extraction, your
C:Program FilesFFmpegfolder should contain subfolders likebin,doc,licenses, etc. The important executables (ffmpeg.exe,ffplay.exe,ffprobe.exe) will be inside thebinfolder.
Step 3: Add FFmpeg to Your System’s PATH Environment Variable
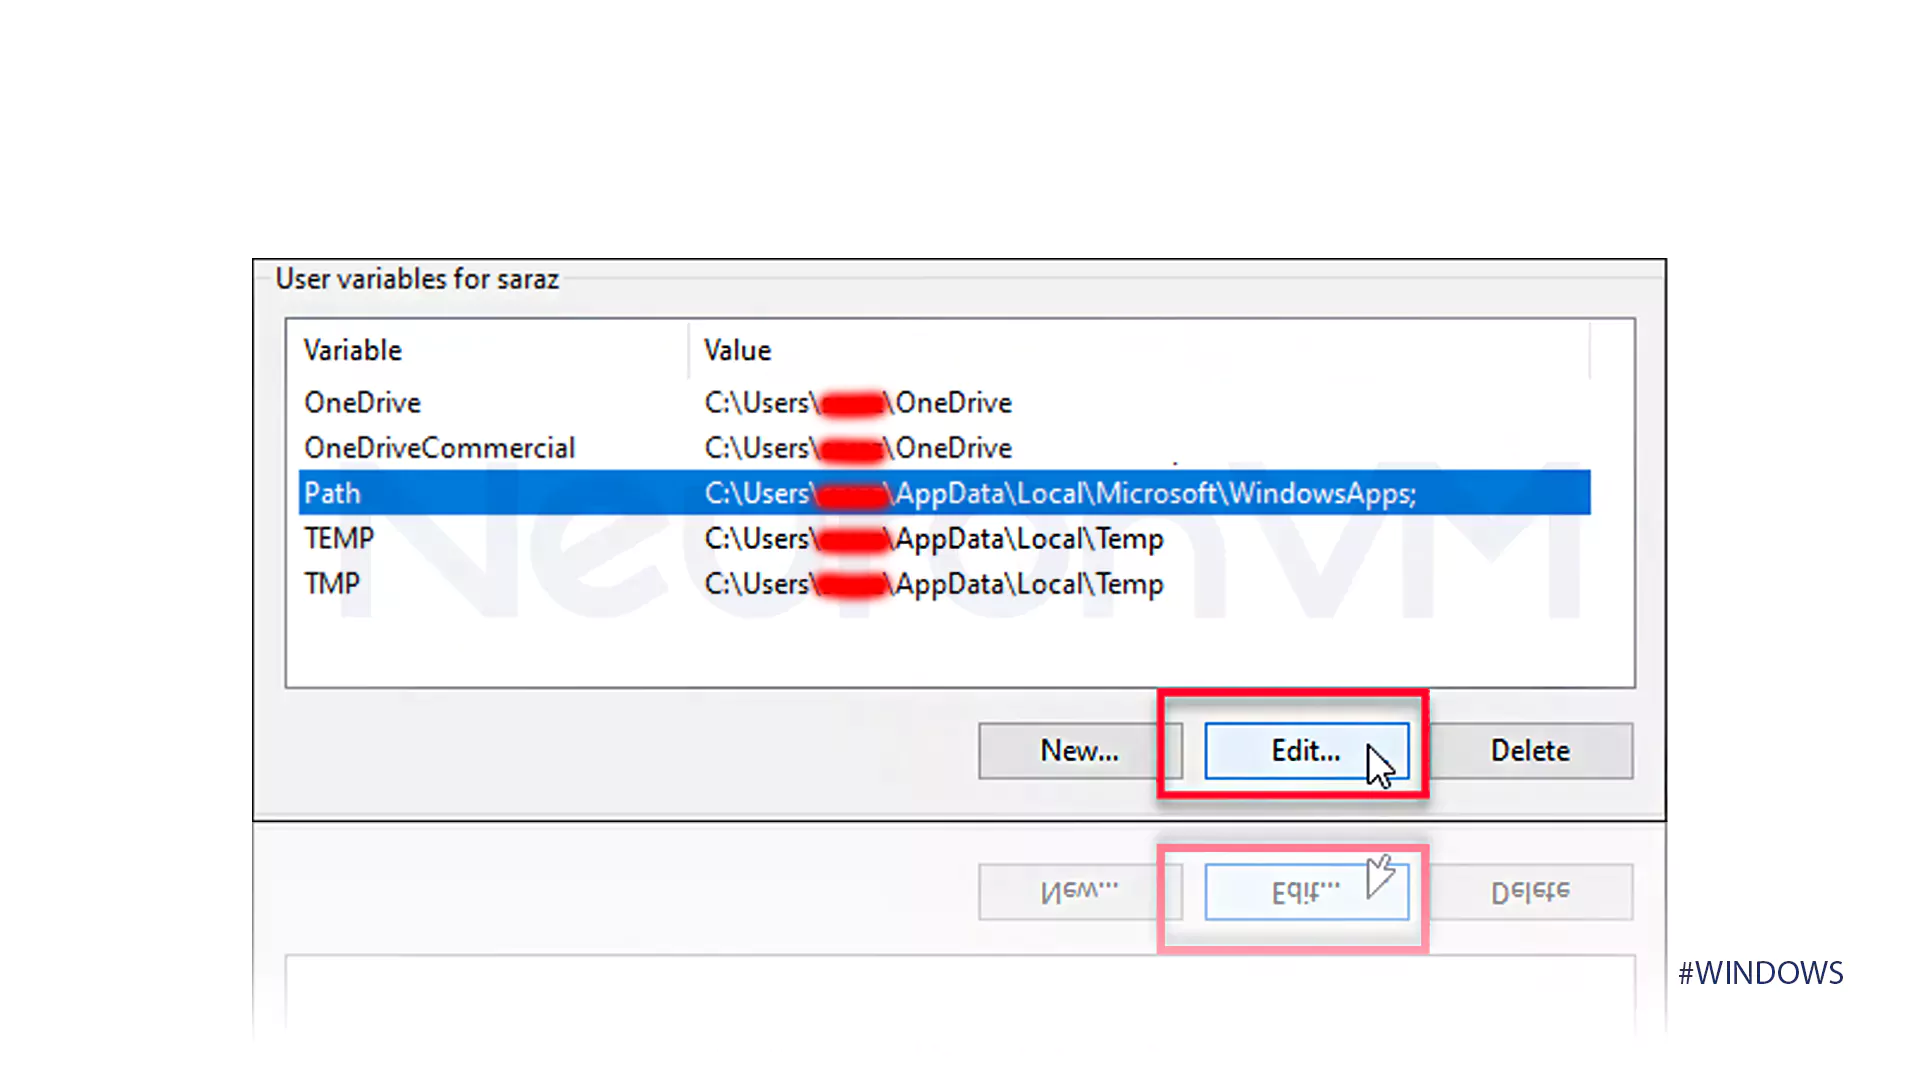
This is the most crucial step. Adding FFmpeg to your system’s PATH allows you to run FFmpeg commands from any directory in the Command Prompt or PowerShell, without having to navigate to the bin folder manually.
- Open System Properties:
- Press the
Windows Key + Rto open the Run dialog. - Type
sysdm.cpland press Enter. This will open the System Properties window.
- Press the
- Go to Environment Variables:
- In the System Properties window, click on the “Advanced” tab.
- Click the “Environment Variables…” button at the bottom.
- Edit the Path Variable:
- In the “Environment Variables” window, you’ll see two sections: “User variables for [your username]” and “System variables.”
- For system-wide access (available to all users), locate the “Path” variable under “System variables” and click “Edit…”.
- If you only want FFmpeg to be available for your specific user account, edit the “Path” variable under “User variables.”
- Add the FFmpeg Bin Directory:
- In the “Edit environment variable” window, click “New.”
- Paste the full path to your FFmpeg
bindirectory. This will likely beC:Program FilesFFmpegbin(orC:Program Files (x86)FFmpegbinif you used the x86 folder). - Ensure the path is entered correctly.
- Confirm Changes:
- Click “OK” on all open Environment Variables windows to save your changes.
Step 4: Verify the Installation
To confirm that FFmpeg has been installed correctly and is accessible from the command line, you need to open a new Command Prompt or PowerShell window and run a command.
- Open Command Prompt or PowerShell:
- Press
Windows Key + R, typecmd(for Command Prompt) orpowershell(for PowerShell), and press Enter. - Important: If you had a command prompt window open before editing the PATH, you need to close it and open a new one for the changes to take effect.
- Press
- Run the Version Command:
- In the newly opened command prompt, type the following command and press Enter:
bash

ffmpeg -version
- If FFmpeg is installed correctly and its path is set up properly, you should see output displaying the FFmpeg version, configuration, and copyright information.
- You can also verify
ffprobeandffplaysimilarly:
bash

ffprobe -version

ffplay -version
- In the newly opened command prompt, type the following command and press Enter:
If you encounter an error like “‘ffmpeg’ is not recognized as an internal or external command,” it means the PATH environment variable was not set correctly, or you didn’t open a new command prompt window. Double-check the path you entered in Step 3 and try again.
Method 2: Using Chocolatey (for Advanced Users)
Chocolatey is a package manager for Windows that simplifies the installation and management of software. If you’re comfortable with package managers, this can be a quicker and more streamlined approach.
- Install Chocolatey: If you don’t have Chocolatey installed, follow the instructions on their official website: https://chocolatey.org/install. This typically involves running a command in an administrator PowerShell window.
- Install FFmpeg: Once Chocolatey is installed, open an administrator PowerShell or Command Prompt and run:
bash

choco install ffmpeg
Chocolatey will download and install FFmpeg, automatically handling the PATH configuration for you. - Verify: Open a new command prompt or PowerShell window and run
ffmpeg -versionto verify the installation.
Common Issues and Troubleshooting
While the installation process is generally straightforward, here are a few common pitfalls and how to resolve them:
“FFmpeg is not recognized” Error
- Solution:
- New Command Prompt: Ensure you’ve opened a new Command Prompt or PowerShell window after modifying the PATH.
- Correct Path: Double-check that the path you added to the Environment Variables points exactly to the
binfolder within your FFmpeg installation directory (e.g.,C:Program FilesFFmpegbin). Typos are common. - Order Matters: If you have multiple entries in your PATH, ensure the FFmpeg path is listed clearly. However, for
ffmpegto be found, it just needs to be present in any of the directories listed in the PATH. - Restart Your Computer: In rare cases, a full system restart might be necessary for environment variable changes to propagate correctly across all system processes.
Antivirus or Firewall Interference
- Solution: Occasionally, antivirus software might flag the FFmpeg executables as suspicious. If you encounter issues with FFmpeg not running or being quarantined, try temporarily disabling your antivirus (at your own risk) and reinstalling, or add FFmpeg’s installation directory to your antivirus’s exclusion list.
Choosing Between Shared and Static Builds
- Solution: For most users, especially beginners, the static build is recommended because it includes all necessary libraries and is self-contained. Shared builds require managing separate DLL files, which can be more complex if they are missing or incompatible. If you choose a shared build, ensure you download and extract the associated libraries to the correct location as specified by the build provider.
Conclusion
Installing FFmpeg on Windows is a gateway to unlocking a world of advanced multimedia capabilities. By following these steps, you can confidently get this powerful command-line tool set up and ready to use. Whether you’re manipulating videos for your YouTube channel, processing audio for a podcast, or integrating media functionalities into your software projects, FFmpeg provides the robust foundation you need.
Remember that FFmpeg is a command-line tool, so familiarizing yourself with basic command-line operations will be key to leveraging its full potential. Numerous resources, tutorials, and documentation are available online to help you master its extensive features. Happy multimedia processing!
aViewFromTheCave is a participant in the Amazon Services LLC Associates Program, an affiliate advertising program designed to provide a means for sites to earn advertising fees by advertising and linking to Amazon.com. Amazon, the Amazon logo, AmazonSupply, and the AmazonSupply logo are trademarks of Amazon.com, Inc. or its affiliates. As an Amazon Associate we earn affiliate commissions from qualifying purchases.