In today’s increasingly connected world, a robust and reliable network is no longer a luxury; it’s a necessity. Whether you’re a gamer demanding low latency, a remote worker relying on stable video calls, or a smart home enthusiast orchestrating a symphony of devices, a wired Ethernet connection offers unparalleled performance and stability over Wi-Fi. While Wi-Fi has its place, for critical connections that require maximum speed and minimal interference, Ethernet reigns supreme.
If you’re looking to elevate your home or office network beyond the limitations of Wi-Fi, installing Ethernet wall jacks is a game-changer. This guide will walk you through the process, from understanding the components to meticulously connecting each wire, ensuring you achieve a professional and dependable network infrastructure. We’ll break down the technical aspects into manageable steps, making this project accessible even for those with limited DIY experience.

The allure of Ethernet isn’t just about speed; it’s also about reliability. Unlike wireless signals that can be susceptible to interference from other devices, building materials, or distance, a physical Ethernet cable provides a direct, dedicated pathway for data. This translates to fewer dropped connections, smoother streaming, and faster file transfers. For businesses, this translates to enhanced productivity and a more seamless operational workflow. For gamers, it means a competitive edge with reduced lag. And for smart home enthusiasts, it ensures that all your devices, from thermostats to security cameras, communicate flawlessly.
While professional installation is always an option, learning how to install Ethernet wall jacks yourself can be a rewarding and cost-effective endeavor. It empowers you to customize your network layout precisely to your needs, ensuring that every room or workspace has the connectivity it requires. Moreover, understanding the inner workings of your network can demystify technology and foster a greater appreciation for the infrastructure that supports our digital lives.
This comprehensive guide will equip you with the knowledge and confidence to tackle this project. We’ll cover the essential tools and materials you’ll need, demystify the color-coded wiring standards, and provide step-by-step instructions for a clean and functional installation. So, gather your tools, prepare your workspace, and let’s embark on the journey to a more connected future.
Understanding the Components and Tools
Before diving into the actual installation, it’s crucial to understand the key components involved and the tools you’ll need to complete the job safely and effectively. This preparation phase is vital for a smooth and successful installation, preventing frustration and ensuring a professional-looking result.
Essential Materials for Your Ethernet Jack Installation
- Ethernet Cable (Cat 5e, Cat 6, or Cat 6a): The backbone of your wired network. Cat 5e is suitable for speeds up to 1 Gigabit Ethernet (GbE), while Cat 6 and Cat 6a support higher speeds (10 GbE) and are generally recommended for future-proofing your network. Ensure you purchase solid-core Ethernet cable for in-wall runs; stranded cable is for patch cords.
- Keystone Jacks: These are the modular connectors that will be terminated at the wall. They come in various categories (matching your cable type) and styles. For wall plates, you’ll typically use keystone jacks designed to snap into a faceplate.
- Wall Plates (Faceplates): These are the decorative covers that mount to your wall, housing the keystone jacks and providing a clean finish. They come in single-port, dual-port, and multi-port configurations.
- RJ45 Connectors (Optional, for terminating at the other end): If you’re running a cable from a central point (like a router or patch panel) to the wall jack, you’ll need RJ45 connectors to terminate the cable at the device end.
- Cable Management Accessories (Optional but Recommended): This can include cable ties, raceways, or conduit to keep your wiring neat and organized, especially if you have multiple runs.
Tools for a Professional Installation
- Punch-Down Tool: This is the most critical tool for terminating Ethernet cables into keystone jacks. It seats the wires into the insulation displacement connectors (IDCs) within the jack and simultaneously cuts off excess wire. Ensure you get a tool with a 110-style blade, which is standard for network jacks.
- Wire Stripper: To carefully remove the outer jacket of the Ethernet cable without damaging the individual wires inside. Look for a stripper with adjustable blades or one specifically designed for network cables.
- Cable Tester: An absolute must-have. After terminating both ends of your cable, a cable tester will verify that all wires are connected correctly and in the right order, ensuring proper network functionality.
- Drywall Saw or Utility Knife: For cutting a hole in the drywall to mount the wall plate. A drywall saw offers more precision.
- Screwdriver Set: For mounting the wall plate and any associated boxes.
- Fish Tape (Optional but helpful): If you need to run cables through walls, attics, or crawl spaces, a fish tape is invaluable for pulling the cable through.
- Stud Finder (Optional): To locate wall studs, which can be helpful for mounting boxes or ensuring your cable runs avoid obstructions.
- Safety Glasses: Always wear eye protection when cutting or punching down wires.
- Pencil and Measuring Tape: For marking the installation location and ensuring accurate placement.
Taking the time to gather these materials and tools will not only streamline the installation process but also contribute to a safer and more professional outcome. A well-equipped DIYer is a confident DIYer.
Planning and Preparing Your Installation Site
Before you pick up any tools, meticulous planning is key. This phase ensures you run cables efficiently, avoid structural obstacles, and achieve a neat, functional installation that meets your specific networking needs. Rushing this stage can lead to unnecessary rework and a less-than-ideal outcome.
Determining the Best Location for Your Ethernet Jacks
Consider where you’ll need the most reliable wired connections. This typically includes:
- Home Office: For stable video conferencing, large file transfers, and consistent internet access.
- Living Room/Entertainment Center: For smart TVs, gaming consoles, streaming devices, and network-attached storage (NAS) devices that benefit from stable, high-speed connections.
- Bedrooms: For computers, gaming consoles, or smart home hubs.
- Kitchens/Dining Areas: For smart appliances or tablets used for recipes and entertainment.
When selecting a location, think about the path the Ethernet cable will take from your router or network switch to the wall jack. Ideally, you want the shortest, most direct route possible, avoiding sharp bends or kinks in the cable.
Routing Your Ethernet Cables: Strategies and Considerations
This is where the bulk of the physical work happens. There are several common methods for routing Ethernet cables within your home or office:
- Through Walls: This is the most aesthetically pleasing method, resulting in a clean, professional look.
- Attic or Crawl Space: If you have access to an attic or crawl space above or below your desired jack location, this is often the easiest path. You can drill holes through ceiling joists or floor joists to drop the cable.
- Within Walls: This requires cutting holes in the drywall to snake the cable. You’ll need to be mindful of existing electrical wiring, plumbing, and structural elements. Use a fish tape to guide the cable through the wall cavity.
- Surface Mounting: If running cables through walls is not feasible or desired, you can use cable raceways or clips to run cables along baseboards, door frames, or walls. This is less discreet but much simpler for quick installations or temporary setups.
- Through Floors: Similar to running cables through walls, this often involves accessing a basement or crawl space to drill through floor joists.
Important Considerations:
- Avoid Electrical Wiring: Never run Ethernet cables parallel to electrical wiring for more than a few feet. Ideally, cross electrical wires at a 90-degree angle if you must cross them. This minimizes the risk of interference.
- Fire Blocking: Be aware of fire blocking (horizontal wood pieces) within wall cavities that may obstruct your cable runs. You may need to drill through these.
- Cable Length: Keep cable runs as short as possible. While Ethernet cables can technically run up to 100 meters (328 feet) without significant signal degradation, shorter runs are always preferable for optimal performance.
- Future Expansion: If you anticipate needing more network ports in the future, consider running extra cables now while you have access to the wall cavities. It’s much easier to do it once.
- Labeling: As you run cables, it’s a good practice to label both ends of each cable with its destination. This will save you immense time and confusion later on.
By carefully planning your cable runs and considering these factors, you’ll lay a solid foundation for a successful Ethernet jack installation.
Terminating the Ethernet Cable and Installing the Wall Jack
This is the core of the installation process. Here, we’ll delve into the details of preparing the cable, understanding the wiring standards, and using your tools to create a secure and functional connection. Patience and precision are key in this step.
Stripping the Cable and Arranging the Wires
- Prepare the Cable: Carefully strip about 1 to 1.5 inches of the outer jacket from the end of the Ethernet cable using your wire stripper. Be cautious not to nick or cut the individual wires within.
- Untwist the Pairs: You’ll notice the cable contains four twisted pairs of wires (blue, orange, green, and brown), each with a solid and a striped wire. Gently untwist each pair, but try to keep the twists as tight as possible right up to the point where they will be inserted into the jack. This helps maintain the cable’s signal integrity.
- Straighten the Wires: Straighten out each individual wire so they are relatively straight and easy to work with.
Understanding T568A and T568B Wiring Standards
Ethernet jacks use a standardized color code to ensure proper connectivity. There are two common standards: T568A and T568B. For a standard “straight-through” cable (connecting a device to a router or switch), both ends of the cable must use the same standard. T568B is more commonly used in North America.
T568B Standard (Most Common):
- Orange-White
- Orange
- Green-White
- Blue
- Blue-White
- Green
- Brown-White
- Brown
T568A Standard:
- Green-White
- Green
- Orange-White
- Blue
- Blue-White
- Orange
- Brown-White
- Brown
Most keystone jacks will have color-coded guides for both T568A and T568B. Choose one standard and stick with it for both ends of the cable. The keystone jack will have slots labeled with the corresponding wire colors for your chosen standard.
Punching Down the Wires into the Keystone Jack
This is where your punch-down tool comes into play.
- Select Your Standard: Look at the keystone jack and identify the color-coded slots for your chosen standard (e.g., T568B).
- Insert Wires: Place the straightened wires into their corresponding slots on the keystone jack. Ensure the wires are seated correctly, with the solid color wire in the solid color slot and the striped wire in the striped slot.
- Punch Down Each Wire: Using your punch-down tool, firmly press down on each wire. The tool will push the wire into the IDC connector, making the electrical connection and simultaneously cutting off the excess wire. Ensure each wire is fully seated and neatly trimmed.
- Repeat for the Other End: Once one end is terminated, repeat the entire process for the other end of the Ethernet cable (connecting it to your router, switch, or patch panel).
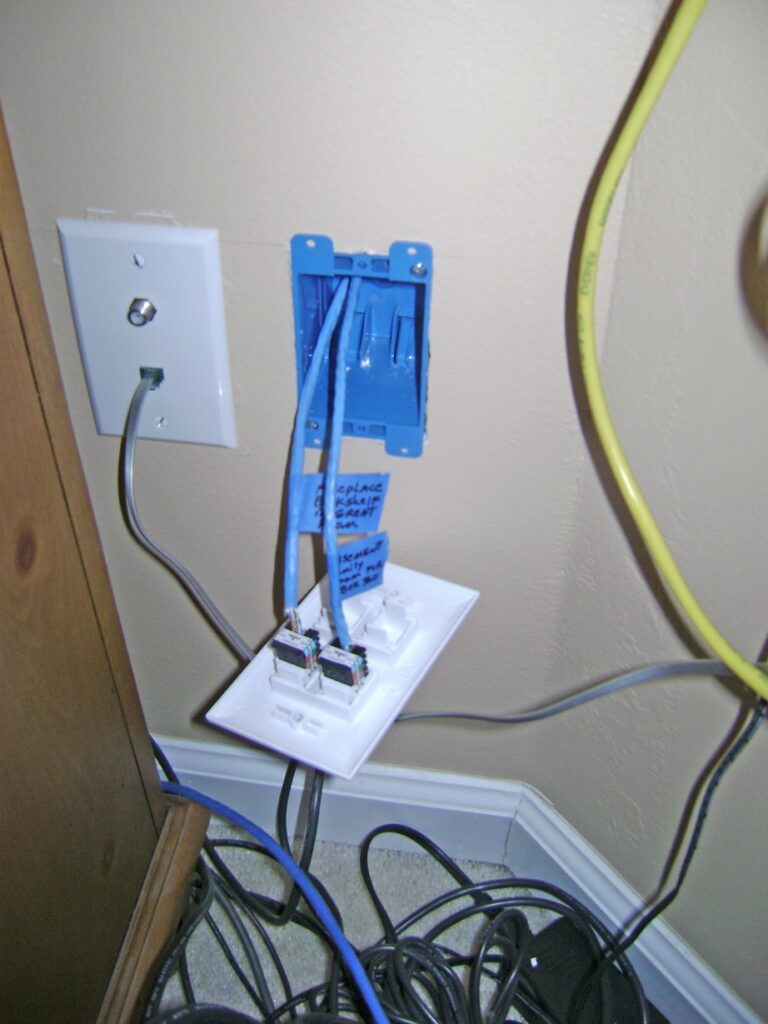
Mounting the Wall Plate
- Prepare the Wall Opening: If you haven’t already, cut a clean rectangular hole in the drywall at your chosen location, large enough to accommodate the wall plate and any mounting bracket.
- Install the Mounting Bracket (if applicable): Some wall plates require a separate mounting bracket to be secured to the drywall.
- Feed the Cable: Gently pull the Ethernet cable through the wall opening.
- Attach the Keystone Jack(s): Snap your terminated keystone jack(s) into the wall plate.
- Secure the Wall Plate: Align the wall plate with the opening and secure it to the wall using the provided screws.
Testing Your Connection
- Connect the Cable Tester: Plug one end of your newly installed Ethernet cable into the wall jack and the other end into the port on your cable tester.
- Run the Test: Turn on the cable tester. It will indicate if all wires are connected correctly and in the proper sequence. If the tester shows any errors (e.g., open circuits, shorts, or crossed wires), you’ll need to re-examine the termination at both ends.
- Connect to Network: Once your cable passes the test, you can plug in your device to the wall jack and connect it to your network.
By following these detailed steps, you’ll successfully terminate your Ethernet cable and install a functional, professional-looking wall jack, paving the way for a more robust and reliable network connection.
Final Touches and Troubleshooting
With the physical installation complete and your cables tested, it’s time to ensure everything is neat, secure, and functioning optimally. This stage involves a final review and addressing any potential issues that may arise.
Cable Management and Aesthetics
- Tidy Up: Ensure any visible cables are neatly managed using cable ties, raceways, or clips. A well-organized network looks professional and is easier to maintain.
- Wall Plate Alignment: Double-check that your wall plates are straight and securely fastened to the wall. A slight adjustment can make a big difference in appearance.
- Labeling: If you haven’t already, now is the perfect time to label both ends of your Ethernet runs at the jack and at the central networking location. This will be invaluable for future troubleshooting or network expansion.

Common Troubleshooting Scenarios
Even with careful installation, occasional issues can arise. Here are a few common problems and their solutions:
-
No Network Connection:
- Cable Tester Error: If your cable tester reported an issue, carefully re-examine the termination at both ends. Ensure all wires are punched down completely and that you followed the T568A or T568B standard consistently.
- Faulty Keystone Jack or Cable: If the tester passes but you still have no connection, try a known-good Ethernet cable to rule out an issue with your installed cable. It’s also possible a keystone jack is faulty.
- Router/Switch Port Issue: Try a different port on your router or switch to ensure the port itself isn’t the problem.
- Device Configuration: While less common for wired connections, ensure your device’s network adapter is enabled and configured to obtain an IP address automatically (DHCP).
-
Slow Speeds or Intermittent Connectivity:
- Cable Damage: Inspect the cable for any signs of damage, kinks, or bends that might be affecting signal integrity.
- Cable Category Mismatch: Ensure the category of your cable (Cat 5e, Cat 6, etc.) is sufficient for the speeds you’re trying to achieve and matches the capabilities of your network equipment.
- Interference: While less common with Ethernet than Wi-Fi, ensure your cables aren’t running too close to significant sources of electromagnetic interference (e.g., high-power electrical cables, fluorescent lights).
- Long Cable Runs: While within spec, very long cable runs at the 100-meter limit can sometimes experience minor performance degradation.
-
Incorrect Wiring Detected by Tester:
- Standard Mismatch: The most common cause is using T568A on one end and T568B on the other. Re-terminate one end to match the other.
- Wire Order Error: Carefully review the color order on both ends against your chosen standard. Even one wire out of place will cause an issue.
By systematically addressing these potential problems, you can ensure your newly installed Ethernet jacks are performing at their best.
Installing Ethernet wall jacks is a project that significantly enhances your home or office network’s performance and reliability. By understanding the components, planning your routes, and executing the termination steps with care, you can achieve a professional-grade wired network that supports your digital life for years to come. This DIY approach not only saves money but also provides the satisfaction of a job well done, empowering you with the knowledge to manage and improve your network infrastructure.
aViewFromTheCave is a participant in the Amazon Services LLC Associates Program, an affiliate advertising program designed to provide a means for sites to earn advertising fees by advertising and linking to Amazon.com. Amazon, the Amazon logo, AmazonSupply, and the AmazonSupply logo are trademarks of Amazon.com, Inc. or its affiliates. As an Amazon Associate we earn affiliate commissions from qualifying purchases.