In the ever-evolving landscape of technology, keeping your Windows 11 operating system running smoothly and efficiently is paramount. At the heart of this performance lie drivers – the crucial software components that enable your hardware to communicate with your operating system. Whether it’s your graphics card, your network adapter, your printer, or even your mouse, drivers are the translators that ensure everything works as intended. Without the correct drivers, you might experience performance issues, compatibility problems, or even discover that certain hardware functionalities are completely unavailable. This comprehensive guide will walk you through the essential methods and best practices for installing and updating drivers on your Windows 11 machine, ensuring your digital experience is seamless and optimized.
Understanding the importance of drivers is the first step. They are not mere background processes; they are the architects of your hardware’s interaction with Windows. Think of it like this: Windows speaks one language, and your hardware speaks another. Drivers are the bilingual interpreters that facilitate this communication. When a new piece of hardware is introduced or when Windows receives an update, it often requires updated or new drivers to function correctly. This is especially true for complex components like graphics cards, where updated drivers can unlock performance improvements for gaming and demanding applications.
In this article, we will delve into the various approaches to driver installation and management, ranging from the automated methods that Windows 11 provides to more manual techniques for those who need granular control. We’ll explore how to identify outdated or missing drivers, the safest ways to obtain driver software, and troubleshooting common driver-related issues. Our aim is to empower you with the knowledge to maintain a robust and responsive Windows 11 system, ensuring all your hardware components perform at their peak.
Understanding Driver Installation Methods on Windows 11
Windows 11, like its predecessors, offers a multi-faceted approach to driver management. This flexibility allows users of all technical skill levels to manage their hardware drivers effectively. The primary methods can be broadly categorized into automatic updates managed by Windows itself, manual installation via Device Manager, and direct downloads from hardware manufacturers. Each method has its own advantages and scenarios where it is most appropriate.
Leveraging Windows Update for Driver Updates
Windows Update is often the first and most convenient place to check for driver updates. Microsoft works closely with hardware manufacturers to ensure that common drivers are distributed through this service. For many users, this is sufficient for keeping their system drivers up-to-date.
How it Works:
Windows Update scans your system for connected hardware and checks if there are any driver updates available that have been certified by Microsoft. These updates are often bundled with regular Windows security and feature updates.
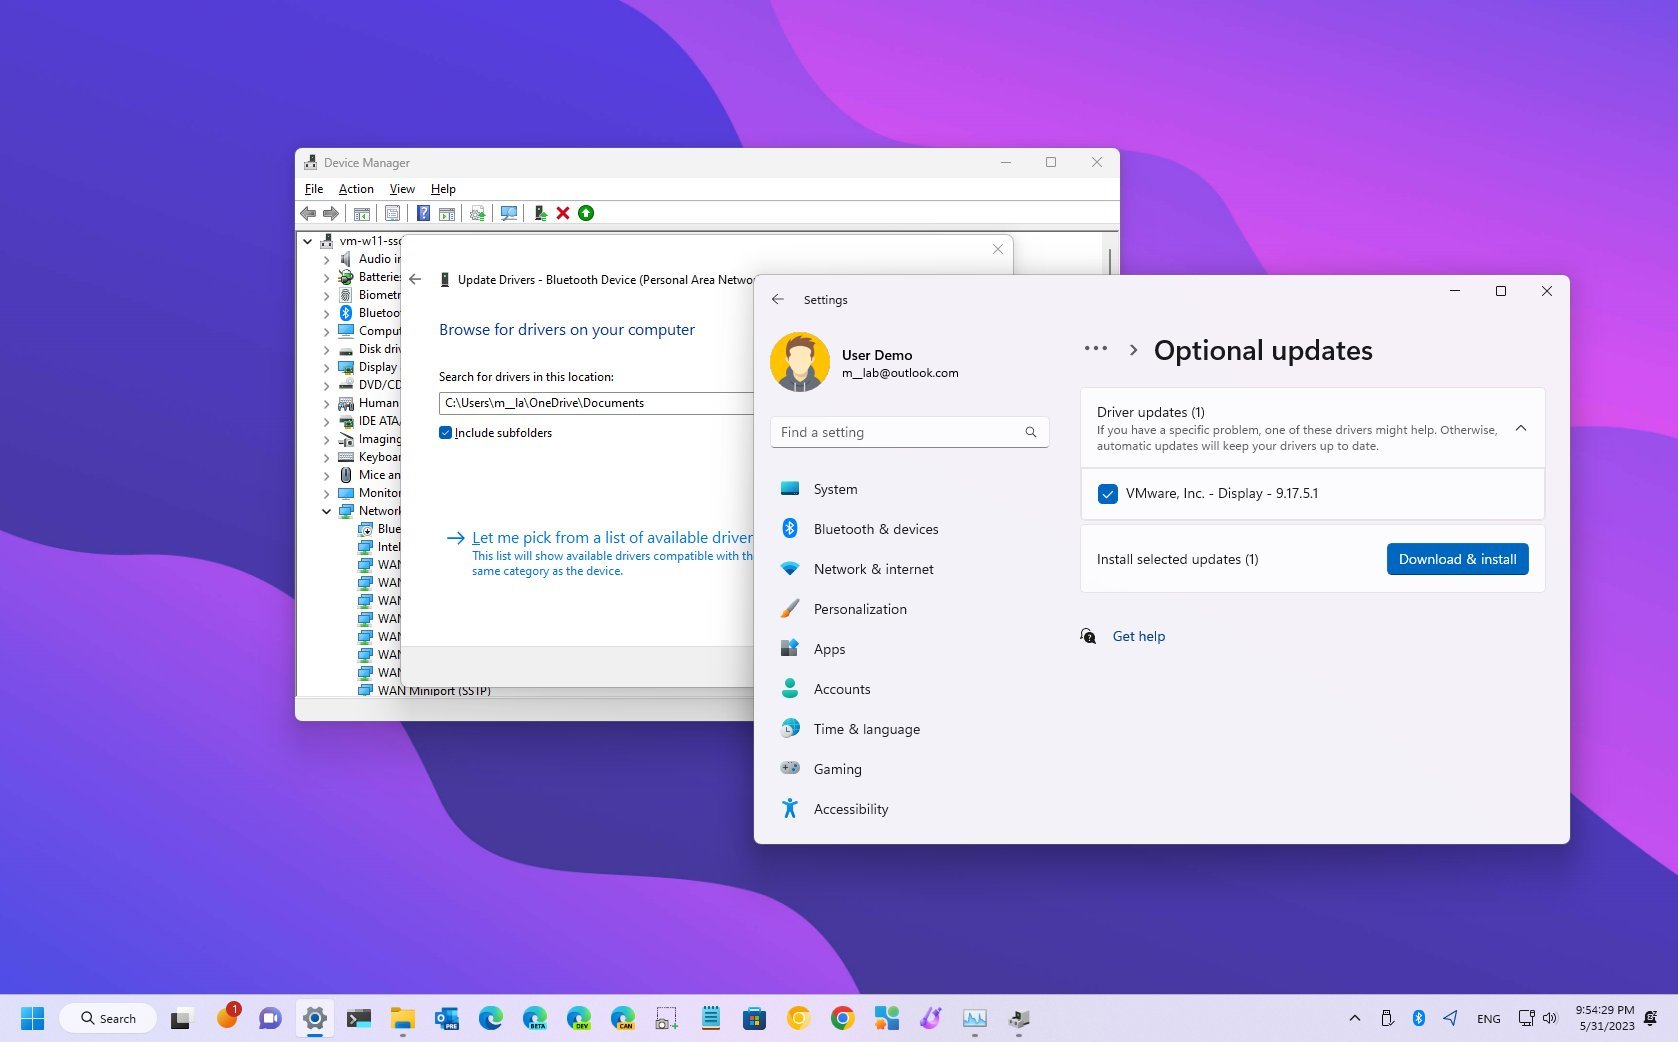
Steps to Check for Driver Updates via Windows Update:
- Open Settings: Click the Start button and select “Settings,” or press
Windows key + I. - Navigate to Windows Update: In the Settings window, click on “Windows Update” in the left-hand pane.
- Check for Updates: Click the “Check for updates” button. Windows will then search for available updates, including optional driver updates.
- Review Optional Updates: If any driver updates are found, they might appear under “Advanced options” as “Optional updates.” Click on “Optional updates” to see a list of available driver packages.
- Install Drivers: Select the drivers you wish to install and click “Download & install.”
Benefits of Using Windows Update:
- Convenience: It’s an integrated and automated process.
- Safety: Drivers provided through Windows Update are generally well-tested and certified by Microsoft, reducing the risk of compatibility issues or malware.
- Simplicity: Requires minimal technical expertise.
Limitations of Windows Update:
- Timeliness: Updates might not always be the very latest versions released by manufacturers.
- Completeness: Not all drivers, especially for specialized hardware or older devices, are distributed through Windows Update.
Manual Driver Installation via Device Manager
Device Manager is a powerful tool within Windows that allows for detailed management of your hardware components, including manual driver installation and uninstallation. This is particularly useful when a specific driver isn’t being automatically detected or when you need to install a driver downloaded directly from the manufacturer’s website.
Understanding Device Manager:
Device Manager lists all the hardware connected to your computer. Each piece of hardware is represented by an icon, and you can expand categories to see specific devices. Any device with a yellow exclamation mark indicates a problem, often a missing or faulty driver.
Steps for Manual Driver Installation using Device Manager:
- Open Device Manager:
- Right-click the Start button and select “Device Manager.”
- Alternatively, search for “Device Manager” in the Windows search bar and open it.
- Locate the Device: Find the hardware component for which you need to install or update the driver. Devices are categorized (e.g., “Display adapters,” “Network adapters,” “Sound, video and game controllers”).
- Update Driver:
- Right-click on the device and select “Update driver.”
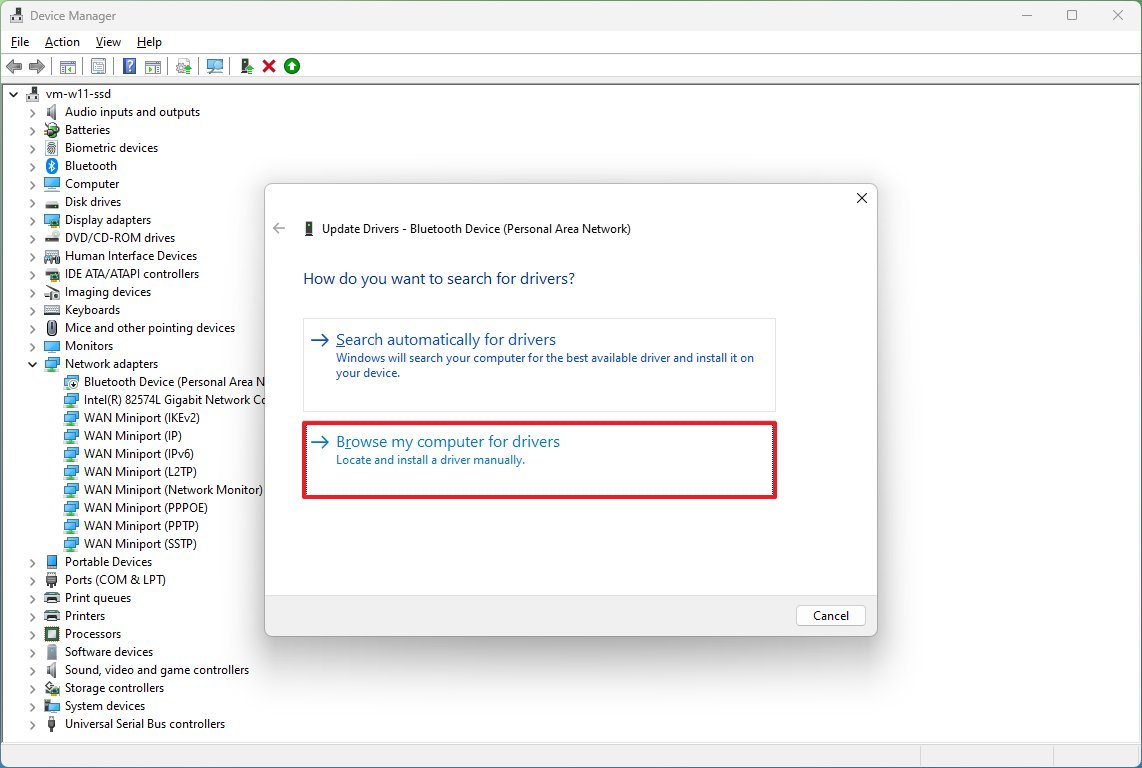
- You will be presented with two options:
- “Search automatically for drivers”: This option will have Windows search your computer and the internet for the best available driver. It’s essentially a more targeted version of the Windows Update driver check.
- “Browse my computer for drivers”: This is the option you’ll use if you have already downloaded the driver software from the manufacturer’s website. Click this, then click “Browse” to navigate to the folder where you saved the driver files. Ensure “Include subfolders” is checked.
- Follow On-Screen Prompts: Windows will attempt to find and install the driver. You may need to restart your computer for the changes to take effect.
Installing from a Downloaded Driver Package:
If you have downloaded a driver from a manufacturer’s website, it might come as an executable file (.exe) or as a package of driver files (often .inf, .sys, and .cat files).
- Executable Files (
.exe): Simply run the.exefile and follow the on-screen installation wizard. This is the most straightforward method for driver packages that come in this format. - Driver Files (
.inf,.sys, etc.): If you choose “Browse my computer for drivers” in Device Manager, point Windows to the folder containing these files. Device Manager will scan the folder for a suitable.inffile to initiate the installation.
Benefits of Using Device Manager:
- Targeted Control: Allows you to update drivers for specific hardware components.
- Flexibility: Enables installation of drivers downloaded from manufacturer websites, ensuring you have the latest or specific versions.
- Troubleshooting: Essential for diagnosing and resolving hardware issues related to drivers.
Limitations of Using Device Manager:
- Requires Driver Files: You need to know which hardware you’re updating and where to get the correct driver files if not using the automatic search.
- Potential for Errors: Incorrectly installing a driver can cause system instability.
Advanced Driver Management and Troubleshooting
While Windows 11 and Device Manager handle most driver needs, there are advanced scenarios and troubleshooting steps that can be crucial for optimal system performance and resolving persistent issues. This includes understanding when and how to download drivers directly from manufacturers and what to do when drivers cause problems.
Downloading Drivers Directly from Hardware Manufacturers
For the absolute latest drivers, specific performance optimizations, or when Windows Update doesn’t provide a necessary update, visiting the manufacturer’s website is the most reliable method. This is particularly relevant for critical components like graphics cards (NVIDIA, AMD, Intel), motherboards (for chipset, audio, and network drivers), and specialized peripherals.
Why Download Directly?
- Latest Versions: Manufacturers often release driver updates to coincide with new software releases, game patches, or to fix specific bugs before they are distributed through Windows Update.
- Performance Enhancements: For graphics cards and gaming hardware, the newest drivers can offer significant performance boosts and bug fixes for specific games.
- Specialized Hardware: For niche or professional hardware, manufacturers are the sole source of official drivers.
- Control: You have complete control over which driver version you install.
How to Download and Install Manufacturer Drivers:
- Identify Your Hardware: Determine the exact model of the hardware component you need a driver for. For example, instead of just “graphics card,” identify it as “NVIDIA GeForce RTX 3070” or “AMD Radeon RX 6800 XT.” You can find this information in Device Manager (under “Display adapters,” right-click the device and select “Properties” > “Details” tab, then choose “Hardware Ids” from the dropdown).
- Visit the Manufacturer’s Website: Go to the official website of the hardware manufacturer (e.g., nvidia.com, amd.com, intel.com, support.hp.com, support.dell.com).
- Navigate to the Support/Drivers Section: Look for a “Support,” “Downloads,” or “Drivers” section.
- Enter Your Product Information: Use the search bar or product selection tool to find your specific hardware model. You may also need to specify your operating system (Windows 11 64-bit is most common).
- Download the Latest Driver: Download the recommended driver package. It will typically be an executable file (
.exe). - Run the Installer: Once downloaded, run the
.exefile. Follow the on-screen instructions. Most installers will guide you through the process, often offering an “Express” or “Custom” installation option. For most users, the Express installation is sufficient. - Restart Your Computer: After the installation is complete, it’s crucial to restart your computer for the new drivers to take full effect.
Caution: Always download drivers from official manufacturer websites to avoid malware or counterfeit software. Avoid third-party driver update utilities, as they can sometimes install incorrect or malicious drivers.
Troubleshooting Common Driver Issues
Despite best efforts, driver-related problems can arise. These can manifest as system crashes (Blue Screen of Death – BSOD), malfunctioning hardware, or performance degradation.
Common Symptoms of Driver Problems:
- Yellow exclamation marks in Device Manager.
- Hardware not working at all.
- Frequent system freezes or crashes.
- Graphics artifacts or poor display quality.
- Slow performance when using specific hardware.
Troubleshooting Steps:
- Check Device Manager: This is your first port of call. Look for any devices with a yellow exclamation mark. Right-click on it and check the “Device status” for error messages.
- Roll Back Driver: If a recently installed or updated driver is causing problems, you can often roll it back to a previous version.
- In Device Manager, right-click the problematic device.
- Select “Properties.”
- Go to the “Driver” tab.
- Click “Roll Back Driver” if the option is available.
- Uninstall and Reinstall Driver: If rolling back isn’t an option or doesn’t resolve the issue, uninstalling and then reinstalling the driver can help.
- In Device Manager, right-click the problematic device.
- Select “Uninstall device.”
- Check the box that says “Attempt to remove the driver software for this device” if available.
- Click “Uninstall.”
- Restart your computer. Windows will attempt to reinstall a generic driver, or you can then manually install the correct driver from the manufacturer’s website.
- Use System Restore: If the driver issue started recently, System Restore can revert your system to a previous state when everything was working correctly.
- Search for “Create a restore point” in the Windows search bar and open it.
- Click the “System Restore…” button.
- Follow the on-screen prompts to choose a restore point.
- Windows Update Troubleshooter: For issues with Windows Update failing to install drivers or other updates, the built-in troubleshooter can sometimes help.
- Go to Settings > System > Troubleshoot > Other troubleshooters.
- Run the “Windows Update” troubleshooter.
- Driver Verifier (Advanced): For severe stability issues, particularly related to driver conflicts, Windows includes a tool called Driver Verifier. This tool stresses drivers to find potential issues. Use this with caution, as it can cause your system to crash more frequently if it finds problems, but it can pinpoint problematic drivers. Search for “Verifier.exe” in the Windows search bar to run it.
By understanding these advanced methods and troubleshooting techniques, you can effectively manage your Windows 11 drivers, ensuring a stable, secure, and high-performing computing experience. Keeping your drivers up-to-date is not just about performance; it’s a fundamental aspect of maintaining the health and security of your entire system.
aViewFromTheCave is a participant in the Amazon Services LLC Associates Program, an affiliate advertising program designed to provide a means for sites to earn advertising fees by advertising and linking to Amazon.com. Amazon, the Amazon logo, AmazonSupply, and the AmazonSupply logo are trademarks of Amazon.com, Inc. or its affiliates. As an Amazon Associate we earn affiliate commissions from qualifying purchases.