In the intricate world of modern technology, peripherals like printers are indispensable tools for both personal and professional productivity. Yet, the seamless operation of these devices often hinges on a crucial, often overlooked component: the driver. For users of Lexmark printers, especially those connecting via USB – which we will clarify as the intended connection, given “UBS” is likely a common typographical error for “USB” in this context – understanding the correct driver installation process is paramount. Without the right driver, your printer is little more than an inert piece of hardware, unable to communicate effectively with your computer. This comprehensive guide will demystify the process, walking you through every step to ensure your Lexmark printer is up and running flawlessly, enhancing your digital security and overall productivity, core tenets of effective tech management.

The digital landscape is constantly evolving, with new operating systems and hardware iterations emerging regularly. This dynamism makes keeping your drivers updated and correctly installed a foundational aspect of your tech maintenance strategy. An improperly installed or outdated driver can lead to a litany of issues, from print failures and slow performance to security vulnerabilities. This article aims to empower you with the knowledge to confidently install, troubleshoot, and maintain your Lexmark printer drivers, transforming a potentially frustrating task into a straightforward exercise in tech mastery.
Understanding Printer Drivers and Why They Matter
Before diving into the installation specifics, it’s vital to grasp what a printer driver is and its critical role within your computing ecosystem. This foundational understanding not only makes the installation process clearer but also equips you to better troubleshoot future issues, aligning with a proactive approach to technology management.
The Role of a Driver in Your Tech Ecosystem
At its core, a printer driver is a piece of software that acts as an interpreter between your computer’s operating system (OS) and the printer hardware. Imagine your computer speaking one language and your printer another; the driver is the translator that allows them to understand each other. When you send a document to print, your OS hands the data to the driver, which then translates it into a language and format that your specific Lexmark printer model can comprehend and execute.
This translation is crucial for several reasons:
- Enabling Communication: Without a driver, your computer simply doesn’t know how to interact with the printer. It won’t recognize the device, nor will it be able to send print jobs or receive status updates.
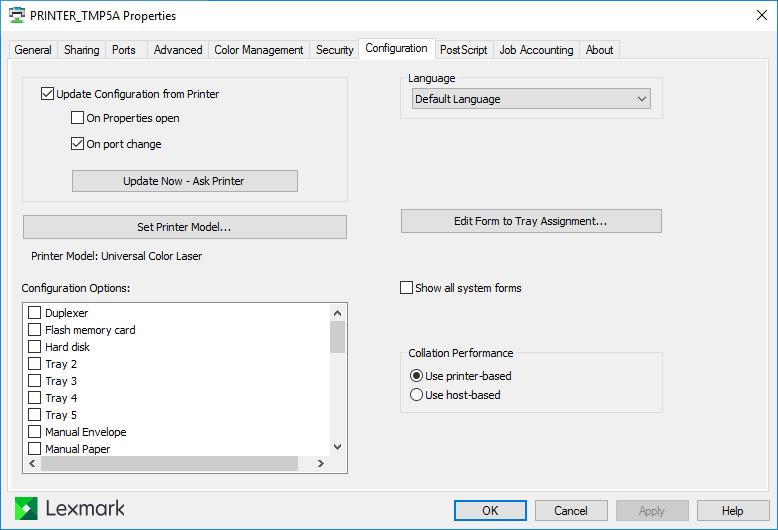
- Unlocking Full Functionality: Generic drivers might allow basic printing, but a dedicated Lexmark driver unlocks all the advanced features of your specific model. This includes duplex printing, specific paper tray selections, color management, scanning capabilities (for multifunction devices), and ink/toner level monitoring. Utilizing these features optimizes your workflow and enhances productivity, directly impacting your “Tech” and “Money” (through efficiency) objectives.
- Ensuring Performance and Stability: A correctly installed and up-to-date driver ensures stable operation, preventing common issues like print spooler errors, crashes, or inexplicable printing delays. It contributes to the overall health and responsiveness of your system, reducing downtime and improving your digital security by patching potential vulnerabilities.
- Maintaining Digital Security: Drivers, like any software, can contain vulnerabilities. Official, updated drivers from a reputable brand like Lexmark are rigorously tested and patched against exploits, protecting your system from potential threats. Downloading drivers from unofficial sources can introduce malware or spyware, jeopardizing your data and system integrity.
Identifying Your Lexmark Printer Model and Operating System
The single most critical step before attempting any driver installation is accurately identifying your Lexmark printer’s exact model number and your computer’s operating system (OS) version. This information is non-negotiable for finding the correct driver, as a mismatch almost guarantees installation failure or suboptimal performance.
Finding Your Lexmark Printer Model:
- Physical Label: Most Lexmark printers have a label affixed to the front, back, or bottom of the device. This label typically displays the full model name and number (e.g., “Lexmark MS410dn,” “Lexmark MX511de,” “Lexmark MC3224adwe”). For older or worn labels, you might need a flashlight.
- Printer’s Display Panel: Many modern Lexmark printers feature an LCD or touchscreen display. You can often navigate through the menu options (usually under “Information,” “System Information,” or “About Printer”) to find the model name and serial number.
- Existing Software: If the printer was previously installed (even with generic drivers), you might find its model name listed in your computer’s “Devices and Printers” (Windows) or “Printers & Scanners” (macOS) settings.
Finding Your Operating System (OS) Information:
- Windows:
- Windows 10/11: Right-click the “Start” button, select “System.” Your OS edition (e.g., Windows 11 Home, Windows 10 Pro) and system type (64-bit or 32-bit) will be displayed under “Windows specifications” or “Device specifications.”
- Earlier Windows Versions: Right-click “My Computer” or “This PC,” then select “Properties.”
- macOS:
- Click the Apple menu in the top-left corner of the screen, then select “About This Mac.” This window will show your macOS version (e.g., macOS Ventura, macOS Monterey) and hardware specifications.
Always note down both the full model number and your OS version (including 32-bit or 64-bit architecture) before proceeding to the next steps. This precision saves time and prevents frustration, underscoring a key principle of effective tech problem-solving.
Step-by-Step Guide to Installing Lexmark Printer Drivers via USB
Once you have identified your Lexmark printer model and OS, you are ready to proceed with the installation. We will cover the most common methods, prioritizing reliability and ease of use. Remember, for USB connectivity, the printer typically needs to be connected to the computer when prompted by the installer, not necessarily before starting the driver installation.
Method 1: Automatic Installation (Plug-and-Play & Windows Update)
Modern operating systems are designed to be as user-friendly as possible, and this often extends to peripheral installation through “Plug-and-Play” functionality. This method is the simplest when it works, and it’s always worth trying first, especially with newer Lexmark models.
When It Works Best:
- Newer Lexmark printers that are widely supported by major OS updates.
- When your computer has an active internet connection to download drivers from Windows Update or Apple’s software repositories.
- For basic printing functionality, though it might not install the full feature software suite.
How to Attempt Automatic Installation:
- Ensure Internet Connection: Make sure your computer is connected to the internet.
- Connect the Printer: Power on your Lexmark printer. Using a high-quality USB 2.0 or 3.0 cable, connect one end to the printer’s USB port and the other to an available USB port on your computer.
- Wait for Detection: Your operating system should automatically detect the new hardware.
- Windows: You might see a notification like “Device driver software installed successfully” or “Setting up a device.” Windows will often search Windows Update for compatible drivers and install them in the background.
- macOS: The system might prompt you to add the printer in “Printers & Scanners” settings.
- Check Device Manager (Windows): To confirm the installation, open “Device Manager” (search for it in the Start menu). Expand “Printers” or “Other devices.” If your Lexmark printer is listed without any yellow exclamation marks or error icons, the basic driver is likely installed.
- Test Print: Try printing a test page from your OS or a simple document from an application like Notepad or Word.
Pros & Cons:
- Pros: Extremely convenient, requires minimal user intervention, quick for basic functionality.
- Cons: Might install only generic drivers, missing out on advanced features (e.g., advanced scanning, detailed status monitoring). May not work for older or very new models not yet included in OS updates.
Method 2: Manual Installation from the Lexmark Support Website
This is the most reliable and recommended method for installing Lexmark printer drivers, ensuring you get the full-featured software package specifically designed for your model and OS. It guarantees optimal performance and access to all printer functionalities.
Step-by-Step Manual Installation Guide:
- Step 1: Disconnect Printer (if connected initially). While not always strictly necessary, it’s a good practice to disconnect the USB cable from your computer before starting the driver installation process. The installer will typically prompt you to connect it at the appropriate time. This prevents the OS from attempting a generic driver installation prematurely.
- Step 2: Navigate to Lexmark’s Official Support Page. Crucial for digital security: Always download drivers directly from the manufacturer’s official website. Avoid third-party driver sites, as they can often host outdated, incorrect, or even malicious software.
- Open your web browser and go to
www.lexmark.com/support. - Look for a section typically labeled “Drivers & Downloads,” “Support,” or “Customer Support.”
- Open your web browser and go to
- Step 3: Locate Your Printer Model and OS.
- On the Lexmark support page, there will usually be a search bar or a dropdown menu where you can enter your printer’s exact model number (e.g., “Lexmark MS410dn”).
- Once your model is found, you’ll be directed to its specific support page. Here, you’ll need to select your operating system (e.g., Windows 11 64-bit, macOS Sonoma) from a list or dropdown menu. This step is critical for compatibility.
- Step 4: Download the Correct Driver Package.
- Lexmark usually offers different types of downloads:
- Full Feature Software and Driver: This is generally recommended. It includes the printer driver, scanning software (for multifunction devices), utilities, and other helpful applications. This provides the richest user experience and full functionality, enhancing “Productivity.”
- Basic Driver: Only provides essential printing functionality.
- Firmware: Updates the printer’s internal software, not the computer’s driver. Download this only if specifically advised for troubleshooting or new features.
- Select the appropriate full feature package for your OS and click “Download.” Read any license agreements or instructions that appear.
- Save the downloaded file (usually an .exe for Windows or .dmg for macOS) to a location you can easily find, like your “Downloads” folder or Desktop.
- Lexmark usually offers different types of downloads:
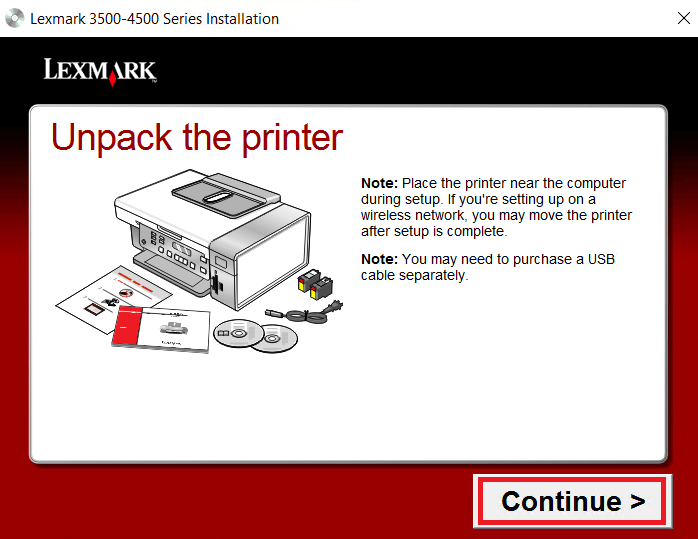
- Step 5: Run the Installer.
- Locate the downloaded file and double-click it to start the installation process.
- Administrator Rights: In Windows, you will likely be prompted to grant administrator permission (“Do you want to allow this app to make changes to your device?”). Click “Yes.” This is essential for the installer to modify system files.
- Follow the on-screen prompts carefully. These will guide you through the Lexmark Setup Wizard, asking you to accept terms, choose installation type (e.g., typical, custom), and confirm installation locations.
- Step 6: Connect the Printer When Prompted.
- A crucial stage of the installation process is when the wizard asks you to connect your Lexmark printer to the computer via USB. This is where you connect the USB cable you initially disconnected (or connect it for the first time if you hadn’t already).
- The installer will then detect the connected printer and finalize the driver configuration. Do not connect the printer before this prompt, as it can confuse the installer.
- Step 7: Complete the Installation and Test.
- Once the installer finishes, it might prompt you to restart your computer. It’s often a good idea to do so, as it ensures all changes are properly integrated into the operating system.
- After restarting (if prompted), print a test page. You can usually do this from the printer properties in your OS settings or directly from the Lexmark software utility that was installed. Confirming a successful test print signifies that your printer and computer are communicating perfectly, leading to enhanced “Productivity.”
Method 3: Utilizing an Installation CD (Legacy Approach)
While less common with modern computers often lacking optical drives, some older Lexmark printers (or those sold without internet connectivity assumptions) may still come with an installation CD. This method is relevant for legacy setups.
- When to Use: Primarily for older Lexmark models purchased with an installation CD, or if you lack a reliable internet connection for downloading drivers.
- Steps:
- Insert the Lexmark installation CD into your computer’s optical drive.
- If an auto-run feature is enabled, the setup wizard should start automatically. If not, open “This PC” (Windows) or “Finder” (macOS), locate the CD drive, and double-click the setup file (e.g.,
setup.exeorinstall.app). - Follow the on-screen instructions, similar to the manual download method. The installer will guide you on when to connect the Lexmark printer via USB.
- Caution: Drivers on installation CDs can be significantly outdated. Even if you use the CD, it’s highly recommended to visit the Lexmark support website afterward to check for and install any newer driver updates. This ensures you benefit from the latest features, bug fixes, and security enhancements, aligning with best “Tech” practices.
Common Installation Hurdles and Troubleshooting Strategies
Even with a clear guide, sometimes issues arise. Knowing how to troubleshoot common Lexmark printer driver installation problems can save you considerable time and frustration, directly impacting your “Productivity” and potentially saving “Money” by avoiding professional tech support.
Driver Not Found or Installation Failed
This is a common issue that can stem from several factors:
- Incorrect Model/OS Selected: Double-check that you downloaded the driver specifically for your exact Lexmark printer model and your precise OS version (e.g., Windows 10 Home 64-bit). A small discrepancy can lead to failure.
- Corrupt Download: The downloaded driver file might be incomplete or corrupted. Delete the file and download it again, ensuring a stable internet connection during the download.
- Administrator Privileges: Ensure you are logged in with an administrator account or provide administrator credentials when prompted by the installer. Without these privileges, the installer cannot make necessary system changes.
- Antivirus/Firewall Interference: Temporarily disable your antivirus software and firewall (if you’re confident about the source of your download) during the installation process. These security tools can sometimes mistakenly flag driver installations as threats. Remember to re-enable them afterward.
- Pending OS Updates: Ensure your operating system itself is fully updated. Sometimes, driver installations rely on core system components that are updated through OS patches.
- Restart Your Computer: A simple restart can often resolve minor system glitches that might be preventing a successful installation.
Printer Not Printing After Installation
If the driver seems installed but your Lexmark printer isn’t responding, consider these checks:
- Check Physical Connections:
- USB Cable: Ensure the USB cable is securely connected at both ends (printer and computer). Try a different USB port on your computer.
- Power: Is the printer powered on? Is it receiving power? Check the power cord connection.
- Error Lights: Are there any error lights or messages on the Lexmark printer’s control panel? Consult your printer’s manual for specific error code meanings.
- Set as Default Printer:
- Windows: Go to “Settings” > “Bluetooth & devices” > “Printers & scanners.” Click on your Lexmark printer and ensure “Let Windows manage my default printer” is off, then click “Set as default.”
- macOS: Go to “System Settings” > “Printers & Scanners.” Select your Lexmark printer and ensure it’s selected as the default.
- Printer Queue Issues:
- Windows: Search for “Services” in the Start menu. Find “Print Spooler,” right-click it, and select “Restart.” This clears any stuck print jobs.
- Clear the print queue by right-clicking the printer in “Printers & scanners” and choosing “Open print queue,” then canceling any pending documents.
- Reinstall the Driver: If all else fails, a clean reinstallation might be necessary.
- Windows: Go to “Settings” > “Bluetooth & devices” > “Printers & scanners.” Click on your Lexmark printer, then select “Remove” or “Delete device.” Then go to “Device Manager,” expand “Print queues,” find your Lexmark printer, right-click and “Uninstall device.” You might also need to open “Print Server Properties” (search for it), go to the “Drivers” tab, and remove any Lexmark drivers listed there. Restart your computer and then follow Method 2 for manual installation.
- macOS: Go to “System Settings” > “Printers & Scanners.” Select your Lexmark printer and click the minus (-) button to remove it. Then, restart your Mac and try the manual installation again.
Driver Conflicts and Outdated Software
Sometimes, problems arise not from a fresh installation but from existing software or old drivers.
- Removing Old Drivers: If you’ve previously installed another printer, or an older Lexmark model, its drivers might conflict. Thoroughly remove all traces of old printer drivers using the steps outlined above for reinstallation. This ensures a clean slate for your new Lexmark driver.
- Outdated Drivers: Even if your driver installed correctly, it might become outdated. Lexmark regularly releases driver updates to improve performance, add features, and patch security vulnerabilities. Periodically visit the Lexmark support site for your model to check for updates. Keeping software current is a crucial aspect of “Digital Security” and “Technology Trends.”
- Lexmark Utility Tools: Many Lexmark printers come with diagnostic and utility software (installed with the full feature package). Utilize these tools to check printer status, troubleshoot connectivity, and sometimes even update drivers or firmware directly. These tools are often brand-specific and leverage Lexmark’s “Brand Strategy” to provide a better user experience.
Optimizing Your Printing Experience: Best Practices and Maintenance
Beyond the initial installation, maintaining your Lexmark printer and its software ecosystem is key to ensuring long-term reliability and maximizing your investment. This section ties into broader “Tech” management and “Money” saving strategies.
Regular Driver and Firmware Updates
- Why Update? Lexmark, like all hardware manufacturers, continuously refines its software. Driver updates often include performance enhancements, bug fixes, compatibility improvements for new operating systems, and crucial security patches. Firmware updates improve the printer’s internal operating system, adding features or resolving hardware-level issues.
- How to Check: Make it a habit to visit the Lexmark support website for your specific printer model every few months. Look for a “Drivers & Downloads” or “Firmware” section. Compare the version numbers to what you have installed.
- Automation: Some Lexmark software suites include an automatic update utility. If available, enable it to simplify the process. This proactive approach ensures your printer operates at peak efficiency and remains secure against emerging threats, embodying smart “Tech” management.
Maintaining Your Printer Hardware
While this guide focuses on software, hardware maintenance directly impacts your printer’s overall performance and longevity.
- Cleanliness: Regularly clean dust and debris from your Lexmark printer’s exterior and accessible interior components. Dust can interfere with internal mechanisms and heat dissipation.
- Consumables Management: Use genuine Lexmark toner or ink cartridges. While third-party alternatives might seem cheaper, they can lead to poor print quality, potential damage to the printer, and may void your warranty. Using genuine consumables protects your “Money” investment in the long run by avoiding costly repairs.
- Paper Handling: Store paper properly to prevent moisture absorption, which can cause jams. Use the correct paper type and size settings on your printer to avoid misfeeds.
- Environmental Factors: Place your printer in a well-ventilated area away from direct sunlight, extreme temperatures, or excessive humidity.
Beyond Drivers: Connectivity and Network Printing Considerations
While our focus has been on USB connectivity, many Lexmark printers offer network connectivity (Ethernet or Wi-Fi).
- USB Cable Quality: Always use a high-quality, shielded USB 2.0 or 3.0 cable. Cheap or damaged cables can lead to intermittent connectivity issues, even if drivers are perfectly installed.
- USB Port Integrity: Ensure the USB port on your computer is functioning correctly. Try connecting another USB device to confirm.
- Network Setup (Brief Mention): If you decide to switch to network printing, the initial driver installation process remains similar (downloading from Lexmark’s website). However, the connectivity steps will involve connecting to your network (wired or wireless) and ensuring the printer obtains a valid IP address. Lexmark’s network setup utilities can assist with this. Understanding these nuances is part of a holistic “Technology Trends” awareness.
Conclusion
Successfully installing and maintaining drivers for your Lexmark printer via USB is a fundamental skill for any tech-savvy individual or business. By following the steps outlined in this comprehensive guide – from accurately identifying your model and OS to navigating Lexmark’s support website and troubleshooting common issues – you empower yourself to ensure seamless printing operations.
The correct driver installation is more than just getting your printer to work; it’s about unlocking its full potential, safeguarding your digital environment through proper security practices, and ultimately enhancing your overall productivity. In a world where technology underpins so much of what we do, mastering these essential tasks directly contributes to efficient “Tech” management and smart “Money” savings by avoiding costly support calls and minimizing downtime. Embrace these best practices, and your Lexmark printer will reliably serve your printing needs for years to come, a testament to thoughtful hardware and software integration.
aViewFromTheCave is a participant in the Amazon Services LLC Associates Program, an affiliate advertising program designed to provide a means for sites to earn advertising fees by advertising and linking to Amazon.com. Amazon, the Amazon logo, AmazonSupply, and the AmazonSupply logo are trademarks of Amazon.com, Inc. or its affiliates. As an Amazon Associate we earn affiliate commissions from qualifying purchases.