
In an increasingly interconnected world, where our digital lives depend on reliable internet, crystal-clear television, and seamless communication, the integrity of our physical connections is paramount. While wireless technologies have soared in popularity, the humble coaxial cable remains the backbone for many essential services, delivering robust and stable signals for broadband internet, cable TV, and various other applications. Learning how to properly install a coax connector is not just a practical skill; it’s an investment in your home’s digital resilience, offering significant advantages in signal quality, security, and even your personal finance.
This guide will demystify the process of installing a coax connector, transforming it from a seemingly daunting task into an empowering DIY project. We’ll delve into the nuances of different connector types, the essential tools you’ll need, and a detailed, step-by-step walkthrough to ensure your connections are not just functional, but flawless. By mastering this skill, you’ll not only save on professional installation costs but also gain a deeper understanding of the technology that powers your home, a valuable asset in today’s tech-driven landscape.
Understanding Coaxial Cables and Their Connectors
Before we dive into the hands-on installation, it’s crucial to understand what coaxial cables are and why their connectors play such a vital role in maintaining signal integrity. This foundational knowledge will help you appreciate the importance of precision in every step of the installation process.
What is a Coaxial Cable? The Backbone of Your Digital Life
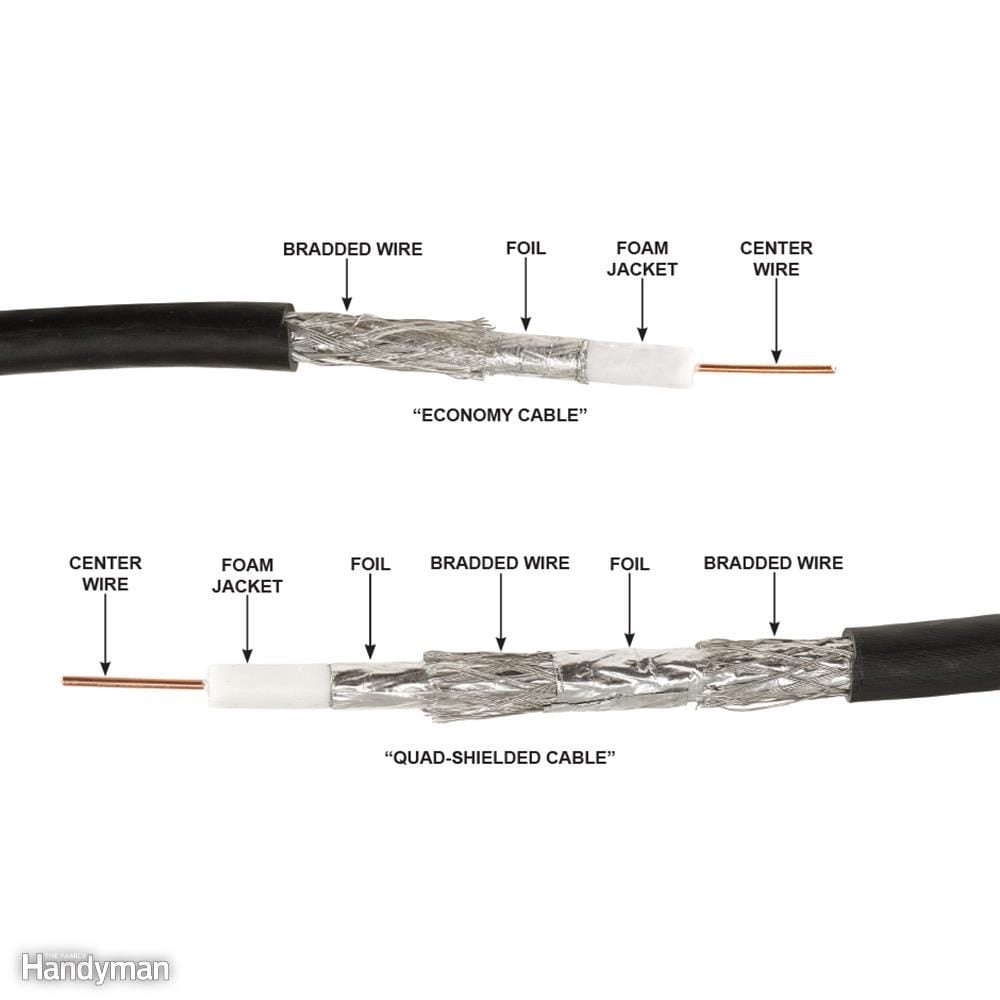
A coaxial cable, often simply called “coax,” is a type of electrical cable consisting of an inner conductor surrounded by a concentric insulating layer, then a conducting shield (usually braided wire or metallic foil), and finally an outer insulating jacket. This unique design is engineered to transmit high-frequency signals with minimal loss and interference from external electromagnetic fields.
Commonly, you’ll find coaxial cables connecting your modem to the wall outlet for internet service, your TV to a cable box or antenna, and even in some older security camera systems. The quality of this cable directly impacts the speed of your internet, the clarity of your television picture, and the reliability of your data transmission. In a world where buffering and dropped connections can severely impact productivity and enjoyment, understanding and optimizing your coax setup is a genuine productivity hack.
Types of Coax Connectors: Identifying Your Needs
While there are several types of coax connectors, for most home applications involving internet and cable TV, you’ll primarily encounter F-type connectors. However, it’s good to be aware of others:
- F-Type Connector: This is by far the most common connector for residential use, found on modems, TVs, cable boxes, and satellite receivers. They are typically screw-on or compression fittings and are designed for high-frequency applications like broadband internet and digital video. Our focus for this guide will be primarily on installing F-type connectors, particularly the modern compression type, known for its superior reliability.
- BNC Connector (Bayonet Neill-Concelman): Often used in professional video equipment, test equipment, and some older networking (e.g., thin Ethernet). They feature a twist-lock mechanism for secure connections.
- RCA Connector: While not strictly a coax connector in the same vein as F-type or BNC, RCA connectors are used for composite video and analog audio signals, and sometimes connect to components via coaxial cables (though often pre-terminated).
- N-Type Connector: A larger, more robust connector used in higher-frequency applications, such as microwave transmitters and antennas.
Choosing the right connector type for your specific cable and application is the first step towards a successful installation. For most readers, ensuring you have the correct F-type connector (usually RG-6 or RG-59 compatible, matching your cable type) will be the critical decision.
Why Proper Installation Matters: Signal Integrity, Speed, and Security
A poorly installed coax connector is more than just an aesthetic flaw; it’s a potential Achilles’ heel for your entire home network. Signal degradation can lead to:
- Slower Internet Speeds: Intermittent or reduced bandwidth, leading to frustrating buffering during streaming or lag during online gaming. For those relying on online income or remote work, this can directly impact your financial productivity.
- Pixelated TV Picture: For cable TV users, a weak signal means a grainy or pixelated picture, especially with high-definition content.
- Intermittent Connections: Dropped internet connections that require constant resetting of your modem or router, wasting valuable time.
- Increased Troubleshooting: Spending hours trying to diagnose network issues, only to find the problem stems from a shoddy cable termination.
- Digital Security Concerns: While not a direct security breach, a compromised physical layer can make a network less robust, potentially impacting devices relying on stable connections for security updates or encrypted communications.
Conversely, a properly installed connector ensures optimal signal flow, minimizing resistance and preventing electromagnetic interference (EMI). This translates to maximum speeds, crystal-clear visuals, and a stable, reliable network – a true testament to the value of a meticulous approach to tech maintenance.
Essential Tools for the Job: Equipping Your DIY Arsenal
Attempting to install a coax connector with the wrong tools is a recipe for frustration and failure. Investing in the right equipment is not just about convenience; it’s about achieving precision and durability, which ultimately saves you time and money in the long run. Think of it as investing in your home’s tech infrastructure.
The Right Coax Stripper: Precision is Key
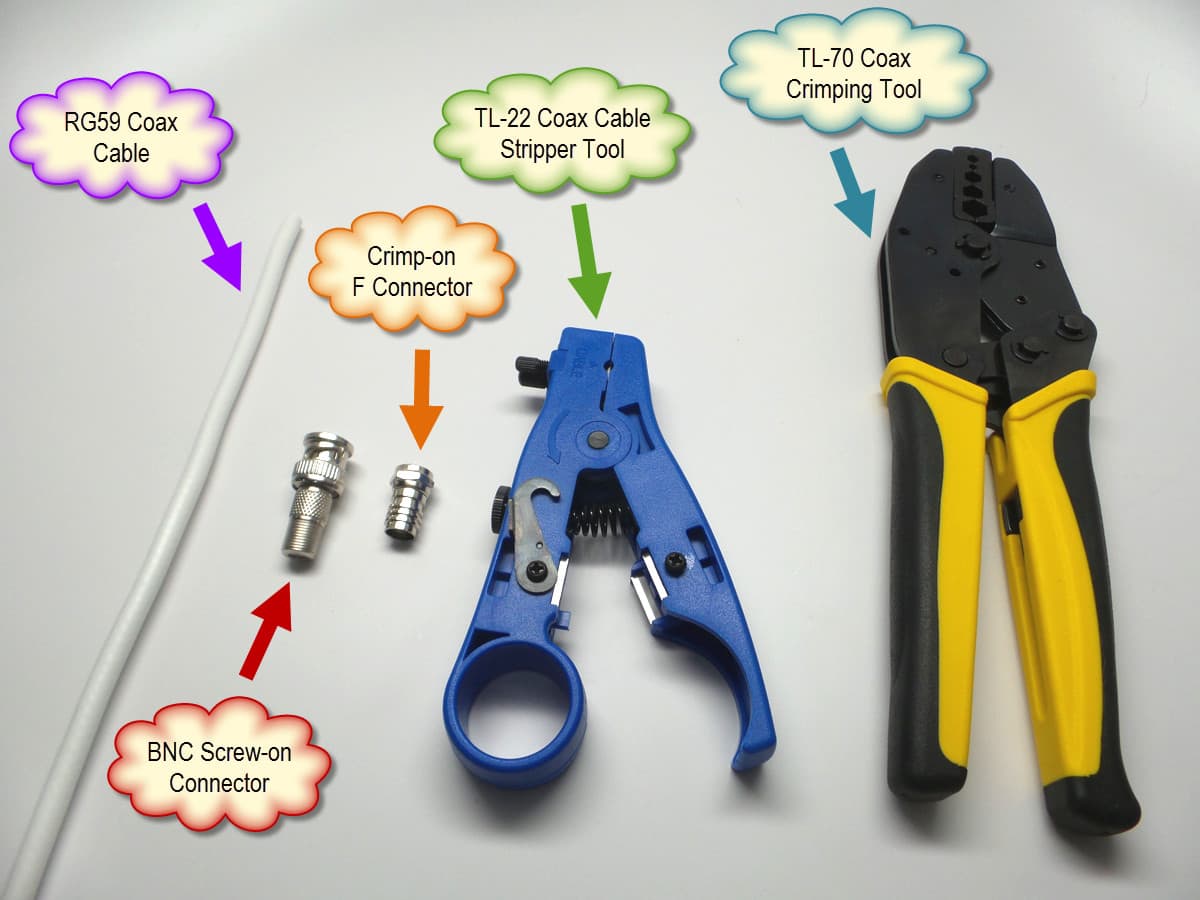
The coax stripper is perhaps the most critical tool for this job. Unlike general wire strippers, a coax stripper is specifically designed to remove the outer jacket, dielectric, and expose the center conductor of a coaxial cable to precise lengths, all in one or two simple turns.
- Adjustable vs. Fixed: Fixed strippers are pre-set for specific cable types (e.g., RG-6, RG-59). Adjustable strippers offer more versatility, allowing you to fine-tune the cutting depth for different cable gauges and connector types. For DIYers tackling various projects, an adjustable stripper is a worthwhile investment.
- Quality Matters: A cheap, poorly designed stripper can chew up your cable, leave burrs, or fail to strip to the correct lengths, compromising your connection. Look for models from reputable brands known for their durability and consistent performance. This is where a small initial investment pays dividends in the form of reliable connections and avoided headaches.
Crimping vs. Compression Tools: Securing Your Connection
Once the cable is stripped and the connector is in place, you need a tool to secure it. There are two primary types:
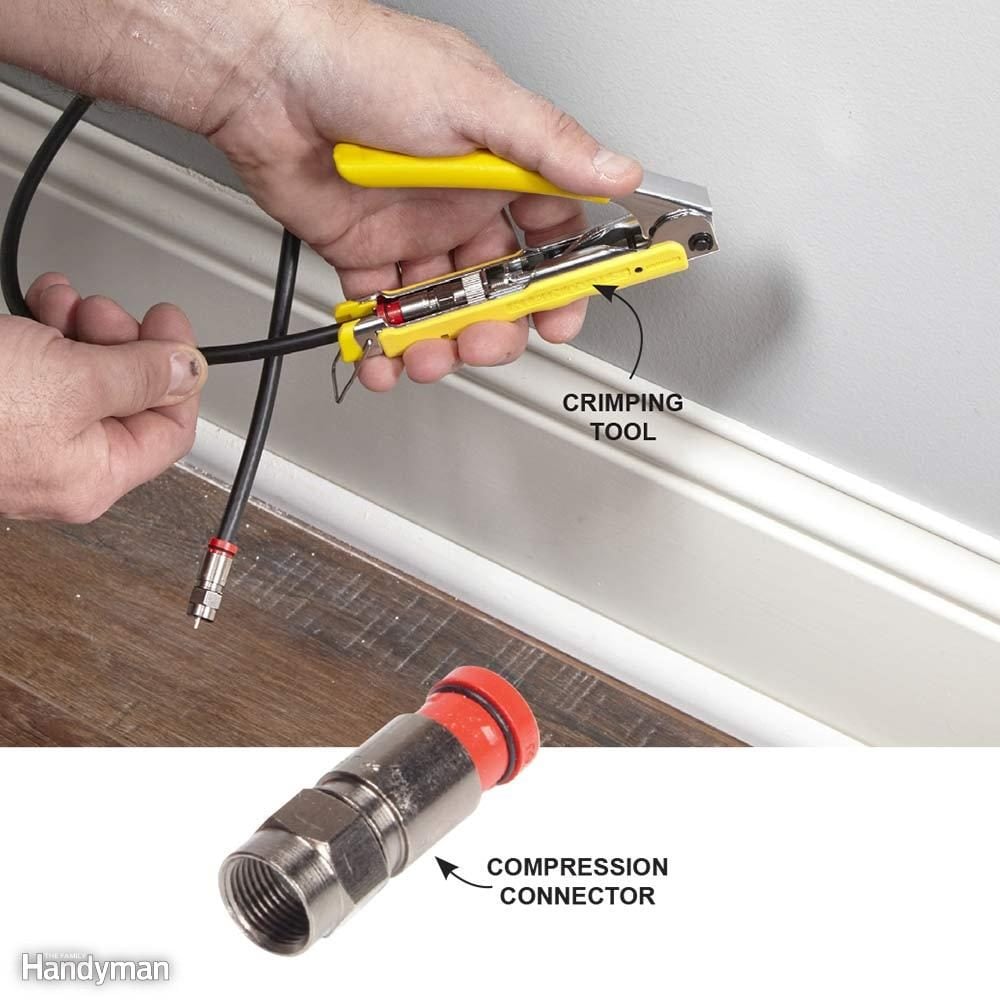
- Crimping Tools: Older style, they squeeze the connector onto the cable. While functional, crimped connections are generally less robust and more prone to signal loss and moisture ingress over time.
- Compression Tools: The industry standard for modern installations. These tools apply even pressure around the connector, compressing it onto the cable in a 360-degree fashion. This creates a much more secure, weather-resistant, and signal-efficient connection. For F-type connectors, particularly if you’re aiming for optimal performance and longevity (e.g., for high-speed internet or outdoor runs), a compression tool is highly recommended. Many modern F-type connectors are specifically designed for compression.
Given the superior performance and durability, our guide will focus on using a compression tool, aligning with current best practices in networking and cable installation.
Cable Cutters and Other Necessities: Rounding Out Your Kit
Beyond the specialized coax tools, a few general items will complete your toolkit:
- Wire Cutters/Snips: A sharp pair of diagonal cutters is essential for making clean, square cuts to the coaxial cable before stripping. Avoid using household scissors, which can fray the cable and lead to an uneven termination.
- Continuity Tester (Optional but Recommended): A simple continuity tester can be invaluable for verifying that your newly installed connector has no short circuits and that the center conductor is making proper contact. This small gadget is a fantastic productivity booster, allowing you to quickly confirm your work and avoid troubleshooting issues down the line.
- Safety Glasses: Always a good idea when cutting and stripping wires, protecting your eyes from stray fragments.
- Marker/Pen: Useful for marking cable lengths if working on multiple runs.
Investing in these tools might seem like an upfront cost, but consider it an investment in your home’s tech infrastructure. For those interested in side hustles or digital entrepreneurship, being able to reliably set up and maintain your own network infrastructure can save significant operational costs.
Step-by-Step Guide to Installing a Coax Connector
With your tools ready and your understanding solid, it’s time for the hands-on process. This detailed walkthrough focuses on installing an F-type compression connector, which offers the best performance and durability for most home applications.
Step 1: Prepare the Cable for Termination
The foundation of a good connection is a perfectly prepared cable. Precision here is paramount.
- Cut the Cable Square: Using your sharp cable cutters, make a clean, straight cut across the end of the coaxial cable. A square cut ensures that all internal components are properly aligned for the stripping process. Avoid crushing the cable during the cut.
- Strip the Cable (Outer Jacket):
- Insert the freshly cut end of the coax cable into your coax stripper. Ensure the cable is fully seated against the internal stop.
- Rotate the stripper around the cable several times (typically 3-5 rotations, depending on the tool and cable type) until you feel the tool cut through the outer jacket and the braided shield.
- Remove the cable from the stripper. Gently pull off the stripped section of the outer jacket and the exposed braid/foil. You should now see the dielectric (white inner insulation) and, possibly, some exposed foil shield beneath the braid.
- Clean and Prepare the Braid/Foil:
- Carefully fold back the braided shield wires over the outer jacket. Ensure none of these tiny wires are straying forward, as they can cause a short circuit with the center conductor.
- If there’s an aluminum foil shield underneath the braid, gently peel it back as well, exposing the dielectric. Some foil shields are bonded to the dielectric and can remain. The goal is to ensure no part of the shield (braid or foil) can touch the center conductor.
- You should now have a section of the dielectric exposed, with the center copper conductor protruding from its end.
- Trim the Dielectric and Expose the Center Conductor:
- Many coax strippers perform this step simultaneously with the outer jacket strip. However, if yours doesn’t, or if you need to adjust, you’ll need to carefully trim the dielectric to the length specified by your connector manufacturer. Typically, the dielectric (white insulation) should be exposed for about 1/4 to 5/16 of an inch, with the center conductor protruding another 1/8 to 3/16 of an inch beyond that.
- The key is that the center conductor should be straight, clean, and protrude just enough to make contact within the connector without being excessively long (which risks bending or shorting) or too short (which risks poor contact).
Step 2: Install the Connector onto the Cable
This step requires a firm but gentle approach to ensure the cable components seat correctly within the connector.
- Align the Connector: Take your F-type compression connector. The inner ring of the connector should be sized to fit snugly over the dielectric (the white insulation).
- Push the Connector On: With a steady hand, push the connector firmly onto the prepared end of the cable.
- The goal is for the center conductor to slide cleanly into the small hole in the center of the connector.
- The dielectric should butt up against the internal stop of the connector.
- The folded-back braid and foil should be neatly tucked between the outer jacket and the connector’s body.
- Continue pushing until the center conductor protrudes cleanly from the tip of the connector. It should be straight and not bent. You should see a small ring of the dielectric inside the connector opening, and the center conductor should extend out past this, typically by 1/8 inch or less. If it’s too long, it can short out; if too short, it won’t make good contact.
Step 3: Secure the Connector with a Compression Tool
This is where the magic of the compression tool truly shines, creating a robust and reliable connection.
- Position the Connector in the Tool: Open your compression tool. There will be a cradle or slot designed to hold the connector. Place the connector (with the cable now attached) into this slot. Ensure the connector is fully seated and aligned within the tool’s jaws.
- Compress the Connector:
- Firmly squeeze the handles of the compression tool together. You will feel resistance as the tool pushes the connector’s sleeve down onto the cable.
- Continue squeezing until the tool “bottoms out” or you hear a click, indicating the compression cycle is complete. The tool will essentially “telescope” the connector, securing it tightly to the cable.
- Inspect the Connection: Once compressed, remove the cable and connector from the tool.
- Visual Check: The connector’s sleeve should be firmly pressed against the cable jacket, creating a secure, weather-tight seal. The center conductor should still be straight and protrude by the correct amount. There should be no stray braid wires visible at the tip that could cause a short. The connector should feel solid and immovable on the cable.
Step 4: Test Your Connection for Flawless Performance
A final test ensures all your hard work has paid off and that your connection is ready for prime time.
- Continuity Check (Recommended): Use a continuity tester (if you have one) to verify two things:
- No Short Circuit: Touch one probe to the center conductor and the other to the outer body of the connector. The tester should not indicate continuity (no beep, no light). If it does, you have a short circuit, likely from a stray braid wire touching the center conductor. You’ll need to remove the connector and start over.
- Good Connection: If possible, test the other end of the cable (if it’s already terminated) or connect it to a device. You want to ensure the signal path is complete.
- Functional Test: Connect the newly terminated cable to your modem, TV, or satellite receiver.
- Internet: Check your internet speed. Run a speed test. Is it performing as expected?
- TV: Check signal quality. Are all channels clear and free from pixelation?
If everything checks out, congratulations! You’ve successfully installed a professional-grade coax connector.
Advanced Tips and Troubleshooting for Optimal Performance
While the steps above cover the core installation, a few additional tips can elevate your connections from good to excellent, and knowing how to troubleshoot common issues will save you time and frustration.
Optimizing for Performance: Beyond the Basic Install
- Mind the Bend Radius: Avoid sharp 90-degree bends in your coaxial cable. Excessive bending can deform the cable’s internal structure, leading to signal loss. Maintain a gentle curve, especially near the connectors.
- Use High-Quality Cable: The connector is only as good as the cable it’s attached to. For new installations, especially for high-speed internet, invest in quality RG-6 quad-shielded cable. This provides superior protection against interference.
- Weatherproof Outdoor Connections: If your cable runs outdoors, use weatherproof compression connectors and consider applying dielectric grease to the threads to prevent moisture ingress, which can corrode connections and degrade signals.
- Proper Cable Management: Secure cables neatly with appropriate clips or ties, preventing them from being snagged, crushed, or creating tripping hazards. Good cable management also makes future troubleshooting easier. This aligns with productivity and digital security, as neatly organized cables are less prone to accidental damage.
Common Pitfalls and How to Avoid Them
- Frayed Braid Wires: The most common cause of short circuits. When stripping, carefully fold back all the tiny braided wires and ensure none are touching the center conductor.
- Center Conductor Too Short or Too Long: If too short, it won’t make proper contact. If too long, it can bend, break, or short out. Always aim for the recommended protrusion (typically 1/8 inch beyond the connector tip).
- Crushed Cable: Using dull cutters or applying too much force can deform the cable’s internal structure, leading to impedance mismatches and signal loss. Use sharp, dedicated cable cutters.
- Loose Connections: A connector that’s not fully compressed or an F-connector that’s not tightly screwed into a device can cause intermittent signal issues. Always ensure a snug fit.
When to Call a Professional: Knowing Your Limits
While DIY coax connector installation is empowering and cost-effective, there are times when professional help is advisable:
- Complex Wiring Diagrams: If your project involves extensive in-wall wiring, multiple splitters, amplifiers, or a complex home network setup, a professional can ensure optimal signal distribution and avoid signal degradation.
- Persistent Signal Issues: If you’ve tried troubleshooting and still experience persistent signal problems, it might indicate a deeper issue with the cable run itself (e.g., damaged cable within walls) or external network problems that only your service provider can address.
- Safety Concerns: If working in areas with high voltage, or if you’re uncomfortable with the electrical aspects of cable management, a professional can complete the job safely.
- Time-Sensitive Projects: If you’re managing a brand launch, a critical remote work setup, or another time-sensitive project where network downtime is not an option, the guaranteed expertise of a professional might be worth the investment.
Conclusion: Empowering Your Digital World Through DIY
Learning how to install a coax connector is a tangible skill that empowers you to take control of your home’s digital infrastructure. In an era where technology is seamlessly integrated into every facet of our lives – from personal finance and online income generation to digital security and entertainment – ensuring the quality of your foundational connections is more crucial than ever.
By following this comprehensive guide, you’ve not only acquired a valuable technical skill but also gained insight into the importance of precision, the value of proper tools, and the direct correlation between physical infrastructure quality and digital performance. You’ve embraced a DIY ethos that saves money, boosts productivity, and provides a deeper understanding of the tech that powers your world. So, next time you face a cable issue or need a new connection, confidently grab your tools and build a connection that’s truly flawless. Your digital life will thank you for it.
aViewFromTheCave is a participant in the Amazon Services LLC Associates Program, an affiliate advertising program designed to provide a means for sites to earn advertising fees by advertising and linking to Amazon.com. Amazon, the Amazon logo, AmazonSupply, and the AmazonSupply logo are trademarks of Amazon.com, Inc. or its affiliates. As an Amazon Associate we earn affiliate commissions from qualifying purchases.