In the intricate world of computing, where every component plays a crucial role in the overall system performance and stability, the Basic Input/Output System (BIOS) holds a foundational position. For ASUS users, understanding how to properly update this critical firmware is not just about staying current; it’s about unlocking enhanced features, improving hardware compatibility, patching security vulnerabilities, and ensuring the longevity and optimal performance of your valuable technology investments. This comprehensive tutorial will guide you through the essential steps to safely and effectively update your ASUS BIOS, transforming a potentially daunting task into a manageable process.
Whether you’re looking to support a new generation CPU, resolve persistent system quirks, or simply maintain peak operational efficiency, a BIOS update can be a powerful tool. However, it’s a procedure that demands precision and careful preparation, as an incorrectly executed update can lead to serious system instability or even render your motherboard inoperable. Aligned with our focus on providing in-depth tech tutorials and ensuring digital security, this guide will equip you with the knowledge to navigate the update process confidently, helping you maximize the productivity and reliability of your ASUS hardware.
Understanding Your BIOS and Why Updates Matter
Before delving into the practical steps, it’s vital to grasp what the BIOS is and why regular, albeit cautious, updates are beneficial. This foundational understanding will underscore the importance of each step we undertake.
What is BIOS? The Firmware Foundation
The BIOS, or Basic Input/Output System, is the first software your computer runs when you power it on. It’s a type of firmware stored on a small chip on your motherboard, independent of your operating system. Its primary role is to initialize and test hardware components (like the CPU, memory, graphics card, and storage devices) before handing control over to the operating system. Essentially, the BIOS is the bridge between your computer’s hardware and software, dictating how they communicate at the most fundamental level. Modern ASUS systems often feature UEFI (Unified Extensible Firmware Interface), which is a more advanced successor to the traditional BIOS, offering a graphical interface, mouse support, and support for larger hard drives and faster boot times. While technically distinct, the term “BIOS update” is commonly used to refer to updating this foundational firmware, whether it’s traditional BIOS or UEFI.
Benefits of Updating Your ASUS BIOS
Updating your ASUS BIOS, when done correctly, can yield several significant advantages for your system:
- Enhanced Hardware Compatibility: New BIOS versions often introduce support for newer CPUs, RAM modules, graphics cards, or other peripherals that weren’t available when your motherboard was manufactured. This is particularly crucial for users upgrading their core components without replacing the entire motherboard.
- Improved System Stability and Performance: Updates can fix bugs, resolve compatibility issues, and optimize how hardware components interact, leading to a more stable and potentially faster system. This can mitigate random crashes, freezing, or inexplicable errors that might stem from firmware glitches.
- Security Vulnerability Patches: Like any software, BIOS can contain security vulnerabilities. Manufacturers like ASUS regularly release updates to patch these flaws, protecting your system from potential exploits and enhancing your digital security posture, especially against low-level attacks.
- New Features and Functionality: Sometimes, BIOS updates introduce new features, improved fan control options, enhanced overclocking capabilities, or refined power management settings, giving users more control over their hardware.
- Operating System Support: Newer operating systems might require specific BIOS optimizations to function correctly or to unlock their full potential. An updated BIOS ensures seamless integration and optimal performance with the latest Windows versions or Linux distributions.
Risks and Considerations Before You Begin
While the benefits are clear, updating the BIOS carries inherent risks that necessitate caution and meticulous preparation.
- Risk of Bricking Your Motherboard: The most significant risk is that a power interruption during the update process, or flashing an incorrect BIOS file, can corrupt the firmware. A corrupted BIOS can prevent your computer from booting, effectively “bricking” your motherboard. This is often an irreversible issue without specialized tools or a motherboard replacement.
- System Instability: Even a successfully flashed BIOS might introduce new, unforeseen bugs or compatibility issues with your specific hardware configuration. While rare with official updates, it’s a possibility.
- Voiding Warranty: In some cases, though less common with official updates, incorrect procedures or using unauthorized BIOS versions could potentially void your motherboard’s warranty. Always refer to ASUS’s official guidelines.
- Time and Effort: The process requires dedicated time, careful attention to detail, and a stable environment. It’s not a task to rush through.
Given these considerations, it’s generally recommended to only update your BIOS if you have a specific reason to do so (e.g., resolving an issue, upgrading hardware, or patching a critical security vulnerability). If your system is running perfectly fine, the “if it ain’t broke, don’t fix it” adage often applies.
Essential Preparations Before Updating
Preparation is the cornerstone of a successful ASUS BIOS update. Skipping any of these steps dramatically increases the risk of complications. Treat this section as your pre-flight checklist.
Identify Your ASUS Motherboard Model
The absolute first step is to accurately identify your ASUS motherboard’s exact model number. Flashing the wrong BIOS file is the quickest way to brick your system.
- Physical Inspection: Open your computer case and look at the motherboard itself. The model name (e.g., “ROG STRIX Z690-E GAMING WIFI” or “PRIME B550M-A”) is usually printed prominently on the board, often near the CPU socket, RAM slots, or PCI-E slots.
- Software Utilities:
- CPU-Z: A free utility that provides detailed information about your CPU, mainboard (motherboard), memory, and graphics card. Under the “Mainboard” tab, you’ll find the manufacturer and model.
- ASUS AI Suite 3 (or similar ASUS utilities): If you have ASUS’s proprietary software installed, it often displays your motherboard model.
- Windows System Information: Type
msinfo32into the Windows search bar and press Enter. Look for “BaseBoard Manufacturer,” “BaseBoard Product,” and “BaseBoard Version.” - Command Prompt: Open Command Prompt as an administrator and type
wmic baseboard get product,manufacturer,version,serialnumberthen press Enter.
Once you have the model number, double-check it. Write it down or copy it to avoid errors.
Download the Correct BIOS File
With your exact motherboard model identified, the next critical step is to download the corresponding BIOS update file directly from the official ASUS support website.
- Navigate to ASUS Support: Go to
www.asus.com/support/. - Search for Your Model: Enter your motherboard model number in the search box.
- Select “Drivers & Utility”: On your motherboard’s support page, find the “Drivers & Utility” section.
- Choose Your Operating System: Even though BIOS is OS-independent, selecting your OS helps filter relevant drivers and utilities. If no specific OS is listed for BIOS, choose “Other.”
- Locate the BIOS/Firmware Section: Find the “BIOS & FIRMWARE” or just “BIOS” category.
- Download the Latest Version: Look for the latest stable BIOS version. Pay attention to the version number, release date, and critical update notes. Read the description carefully to understand what the update addresses. It’s generally recommended to update to the latest non-beta version.
- Extract the File: The downloaded file will usually be a ZIP or RAR archive. Extract its contents to a readily accessible location, such as your desktop. Inside, you should find a
.CAPfile (for UEFI BIOS) or sometimes a.ROMfile. This is the actual BIOS firmware image.
Back Up Your Important Data and BIOS Settings
This step cannot be overstated. While a successful BIOS update should not affect your data, any major system intervention carries a minute risk.
- Data Backup: Before you do anything else, back up all critical files, documents, photos, and any other irreplaceable data to an external hard drive, USB stick, or cloud storage service. This is a general best practice for any significant system change.
- BIOS Settings Backup: If you’ve customized your BIOS settings (e.g., overclocking profiles, boot order, fan curves, RAID configurations), it’s wise to make a note of them. Some ASUS motherboards allow you to save your BIOS profiles to a USB drive or directly within the BIOS itself. This will save you time reconfiguring everything after the update, as a BIOS update typically resets settings to default.
Ensure a Stable Power Supply
A power interruption during a BIOS update is catastrophic.
- Desktop PCs: Connect your desktop computer to an Uninterruptible Power Supply (UPS) if possible. If not, ensure you are updating during a time when power outages are unlikely, and avoid any activities that might trip a circuit breaker.
- Laptops: Ensure your laptop is plugged into its power adapter and the battery is fully charged. Do NOT rely solely on battery power during a BIOS update.
Step-by-Step Guide: Methods for Updating ASUS BIOS
ASUS provides several methods for updating the BIOS, each suited for different scenarios and user preferences. We will cover the most common and recommended approaches.
Method 1: Updating via ASUS EZ Flash (Recommended)
ASUS EZ Flash is generally the safest and most recommended method for updating your BIOS. It’s a utility built directly into the BIOS/UEFI firmware, meaning it operates outside of the Windows environment, reducing potential conflicts.
-
Prepare the USB Drive:
- Format a USB flash drive (preferably 8GB or smaller) to FAT32. You can do this by right-clicking the drive in “My Computer” or “This PC,” selecting “Format,” and choosing “FAT32” as the file system.
- Copy the extracted BIOS
.CAPfile (e.g.,ROG-STRIX-Z690-E-GAMING-WIFI-ASUS-3004.CAP) directly to the root directory of the FAT32 formatted USB drive. Do NOT put it in a folder. - Some older ASUS motherboards require you to rename the BIOS file to a specific format (e.g.,
P8Z77VPRO.CAPfor a P8Z77-V PRO motherboard). Check your motherboard’s manual or the ASUS support page for specific instructions regarding file renaming, though most modern ASUS boards don’t require this.
-
Enter BIOS/UEFI:
- Restart your computer.
- Repeatedly press the
DELkey orF2key during boot-up to enter the BIOS/UEFI settings. The exact key might vary slightly depending on your motherboard model; refer to your manual if unsure.
-
Launch EZ Flash:
- Once in the BIOS/UEFI, navigate to the “Tool” menu (usually found in Advanced Mode if your BIOS has a simple/advanced mode toggle).
- Select “ASUS EZ Flash 3 Utility” (or similar, depending on your BIOS version).
-
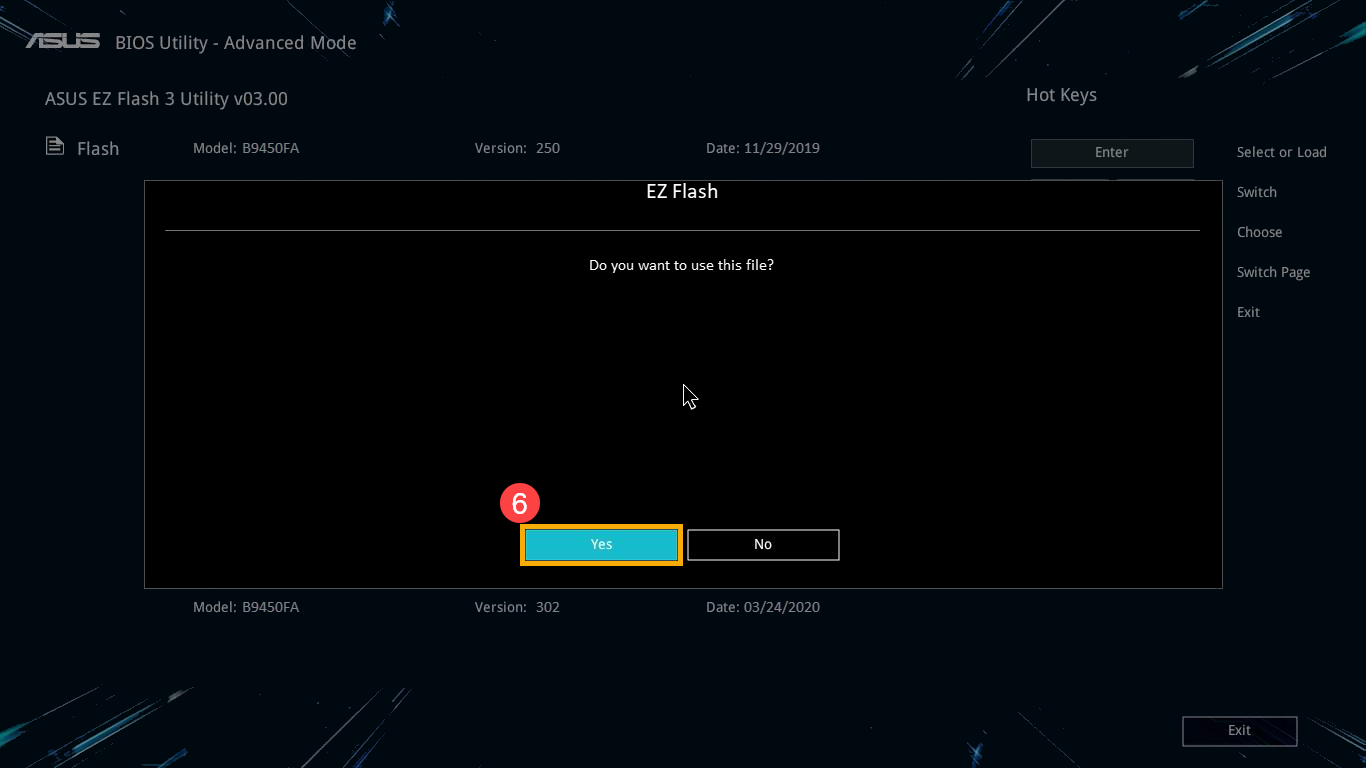
Select and Flash the BIOS File:
- In the EZ Flash utility, you should see your USB drive listed. Select it.
- Locate and select the BIOS
.CAPfile you placed on the USB drive. - The utility will display the old BIOS version and the new BIOS version. Double-check that these match your expectations.
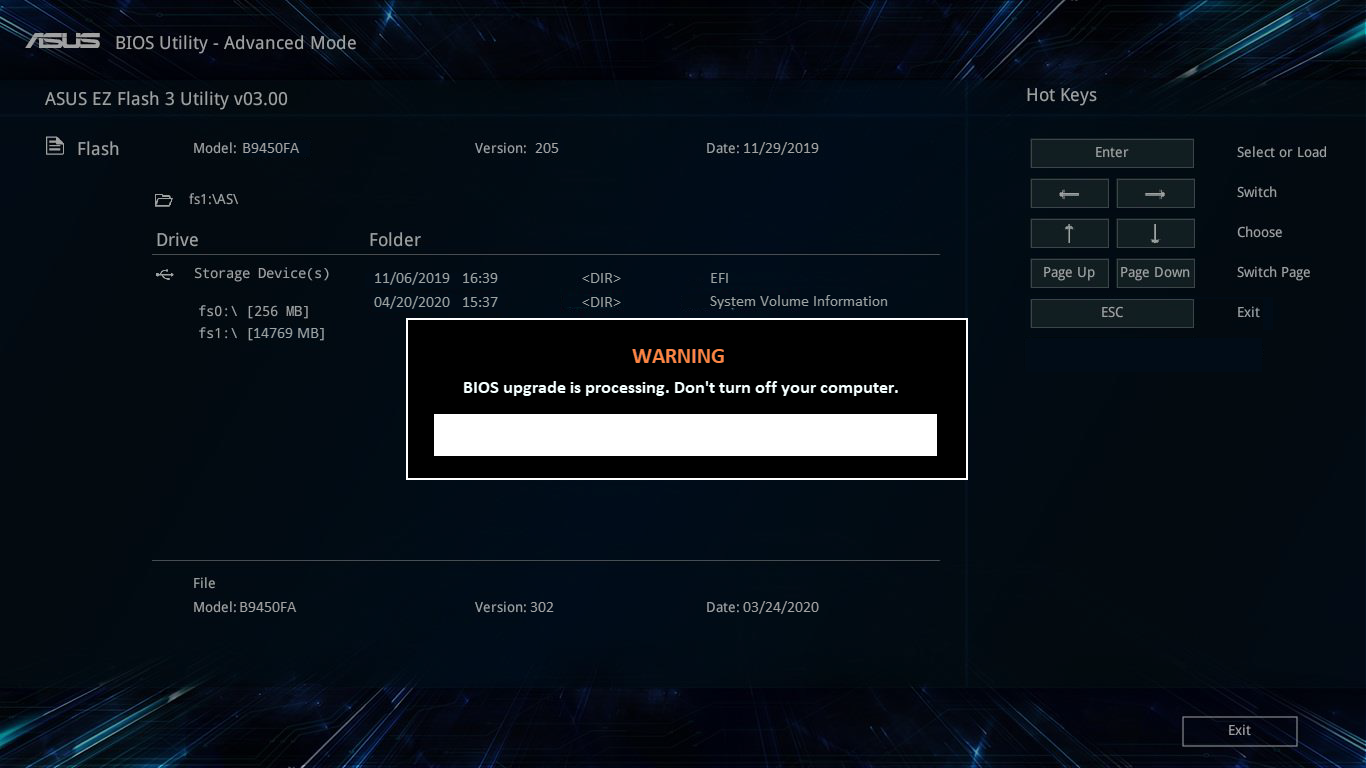
- Confirm the update. The utility will begin flashing the BIOS.
- CRITICAL: Do NOT turn off or restart your computer during this process. Allow it to complete entirely. It may take several minutes.
-
Restart and Configure:
- Once the flashing is complete, the system will usually restart automatically.
- It might boot directly back into the BIOS/UEFI, or you might need to press
DELorF2again. - The BIOS settings will likely be reset to default. Go into the BIOS and load “Optimized Defaults” (often under the “Exit” tab). Save and exit.
- Reconfigure any specific settings you backed up earlier (e.g., XMP profile for RAM, boot order).
Method 2: Updating via ASUS Live Update (Windows-Based Utility – Use with Caution)
ASUS Live Update is a Windows-based utility designed to automate driver and BIOS updates. While convenient, updating BIOS from within Windows carries a higher risk due to potential software conflicts, background processes, or system instability during the update. It is generally not recommended as the primary method unless no other option is available or if you are very confident in your system’s stability.
- Download ASUS Live Update: If you choose this method, download the latest version of ASUS Live Update (or Armoury Crate, which often includes Live Update functionality) from your motherboard’s support page on the ASUS website.
- Install the Utility: Install the software on your Windows system.
- Run and Scan: Open ASUS Live Update and allow it to scan for available updates.
- Select BIOS Update: If a BIOS update is detected, select it.
- Proceed with Update: Follow the on-screen prompts. The utility will download the BIOS file, prepare for the update, and likely require a system restart.
- During the Update: Your system will restart, and the BIOS flashing process will occur before Windows fully loads. Again, do NOT interrupt this process.
- Post-Update: After the update, the system will restart. As with EZ Flash, you may need to enter the BIOS to load optimized defaults and reconfigure your settings.
Disclaimer: Use this method with extreme caution. Ensure all non-essential programs are closed, and your system is stable before initiating the update.
Method 3: Using USB BIOS Flashback (For Specific Motherboards & Crisis Recovery)
USB BIOS Flashback is a powerful feature available on select high-end ASUS motherboards. It allows you to update the BIOS without a CPU, RAM, or even a working graphics card installed. This makes it invaluable for recovering from a bad flash or for installing a new CPU that isn’t supported by the current BIOS version on a new build.
- Check for BIOS Flashback Button: Look for a dedicated “BIOS Flashback” button (often labeled and sometimes accompanied by a specific USB port) on your motherboard’s rear I/O panel.
- Prepare the USB Drive:
- Format a USB flash drive (FAT32).
- Download the correct BIOS
.CAPfile for your motherboard from the ASUS website. - Crucially, rename the BIOS file to a specific name required by your motherboard for BIOS Flashback (e.g.,
M5F.CAPfor a Maximus V Formula, orCSM.CAPfor certain Prime series boards). This specific name is vital and can be found on your motherboard’s support page under the “BIOS” section or in your manual. - Copy the renamed BIOS file to the root directory of the FAT32 formatted USB drive.
- Insert USB and Initiate Flashback:
- Ensure your system is completely powered off (even unplugged from the wall for a moment to clear residual power).
- Insert the USB drive into the designated USB BIOS Flashback port on your motherboard’s rear I/O panel.
- Connect the 24-pin ATX power connector and the 8-pin CPU power connector to the motherboard (you don’t need CPU, RAM, or GPU installed, but power is essential).
- Press and hold the BIOS Flashback button for three seconds until the LED starts flashing.
- Monitor the Process:
- The LED will flash rapidly, indicating the update is in progress.
- Do NOT remove the USB drive or interrupt power.
- The LED will stop flashing when the update is complete. This can take several minutes.
- First Boot and Configuration:
- Once the LED stops, remove the USB drive.
- Assemble your system (if you’re using this for a new build or recovery).
- Power on the system. It may cycle a few times.
- Enter the BIOS/UEFI, load optimized defaults, save, and exit.
- Reconfigure any necessary settings.
Post-Update Procedures and Troubleshooting
After successfully updating your ASUS BIOS, there are a few important steps to ensure everything is running smoothly and to address any potential hiccups.
First Boot After BIOS Update
The first boot after a BIOS update might take longer than usual. Your system might power cycle a few times as the new firmware initializes and re-detects hardware. This is normal. If your system boots into Windows without issues, that’s a good sign. If it consistently boots into the BIOS, or gives you a prompt, proceed to the next step.
Restoring Optimal Settings
As mentioned, a BIOS update typically resets all settings to their default values.
- Enter BIOS/UEFI: Reboot and press
DELorF2to enter the BIOS. - Load Optimized Defaults: Navigate to the “Exit” tab and select “Load Optimized Defaults” (or “Load Default Settings”). Save and exit. This ensures your system is configured to a known stable state by ASUS.
- Reconfigure Custom Settings: If you made notes or backed up your specific settings, now is the time to re-apply them. This includes:
- XMP Profile: Re-enable your RAM’s Extreme Memory Profile for optimal performance.
- Boot Order: Adjust if you prefer to boot from a specific drive.
- RAID Configuration: If you’re using RAID, ensure your settings are correctly restored.
- Fan Curves: Re-apply any custom fan speed profiles.
- Overclocking: If you overclock, re-apply your stable overclocking settings. Proceed with caution and re-test stability.
Common Issues and Solutions
Even with careful preparation, issues can sometimes arise.
- System Won’t Boot/Black Screen:
- Clear CMOS: This is often the first troubleshooting step. Power off your PC, unplug it, and remove the small circular battery from your motherboard for 1-2 minutes. Alternatively, use the “Clear CMOS” jumper or button on your motherboard (refer to your manual). This will reset the BIOS to its factory defaults.
- Check Components: Ensure all power cables, RAM modules, and graphics card are properly seated.
- Revert to Previous BIOS (if possible): Some motherboards support flashing an older BIOS version. Consult your manual.
- Use USB BIOS Flashback: If your motherboard supports it, this is your best bet for recovery from a bad flash.
- System Instability/Crashes After Update:
- Load Optimized Defaults: Ensure you’ve loaded optimized defaults in the BIOS.
- Test Components: Gradually re-enable custom settings (like XMP) one by one to identify if a specific setting is causing instability.
- Check Drivers: Ensure all your system drivers (chipset, GPU, etc.) are up to date and compatible with the new BIOS. Download them from ASUS or component manufacturer websites.
- Revert BIOS: If instability persists and you’re certain it’s BIOS-related, consider reverting to the previous stable BIOS version if your motherboard supports it.
- BIOS Not Recognizing USB Drive (EZ Flash):
- Ensure the USB drive is FAT32 formatted.
- Try a different USB port (especially a USB 2.0 port if you’re using an older board).
- Try a different, smaller USB drive.
- Ensure the BIOS file is in the root directory and not in a folder.

Best Practices for Maintaining Your ASUS System
Beyond the immediate update process, adopting a few best practices can help maintain your ASUS system’s health and performance.
- Regular Software Updates: Keep your operating system (Windows, Linux) and all device drivers updated. This complements BIOS updates by ensuring all layers of your system are compatible and secure.
- Monitor System Health: Utilize tools like ASUS AI Suite, HWMonitor, or other monitoring software to keep an eye on CPU temperatures, fan speeds, and overall system stability.
- Cleanliness: Periodically clean dust from inside your PC case, especially from fans and heatsinks, to ensure optimal cooling and prevent performance degradation.
- Backup Strategy: Maintain a robust data backup strategy. External drives, cloud storage, or a combination thereof are essential for protecting your valuable data.
- Educate Yourself: Stay informed about new technology trends, software developments, and digital security best practices. Understanding your hardware and software helps in making informed decisions about updates and maintenance.
Updating your ASUS BIOS is a critical maintenance task that, while intimidating, can significantly contribute to the longevity, stability, and performance of your computer. By following this detailed guide, emphasizing careful preparation, choosing the right method, and understanding the inherent risks, you can confidently navigate the process. Remember, a well-maintained system is a productive system, and proper BIOS management is a cornerstone of that maintenance.
aViewFromTheCave is a participant in the Amazon Services LLC Associates Program, an affiliate advertising program designed to provide a means for sites to earn advertising fees by advertising and linking to Amazon.com. Amazon, the Amazon logo, AmazonSupply, and the AmazonSupply logo are trademarks of Amazon.com, Inc. or its affiliates. As an Amazon Associate we earn affiliate commissions from qualifying purchases.