Node.js is an open-source, cross-platform JavaScript runtime environment that allows developers to execute JavaScript code outside of a web browser. Its versatility makes it a cornerstone for modern web development, powering everything from backend servers and APIs to command-line tools and desktop applications. For Windows users eager to dive into this powerful ecosystem, understanding the installation process is the crucial first step. This comprehensive guide will walk you through everything you need to know to successfully install Node.js on your Windows machine, ensuring you’re ready to build, test, and deploy your next project.
The world of technology is constantly evolving, and Node.js has cemented its place as a vital tool for developers. Whether you’re a seasoned programmer looking to expand your toolkit or a beginner taking your first steps into web development, mastering Node.js on Windows is an achievable goal. This tutorial will demystify the installation process, providing clear, actionable steps that cater to both straightforward installations and more nuanced configurations. We’ll cover the essential downloads, the installation wizard, and how to verify your setup, laying a solid foundation for your Node.js journey.
Understanding Node.js and Its Relevance
Before we delve into the practicalities of installation, it’s beneficial to grasp what Node.js is and why it’s so prevalent in the tech landscape. At its core, Node.js is built on Chrome’s V8 JavaScript engine, the same engine that powers Google Chrome. This allows for high-performance execution of JavaScript. Unlike traditional web development where JavaScript was primarily client-side (running in the browser), Node.js enables JavaScript to be used on the server-side.
The Power of JavaScript Everywhere
The ability to use JavaScript for both frontend and backend development is a significant advantage. It streamlines the development process, reduces context switching for developers, and fosters the creation of isomorphic applications – applications where code can run on both the server and the client. This unification has led to the rise of popular frameworks like React, Angular, and Vue.js, which, while often associated with frontend development, can also leverage Node.js for server-side rendering and other backend functionalities.
Beyond Web Servers: The Versatility of Node.js
Node.js’s impact extends far beyond traditional web servers. It’s instrumental in building:
- Command-Line Interfaces (CLIs): Many essential developer tools, including package managers like npm and yarn, are built using Node.js.
- Desktop Applications: Frameworks like Electron allow developers to build cross-platform desktop applications using web technologies (HTML, CSS, JavaScript) powered by Node.js.
- Real-time Applications: Its asynchronous, event-driven architecture makes it ideal for building applications that require real-time communication, such as chat applications, online gaming platforms, and live data dashboards.
- Microservices: Node.js is a popular choice for building microservices due to its lightweight nature and ease of scaling.
Given its widespread adoption and the sheer breadth of its applications, installing Node.js on Windows is a fundamental skill for anyone looking to engage with modern software development.
Installing Node.js on Windows: A Step-by-Step Guide
The installation process for Node.js on Windows is generally straightforward, thanks to its well-designed installer. We’ll guide you through the recommended approach using the official Node.js installer.
1. Downloading the Node.js Installer
The first step is to visit the official Node.js website.
- Navigate to the Official Website: Open your web browser and go to https://nodejs.org/.
- Choose the Recommended Version: On the homepage, you will typically see two download options:
- LTS (Long Term Support): This is the recommended version for most users. It’s stable, reliable, and receives ongoing support for an extended period. If you’re new to Node.js or building a production application, always opt for the LTS version.
- Current: This version features the latest updates and experimental features. It’s suitable for users who want to try out new functionalities or are developing against the bleeding edge of Node.js. However, it may be less stable than the LTS version.
- Select the Windows Installer: Click on the download button for the LTS version. The website will automatically detect your operating system. If not, you may need to navigate to the “Downloads” section of the website and select the Windows installer (usually an
.msifile).
The downloaded file will be an executable installer, typically named something like node-vXX.XX.X-x64.msi (where XX.XX.X represents the version number and x64 indicates it’s for 64-bit Windows).
2. Running the Node.js Installation Wizard
Once the download is complete, locate the .msi file in your Downloads folder and double-click it to start the installation wizard.
-
Welcome Screen: The wizard will begin with a welcome screen. Click “Next” to proceed.
-
End-User License Agreement: You will be presented with the Node.js License Agreement. Read through it, and if you agree to the terms, check the box that says “I accept the terms in the License Agreement” and click “Next.”
-
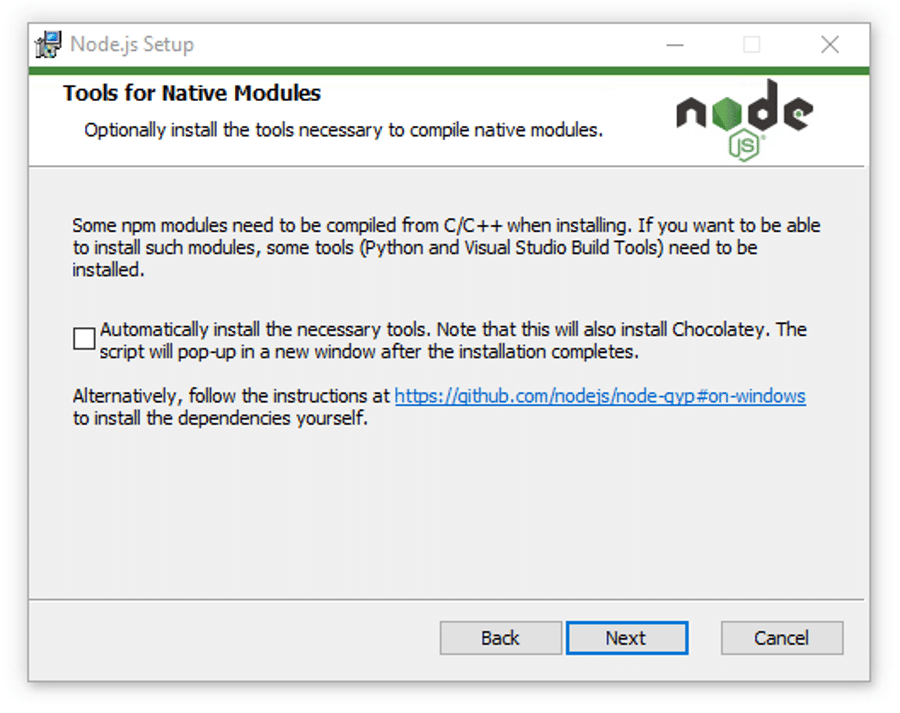
Custom Setup: This is where you can choose which components to install.
- Node.js runtime: This is the core JavaScript engine. It must be installed.
- npm package manager: npm (Node Package Manager) is bundled with Node.js and is essential for installing and managing external libraries and dependencies. It should also be installed.
- Add to PATH: This is a crucial option. Ensure that “Add to PATH” is selected. This allows you to run Node.js and npm commands from any directory in your Command Prompt or PowerShell without having to navigate to the Node.js installation folder.
- Online documentation shortcuts: You can choose whether to install shortcuts to the online documentation.
- Node.js runtime: This option is selected by default and should be kept.
- npm package manager: This option is also selected by default and is essential.
- Automatically install the necessary tools. Note that this will also install Chocolatey. This option, if presented, is for installing additional tools like Python and Visual Studio Build Tools, which are sometimes required for compiling native add-ons for Node.js. For a basic installation, you can usually skip this. If you encounter issues later with native module compilation, you can revisit this.
For most users, leaving the default selections, especially “Add to PATH,” is the best approach. Click “Next” to continue.
-
Ready to Install: The installer will now show you a summary of your chosen settings. Click “Install” to begin the installation process.
-
User Account Control: Windows may prompt you with a User Account Control (UAC) dialog asking for permission to make changes to your device. Click “Yes” to allow the installation to proceed.
-
Installation Progress: You will see a progress bar indicating the installation status.
-
Completed: Once the installation is finished, you will see a “Completed the Node.js Setup Wizard” screen. Click “Finish” to exit the wizard.
3. Verifying the Installation
After the installation is complete, it’s essential to verify that Node.js and npm have been installed correctly and are accessible from your command line.
- Open Command Prompt or PowerShell:
- Press the Windows key, type “cmd” or “PowerShell,” and press Enter.
- Check Node.js Version: In the command prompt, type the following command and press Enter:
bash

node -v
This command should output the version of Node.js you just installed (e.g.,v18.17.1). - Check npm Version: Next, check the npm version with the following command:
bash

npm -v
This command should output the version of npm that came bundled with your Node.js installation (e.g.,9.6.7).
If both commands successfully return version numbers, your Node.js installation is complete and correctly configured. If you encounter an error like ” ‘node’ is not recognized as an internal or external command,” it likely means that the “Add to PATH” option was not selected during installation, or your system hasn’t refreshed its environment variables.
Troubleshooting PATH Issues
If you suspect a PATH issue:
- Restart Your Computer: Sometimes, a simple restart is all that’s needed for Windows to recognize the updated PATH environment variable.
- Manually Add to PATH: If restarting doesn’t help, you can manually add Node.js to your system’s PATH.
- Search for “Edit the system environment variables” in the Windows search bar and open it.
- Click the “Environment Variables…” button.
- Under “System variables,” find the “Path” variable and click “Edit.”
- Click “New” and add the path to your Node.js installation directory. This is typically
C:Program Filesnodejs(orC:Program Files (x86)nodejsfor older 32-bit systems). - You’ll also need to add the path to the
npmglobal binaries, which is usuallyC:UsersYourUsernameAppDataRoamingnpm(replaceYourUsernamewith your actual Windows username). - Click “OK” on all open windows to save the changes.
- Important: Close and reopen your Command Prompt or PowerShell window after making these changes for them to take effect.
Managing Node.js Versions with NVM (Node Version Manager)
While installing a single version of Node.js is sufficient for many projects, as your development needs grow, you might find yourself working on projects that require different Node.js versions. For instance, an older project might rely on Node.js 14, while a new one uses the latest LTS features available in Node.js 18. Manually switching between these versions can be cumbersome. This is where Node Version Manager (NVM) comes in.
NVM allows you to install, manage, and switch between multiple Node.js versions on your system with ease. Although NVM is natively available on macOS and Linux, for Windows, the most recommended and widely used alternative is nvm-windows.
Installing nvm-windows
- Download nvm-windows: Go to the official nvm-windows GitHub repository. Search for the latest release. You’ll find an executable installer (
nvm-setup.zip). Download and run this installer. It’s a straightforward wizard similar to the Node.js installer. - Installation Options: During installation, nvm-windows will ask for the directory where Node.js should be installed and the directory for the symlink (which points to the currently active Node.js version). Accept the defaults unless you have specific reasons to change them.
Using nvm-windows to Manage Node.js Versions
Once nvm-windows is installed, you can use it from your Command Prompt or PowerShell.
- List Available Versions: To see which Node.js versions are available for installation, type:
bash

nvm list available
- Install a Specific Version: To install a particular version (e.g., the latest LTS), use the
installcommand. For instance, to install the latest LTS version:
bash

nvm install lts
Or, to install a specific version number:
bash

nvm install 18.17.1
- List Installed Versions: To see which Node.js versions you have installed on your system:
bash

nvm list
- Switch Between Versions: To switch to a previously installed version, use the
usecommand:
bash

nvm use 18.17.1
After running this command, you will be prompted to close and reopen your terminal for the changes to take effect.
Using nvm-windows provides immense flexibility, especially when working on multiple projects with different Node.js version requirements, ensuring compatibility and avoiding potential conflicts.
Essential Next Steps After Installation
Congratulations! You’ve successfully installed Node.js on your Windows machine. Now that you have the core runtime environment set up, there are a few essential steps to take to fully leverage its capabilities.
Working with npm Packages
npm, the Node Package Manager, is your gateway to a vast ecosystem of open-source libraries and tools. You’ll use npm to install, manage, and update project dependencies.
- Initializing a New Project: To start a new Node.js project, create a new directory, navigate into it in your terminal, and run:
bash

npm init -y
This command will create apackage.jsonfile, which acts as the manifest for your project, listing its dependencies and other metadata. The-yflag accepts all default options. - Installing Packages: To install a package (e.g., a web framework like Express), run:
bash

npm install express
This command downloads theexpresspackage and its dependencies into anode_modulesfolder within your project directory and records it in yourpackage.jsonfile. - Installing Development Dependencies: Some packages are only needed during development (e.g., testing frameworks or build tools). Install them with the
--save-devflag:
bash

npm install jest --save-dev

Exploring the Node.js Ecosystem
With Node.js installed, you can begin exploring its rich ecosystem.
-
Learn About npm Scripts: The
scriptssection in yourpackage.jsonfile allows you to define custom commands for common tasks like starting your application, running tests, or building your project. -
Try a Simple “Hello World” Server: Create a file named
app.jswith the following content:const http = require('http'); const hostname = '127.0.0.1'; const port = 3000; const server = http.createServer((req, res) => { res.statusCode = 200; res.setHeader('Content-Type', 'text/plain'); res.end('Hello, World!n'); }); server.listen(port, hostname, () => { console.log(`Server running at http://${hostname}:${port}/`); });Then, in your terminal, navigate to the directory containing
app.jsand run:node app.jsOpen your web browser and go to
http://127.0.0.1:3000/. You should see “Hello, World!”.
Your journey into the world of Node.js development on Windows has just begun. The installation is the first, crucial step, opening the door to building dynamic web applications, powerful tools, and much more. Happy coding!
aViewFromTheCave is a participant in the Amazon Services LLC Associates Program, an affiliate advertising program designed to provide a means for sites to earn advertising fees by advertising and linking to Amazon.com. Amazon, the Amazon logo, AmazonSupply, and the AmazonSupply logo are trademarks of Amazon.com, Inc. or its affiliates. As an Amazon Associate we earn affiliate commissions from qualifying purchases.