The allure of macOS is undeniable. With its sleek interface, robust performance, and a curated ecosystem of applications, it’s a platform that many tech enthusiasts aspire to experience. Whether you’re upgrading an existing Mac, embarking on a new build, or even exploring the possibility of running macOS on non-Apple hardware (a more advanced endeavor we’ll touch upon lightly), understanding the installation process is paramount. This guide will walk you through the essential steps, from preparing your system to the final setup, ensuring a smooth and successful macOS installation.
The world of technology is constantly evolving, and staying up-to-date with the latest operating systems is crucial for maximizing your productivity and enjoying the cutting edge of digital innovation. macOS, Apple’s proprietary operating system for its Mac computers, is renowned for its user-friendly design and powerful features. This article aims to demystify the process of installing macOS, making it accessible to both seasoned tech veterans and newcomers alike. We’ll cover the fundamental aspects, ensuring you have the knowledge to confidently undertake this task.
Preparing for Your macOS Installation
Before diving into the installation itself, thorough preparation is key to a seamless experience. This phase involves several critical steps, each designed to prevent data loss and ensure compatibility. Neglecting any of these can lead to frustrating setbacks, so take your time and follow each instruction meticulously.
Backing Up Your Data: The Unbreakable Rule
The golden rule of any operating system installation or upgrade is backup, backup, backup. Your existing data – documents, photos, music, applications, and personal settings – are irreplaceable. A comprehensive backup safeguards against accidental deletion, drive failures, or any unforeseen issues during the installation process.
Time Machine: Apple’s Integrated Backup Solution
For Mac users, Apple provides an elegant and user-friendly backup solution called Time Machine. It’s built directly into macOS and allows you to create incremental backups of your entire system to an external hard drive.
Steps to use Time Machine:
- Connect an External Drive: Plug in an external hard drive with sufficient storage capacity for your backup. It’s recommended to use a drive that’s at least twice the size of your Mac’s internal storage.
- Open Time Machine Preferences: Go to System Settings (or System Preferences) > General > Time Machine.
- Select Backup Disk: Click “Add Backup Disk” and choose your connected external drive.
- Start Backing Up: Time Machine will prompt you to format the drive if it’s not already compatible. Once selected, it will begin its first backup automatically. Subsequent backups will be incremental, only saving changes since the last backup, making them much faster.
Other Backup Methods
While Time Machine is the preferred method for Mac users, other options exist:
- Cloud Storage: Services like iCloud Drive, Google Drive, Dropbox, or OneDrive can synchronize your important files to the cloud. While not a full system backup, it’s excellent for ensuring critical documents are accessible from anywhere.
- Third-Party Backup Software: Numerous third-party applications offer advanced backup features, including full system imaging, scheduling, and encryption. Examples include Carbon Copy Cloner and SuperDuper!
- Manual Copying: For specific files and folders, you can manually copy them to an external drive or cloud storage. This is less comprehensive but can be a quick solution for essential data.
Checking System Requirements
Not all Macs are created equal, and newer versions of macOS have specific hardware requirements. Before you download and attempt to install, verify that your Mac is compatible with the desired macOS version.
Where to find macOS compatibility information:
- Apple’s Official Website: Apple provides detailed compatibility lists for each macOS version on its support website. A quick search for “[macOS version] system requirements” will lead you to the relevant pages.
- About This Mac: On your current Mac, click the Apple menu () in the top-left corner and select About This Mac. This will display your Mac’s model and year, which you can then use to cross-reference with Apple’s compatibility information.
Generally, newer macOS versions require more recent hardware. Older Macs might not be able to run the latest operating system, or they might experience performance issues if they do.
Creating a Bootable Installer (Optional but Recommended)
While macOS can often be installed directly from the App Store or Recovery Mode, creating a bootable installer on a USB drive offers several advantages:
- Offline Installation: You don’t need an internet connection for the core installation.
- Clean Install: It’s ideal for performing a completely fresh installation, wiping the drive clean before installing the new OS.
- Troubleshooting: A bootable installer can be invaluable for troubleshooting issues with your Mac, as it allows you to boot into a functional OS environment.
Creating a Bootable USB Installer for macOS:
This process typically involves using the Terminal application and a USB drive (at least 16GB).
General Steps (may vary slightly by macOS version):
-
Download macOS: Obtain the macOS installer from the App Store. It will usually appear in your Applications folder after download.
-
Format the USB Drive: Open Disk Utility (Applications > Utilities > Disk Utility). Select your USB drive, click Erase, choose Mac OS Extended (Journaled) as the format, and GUID Partition Map as the scheme.
-
Use Terminal: Open Terminal (Applications > Utilities > Terminal).
-
Execute the
createinstallmediacommand: The command structure is generally as follows, but the exact name of the installer file might differ. You’ll need to replace “MyVolume” with the name of your USB drive.sudo /Applications/Install macOS [Version Name].app/Contents/Resources/createinstallmedia --volume /Volumes/MyVolumeFor example, for macOS Ventura:
sudo /Applications/Install macOS Ventura.app/Contents/Resources/createinstallmedia --volume /Volumes/MyVolumeYou will be prompted for your administrator password. The process can take some time to complete.
Installing macOS: The Core Process
With your preparations complete, it’s time to install macOS. The method you choose will depend on whether you’re performing a clean install, upgrading an existing system, or recovering a malfunctioning Mac.
Method 1: Installing or Upgrading from the App Store
This is the most common and straightforward method for upgrading an existing macOS installation or installing a new version on a compatible Mac.
- Open the App Store: Click the App Store icon in your Dock or search for it using Spotlight.
- Search for macOS: In the App Store’s search bar, type the name of the macOS version you want (e.g., “macOS Ventura,” “macOS Monterey”).
- Download the Installer: Click the “Get” or “Download” button for the desired macOS version. The installer will download to your Applications folder and may launch automatically upon completion.
- Launch the Installer: If it doesn’t launch automatically, open your Applications folder and double-click the downloaded macOS installer application.
- Follow On-Screen Prompts: The installer will guide you through the process. You’ll need to agree to the software license agreement and select the destination disk for the installation.
- For Upgrades: If you’re upgrading an existing macOS, the installer will detect your current installation and proceed with the upgrade. Your files and applications will generally be preserved.
- For Clean Installs: If you wish to perform a clean install, you’ll need to boot from your bootable USB installer (as described in Method 3) and then use Disk Utility to erase the target drive before proceeding with the installation.
The installation process can take anywhere from 30 minutes to a few hours, depending on your Mac’s speed and the version of macOS being installed. Your Mac will likely restart several times during this process.

Method 2: Installing from macOS Recovery
macOS Recovery is a built-in recovery system that allows you to restore your Mac from a backup, repair your disk, or reinstall macOS. This is useful if your Mac is experiencing issues or if you’ve erased your startup disk.
How to access macOS Recovery:
- Intel-based Macs: Restart your Mac and immediately press and hold Command (⌘) + R until you see the Apple logo or a spinning globe.
- Apple Silicon Macs (M1, M2, etc.): Shut down your Mac. Press and hold the power button until you see the startup options window. Click Options, then click Continue.
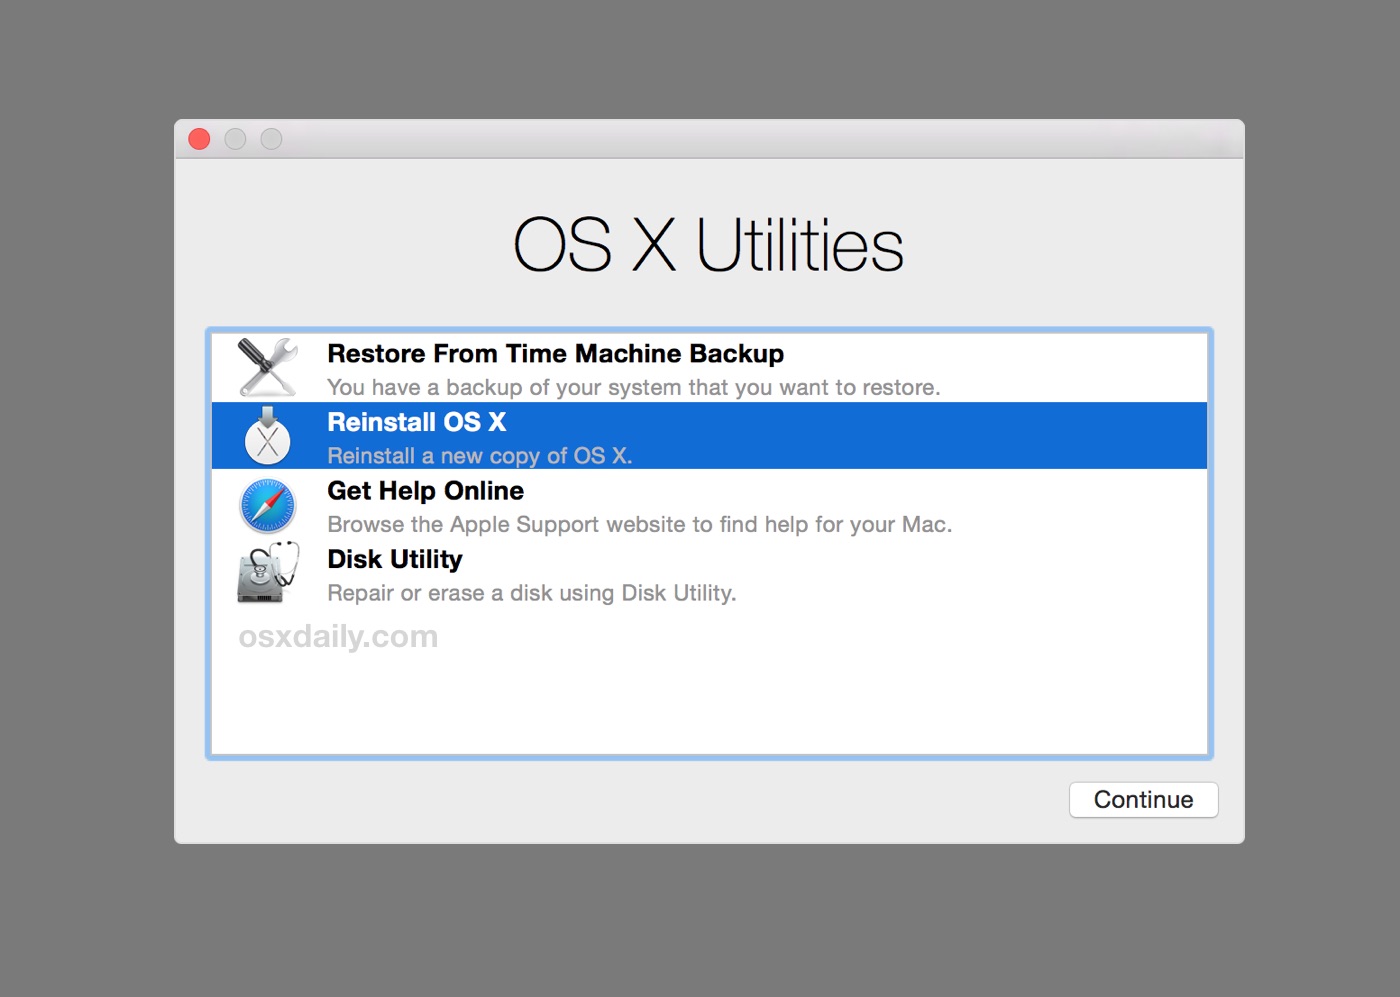
Once in macOS Recovery, you’ll see a screen with several options. Select Reinstall macOS. The system will then guide you through downloading and installing the latest compatible version of macOS for your Mac. This method also requires an internet connection.
Method 3: Installing from a Bootable USB Installer
This method is particularly useful for performing clean installs, troubleshooting, or installing macOS on multiple machines.
- Boot from USB:
- Intel-based Macs: Insert your bootable USB installer. Restart your Mac and immediately press and hold the Option (⌥) key until you see the Startup Manager. Select your USB installer drive and press Enter.
- Apple Silicon Macs: Shut down your Mac. Press and hold the power button until you see the startup options window. Click Options, then click Continue. Select your USB installer drive from the list of available drives.
- Select “Install macOS”: Once your Mac boots from the USB drive, you’ll see the macOS Utilities window. Choose Install macOS.
- Follow On-Screen Prompts:
- Erase Disk (for clean install): If you are performing a clean install, you will need to erase your internal hard drive. To do this, go back to the macOS Utilities window and select Disk Utility. Select your internal Macintosh HD (or similarly named drive), click Erase, choose APFS as the format, and GUID Partition Map as the scheme.
- Continue with Installation: After erasing (if you chose to), proceed with the installation by selecting your internal drive as the destination.
The installation process will then proceed similarly to Method 1, but it’s initiated from your bootable USB.
Post-Installation Setup and Configuration
Once macOS has successfully installed, you’ll be greeted with the initial setup assistant. This is where you configure your Mac to your preferences.
Initial Setup Assistant
The setup assistant will guide you through the following:
- Country and Language Selection: Choose your region and preferred language.
- Wi-Fi Connection: Connect to your wireless network. This is crucial for downloading updates and signing into your Apple ID.
- Data & Privacy: Review Apple’s privacy policies.
- Migration Assistant: This is a critical step if you’re migrating from another Mac or a Windows PC. It allows you to transfer your user accounts, applications, settings, and files. If you performed a backup, this is where you’ll select your Time Machine backup to restore your system.
- Apple ID: Sign in with your Apple ID. This links your Mac to your iCloud services, App Store purchases, and other Apple features. If you don’t have one, you can create one.
- Terms and Conditions: Agree to Apple’s software license agreement.
- Create a Computer Account: Set up your primary user account with a full name, account name, and password. You’ll also set up a password hint.
- Express Setup vs. Customize Settings: You can choose express setup for default settings or customize various options, including:
- Screen Time: Set limits for app usage.
- Siri: Enable or disable Siri.
- FileVault: Encrypt your startup disk for enhanced security. It’s highly recommended to enable FileVault.
- Touch ID/Apple Pay: Set up if your Mac supports these features.
- Appearance: Choose between Light and Dark mode.
- True Tone: Adjust display settings for ambient light.
Updating macOS and Applications
After the initial setup, it’s essential to ensure your system is up-to-date.
- Check for macOS Updates: Go to System Settings (or System Preferences) > General > Software Update. Your Mac will check for any available macOS updates and prompt you to download and install them.
- Update Applications: Open the App Store and navigate to the Updates tab to see if any of your installed applications have updates available. For applications installed from outside the App Store, you may need to check the developer’s website or the application’s internal update mechanism.
Installing Essential Software
With a fresh macOS installation, you’ll likely want to install your favorite applications. This is where the “Tech” aspect of our website’s main topics comes into play.
- Productivity Apps: Consider productivity suites like Microsoft 365, Google Workspace, or alternative options like LibreOffice. Note-taking apps such as Evernote or Notion, and task managers like Things or Todoist, are also essential for many.
- Creative Software: For designers and content creators, Adobe Creative Cloud (Photoshop, Illustrator, Premiere Pro), Final Cut Pro, Logic Pro, or DaVinci Resolve might be on your list.
- Development Tools: If you’re a programmer, consider installing Xcode (Apple’s integrated development environment), VS Code, and any necessary command-line tools or language runtimes.
- Digital Security: Ensure you have robust security software installed, such as a reputable antivirus and anti-malware solution.
Customizing Your macOS Experience
macOS offers extensive customization options to tailor your environment. Explore the various System Settings (or System Preferences) panes to adjust:
- Desktop and Dock: Personalize your dock, wallpaper, and desktop layout.
- Mission Control: Configure how you manage open windows and spaces.
- Accessibility: Adjust settings for users with disabilities.
- Notifications: Control which apps can send you notifications and how they appear.
- Users & Groups: Manage user accounts and permissions.
macOS Installation for Advanced Users and Future Considerations
While the core installation process is covered, advanced users might explore more complex scenarios.
Hackintosh: Running macOS on Non-Apple Hardware
The concept of a “Hackintosh” refers to installing macOS on computers that are not manufactured by Apple. This is a technically challenging endeavor that involves careful hardware selection, custom bootloaders (like OpenCore or Clover), and extensive configuration to trick macOS into thinking it’s running on genuine Apple hardware.
Key considerations for Hackintosh:
- Hardware Compatibility: Not all PC components are compatible with macOS. Researching specific CPU, GPU, Wi-Fi, and audio chipsets is crucial.
- Technical Expertise: This is not for beginners. It requires a deep understanding of computer hardware, EFI booting, and macOS internals.
- Legality and Ethics: While generally tolerated by Apple for personal use, the macOS End User License Agreement (EULA) technically prohibits its installation on non-Apple branded hardware.
- Updates: macOS updates can break Hackintosh installations, requiring ongoing maintenance and troubleshooting.
Given the complexity and potential for instability, a Hackintosh is a project for dedicated enthusiasts rather than a practical solution for most users.
Brand and Marketing in the Context of macOS
From a Brand perspective, macOS is a testament to Apple’s masterful branding. Its intuitive interface, premium build quality, and seamless ecosystem contribute to a strong brand identity. When installing or using macOS, you’re engaging with a brand that emphasizes user experience, design, and a certain lifestyle. The consistent visual language and user-friendliness are deliberate design choices that reinforce this brand. Marketing efforts often highlight the creative potential and productivity gains associated with the platform.
Financial Aspects of macOS Ownership
For Money and personal finance considerations, the cost of Apple hardware, which runs macOS, is typically higher than comparable PC hardware. However, many users find the investment worthwhile due to the perceived longevity, resale value, and integrated ecosystem. When considering an installation, think about the total cost of ownership: the initial hardware purchase, potential software licenses (though many core apps are free or subscription-based), and any necessary accessories like external drives for backups. For businesses, the total cost of ownership can also include the productivity gains and reduced IT support needs often associated with the platform.

Conclusion
Installing macOS, whether as an upgrade, a clean install, or a more experimental endeavor, is a rewarding process that opens the door to Apple’s acclaimed operating system. By meticulously following the preparation steps, understanding the different installation methods, and completing the post-installation setup, you can ensure a smooth and successful transition. From the foundational tech setup to considering the broader implications of brand perception and financial investment, this guide provides a comprehensive overview for anyone looking to embark on their macOS installation journey. Enjoy the polished and powerful experience that macOS offers!
aViewFromTheCave is a participant in the Amazon Services LLC Associates Program, an affiliate advertising program designed to provide a means for sites to earn advertising fees by advertising and linking to Amazon.com. Amazon, the Amazon logo, AmazonSupply, and the AmazonSupply logo are trademarks of Amazon.com, Inc. or its affiliates. As an Amazon Associate we earn affiliate commissions from qualifying purchases.