In the dynamic world of technology, where software updates and evolving development environments are the norm, maintaining a pristine workspace is paramount. For Python developers, whether seasoned professionals or enthusiastic beginners diving into AI tools, data science, or web development, a clean installation of Python is not just a preference—it’s often a necessity. Over time, multiple Python versions, conflicting packages, and corrupted installations can lead to frustrating errors, unexpected behavior, and significant productivity roadblocks. This comprehensive guide will walk you through the process of performing a truly clean installation of Python, ensuring you have a stable, efficient, and hassle-free development environment tailored to your needs.

A clean install is more than just running an installer; it’s a methodical process of meticulously removing all traces of previous Python installations before introducing a fresh one. This approach mitigates common issues like ModuleNotFoundError, incorrect PATH configurations, and conflicts between different project dependencies. By following the steps outlined here, you’ll not only resolve existing problems but also lay a robust foundation for future projects, enhancing your digital security by reducing vulnerabilities from outdated software and improving overall system productivity. Let’s embark on this essential journey to master your Python environment.
The Importance of a Clean Slate: Why a Fresh Python Installation Matters
The “clean” in “clean install” isn’t just about tidiness; it’s about foundational integrity. Like a freshly formatted hard drive, a clean Python environment provides a blank canvas, free from the detritus of past experiments and conflicting configurations. Understanding why this matters is the first step towards appreciating the process.
Preventing Conflict and Ensuring Stability
One of the most common dilemmas developers face is managing multiple Python versions. Projects might require Python 3.7, while others demand 3.9 or 3.10. Without proper management, these versions can clash, leading to unpredictable behavior. When you install a new Python version without fully removing the old one, environment variables (PATH), system symlinks, and even residual files can point to incorrect interpreters or libraries. This “versionitis” often results in:
- Module Not Found Errors: Your project expects a module from one Python version, but your system’s
PATHpoints to another where that module isn’t installed. - Conflicting Dependencies: Two projects might require different versions of the same library (e.g., NumPy 1.20 vs. NumPy 1.23). A shared, messy environment makes this nearly impossible to resolve without breaking one project.
- Inconsistent Behavior: Code that works perfectly on one machine might fail mysteriously on another, simply due to subtle differences in the Python environment setup.
A clean install eradicates these ambiguities, providing a single, unambiguous Python interpreter to work with, at least initially. This stability is crucial for consistent development and deployment, especially when collaborating on teams or deploying applications to production servers.
Optimizing Performance and Troubleshooting Issues
Over time, installations can become fragmented. Unused packages, broken symlinks, and outdated configuration files accumulate, potentially slowing down operations or leading to obscure errors that are incredibly difficult to diagnose. A fresh installation streamlines the environment:
- Reduced Bloat: Only the necessary components are installed, leading to a leaner system that consumes fewer resources.
- Faster Execution: With a clean
PATHand minimal overhead, Python can locate modules and execute scripts more efficiently. - Simplified Debugging: When an issue arises, you can be confident that it stems from your code or a newly installed dependency, rather than a legacy configuration problem. This drastically cuts down troubleshooting time, enhancing your productivity—a key aspect for any tech professional.
Starting Fresh for New Projects
Every new project is an opportunity to implement best practices. A clean Python installation, coupled with effective virtual environment management (which we’ll discuss later), allows you to define a bespoke environment for each project. This isolation ensures that dependencies for Project A don’t interfere with Project B, fostering a modular and sustainable development workflow. It’s akin to having a dedicated toolbox for each job, preventing cross-contamination and ensuring the right tools are always at hand. This discipline is a cornerstone of robust software engineering and contributes positively to your “Tech” prowess.
Preparing for Your Clean Install: Essential Pre-Uninstallation Steps
Before you begin wielding the uninstall button, a systematic approach to preparation is vital. Rushing this stage can lead to lost work or unnecessary complications down the line. Think of this as backing up your financial records before changing banks—you wouldn’t want to lose critical information.
Backing Up Your Work and Configurations
This is arguably the most critical step. Any code you’ve written, configuration files you’ve tweaked, or virtual environments you’ve created are precious.
- Project Folders: Ensure all your project directories are backed up. Use version control systems like Git to push your latest changes to a remote repository (GitHub, GitLab, Bitbucket). For projects not under version control, manually copy the entire project folder to a safe location (external drive, cloud storage).
pip freezeOutput: For each project with a virtual environment, activate the environment and runpip freeze > requirements.txt. This command saves a list of all installed packages and their exact versions. Thisrequirements.txtfile will be invaluable for recreating your project’s environment later. Store these files alongside their respective projects.- Configuration Files: If you’ve customized Python-related configuration files (e.g.,
.bashrc,.zshrc,settings.jsonfor VS Code, IDE settings specific to Python paths), back them up. - Data Files: Any data files used by your Python scripts (databases, CSVs, JSONs) should also be secured.
Identifying Existing Python Installations and Dependencies
Knowing what you currently have installed helps ensure a thorough cleanup.
- Check Python Version: Open your terminal or command prompt and type
python --versionorpython3 --version. Note down the output. If multiple versions appear (e.g., typingpythongives one version,python3another), note both. - Check
which pythonorwhere python: These commands (Linux/macOS and Windows, respectively) will show you the exact path to the Python executable currently being used. This helps identify where Python is installed. - Check Environment Variables (PATH): Inspect your system’s
PATHenvironment variable. On Windows, search for “Environment Variables” in the Start menu. On macOS/Linux, check your shell configuration files (.bashrc,.zshrc,.profile). Look for any paths pointing to Python installations. - Virtual Environments: List any active virtual environments. These are typically folders containing their own Python executable and packages. You don’t necessarily need to back up the virtual environment itself (you’ll recreate it), but understanding its location and associated projects is useful.
Understanding Your Operating System’s Specifics
The method for uninstalling Python varies significantly between Windows, macOS, and Linux. Familiarize yourself with the appropriate steps for your OS to avoid accidental system damage. For instance, removing the system Python on Linux or macOS without proper care can render parts of your operating system unstable.
The Uninstallation Process: Meticulously Removing Old Python Versions
This is the “clean” part of the clean install. The goal is to remove every trace of previous Python installations. This section will guide you through the process for the major operating systems.
For Windows Users: A Step-by-Step Guide to Complete Removal
Windows installations tend to be more straightforward, thanks to its graphical user interface for managing programs.
Using the Control Panel and Windows Settings
- Uninstall via Apps & Features:
- Open the Start Menu, type “Add or remove programs” and hit Enter.
- In the “Apps & features” list, locate all entries related to Python (e.g., “Python 3.x.x (64-bit)”).
- Click on each Python entry and select “Uninstall.” Follow the on-screen prompts. Repeat for all detected Python versions.
- Also check for “Python Launcher” and uninstall it.
- Uninstall via Control Panel (older Windows versions):
- Open Control Panel > Programs > Programs and Features.
- Find Python entries and uninstall them.
Deleting Residual Files and Environment Variables
- Remove from PATH Environment Variables:
- Search for “Edit the system environment variables” in the Start Menu and open it.
- Click “Environment Variables…”
- Under “System variables,” find the “Path” variable and click “Edit.”
- Look for entries like
C:Python3x,C:UsersYourUserAppDataLocalProgramsPythonPython3x, orC:UsersYourUserAppDataLocalMicrosoftWindowsApps(if Python was installed via Windows Store) and remove them. Be cautious not to delete unrelated paths. - Also check “User variables” for “Path” and remove any Python-related entries.
- Apply changes by clicking “OK” on all open windows.
- Delete Residual Folders:
- After uninstalling, some folders might remain. Check and delete:
C:Python3x(if you installed directly to the root)C:UsersYourUserAppDataLocalProgramsPythonC:UsersYourUserAppDataRoamingPythonC:UsersYourUserAppDataLocalpip(for pip cache)
- Be extremely careful not to delete any folders containing your actual project code or important data.
- After uninstalling, some folders might remain. Check and delete:
- Restart Your System: A restart ensures all changes to environment variables are applied and any locked files are released.
For macOS Users: Clearing Out Python with Terminal Commands and Finder
macOS comes with a pre-installed Python (often Python 2, or a very old Python 3 for system utilities). Do NOT remove the system Python directly, as it can break macOS functionality. Focus on removing user-installed versions.
Uninstalling Python from Applications and Frameworks
- Check Installed Versions and Locations:
- Open Terminal.
which pythonwhich python3ls -l /usr/local/bin | grep pythonls -l /usr/bin | grep python(system Python, do not touch)ls -l /Library/Frameworks/Python.framework/Versions/(common installation path)
- Remove Frameworks Installations:
- If Python was installed using the official installer, it typically goes into
/Library/Frameworks/Python.framework. - Navigate to this directory:
cd /Library/Frameworks/Python.framework/Versions/ - Identify the version you want to remove (e.g.,
3.9,3.10). - Use
sudo rm -rf 3.x(replace3.xwith the version you’re removing). For example:sudo rm -rf 3.9 - Then,
sudo rm -rf /Applications/Python 3.x(if an application shortcut exists).
- If Python was installed using the official installer, it typically goes into
- Remove Homebrew Installations:
- If you installed Python via Homebrew (
brew install python@3.x), use:brew uninstall python@3.xbrew cleanup
- If you installed Python via Homebrew (
Managing PATH Variables and Homebrew Installations
- Clean up PATH:
- Check your shell configuration files:
~/.bash_profile,~/.zshrc,~/.profile. - Open them using a text editor (e.g.,
nano ~/.zshrc). - Look for lines that add Python paths (e.g.,
export PATH="/Library/Frameworks/Python.framework/Versions/3.x/bin:$PATH"or Homebrew paths like/usr/local/opt/python/libexec/bin). - Delete or comment out these lines. Save and close the file.
- Apply changes:
source ~/.zshrc(or your relevant shell file).
- Check your shell configuration files:
- Delete Residual Files:
rm -rf ~/Library/Pythonrm -rf ~/.pip(pip cache)rm -rf ~/.virtualenvs(if you had global virtual environments)- Check
/usr/local/binfor any lingering symlinks to Python versions you uninstalled (e.g.,python3,pip3). If they point to a deleted version, remove them withsudo rm /usr/local/bin/python3.
- Restart Terminal: Close and reopen your terminal to ensure environment variables are refreshed.
For Linux Users: Leveraging Package Managers and Manual Cleanup
Linux environments vary greatly, but generally involve using a package manager. Be extremely cautious when removing system Python (e.g., python or python3 that came with your OS), as many system utilities depend on it. Focus on explicitly installed versions.
Utilizing apt, yum, or dnf for System-Wide Removal
- Debian/Ubuntu (apt):
sudo apt remove python3.x(replace3.xwith your version)sudo apt autoremovesudo apt purge python3.x(removes configuration files too)
- CentOS/Fedora (yum/dnf):
sudo dnf remove python3.x(orsudo yum remove python3.xfor older CentOS)sudo dnf autoremove
- Verify Removal:
python3.x --versionshould yield an error.which python3.xshould return nothing.
Erasing Remaining Directories and Symlinks
- Check
alternatives(Debian/Ubuntu):sudo update-alternatives --config pythonsudo update-alternatives --config python3- If the version you uninstalled is still listed, remove it from alternatives:
sudo update-alternatives --remove python /usr/bin/python3.x(adjust paths).
- Remove Residual Files and Directories:
rm -rf /usr/local/lib/python3.xrm -rf /usr/local/bin/python3.xrm -rf /usr/local/bin/pip3.xrm -rf ~/.piprm -rf ~/.local/bin/python3.x- Check
~/.bashrc,~/.profile,~/.zshrcfor any custom PythonPATHentries and remove them.
- Restart Shell: Close and reopen your terminal session.
Installing the New Python Version: A Fresh Start
With the old versions thoroughly purged, you’re ready to install a pristine version of Python. This section guides you through the process, emphasizing best practices for different operating systems.
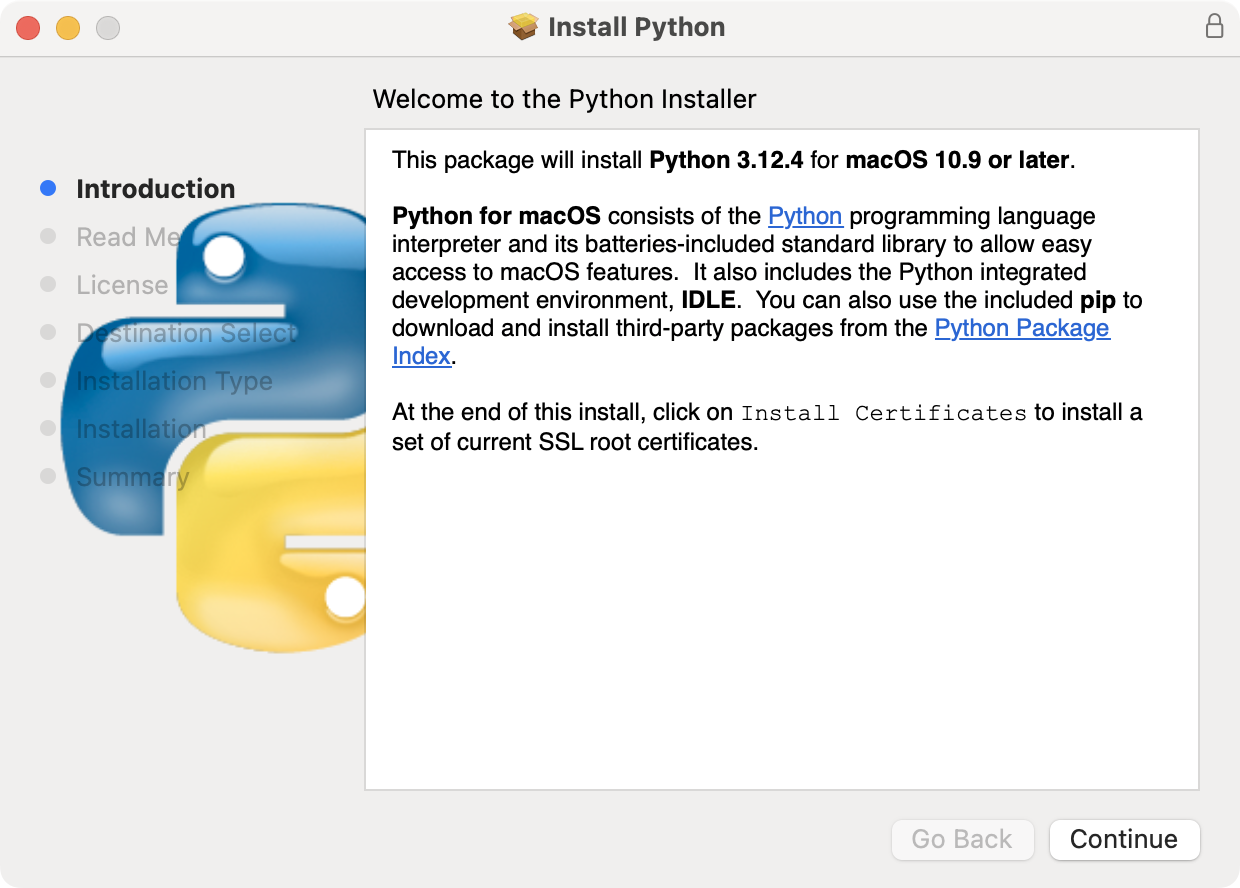
Downloading the Official Python Installer
Always download Python from the official source: python.org/downloads. This ensures you get legitimate, untampered versions, mitigating security risks and ensuring full functionality. Choose the latest stable release or the specific version required by your projects.
Executing the Installation on Different Operating Systems
The installation process is generally straightforward, but pay close attention to specific options.
Windows: The User-Friendly Installer and PATH Configuration
- Run the Installer: Double-click the downloaded
.exefile. - Crucial Step: “Add Python to PATH”: On the first screen of the installer, ensure you check the box that says “Add Python 3.x to PATH”. This is vital for using Python from the command prompt without specifying the full path. Failing to do this is a common source of post-installation headaches.
- Customize Installation (Optional but Recommended): Choose “Customize installation” to review components. Generally, leave all checked, especially
pipandIDLE. You can change the installation directory if you prefer, but the default is usually fine. - Complete Installation: Click “Install Now” and allow the process to finish.
- Disable PATH length limit (Optional): If prompted, click “Disable path length limit” to avoid issues with long file paths, especially in deeply nested project structures.
- Verify: Open a new Command Prompt or PowerShell window and type
python --versionandpip --version. You should see the newly installed Python version.
macOS: Official Installer vs. Homebrew for System Integrity
On macOS, you have two primary recommended methods for installing Python:
- Official Installer (python.org):
- Download the
.pkgfile. - Run the installer, which is a standard macOS wizard. Follow the prompts.
- The official installer usually places Python in
/Library/Frameworks/Python.framework/Versions/3.xand creates symlinks in/usr/local/bin. - Verify: Open a new Terminal and type
python3 --versionandpip3 --version.
- Download the
- Homebrew (Recommended for Developers): Homebrew is a package manager that simplifies software installation on macOS.
- Install Homebrew (if you don’t have it): Follow instructions on brew.sh.
- Install Python:
brew install python@3.x(e.g.,brew install python@3.10). Homebrew handles PATH configuration automatically for its installations. - Verify: Open a new Terminal and type
python3 --versionandpip3 --version. Homebrew installs Python such thatpython3points to the Homebrew version.
Linux: Package Managers or Compiling from Source for Control
- Using System Package Manager (Recommended for simplicity):
- This is the easiest way to get Python on Linux, but the version might not be the absolute latest.
- Debian/Ubuntu:
sudo apt update && sudo apt install python3.x python3-pip(replace3.xwith desired version, e.g.,python3.10). - CentOS/Fedora:
sudo dnf install python3.x python3-pip(orsudo yum install python3.x python3-pip). - Verify: Open a new Terminal and type
python3.x --versionandpip3.x --version.
- Compiling from Source (For specific needs or latest versions):
- This offers the most control but is more complex. Only do this if you have a specific reason (e.g., a very niche Python version not available via package manager, or performance tweaks).
- Download the source tarball from python.org.
- Extract:
tar -xf Python-3.x.x.tgz - Navigate:
cd Python-3.x.x - Configure:
./configure --enable-optimizations --with-ensurepip=install --prefix=/usr/local/python3.x(adjust prefix as desired). - Compile:
make -j $(nproc) - Install:
sudo make altinstall(usingaltinstallprevents overwriting system Python binaries). - Manually add
export PATH="/usr/local/python3.x/bin:$PATH"to your shell config file. - Verify: Open a new Terminal and type
python3.x --versionandpip3.x --version.
Post-Installation Best Practices and Verification
A successful installation is just the beginning. Setting up your environment correctly post-installation is crucial for long-term productivity and avoiding future conflicts.
Confirming Your New Python Installation and Pip
After installing Python, always verify its presence and functionality:
- Open a new terminal or command prompt.
- Type
python --version(Windows) orpython3 --version(macOS/Linux). It should display the version you just installed. - Type
pip --version(Windows) orpip3 --version(macOS/Linux). This confirmspip, Python’s package installer, is correctly set up. - Troubleshooting: If these commands don’t work, revisit your
PATHenvironment variables (Windows, Linux) or check~/.zshrc/.bashrc(macOS/Linux).
Setting Up Virtual Environments for Project Isolation
This is perhaps the single most important best practice for Python development. Virtual environments (often venv or conda) create isolated spaces for each project, meaning dependencies for one project do not interfere with another.
- Create a Project Directory:
mkdir my_awesome_project && cd my_awesome_project - Create a Virtual Environment:
python -m venv venv(Windows)python3 -m venv venv(macOS/Linux)- This creates a folder named
venvinside your project, containing a copy of the Python interpreter andpip.
- Activate the Virtual Environment:
.venvScriptsactivate(Windows PowerShell)venvScriptsactivate.bat(Windows Command Prompt)source venv/bin/activate(macOS/Linux)- Your terminal prompt will change, typically showing
(venv)prefix, indicating the environment is active.
- Install Project Dependencies:
- If you saved
requirements.txtearlier:pip install -r requirements.txt - Otherwise:
pip install package_name
- If you saved
- Deactivate: When you’re done with the project, type
deactivate.
Always activate your virtual environment before installing packages or running scripts for a specific project. This keeps your global Python installation clean and ensures project-specific dependencies are managed effectively.
Essential Tools and Further Steps for a Robust Development Environment
- Integrated Development Environment (IDE) or Code Editor:
- VS Code: Highly popular, lightweight, and extensible. Install the Python extension for excellent linting, debugging, and IntelliSense.
- PyCharm: A full-featured IDE specifically designed for Python, offering powerful debugging, testing, and web framework support.
- Version Managers (Optional but Powerful):
- For managing multiple global Python versions (e.g., 3.8, 3.9, 3.10) more easily, consider tools like
pyenv(macOS/Linux) orconda(cross-platform, also a package manager). These tools allow you to switch between Python versions system-wide or per-directory.
- For managing multiple global Python versions (e.g., 3.8, 3.9, 3.10) more easily, consider tools like
- Linters and Formatters: Integrate tools like
Flake8(linter) andBlackorisort(formatters) into your workflow to maintain code quality and consistency, aligning with professional “Brand” standards in software development. - Learning Resources: Continuously explore Python documentation, online tutorials, and communities. The “Tech” landscape evolves rapidly, and staying updated is key to leveraging new features and tools effectively.
By following these steps, you’ve not only performed a clean installation of Python but also established a robust and maintainable development environment. This investment in setup will pay dividends in productivity, fewer headaches, and a more enjoyable coding experience, empowering you to focus on building innovative applications and mastering the vast possibilities of Python.
aViewFromTheCave is a participant in the Amazon Services LLC Associates Program, an affiliate advertising program designed to provide a means for sites to earn advertising fees by advertising and linking to Amazon.com. Amazon, the Amazon logo, AmazonSupply, and the AmazonSupply logo are trademarks of Amazon.com, Inc. or its affiliates. As an Amazon Associate we earn affiliate commissions from qualifying purchases.