In an era defined by advanced technology and a relentless drive for personal safety, the humble reverse camera has transitioned from a luxury add-on to an essential vehicle feature. Whether you’re navigating tight city parking spaces, backing out of a busy driveway, or simply seeking an extra layer of protection for pedestrians and pets, a reverse camera offers unparalleled peace of mind. But for many, the primary question isn’t if they should get one, but how much it will cost to install. This article delves into the financial landscape of reverse camera installation, offering a detailed breakdown of costs, factors influencing prices, and how this investment aligns with the core principles of tech, branding, and smart money management.
Understanding Reverse Camera Systems: Technology Driving Safety
Before we discuss the price tag, it’s crucial to understand the technological landscape of reverse camera systems. The market offers a diverse range of options, each with varying levels of sophistication and, consequently, different price points. Understanding these distinctions is the first step in making an informed financial decision.
Types of Reverse Cameras: Wired vs. Wireless
The fundamental choice often boils down to wired versus wireless systems. Each has its own implications for installation complexity and overall cost.
- Wired Systems: These are generally considered more reliable due to a direct physical connection between the camera and the display unit. They transmit video signals consistently without interference, making them a robust choice for long-term use. However, the installation process involves running cables through the vehicle’s interior, which can be labor-intensive and contribute significantly to professional installation costs. From a tech perspective, wired systems offer superior signal integrity and often higher image quality, appealing to those who prioritize performance and digital security against signal drops.
- Wireless Systems: Offering a seemingly simpler installation, wireless cameras transmit signals via Wi-Fi or Bluetooth. This eliminates the need for extensive cable routing, potentially lowering labor costs for DIY enthusiasts. However, wireless systems can be susceptible to interference from other electronic devices or structural elements of the vehicle, sometimes leading to lag or signal dropouts. The tech consideration here revolves around the quality of the wireless module and the potential for latency, which can impact real-time awareness. While often cheaper upfront, long-term reliability might be a concern for some.
Display Options: Integrating into Your Vehicle’s Ecosystem
The way the camera’s feed is displayed is another critical factor influencing cost and system integration.
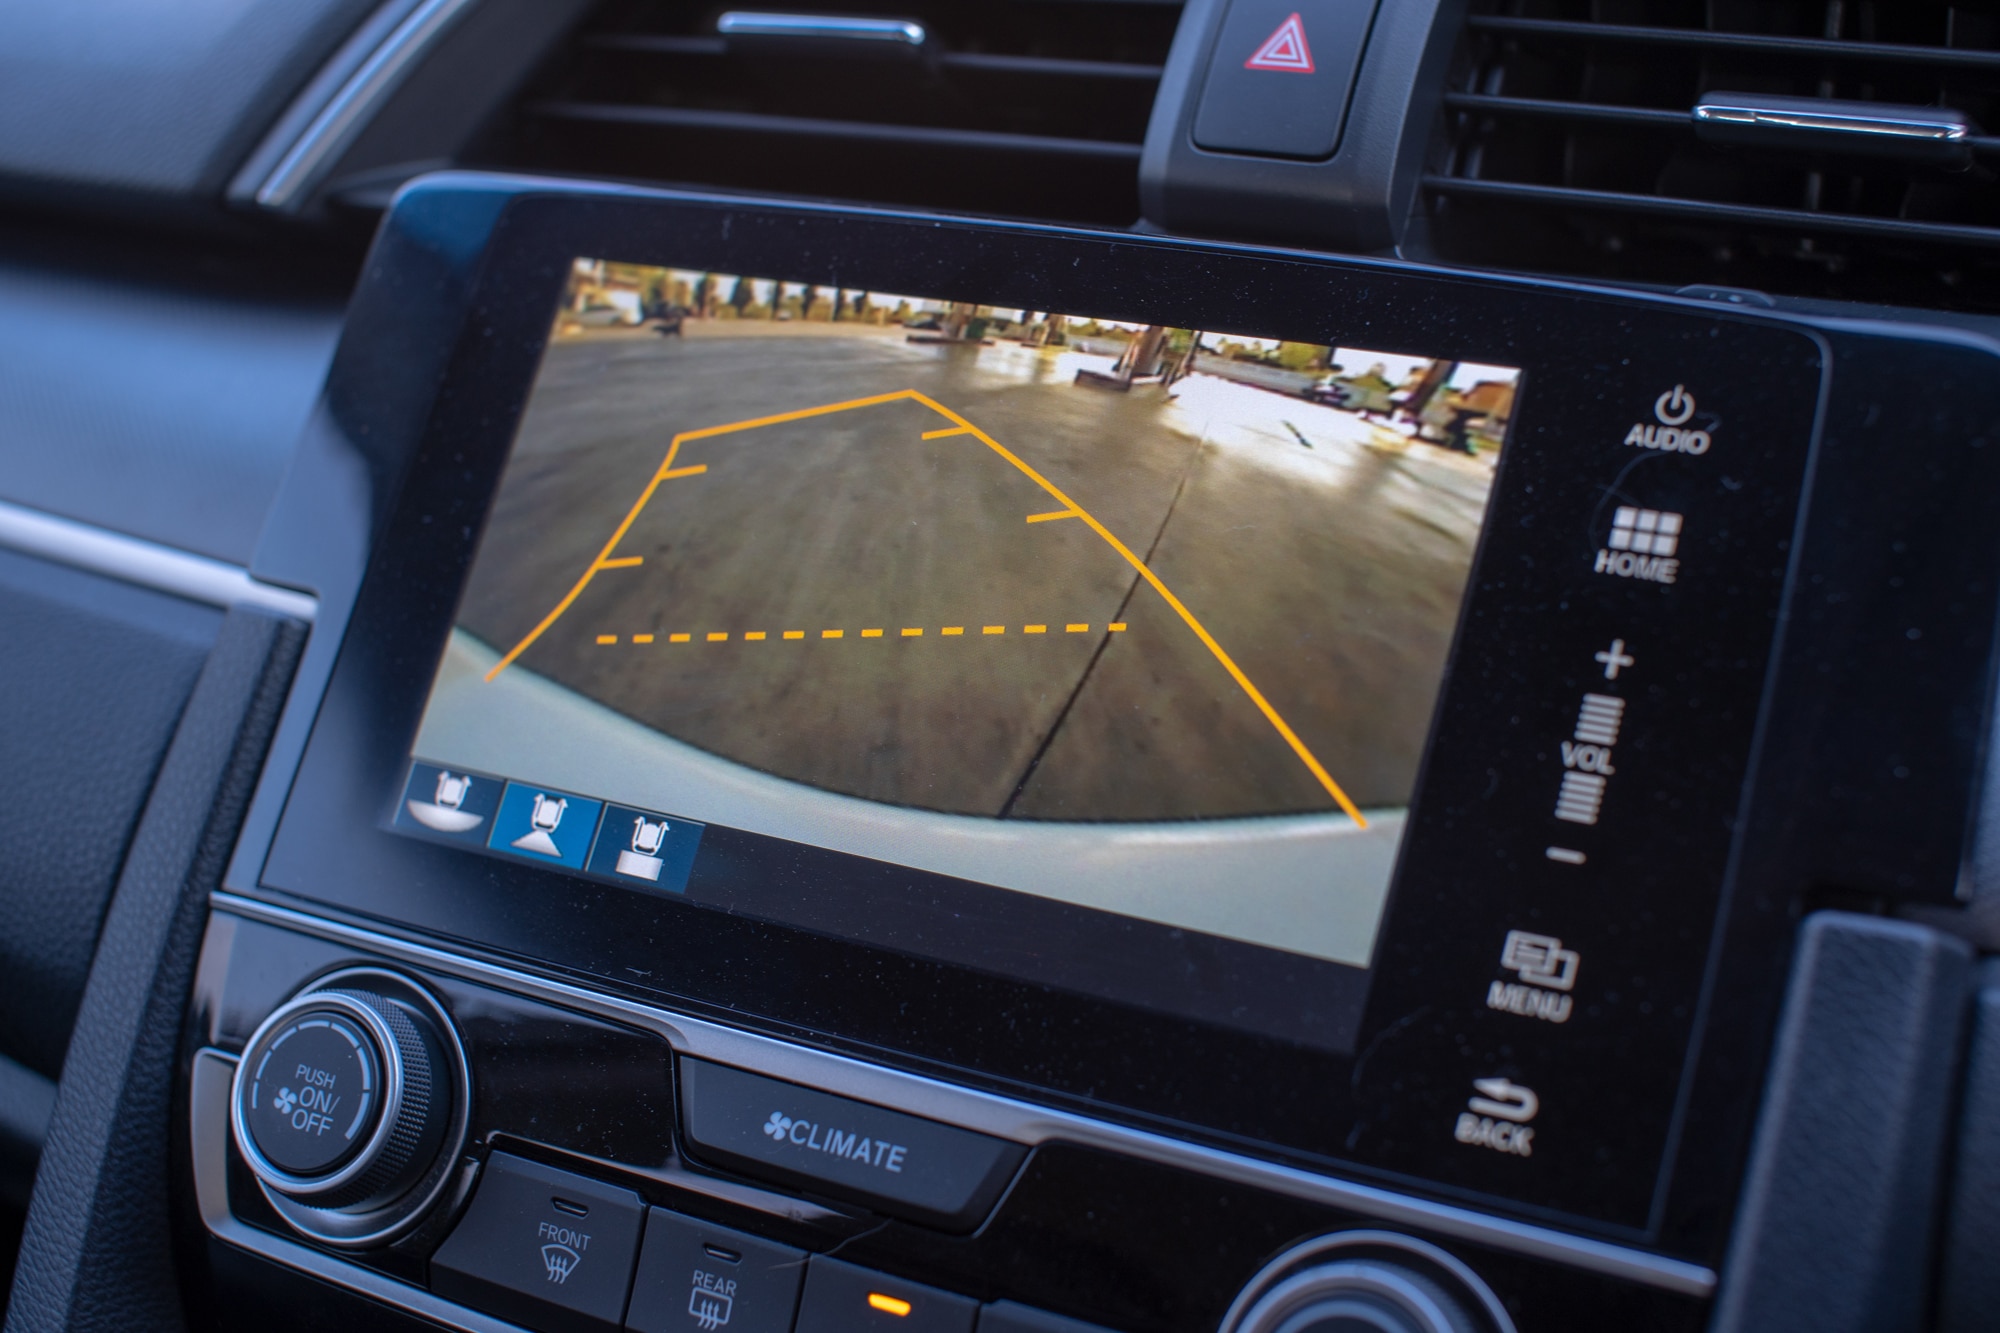
- Integrated Head Unit Displays: Many modern vehicles come with an infotainment system that can be adapted to display a reverse camera feed. If your car has an existing screen, an aftermarket camera can often be wired into it with the help of specific adapters or interfaces. This offers a clean, factory-like aesthetic, aligning with good brand presentation for your vehicle. However, the necessary adapters can add to the cost, and professional installation is often required to ensure seamless integration without compromising the vehicle’s existing electronics.
- Mirror Monitors: These clever devices replace your existing rearview mirror or clip over it, incorporating an LCD screen that appears when the car is in reverse. They are a popular aftermarket option as they don’t require adding a separate screen to the dashboard, maintaining a minimalist interior. From a tech standpoint, these are an elegant solution, but the quality of the mirror’s reflectivity and the screen’s brightness can vary.
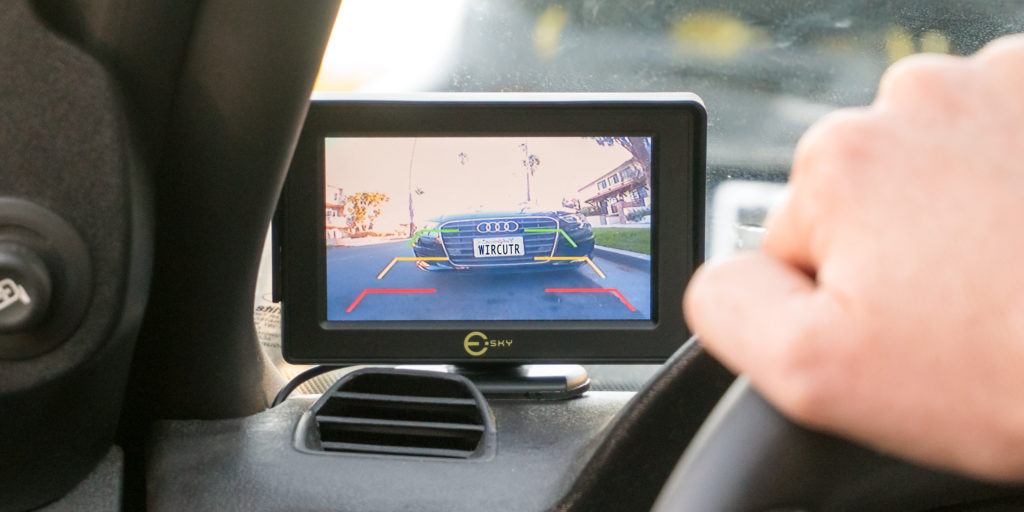
- Dash-Mounted Monitors: A standalone screen mounted on the dashboard is the most straightforward and often cheapest display option. These can range from small, discreet screens to larger, more prominent displays. While functional, they might not offer the same integrated feel as other options and can sometimes clutter the dashboard, which might detract from the vehicle’s brand aesthetic.
- Smartphone Integration: Some wireless cameras can connect directly to your smartphone via an app, turning your phone into the display. This is a very budget-friendly option for those comfortable using their phone for this purpose, aligning with the tech trend of leveraging existing smart devices.
Advanced Features: Beyond the Basic View
Modern reverse cameras offer more than just a rear view. Features like dynamic parking guidelines (which bend with your steering wheel), night vision capabilities, wide-angle lenses, and even multiple camera views (e.g., parking assist views) can significantly enhance functionality. These advanced tech features naturally come at a higher price point, but they can dramatically improve safety and convenience, offering a tangible return on investment in terms of accident prevention and reduced stress, aligning with a smart money perspective by mitigating potential repair costs.
The Cost Breakdown: Factors Influencing Installation Price
Understanding the various components that contribute to the total cost of installing a reverse camera is key to budgeting effectively. This section focuses on the money aspect, breaking down where your investment goes.
1. The Camera Unit Itself
The price of the reverse camera unit is the most variable factor.
- Basic Models ($20 – $80): These typically offer standard resolution, a fixed wide-angle view, and minimal features. They are functional but may lack advanced capabilities like night vision or dynamic guidelines.
- Mid-Range Models ($80 – $200): These often feature higher resolution, improved low-light performance, better build quality, and sometimes include static or basic dynamic parking lines. They strike a good balance between cost and functionality.
- Premium Models ($200 – $500+): At the higher end, you’ll find cameras with superior image sensors, true night vision, ultra-wide-angle lenses, dynamic parking lines, robust weatherproofing, and seamless integration capabilities (especially for specific vehicle models). These often come from reputable brands known for their durability and performance.
The choice here often depends on balancing your budget with your desire for advanced tech features and long-term reliability.
2. Vehicle Make, Model, and Complexity
The type of vehicle you own plays a significant role in the installation cost.
- Standard Vehicles: Sedans, hatchbacks, and many SUVs are relatively straightforward to work on. Wiring can be routed through existing channels with less difficulty.
- Luxury or Newer Vehicles: Cars with complex electrical systems, advanced driver-assistance features, or intricate interior paneling can significantly increase labor time. Integrating an aftermarket camera into an existing infotainment system often requires specialized interfaces and programming, which adds to both parts and labor costs. European brands like BMW, Mercedes, and Audi often fall into this category, where installation expertise commands a higher price.
- Trucks/Vans/RVs: Larger vehicles may require longer cable runs (for wired systems) and more robust, weather-resistant cameras, increasing both material and labor costs.
This factor highlights how vehicle brand and design directly impact the money you’ll spend on installation.
3. Installation Method: Professional vs. DIY
This is perhaps the biggest differentiator in the total cost.
- DIY Installation: If you possess the necessary tech skills, tools, and time, installing a reverse camera yourself can save you a substantial amount in labor costs. You’d only pay for the camera unit and any required adapters or wiring. However, this approach carries risks, including potential damage to your vehicle’s wiring or interior, improper functionality, or voiding parts of your vehicle’s warranty. It requires careful research and patience, aligning with a “productivity” mindset if you value your own time as an asset.
- Professional Installation: Opting for a professional installer means paying for their expertise, tools, and warranty on their work. Labor costs typically range from $75 to $300, but can go higher for complex vehicles or premium systems. The benefit is a clean, reliable, and guaranteed installation. This investment ensures your camera functions correctly and doesn’t interfere with other vehicle electronics, safeguarding your car’s brand integrity and avoiding costly future repairs, which is a smart money decision in the long run.
4. Labor Rates and Geographic Location
Labor costs vary significantly based on your geographical location and the reputation of the installation shop. Auto electricians and specialized car audio/accessory shops typically charge an hourly rate.
- Urban areas generally have higher labor costs than rural areas.
- Specialized shops with a strong brand reputation for quality work might charge more, but their expertise can be invaluable, especially for complex installations.
5. Additional Equipment and Hidden Costs
Don’t forget potential extra costs:
- Wiring Harnesses and Adapters: Especially for integrating with factory head units, specific harnesses or CAN-bus adapters might be necessary, adding $30 – $150+ to the overall price.
- Mounting Brackets: Some installations may require custom brackets.
- Sales Tax: Always account for this on parts and labor.
When considering the money aspect, always ask for a full, itemized quote to avoid surprises.
Professional Installation vs. DIY: A Detailed Look
The decision between a DIY project and professional service is a critical financial and practical one. Each path has distinct advantages and disadvantages that resonate with different priorities on our website’s themes.
The DIY Approach: Savings and Challenges
For individuals comfortable with automotive electronics and basic mechanics, a DIY installation can be a rewarding endeavor, offering significant money savings on labor.
- Pros:
- Cost Savings: The most obvious benefit is avoiding labor charges, which can be hundreds of dollars.
- Learning Experience: It’s an opportunity to learn more about your vehicle’s electrical system and interior components, aligning with a tech enthusiast’s curiosity.
- Flexibility: You can work at your own pace and schedule.
- Cons:
- Time Commitment: Even a “simple” installation can take several hours, especially for beginners. This is where productivity comes into play – is your time better spent elsewhere?
- Risk of Errors: Incorrect wiring can lead to blown fuses, damage to your vehicle’s electrical system, or non-functional camera. Poor routing can result in visible wires or damage to interior panels, affecting your car’s brand aesthetic.
- Required Tools: You might need specific tools (multimeter, wire strippers, trim removal tools) that you don’t already own, adding to the initial outlay.
- No Warranty on Labor: If something goes wrong, you’re responsible for troubleshooting and fixing it yourself.
From a money perspective, the upfront savings are attractive, but the potential for costly mistakes or wasted time should be weighed carefully.
Opting for Professional Service: Benefits and Investment
Hiring a professional installer, whether from a car audio shop, an auto electrician, or a dealership, offers peace of mind and expertise that many find well worth the investment.
- Pros:
- Expertise and Experience: Professionals have the knowledge and tools to handle complex wiring, integrate with existing systems, and ensure a clean, reliable installation. Their tech proficiency guarantees optimal performance.
- Time-Saving: The installation is completed efficiently, allowing you to focus on other productivity tasks.
- Warranty and Support: Most reputable installers offer a warranty on their labor, providing assurance in case of any issues. This protects your money investment.
- Clean and Integrated Look: Professionals excel at hiding wires and mounting components discreetly, preserving your vehicle’s interior aesthetic and its brand image.
- Reduced Risk: Minimized risk of damage to your vehicle’s electronics or interior panels.
While the money outlay is higher, the benefits of a professional job often outweigh the DIY risks, especially for those who value flawless integration and long-term reliability. It’s an investment in quality and peace of mind.
Beyond the Price Tag: The Value Proposition
While cost is a primary concern, it’s essential to look beyond the immediate expense and consider the long-term value and benefits a reverse camera provides. This touches on brand, money, and even digital security in a broader sense of protecting assets.
Enhanced Safety and Peace of Mind
This is the most significant benefit. Reverse cameras eliminate dangerous blind spots, significantly reducing the risk of backing into objects, other vehicles, or, most critically, pedestrians and small children. According to the National Highway Traffic Safety Administration (NHTSA), back-over accidents cause hundreds of fatalities and thousands of injuries annually. An investment in a reverse camera is an investment in human life and safety, which is an invaluable brand statement for any responsible driver. This also translates to money saved by avoiding insurance claims, increased premiums, and potential legal fees from accidents.
Protecting Your Investment (Vehicle)
Even minor fender benders can result in hundreds, if not thousands, of dollars in repair costs. A reverse camera helps you avoid these costly mishaps, preserving your vehicle’s pristine condition and its brand value. Preventing dents, scratches, and more severe damage translates directly into money saved on bodywork and higher potential resale value.
Potential Impact on Resale Value
While an aftermarket reverse camera might not drastically increase your car’s resale value, a professionally installed, high-quality system can certainly make your vehicle more appealing to prospective buyers, especially if the car didn’t come with one from the factory. It demonstrates that the vehicle has been cared for and enhanced with desirable tech features, potentially aiding in a quicker sale or fetching a slightly better price – a tangible money benefit.
Smart Buying and Installation Tips
Making a wise decision involves more than just comparing price tags. Here are some tips to ensure you get the best value for your money and a top-notch tech solution.
1. Research Products and Installers Thoroughly
- Read Reviews: Look for independent reviews of both camera units and installation shops. Websites like Amazon, Crutchfield, and local review platforms are invaluable. Pay attention to user experiences regarding image quality, durability, and installer professionalism.
- Check Compatibility: Ensure the camera system you choose is compatible with your specific vehicle make and model, especially if you’re integrating with an existing head unit. This is a crucial tech check.
- Installer Reputation: For professional installation, choose a shop with a strong brand reputation, certified technicians, and good customer service. Their expertise is paramount.
2. Get Multiple Quotes
Don’t settle for the first quote you receive. Contact several reputable installation shops and request detailed, itemized quotes. Compare not just the total price but also what’s included (parts, labor, warranty). This money management strategy ensures you find the best value.
3. Consider Long-Term Value and Warranty
Sometimes, spending a little more upfront for a higher-quality camera or professional installation can save you money in the long run by preventing failures, costly repairs, or even accidents. A product or service with a solid warranty provides peace of mind and protection for your investment.
4. Ask About Integration and Future Upgrades
If you’re integrating with your car’s existing infotainment system, discuss how this might affect future tech upgrades or diagnostics. A good installer should be able to explain the process and any potential limitations.

Conclusion: An Investment in Safety and Smart Technology
The cost of installing a reverse camera typically ranges from $100 to $600+, depending on the camera type, vehicle complexity, and whether you opt for DIY or professional installation. While this represents a financial outlay, it’s an investment that aligns perfectly with the principles of smart money management, leveraging cutting-edge tech for enhanced safety, and bolstering the brand integrity of your vehicle and your driving habits.
In an increasingly crowded world, the ability to reverse safely and confidently is a necessity. By carefully considering your options, researching products, and choosing the right installation method, you can equip your vehicle with this indispensable safety feature without breaking the bank. It’s an investment that pays dividends in peace of mind, accident prevention, and the long-term preservation of your most valuable assets – your vehicle and, more importantly, human lives.
aViewFromTheCave is a participant in the Amazon Services LLC Associates Program, an affiliate advertising program designed to provide a means for sites to earn advertising fees by advertising and linking to Amazon.com. Amazon, the Amazon logo, AmazonSupply, and the AmazonSupply logo are trademarks of Amazon.com, Inc. or its affiliates. As an Amazon Associate we earn affiliate commissions from qualifying purchases.