For many homeowners and businesses considering a shift to renewable energy, one of the most pressing questions isn’t just “how much do solar panels cost?” but “how long will it actually take to get them installed?” The appeal of harnessing the sun’s power, reducing electricity bills, and contributing to a greener planet is strong, but the prospect of a lengthy, complicated installation process can be daunting.
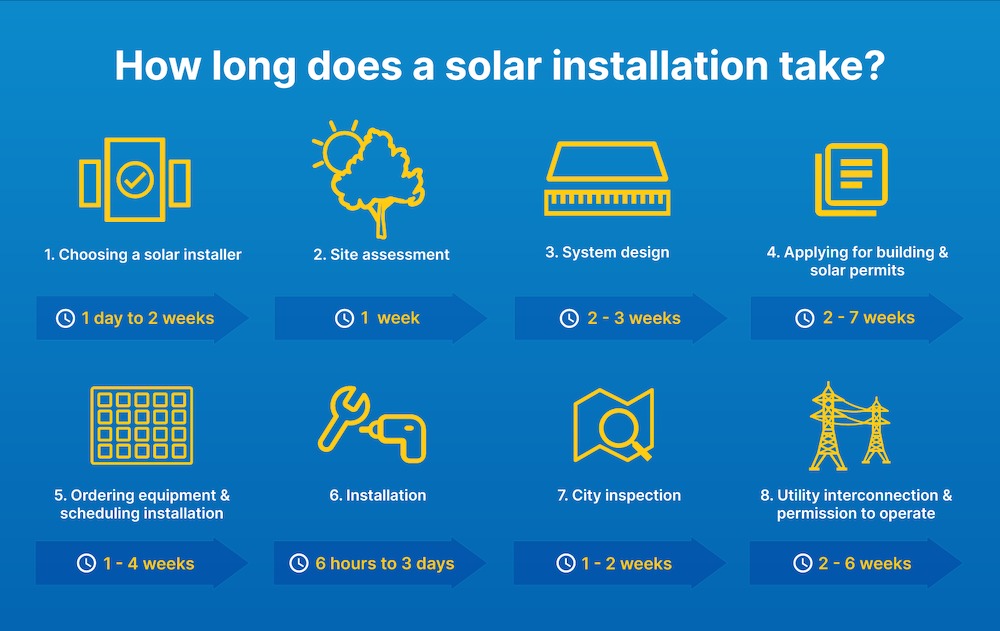
The short answer is surprisingly nuanced: the physical installation of solar panels on your roof typically takes a mere 1 to 3 days for most residential systems. However, this is just the tip of the iceberg. The entire journey from your initial inquiry to flipping the switch and enjoying clean, free electricity can span anywhere from 4 weeks to 3 months, or even longer, depending on a myriad of factors. This comprehensive guide will break down each phase of the solar installation timeline, offering insights into what to expect and how to navigate the process efficiently, integrating perspectives on technology, financial implications, and even the strategic considerations of such a home improvement.
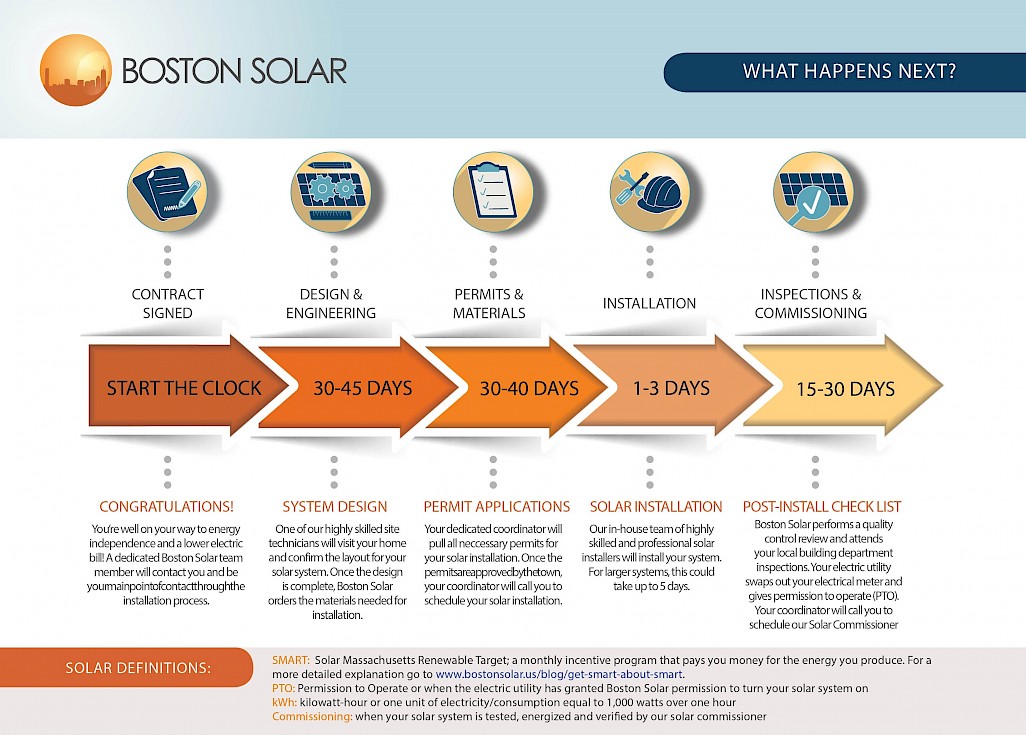
The Full Solar Journey: A Phased Breakdown of the Installation Process
Understanding the complete timeline for solar panel installation requires looking beyond just the manual labor on your roof. The process is best viewed as a multi-stage project, each with its own specific time demands and potential bottlenecks.
Phase 1: The Pre-Installation Gauntlet – Planning, Permits, and Preparation (2-12 Weeks)
This initial phase is arguably the most crucial and often the longest. It’s where all the groundwork is laid, ensuring your system is perfectly designed, legally compliant, and financially sound. Skipping or rushing through any of these steps can lead to significant delays and complications down the line.
Initial Consultation and Site Assessment (1-2 Weeks)
Your solar journey typically begins with a consultation. An experienced solar installer will visit your property to conduct a thorough site assessment. This isn’t just about looking at your roof; it involves a detailed analysis of several critical factors:
- Sun Exposure: Using specialized tools, the installer will evaluate your roof’s angle, orientation, and any potential shading issues from trees, chimneys, or neighboring buildings throughout the day and year. This data is crucial for accurately predicting your system’s energy production.
- Roof Condition and Structure: They’ll inspect the integrity of your roof, its age, material, and structural capacity to ensure it can safely support the weight of the solar panels and racking system. Any necessary roof repairs or upgrades must be addressed before installation can begin, which can add significant time and cost.
- Energy Consumption Analysis: The installer will review your past electricity bills to understand your average energy usage patterns. This helps in designing a system that meets your specific energy needs, avoiding both undersizing (leaving you reliant on grid power) and oversizing (an unnecessary expense).
- Electrical Panel Assessment: They will check your current electrical panel to ensure it has enough capacity for the new solar system. Upgrades to your main service panel might be required, especially in older homes, adding another layer of complexity and potential delay.
Based on this assessment, the installer will provide a detailed proposal, outlining system size, estimated production, equipment recommendations (panels, inverters, battery storage if applicable), and a preliminary cost estimate. This early stage also touches upon the “Tech” aspect of our website’s focus, as installers leverage advanced software for solar modeling and energy simulations to provide precise recommendations.
System Design and Proposal Finalization (1-2 Weeks)
Once you’ve decided to move forward with a particular installer, their engineering team will get to work designing your custom solar power system. This involves:
- Detailed CAD Drawings: Creating precise blueprints that show the exact placement of panels, wiring routes, inverter location, and connection to your home’s electrical system. These designs must comply with local building codes and electrical standards.
- Energy Production Modeling: Using sophisticated software, they’ll model the expected energy output of your system over its lifetime, taking into account seasonal variations and potential degradation. This helps in calculating your potential savings and return on investment – a key “Money” consideration.
- Equipment Specification: Finalizing the specific brands and models of solar panels, inverters (string, micro-inverters, or power optimizers), and mounting hardware. High-quality, efficient technology often translates to better long-term performance and reliability.
This is also when the contract is drawn up, detailing the scope of work, warranty information, payment schedule, and project timeline. Careful review of this document is paramount.
Financing and Incentives (1-3 Weeks)
Securing financing is a critical step for many homeowners. Options typically include cash purchase, solar loans, leases, or Power Purchase Agreements (PPAs). Each has different implications for ownership, savings, and eligibility for incentives. Navigating these financial tools requires careful consideration, aligning with the “Money” topic.
Concurrently, your installer will help you identify and apply for various solar incentives, which can significantly reduce the net cost of your system. These often include:
- Federal Solar Tax Credit (ITC): A significant credit that allows you to deduct a percentage of the cost of your solar system from your federal taxes.
- State and Local Rebates: Many states and municipalities offer their own incentives, grants, or property tax exemptions for solar installations.
- Net Metering Programs: This allows you to sell excess electricity generated by your panels back to the grid, often at retail rates, further offsetting your electricity bills. Understanding the intricacies of net metering is vital for maximizing your financial return.
The application process for loans and incentives can take a few weeks, depending on the responsiveness of financial institutions and government agencies.
Permitting and Utility Interconnection (2-8+ Weeks)
This is frequently the most time-consuming phase and the most common source of delays. Solar installations require approval from multiple authorities:
- Local Building Permits: Your city or county building department must review and approve your solar system’s design to ensure it meets safety and structural codes. The time for this can vary dramatically, from a few days in solar-friendly municipalities to several weeks or even months in others.
- Homeowners Association (HOA) Approval: If you live in an HOA-governed community, you’ll need to submit your plans for their approval. This can add another layer of review and potential delays, as HOAs often have specific aesthetic requirements or restrictions.
- Utility Interconnection Agreement: Before your system can be connected to the grid and start generating electricity, your local utility company must approve the plans and agree to interconnect your system. This involves a separate application process and can take several weeks for their engineering teams to review.
An experienced installer will have dedicated staff to manage this complex paperwork and liaison with various departments, often streamlining the process. However, external factors like slow bureaucratic processes or unexpected requests for additional information can still lead to frustrating hold-ups. This entire permitting process is a significant factor in the perceived “Brand” of an installer; efficient permit handling reflects positively on their professionalism and customer service.
Equipment Procurement and Delivery (1-4 Weeks)
Once all permits are approved, your installer will order the necessary equipment. While reputable installers often have established supply chains, lead times for specific panels, inverters, or battery storage solutions can vary. Global supply chain issues, peak demand periods, or choosing niche technologies can extend this waiting period. The quality and availability of “Tech” components play a direct role here.
Phase 2: The Physical Installation – Mounting and Wiring (1-3 Days)
After weeks or months of planning and approvals, this is the moment many homeowners eagerly anticipate. The actual hands-on work of installing the solar panels is remarkably quick and efficient, especially with a well-prepared crew.
Site Preparation and Safety Measures (Half-Day)
On the first day, the installation crew will arrive, set up safety equipment (scaffolding, harnesses), and prepare the work area. They’ll protect landscaping and ensure a safe environment for both workers and residents.
Racking System Installation (1 Day)
The crew will first install the racking system onto your roof. This involves:
- Flashing and Mounts: Attaching waterproof flashing and mounts directly to the roof rafters. This ensures the system is securely anchored and prevents water leaks.
- Rails: Connecting the horizontal or vertical rails to the mounts, which will hold the solar panels in place. Precision is key here to ensure the array is perfectly aligned and robust.
Panel Placement and Wiring (1-2 Days)
With the racking system in place, the solar panels are carefully lifted onto the roof and secured to the rails. This is followed by the electrical wiring:
- DC Wiring: Connecting the individual solar panels together in series or parallel, creating a direct current (DC) circuit.
- Inverter Installation: Installing the inverter (or micro-inverters/power optimizers) which converts the DC electricity generated by the panels into alternating current (AC) electricity, suitable for home use and the grid. This component is the brain of your solar “Tech” system.
- AC Wiring and Electrical Tie-in: Connecting the inverter to your home’s main electrical panel and, if necessary, upgrading your panel or meter. This requires a licensed electrician to ensure all connections meet stringent safety and electrical codes.
System Testing (Half-Day)
Once all components are installed and wired, the crew will conduct initial tests to ensure the system is functioning correctly, producing power as expected, and that there are no faults or issues.
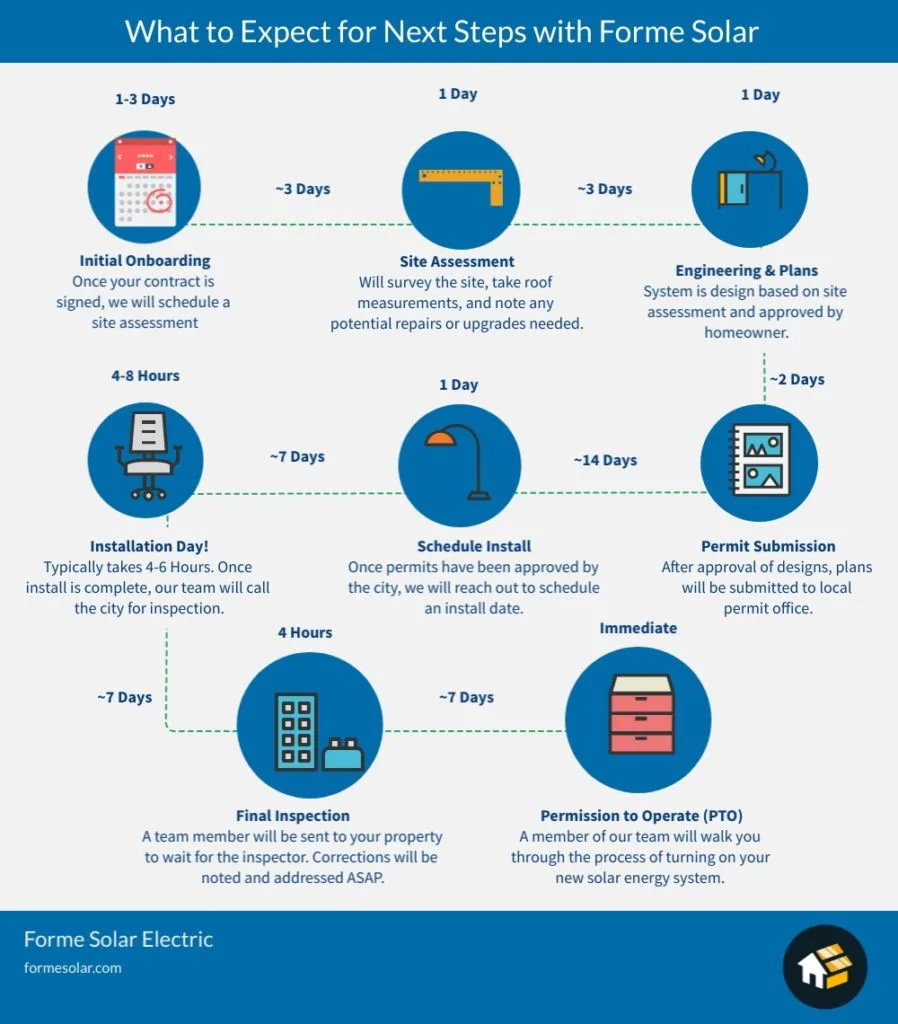
Phase 3: Post-Installation and Activation – The Final Hurdles (1-4 Weeks)
Even after the physical installation is complete, there are a few more steps before you can officially start generating your own electricity.
Final Inspections (1-3 Weeks)
- Local Building Department Inspection: A city or county inspector will visit your home to verify that the installation complies with all approved plans, building codes, and safety regulations. They’ll check the structural integrity, electrical wiring, and overall safety of the system.
- Utility Company Inspection: After the municipal inspection, the utility company will conduct its own final inspection. This is to ensure the system meets their specific requirements for grid interconnection and net metering. They will often install a new net meter or reprogram your existing one to accurately measure both the electricity you draw from and send back to the grid.
Permission to Operate (PTO) and System Activation (1-2 Weeks)
Once both the local building department and the utility company have given their final approval, the utility company will issue a “Permission to Operate” (PTO) notice. This is the green light you’ve been waiting for!
Upon receiving PTO, your solar installer will typically come back for a brief visit to formally activate your system, show you how to monitor its performance (often via a smartphone app, leveraging modern “Tech”), and answer any final questions. Finally, you can flip the switch and start enjoying the benefits of solar energy.
Factors That Significantly Influence the Timeline
While the average timeline serves as a good benchmark, several variables can either accelerate or delay your solar panel installation:
- Location and Local Regulations: This is arguably the biggest factor. Some municipalities have streamlined permitting processes and dedicated solar departments, while others are slower or have more complex requirements. Proximity to solar-friendly regions can significantly cut down permit wait times.
- System Size and Complexity: A larger system with more panels, or one that includes battery storage or requires extensive electrical upgrades, will inherently take longer to design, permit, and install than a smaller, simpler array. Ground-mounted systems also add complexity compared to standard roof mounts.
- Installer Efficiency and Experience: A reputable, experienced installer with strong relationships with local permit offices and utilities can navigate the bureaucratic hurdles much more efficiently. Their scheduling, paperwork handling, and project management skills directly impact your timeline. This is where the “Brand” reputation of the installer truly shines.
- Homeowner Responsiveness: Delays can occur if homeowners are slow to provide necessary documents, sign contracts, or respond to requests for information from the installer or authorities.
- Utility Company Responsiveness: The speed at which your local utility company processes interconnection applications and conducts inspections can vary greatly. Some utilities are notoriously slow, which is often beyond the installer’s control.
- Weather Conditions: Inclement weather (heavy rain, snow, extreme heat, high winds) can halt or delay physical installation for safety reasons.
- Supply Chain Issues: While usually minimal for standard components, specific panel types, inverters, or battery systems can occasionally face manufacturing or shipping delays.
Maximizing Efficiency: Tips for a Smoother Solar Installation
To ensure your solar journey is as swift and stress-free as possible, consider these proactive steps:
- Choose a Reputable Installer: Research local solar companies thoroughly. Look for installers with strong reviews, clear communication, a track record of timely project completion, and expertise in handling local permits and regulations. Their “Brand” image and operational efficiency are key.
- Be Prepared with Documents: Have copies of your electricity bills, property deeds, and any HOA documents readily available.
- Understand Your Contract: Read all agreements carefully, including payment schedules, warranty details, and estimated timelines. Don’t hesitate to ask questions.
- Stay Engaged: While your installer handles much of the heavy lifting, staying in communication and promptly responding to requests for information can prevent unnecessary delays.
- Ask About Expected Timelines: During your initial consultation, ask your installer for a realistic breakdown of the specific timeline for each phase, tailored to your location and system.
- Consider Financing Early: If you plan to finance your system, begin exploring options and applying for loans early in the process. This aligns directly with prudent “Money” management.
Conclusion: The Investment in Time Pays Off
While the physical installation of solar panels is remarkably quick, the complete process, from initial consultation to flipping the switch, is a multi-stage endeavor that typically spans 1 to 3 months. This timeframe is largely dictated by the essential pre-installation phases, particularly permitting and utility approvals, which are critical for ensuring a safe, compliant, and efficient solar power system.
Understanding each step and the factors that influence its duration empowers you to navigate the process with confidence. Despite the administrative lead time, the long-term benefits – substantial “Money” savings on electricity bills, increased home value, energy independence, and a positive environmental impact through sustainable “Tech” – overwhelmingly justify the investment in time. By partnering with a reputable solar “Brand” and staying proactively involved, you’ll soon be enjoying the abundant power of the sun from your own rooftop.
aViewFromTheCave is a participant in the Amazon Services LLC Associates Program, an affiliate advertising program designed to provide a means for sites to earn advertising fees by advertising and linking to Amazon.com. Amazon, the Amazon logo, AmazonSupply, and the AmazonSupply logo are trademarks of Amazon.com, Inc. or its affiliates. As an Amazon Associate we earn affiliate commissions from qualifying purchases.