The Central Processing Unit (CPU) is unequivocally the “brain” of any computer system, dictating its overall speed, responsiveness, and capability. Whether you’re assembling a brand-new PC from scratch, upgrading an aging system for better performance, or replacing a faulty chip, understanding how to properly install a CPU is a fundamental skill for any tech enthusiast. This guide will walk you through every critical step, transforming a potentially daunting task into a rewarding exercise in precision and patience. By the end, you’ll not only have successfully installed your CPU but also gained a deeper appreciation for the intricate world of computer hardware, connecting directly to the core “Tech” principles that power our digital lives.
Embracing the DIY approach to PC building or upgrades offers numerous advantages. Beyond the significant “Money” savings compared to pre-built systems or professional services, it provides an invaluable learning experience. You’ll gain firsthand knowledge of how components interact, enhancing your “Brand” as a knowledgeable tech individual capable of troubleshooting and optimizing your own machines. This skill empowers you to make informed decisions about future upgrades and maintenance, ensuring your digital workspace remains productive and efficient for years to come.
Essential Preparations: Setting the Stage for Success
Before you even think about touching your precious new CPU or motherboard, meticulous preparation is key. This initial phase minimizes risks, prevents costly errors, and ensures a smooth installation process. Think of it as laying the groundwork for a high-performance system – without it, even the most advanced components can falter.
Gathering Your Arsenal: Tools and Components
Having the right tools and components at your fingertips is paramount. Interrupting the installation process to hunt for a screwdriver or a crucial piece of hardware can lead to frustration and potential mistakes.
- The CPU: Your brand-new processor. Ensure it’s the correct model for your intended use (e.g., Intel Core i7, AMD Ryzen 7).
- The Motherboard: The backbone of your system. Make sure its CPU socket type matches your processor.
- CPU Cooler: Essential for dissipating the heat generated by the CPU. This could be a stock cooler, an aftermarket air cooler, or an All-in-One (AIO) liquid cooler. Most aftermarket coolers come with pre-applied or a tube of thermal paste.
- Thermal Paste (Thermal Interface Material – TIM): If your cooler doesn’t have pre-applied paste or if you’re reusing an old cooler, a high-quality thermal paste is crucial for efficient heat transfer.
- Screwdriver: Typically a Phillips head screwdriver (sizes #1 and #2 are most common) for mounting the cooler and potentially other components.
- Anti-Static Wrist Strap or Mat: Absolutely essential for preventing Electrostatic Discharge (ESD), which can permanently damage sensitive components.
- Rubbing Alcohol (Isopropyl Alcohol ≥90%) and Lint-Free Cloths: For cleaning old thermal paste if you’re reusing a cooler or need to reapply.
- Motherboard and CPU Manuals: These contain specific instructions for your particular models, including socket diagrams and cooler mounting procedures. Always refer to them for precise details.
- A Clean, Well-Lit Workspace: A stable, non-conductive surface (like a wooden table) free from clutter is ideal. Good lighting helps you see small details and prevents alignment errors.
The Critical Compatibility Check
One of the most frequent pitfalls in PC building is component incompatibility. A mismatched CPU and motherboard can render your entire system unusable and lead to frustrating returns or exchanges. This step is a direct application of “Tech” knowledge and can save you considerable “Money” in the long run.
- CPU Socket Type: This is the most critical factor. Intel uses LGA (Land Grid Array) sockets (e.g., LGA1700, LGA1200), where pins are on the motherboard. AMD primarily uses PGA (Pin Grid Array) for older chips (AM4) and LGA for newer ones (AM5), where pins are on the CPU (PGA) or motherboard (LGA). Your CPU and motherboard must share the same socket type and generation.
- Chipset Compatibility: Beyond the socket, the motherboard’s chipset (e.g., Intel Z790, AMD B650) must support your CPU generation. Newer CPUs often require newer chipsets. Check the motherboard manufacturer’s website for a CPU compatibility list.
- RAM Type and Speed: While not directly for CPU installation, ensure your motherboard supports the RAM you intend to use (DDR4 vs. DDR5) and that the CPU supports its advertised speeds.
- CPU Cooler Clearance and TDP: Ensure your chosen cooler fits within your PC case and doesn’t obstruct RAM slots. Also, verify that its Thermal Design Power (TDP) rating is sufficient to cool your CPU effectively, especially if you plan on overclocking.
- BIOS Version: For newer CPUs being installed on older motherboards (even if the socket is compatible), a BIOS update might be required. This can be tricky if you don’t have an older, compatible CPU to perform the update. Check the motherboard’s QVL (Qualified Vendor List) and CPU support page.
Safety First: Protecting Your Investment
Handling delicate electronic components requires caution. A single static discharge or careless movement can damage your hardware, turning your exciting project into an expensive headache. Prioritizing safety is a crucial aspect of “Digital Security” in a physical sense, preventing the destruction of your foundational hardware.
- Electrostatic Discharge (ESD) Prevention: This is paramount. Always wear an anti-static wrist strap, connected to a grounded metal object (like a bare metal part of your PC case or a grounded outlet screw, if using a proper adapter). Alternatively, work on an anti-static mat. Periodically touch a grounded metal object to discharge any static buildup. Avoid carpeted floors.
- Work on a Clean, Non-Conductive Surface: Dust and debris can short-circuit components, and a conductive surface can create unintended electrical pathways.
- Handle Components Gently: Avoid touching the gold contacts on the CPU or the pins in the motherboard socket. Hold the CPU by its edges. Never force components into place. If something doesn’t fit, recheck your alignment and compatibility.
- Read the Manuals: Seriously, every motherboard and CPU combination can have subtle differences. The manuals are your authoritative source for specific details.
The Installation Process: Step-by-Step Mastery
With preparations complete and safety precautions in place, it’s time for the main event: installing the CPU. This section details the precise steps, emphasizing careful execution to ensure your CPU is seated correctly and ready to perform.
Unveiling the Socket: Motherboard Preparation
Start by giving your motherboard adequate space to work with.
- Place the Motherboard: Carefully place your motherboard on its anti-static bag (non-conductive side down) or an anti-static mat, on your clean workspace. This protects the underside from scratches or static.
- Locate the CPU Socket: This is the square or rectangular area, usually covered by a plastic protective cap, near the center of the motherboard.
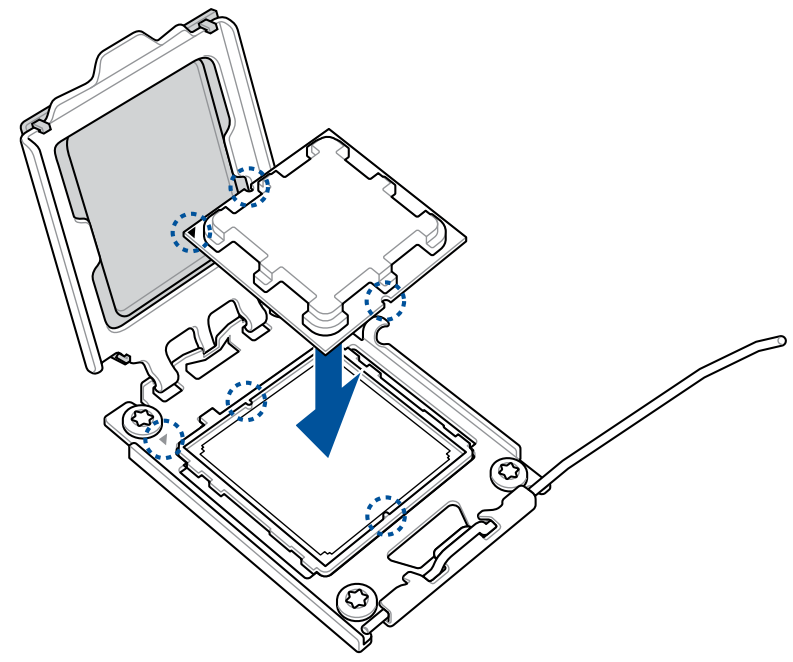
- Open the Retention Mechanism: Most modern sockets have a metal retention arm or lever on the side. Gently push it down and outward to release it, then lift it fully. For Intel LGA sockets, this will also raise a metal load plate that covers the socket pins. Carefully lift this plate.
- Remove the Protective Cap: The plastic cap will likely pop off when the load plate is lifted. Set it aside; you might need it if you ever have to return the motherboard. Do not touch the pins within the socket.
Seating the CPU: Precision and Care
This is the most delicate step. Precision is key; never apply force.
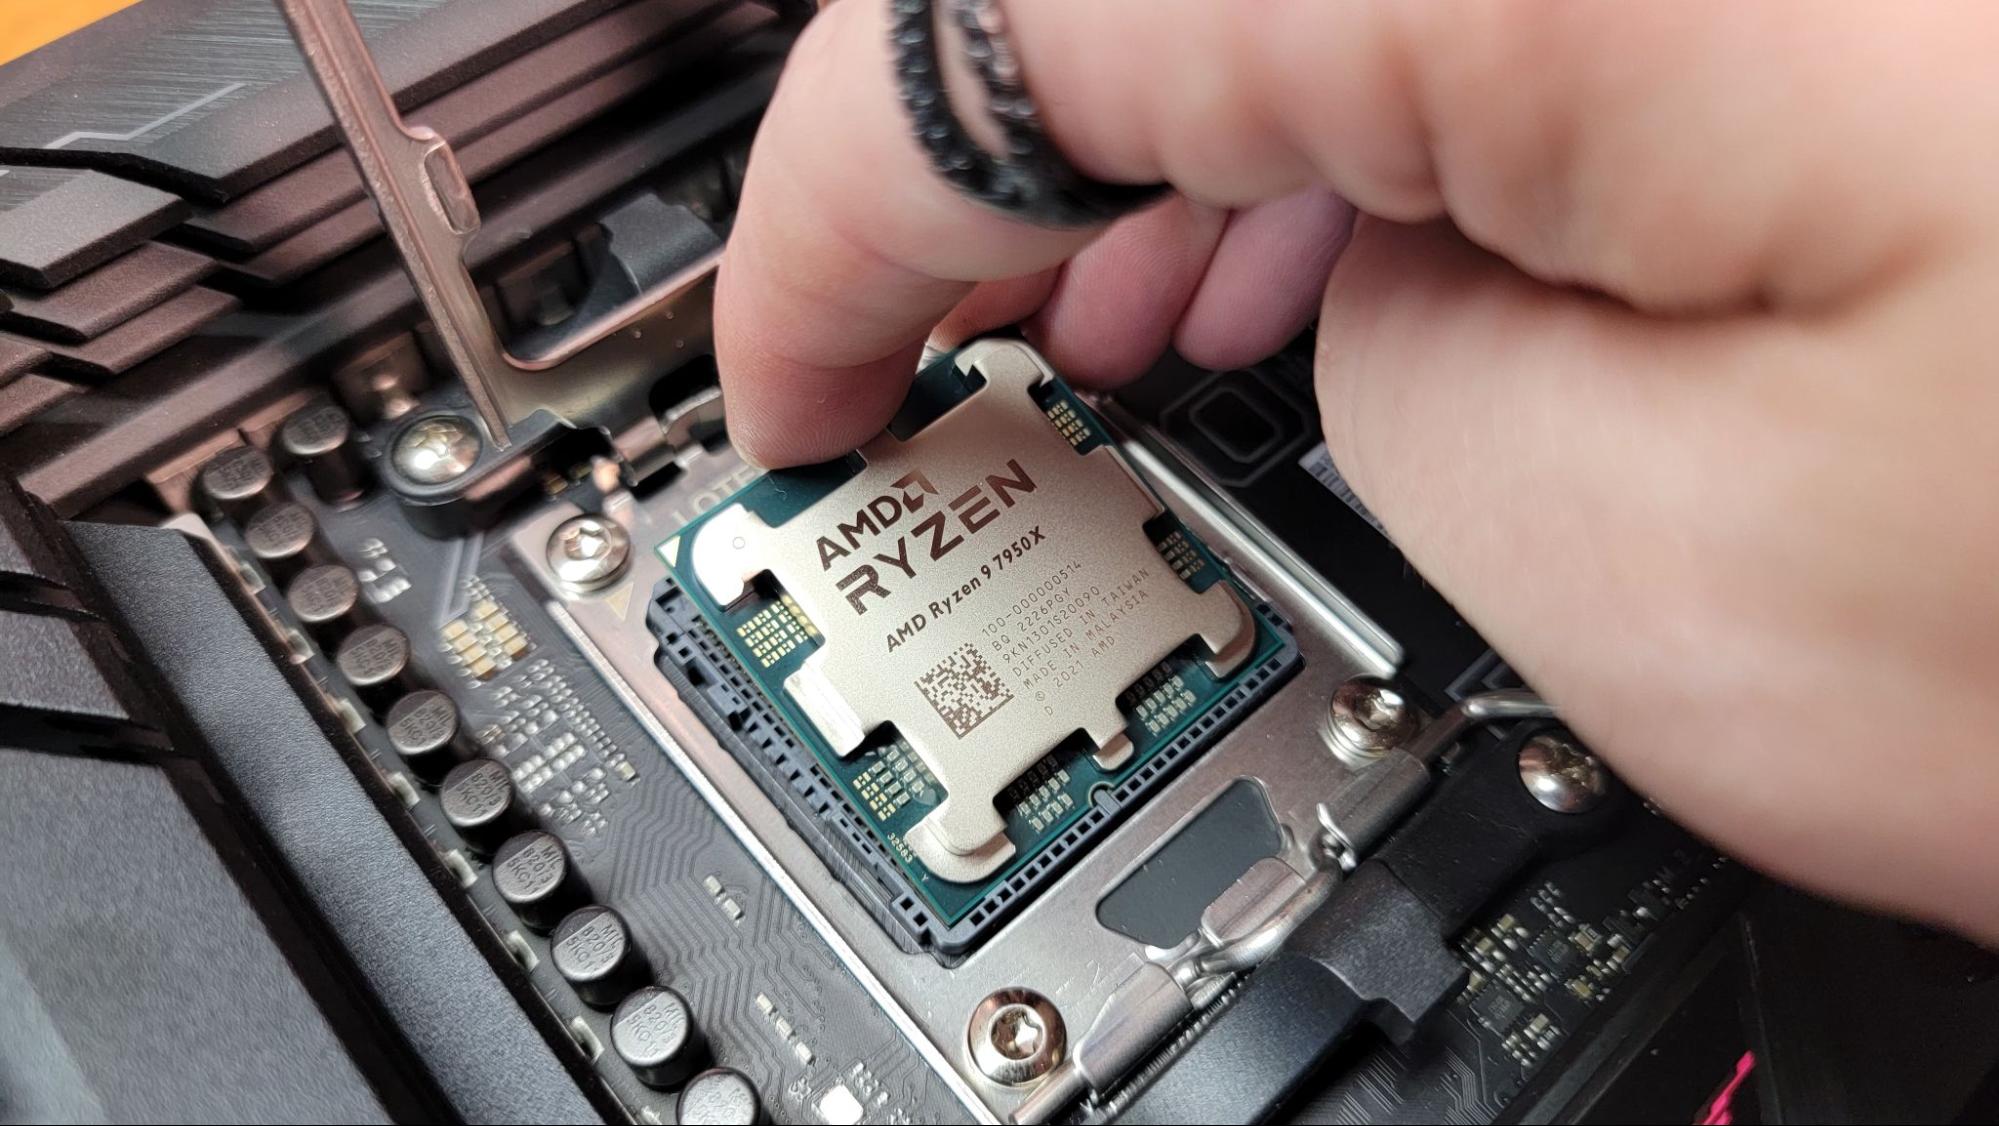
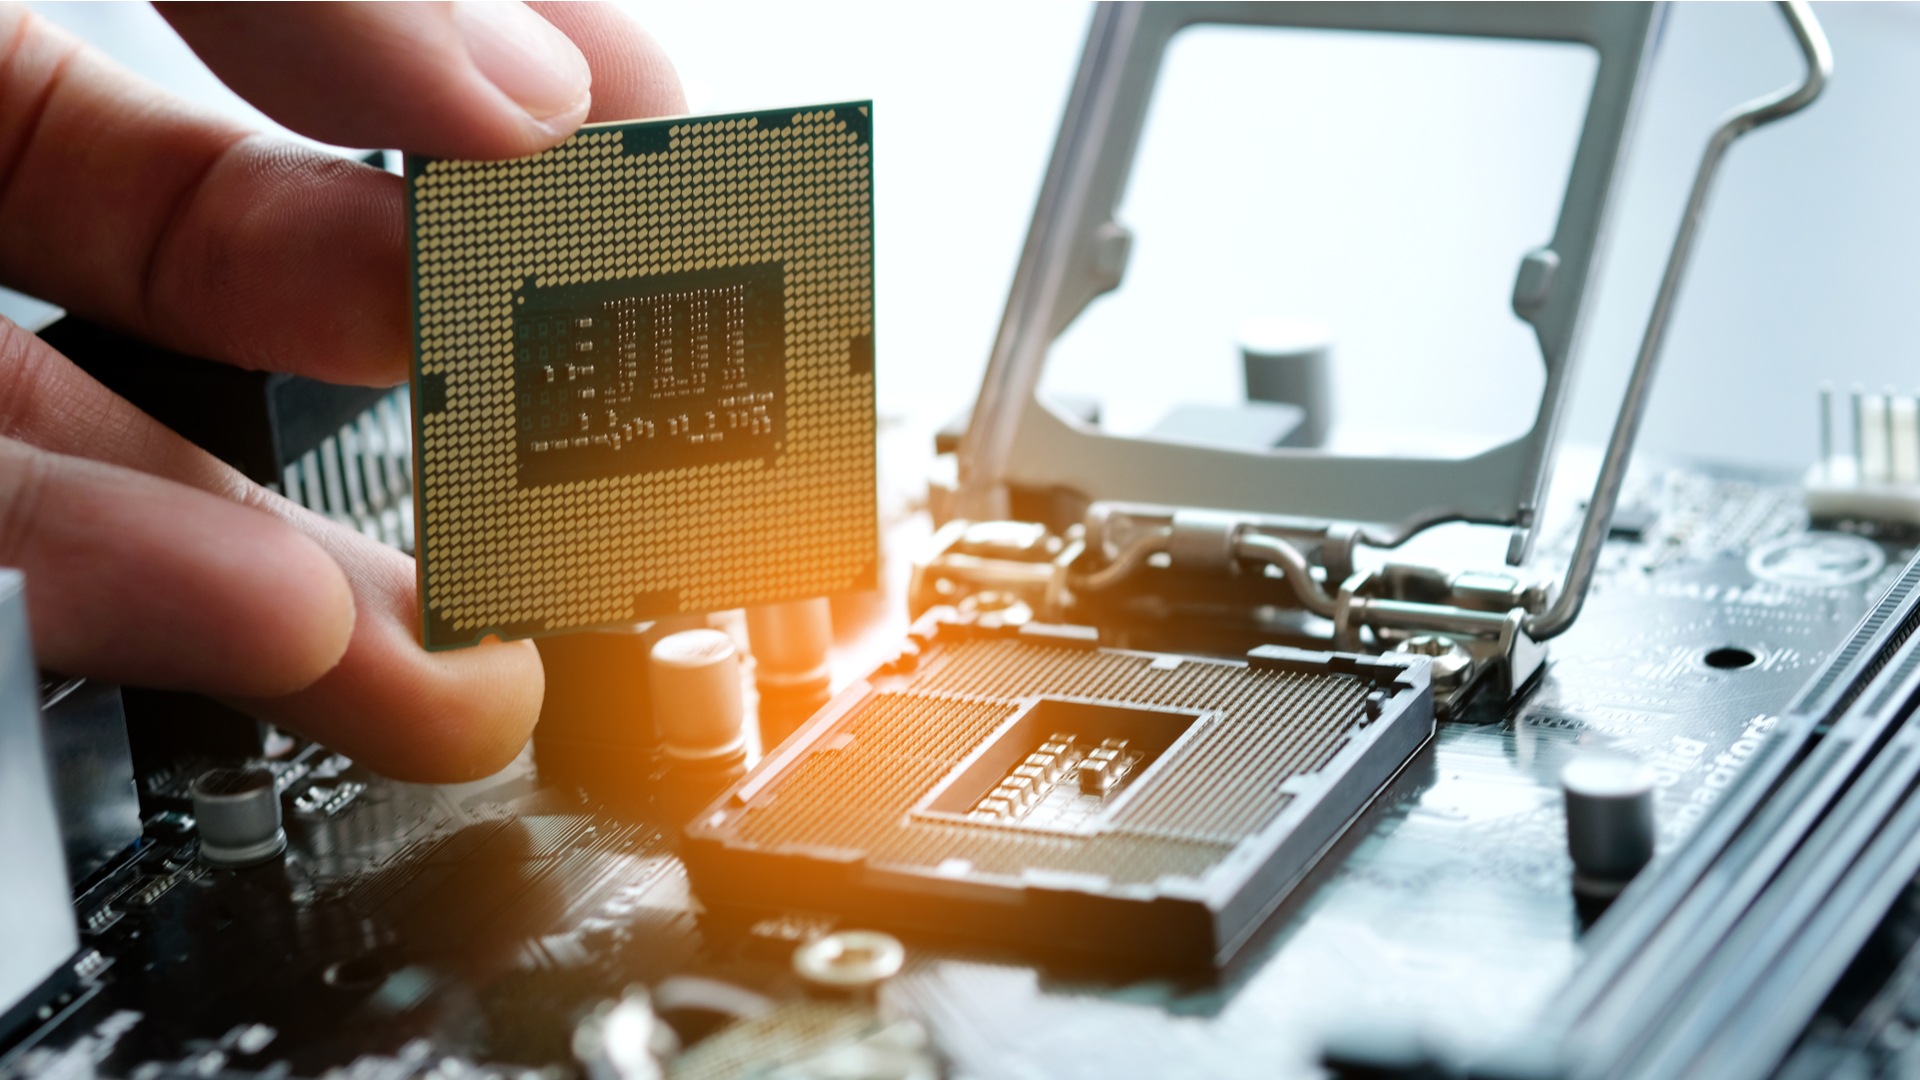
- Unbox the CPU: Carefully remove your CPU from its packaging, holding it by the edges only. Avoid touching the gold contacts on the bottom (for PGA) or the metal surface (Integrated Heat Spreader – IHS) on top.
- Identify Orientation Markers: Both the CPU and the motherboard socket have small indicators for correct orientation. This is usually a small golden triangle or an arrow on one corner of the CPU, and a corresponding triangle or notch on the CPU socket. For AMD AM4/AM5, there might also be key notches on the sides.
- Align and Gently Lower the CPU: Align the CPU’s orientation marker with the socket’s marker. Once perfectly aligned, gently lower the CPU straight down into the socket. Crucially, it should fall into place effortlessly with minimal to no resistance. If you feel any resistance, stop immediately. Do NOT force it. Lift the CPU, re-verify alignment, and try again. Forcing it can bend pins on the CPU (PGA) or the socket (LGA), rendering the component useless.
- Secure the CPU: Once the CPU is perfectly seated, carefully lower the metal load plate (if LGA) back over the CPU. Then, push the retention arm back down and clip it into its locking position. You might feel a slight amount of resistance from the arm as it compresses the CPU, which is normal.
Thermal Interface Material: The Bridge to Cooling
Thermal paste, or TIM, is a critical component often overlooked. It fills the microscopic gaps and imperfections between the CPU’s IHS and the cooler’s base, creating an efficient pathway for heat to transfer away from the CPU.
- Clean Surfaces (If Necessary): If you’re reusing a cooler or if the CPU IHS has any residue, use a lint-free cloth dampened with isopropyl alcohol (90% or higher) to gently clean both the CPU’s IHS and the base of your CPU cooler. Allow both surfaces to dry completely.
- Apply Thermal Paste: There are several accepted methods for applying thermal paste, and most are equally effective as long as you use the right amount.
- Pea-Sized Dot: The most common method. Apply a single, small pea-sized dot (about 4-5mm in diameter) to the very center of the CPU’s IHS.
- Single Line: For rectangular CPUs, a thin line down the center might be preferred.
- X-Pattern: A thin ‘X’ across the IHS.
- Important: Do not apply too much paste; excessive paste can hinder heat transfer or squeeze out onto the motherboard. Do not manually spread the paste; the pressure from the cooler will spread it evenly.
Securing the Cooler: The Lifeline of Your CPU
The CPU cooler is vital for maintaining safe operating temperatures. Proper installation ensures efficient heat dissipation and prevents thermal throttling or damage.
- Assemble Cooler Brackets (If Necessary): Many aftermarket coolers require you to install specific mounting brackets onto the motherboard around the CPU socket. Follow your cooler’s manual closely for these steps, ensuring you use the correct standoffs and screws for your socket type.
- Align and Place the Cooler: Carefully align the cooler’s base with the CPU, ensuring the mounting screws or clips line up with the motherboard’s holes or retention points. Gently lower the cooler onto the CPU.
- Secure the Cooler:
- Screw-Mounted Coolers: Tighten the screws evenly in a diagonal pattern (e.g., top-left, bottom-right, top-right, bottom-left). Turn each screw a few rotations at a time, moving to the next in the diagonal pattern, until all four screws are snug. Do not overtighten, as this can strip screws or damage the motherboard.
- Clip-Mounted Coolers: Follow the specific instructions for your cooler. These usually involve pushing down on levers or clips until they snap into place.
- Connect the CPU Fan Cable: Locate the “CPUFAN” header on your motherboard (usually labeled and near the CPU socket). Plug the CPU cooler fan cable into this header. This is crucial for the fan to receive power and for the motherboard to monitor fan speed. For AIO coolers, you’ll also connect the pump’s power cable (often to a “PUMPFAN” or AIO header) and potentially RGB cables.
- Check for Obstructions: Ensure the cooler, especially larger air coolers, does not interfere with RAM sticks or other components.
Post-Installation and First Boot: Bringing Your System to Life
With the CPU and cooler securely in place, you’re ready to integrate the remaining components and initiate the first power-up. This phase verifies your installation and sets the stage for your operating system.
Initial Power-Up and BIOS Checks
Before fully assembling your PC inside the case, it’s often a good practice to “bench test” it with the bare essentials.
- Connect Essential Components: For a first boot, you typically only need the CPU, CPU cooler, one stick of RAM (installed in the correct slot as per your motherboard manual), and the graphics card (if your CPU doesn’t have integrated graphics or if you want to verify discrete GPU functionality). Connect the 24-pin ATX power cable from your PSU to the motherboard, and the 8-pin (or 4+4 pin) CPU power cable. Also, connect a monitor.
- Boot the System: Use the power button on your PC case or carefully short the power pins on your motherboard (consult your manual for pin locations if doing a bench test). Observe for the Power-On Self-Test (POST) sequence. You should see the motherboard’s logo or POST messages appear on your monitor.
- Access BIOS/UEFI: Repeatedly press the designated key (usually Del, F2, F10, or F12) during boot-up to enter the BIOS/UEFI settings.
- Verify CPU Recognition and Temperature: Inside the BIOS, navigate to the system information or hardware monitor section. Confirm that your CPU is correctly identified (model name, speed) and check the CPU temperature. Ideal idle temperatures are typically below 50°C (122°F). High temperatures at idle could indicate an issue with cooler mounting or thermal paste application.
Operating System and Driver Installation
Once your system successfully POSTs and enters BIOS, you can proceed with the full build and software installation.
- Install Other Hardware: Install your storage drives (SSDs/HDDs), additional RAM, and any other expansion cards. Mount the motherboard and other components into your PC case. Connect all front panel connectors (USB, audio, power/reset buttons) and case fans.
- Install Your Chosen OS: Boot from a USB drive containing your operating system installer (Windows, Linux, etc.) and follow the on-screen prompts to install it onto your primary storage drive.
- Install Chipset Drivers: After the OS is installed, download and install the latest chipset drivers directly from your motherboard manufacturer’s website. These are crucial for your CPU and motherboard to communicate efficiently with all connected devices.
- Install Other Drivers: Install graphics card drivers (from NVIDIA, AMD, or Intel), network drivers, and any other peripheral drivers. Keep your system updated via Windows Update or similar OS tools.
Troubleshooting Common Hurdles: When Things Don’t Go as Planned
Even with meticulous care, issues can sometimes arise. Knowing how to troubleshoot common problems can save you from unnecessary panic and help you quickly resolve issues, enhancing your “Productivity” by minimizing downtime.
“No POST” or Black Screen
This is the most common and often scariest problem for new builders. The computer powers on, but nothing appears on the screen, or it doesn’t seem to boot at all.
- Double-Check Power Connections: Ensure the 24-pin ATX power cable and the 8-pin (or 4+4 pin) CPU power cable are firmly seated in both the motherboard and the PSU (if modular).
- Reseat RAM Modules: Remove and reinsert all RAM sticks, ensuring they are clicked securely into place. Try booting with just one stick of RAM in the recommended primary slot (check your motherboard manual).
- Reseat GPU: If using a discrete graphics card, ensure it’s firmly seated in its PCIe slot and that all necessary power cables are connected from the PSU. Try booting without the GPU if your CPU has integrated graphics.
- Clear CMOS: This resets your motherboard’s BIOS settings to default. You can usually do this by removing the small circular CMOS battery for 30 seconds or by using a dedicated jumper/button on the motherboard (consult manual).
- Check CPU Installation: As a last resort, if all else fails, carefully re-check the CPU installation. Ensure the retention arm is fully locked and that the CPU is correctly oriented and seated. Only do this if you are confident in your ability to handle the CPU without bending pins.
Overheating or Instability
Your system boots, but the CPU runs hot, or the system crashes under load.
- Verify CPU Fan Connection: Ensure the CPU cooler fan cable is connected to the “CPU_FAN” header on the motherboard and that the fan is spinning.
- Check Thermal Paste Application and Cooler Mounting: High temperatures usually point to an issue here. The cooler might not be making good contact, or the thermal paste might be insufficient or improperly applied. Carefully remove the cooler, clean off the old paste (from both CPU and cooler), and reapply fresh paste before remounting the cooler firmly and evenly.
- Monitor Temperatures: Use software tools (like HWMonitor, Core Temp, or your motherboard’s utility) within your OS to monitor CPU temperatures under load.
- Ensure Good Case Airflow: Proper case fan setup is essential for overall system cooling. Ensure there’s a balance of intake and exhaust fans.
Performance Issues
Your system is running, but it feels slower than expected, or benchmarks are low.
- Ensure Correct Drivers are Installed: Especially chipset and graphics drivers. Outdated or missing drivers can severely impact performance.
- Check BIOS Settings: Verify that RAM is running at its advertised speed (enable XMP/DOCP). Ensure your CPU’s core speeds are not being artificially limited.
- Monitor Resource Usage: Use Task Manager (Windows) or Activity Monitor (macOS) to see if any background processes are hogging CPU resources.
Conclusion: Empowering Your Tech Journey
Successfully installing a CPU is a significant accomplishment, marking a crucial step in your journey as a tech enthusiast. You’ve navigated intricate hardware, applied precision, and overcome potential challenges, culminating in a functional, high-performance machine. This isn’t just about putting a chip in a socket; it’s about mastering a core “Tech” skill that underpins everything from gaming rigs to powerful workstations for creative professionals.
By taking the DIY route, you’ve not only saved “Money” but also gained invaluable knowledge and confidence. This hands-on experience strengthens your “Brand” as a capable and resourceful individual in the digital sphere, someone who understands the inner workings of their tools. It opens the door to future upgrades, more complex builds, and a deeper understanding of the technology that drives our modern world.
As technology continues to evolve, the ability to build, maintain, and troubleshoot your own hardware remains a powerful asset. Embrace this newfound expertise, continue to learn, and let your self-built system be a testament to your growing mastery of the tech landscape.
aViewFromTheCave is a participant in the Amazon Services LLC Associates Program, an affiliate advertising program designed to provide a means for sites to earn advertising fees by advertising and linking to Amazon.com. Amazon, the Amazon logo, AmazonSupply, and the AmazonSupply logo are trademarks of Amazon.com, Inc. or its affiliates. As an Amazon Associate we earn affiliate commissions from qualifying purchases.