In the rapidly evolving world of technology, a powerful graphics card (GPU) is often the heart of an exceptional computing experience. Whether you’re a hardcore gamer chasing the highest frame rates, a creative professional rendering intricate 3D models or editing high-resolution videos, or simply seeking to future-proof your system, upgrading your graphics card is one of the most impactful hardware changes you can make. The prospect of delving into the internals of your PC might seem daunting at first, but with a methodical approach and the right preparation, installing a new graphics card is a straightforward DIY project well within the grasp of most tech enthusiasts.
This comprehensive guide will walk you through every step of the process, from initial compatibility checks and gathering your tools to the physical installation and post-setup optimization. We’ll demystify the intricacies, ensure you take all necessary safety precautions, and empower you to confidently enhance your computer’s visual prowess. By the end of this article, you’ll not only have successfully installed your new GPU but also gained a deeper understanding of your system’s architecture, setting you up for countless hours of enhanced performance and visual fidelity. Let’s dive in and transform your PC’s capabilities.
Preparation is Key: Before You Begin
The success of any technical endeavor lies largely in the preparation. Installing a graphics card is no exception. Before you even think about opening your PC case, there are several crucial steps to take that will ensure a smooth, safe, and successful upgrade. Ignoring these preliminary checks can lead to frustrating compatibility issues, insufficient power, or even damage to your new hardware.
Compatibility Check: Ensuring a Perfect Fit
The first and most critical step is to confirm that your chosen graphics card is compatible with your existing system. This isn’t just about whether it physically fits, but also if your components can adequately support its performance and power requirements.
- Motherboard Slot: Virtually all modern graphics cards use a PCI Express x16 (PCIe x16) slot. Your motherboard must have an available PCIe x16 slot. While newer motherboards often have multiple such slots, ensure one is free and ideally, the primary one (usually closest to the CPU) for optimal performance. Older systems might use PCIe 2.0 or 3.0, while newer ones leverage PCIe 4.0 or even 5.0. Modern GPUs are generally backward compatible, but they will operate at the speed of the slowest generation slot.
- Case Size: Graphics cards come in various lengths, heights, and thicknesses. Some high-end models are enormous, spanning three or even four expansion slots. Measure the available space inside your PC case, paying close attention to drive cages, front fans, or other obstructions that might block a longer card. Check the specifications of your case and the new GPU for dimensions.
- Power Supply Unit (PSU): This is perhaps the most overlooked compatibility aspect. Your new graphics card will likely demand significantly more power than your old one, or your integrated graphics.
- Wattage: Check the recommended PSU wattage for your chosen GPU (usually found on the manufacturer’s website or the GPU’s product page). Compare this to your current PSU’s total wattage output. It’s always better to have some headroom; don’t just meet the minimum. A common recommendation is to add up the TDP (Thermal Design Power) of your CPU and GPU, then account for other components and add a buffer.
- Connectors: Modern graphics cards require dedicated PCIe power connectors, which come in 6-pin, 8-pin, or even new 12-pin or 12VHPWR configurations (for very high-end cards). Ensure your PSU has the correct type and number of free connectors. Adapters exist (e.g., Molex to PCIe), but using dedicated PSU cables is always preferred for stability and safety.
- Monitor Connections: Verify that your monitor has inputs compatible with the output ports on your new graphics card (e.g., HDMI, DisplayPort, DVI). While adapters exist, a direct connection is always best.
- CPU Bottleneck (Consideration): While not strictly a compatibility issue, a very old or low-end CPU paired with a powerful, modern GPU might result in a “bottleneck,” where the CPU can’t feed data to the GPU fast enough, preventing the graphics card from performing at its full potential. This is less about installation and more about overall system balance for optimal performance.
Gathering Your Tools & Materials
Once you’ve confirmed compatibility, it’s time to assemble your toolkit. Having everything at hand before you start will prevent interruptions and make the process smoother.
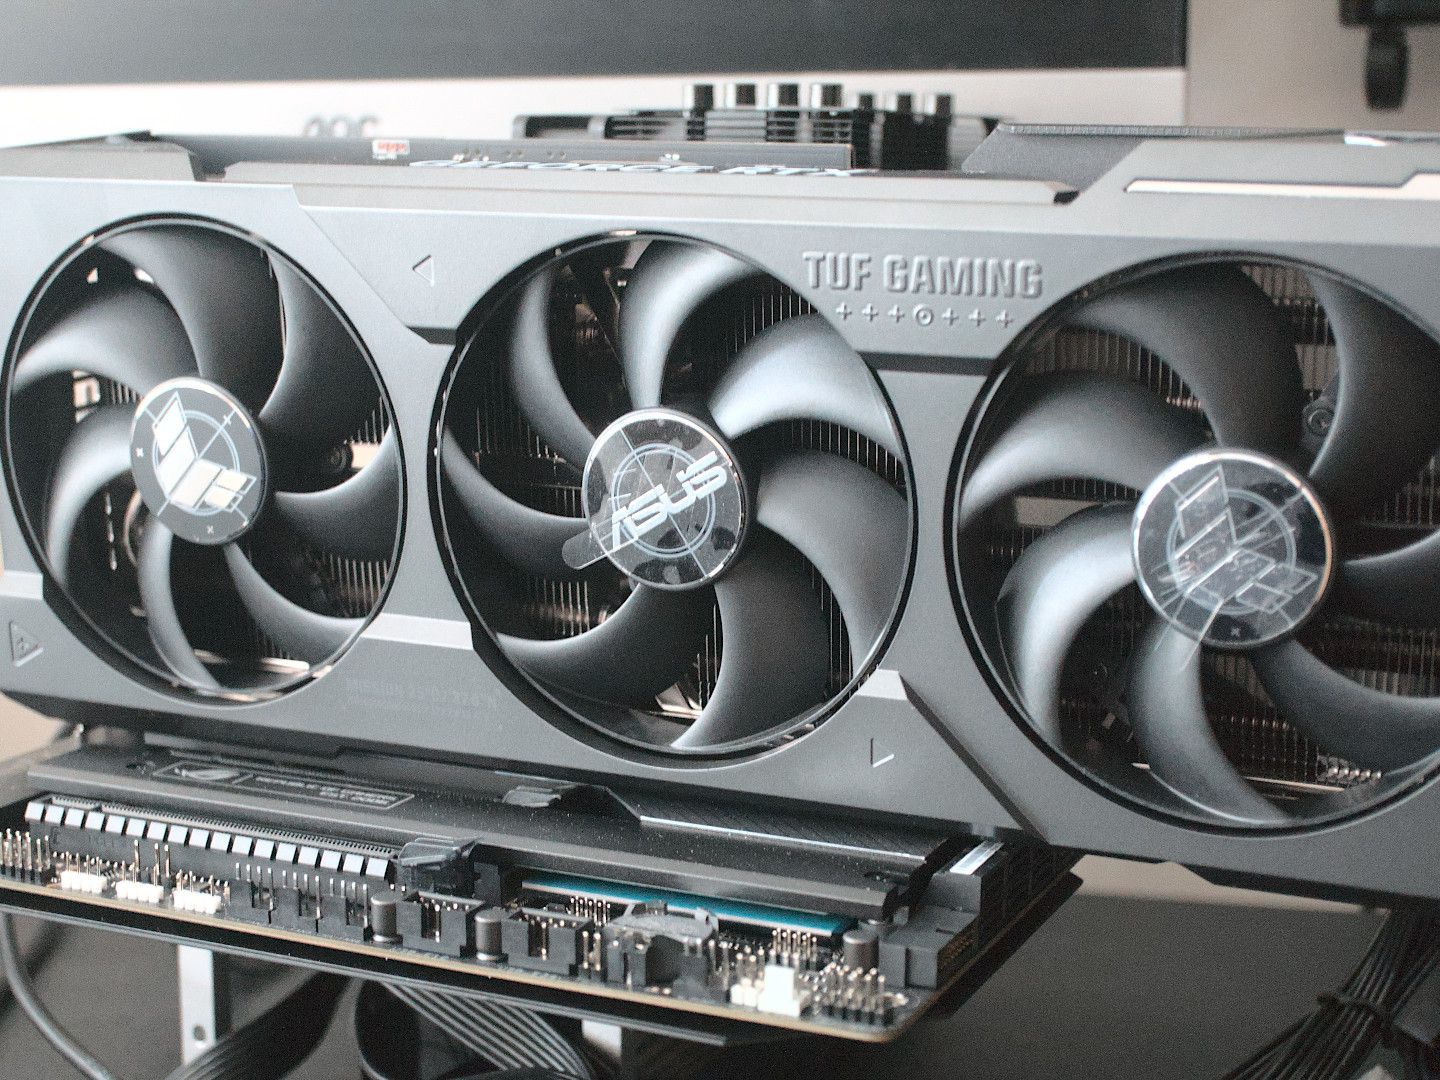
- New Graphics Card: The star of the show! Handle it by its edges, avoid touching the gold contacts on the PCIe connector.
- Phillips Head Screwdriver: The most essential tool for opening your case and securing the GPU. A magnetic tip can be helpful for tiny screws.
- Anti-static Wrist Strap: Highly recommended! Static electricity can irreparably damage sensitive electronic components. An anti-static strap safely grounds you, dissipating any static charge. If you don’t have one, frequently touch a metal part of your PC case (which should be plugged into a grounded outlet, but powered off) to discharge static.
- Flashlight or Headlamp: Internal PC spaces can be dark. A light source will help you see screw holes, connectors, and retention clips.
- Zip Ties or Velcro Straps: (Optional) For cable management after installation. A tidy case improves airflow and aesthetics.
- Compressed Air: (Optional but recommended) While your case is open, it’s an excellent opportunity to blow out dust from fans and heatsinks.
- Anti-static Bag: Keep the anti-static bag your new GPU came in to store your old card, if applicable.
Software & Driver Considerations
While not part of the physical installation, preparing your software environment is crucial for a seamless transition.
- Downloading Latest Drivers: Visit the website of your new graphics card’s manufacturer (Nvidia or AMD) and download the latest drivers for your specific GPU model and operating system. Storing them on a USB drive or easily accessible folder will save time post-installation when you might initially be using a low-resolution display.
- Uninstalling Old Drivers: If you’re replacing an existing graphics card, especially if it’s from a different manufacturer (e.g., switching from AMD to Nvidia), it’s highly recommended to completely uninstall the old drivers before installing the new hardware. Tools like Display Driver Uninstaller (DDU) can help remove all traces of old drivers, preventing potential conflicts. Boot into Windows Safe Mode to run DDU for the most thorough cleaning. If you’re using integrated graphics, this step is often unnecessary, but can be helpful to ensure a clean slate.
Backup and Safety Precautions
Before touching any internal components, prioritize safety.
- Backup Important Data: While a graphics card installation rarely leads to data loss, it’s good practice to back up critical files before performing any significant hardware changes.
- Power Off and Unplug: Completely shut down your computer. Do not simply put it to sleep. Unplug the power cable from the wall outlet and from the back of your PC.
- Discharge Static: Wear your anti-static wrist strap, connecting it to an unpainted metal part of your PC case. If you don’t have one, frequently touch a grounded metal object. This is essential to protect delicate electronics from electrostatic discharge (ESD).
- Work Area: Choose a clean, well-lit, and sturdy workspace. Avoid working on carpeted surfaces, as they can generate more static.
The Installation Process: A Step-by-Step Guide
With all preparations complete, you’re ready to dive into the physical installation. This section will guide you through each step, ensuring you handle components with care and connect everything correctly.
Power Down and Open Your PC
This is where the actual work begins. Take your time, and don’t rush any steps.
- Shut Down Completely: Ensure your computer is fully powered off, not just in sleep or hibernation mode.
- Unplug All Cables: Disconnect the power cable, monitor cables, USB peripherals, Ethernet, and any other cables attached to the back of your PC.
- Move to Your Workspace: Position your PC on your prepared, clean, and well-lit work surface.
- Open the Side Panel: Most PC cases have thumb screws or standard Phillips head screws holding the side panel(s) in place. Remove the screws, then slide or pivot the panel off. Typically, you’ll need to open the main side panel that provides access to the motherboard and components.
Removing Your Old Graphics Card (if applicable)
If you’re upgrading from an existing discrete graphics card, you’ll need to remove it first. If you’re installing a GPU for the first time into a system that only used integrated graphics, you can skip this section.
- Identify the Old GPU: Locate your current graphics card plugged into the PCIe x16 slot.
- Unplug Power Cables: If your old GPU had dedicated power connectors (6-pin, 8-pin), gently unclip and remove them. These usually have a small tab you need to press down on to release.
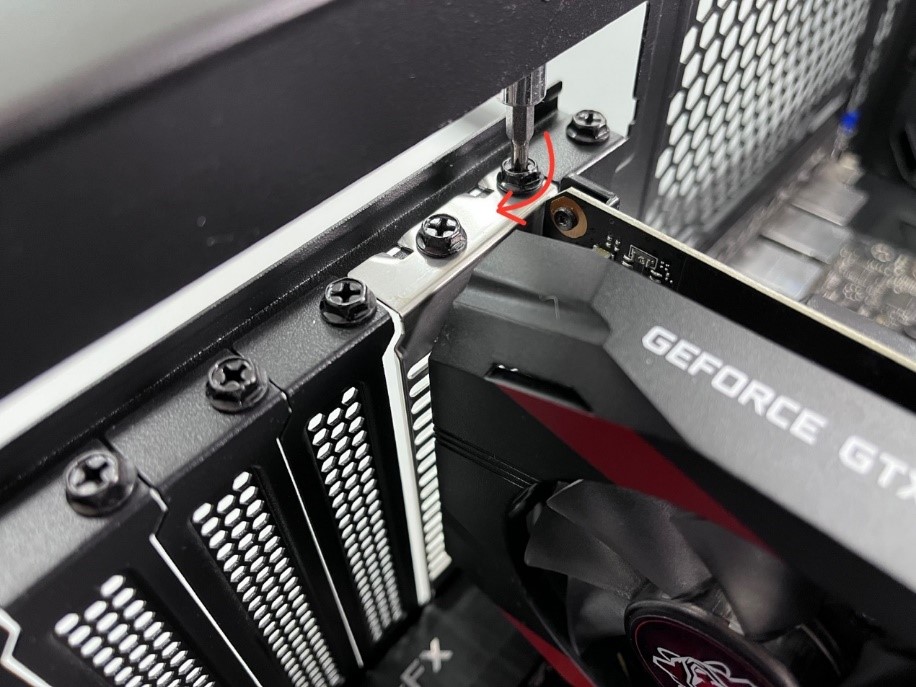
- Unscrew Retaining Screw(s): At the back of your PC case, where the monitor ports of the GPU are visible, there will be one or two screws securing the card to the case. Unscrew and remove these. Some cases use a tool-less retention clip mechanism instead of screws.
- Press the PCIe Retention Clip: Look at the end of the PCIe x16 slot where the graphics card plugs in. There’s usually a small plastic lever or clip that holds the card firmly in the slot. Gently press or push this clip away from the card to release it. Be careful not to force it, as these clips can be delicate.
- Gently Pull the Old Card Out: With the power cables disconnected, the retaining screws removed, and the PCIe clip released, grasp the card firmly but gently by its body and pull it straight up and out of the PCIe slot. Avoid wiggling it excessively.
- Store the Old Card: Place your old graphics card into an anti-static bag (if you have one) for safe storage or disposal.
Installing the New Graphics Card
Now for the exciting part – putting in your new powerhouse GPU!
- Identify the Correct PCIe x16 Slot: Locate the primary PCIe x16 slot on your motherboard. This is typically the top-most long slot, closest to your CPU. If your motherboard has multiple x16 slots, consult your motherboard manual to identify the primary slot for maximum performance.
- Remove Blanking Plates: At the back of your PC case, you’ll see metal “blanking plates” covering the expansion slots. You’ll need to remove as many of these as your new graphics card occupies (typically two or three slots). These are usually held in by screws or sometimes just snap off. Remove them carefully, as they can be sharp.
- Align the New GPU: Hold your new graphics card by its edges. Align the gold-plated PCIe connector on the card with the PCIe x16 slot on your motherboard. Ensure the backplate with the display ports lines up with the open slots you just created at the rear of the case.
- Apply Even, Firm Pressure: Once aligned, gently but firmly push the graphics card straight down into the PCIe slot. You should feel it seat properly, and you’ll often hear a satisfying “click” as the PCIe retention clip engages and locks the card into place. Do not force it; if it’s not going in, re-check alignment and the retention clip.
- Secure the Card: Once the card is fully seated, secure it to the back of your PC case using the screws you removed earlier (or the case’s tool-less mechanism). This prevents the card from sagging and ensures it’s firmly held.
Connecting Power Cables
This is a critical step for powering your new GPU. Many modern graphics cards require dedicated power connectors directly from the PSU.
- Identify Required Connectors: Check the power inputs on your new graphics card. It might require one, two, or even three 6-pin, 8-pin, or 12-pin (e.g., 12VHPWR for Nvidia’s RTX 40 series) connectors.
- Locate PSU Cables: Find the appropriate PCIe power cables coming from your power supply unit. These are usually labeled “PCIe” or “VGA.”
- Connect the Cables: Plug the required power cables securely into the corresponding ports on your graphics card. Ensure they are fully seated and the retention clips engage. Avoid daisy-chaining multiple connectors onto a single cable from the PSU if your GPU requires multiple 8-pin connectors; use separate cables if possible for better power delivery, especially for high-power cards.
- Cable Management (Optional): Route the power cables neatly to improve airflow and aesthetics. Use zip ties or Velcro straps if desired.
Closing Up Your PC & Initial Boot
You’re almost there! A few final checks and then it’s time to power on.
- Double-Check All Connections: Before closing the case, take a moment to visually inspect everything:
- Is the graphics card fully seated in the PCIe slot?
- Are all required power cables connected securely to the GPU?
- Are all other components (RAM, CPU cooler, etc.) still properly seated and connected?
- Replace the Side Panel: Carefully slide or pivot the side panel back onto your case and secure it with the screws.
- Reconnect Peripherals: Plug your monitor cable into one of the display outputs on your new graphics card. Do not plug it into the motherboard’s video output, as that uses integrated graphics (unless you’re troubleshooting). Reconnect your power cable, keyboard, mouse, and any other peripherals.
- Boot Up: Take a deep breath and press the power button on your PC.
If everything went well, you should see your monitor light up and display your operating system. If you get no signal, don’t panic. Check the troubleshooting section below.
Post-Installation Setup and Optimization
Successfully installing the hardware is a major milestone, but the journey doesn’t end there. To fully harness the power of your new graphics card, you need to install the correct drivers, verify its functionality, and potentially optimize its settings.
Driver Installation
This is the most critical software step to get your GPU running at its peak.
- Install the Downloaded Drivers: If your computer booted up successfully, navigate to the drivers you downloaded earlier. Run the installer package. Both Nvidia (GeForce Experience) and AMD (Adrenalin Software) provide comprehensive installation suites that will detect your new hardware and install the necessary drivers and control software.
- Nvidia GeForce Experience: This software manages drivers, optimizes game settings, and provides additional features.
- AMD Adrenalin Software: Similar to GeForce Experience, it offers driver management, gaming optimization, and system monitoring.
- Follow On-Screen Prompts: The driver installation process will likely involve a few reboots. Follow all on-screen instructions carefully. Your screen might flicker or go black temporarily during installation; this is normal.
- Verify Installation: Once the installation is complete and your PC has restarted, open your operating system’s Device Manager (search for “Device Manager” in Windows). Expand the “Display adapters” section. You should see your new graphics card listed there without any yellow exclamation marks or error codes.
Testing and Benchmarking
Now that the drivers are in place, it’s time to confirm everything is working as it should and to get a sense of your performance gains.
- Check Display Settings: Right-click on your desktop and go to “Display settings” (Windows). Ensure your monitor is running at its native resolution and refresh rate, and that the display is using your new GPU.
- Run a Game or Application: Launch a graphically demanding game or a professional application you frequently use. Pay attention to frame rates, visual quality, and overall system responsiveness.
- Monitor Temperatures: Use monitoring software (like MSI Afterburner, HWMonitor, or the GPU manufacturer’s own software) to keep an eye on your GPU temperatures while under load. Typical gaming temperatures are usually below 80°C (176°F), but this can vary by card. Excessive temperatures might indicate a cooling issue (e.g., case airflow, fan profile).
- Benchmarking Software: For a more objective measure of performance, consider running a dedicated benchmarking tool like 3DMark, Unigine Heaven, or FurMark. These tools stress your GPU and provide scores you can compare with other systems.
Troubleshooting Common Issues
Even with careful preparation, issues can sometimes arise. Here are solutions to common problems:
- No Display Signal (Black Screen):
- Check monitor cable: Ensure it’s firmly connected to the new graphics card’s output and your monitor’s input. Try a different cable or port if available.
- Check power cables: Verify the GPU’s PCIe power connectors are securely plugged in.
- Reseat the GPU: Power down, unplug, open the case, and re-seat the graphics card firmly in its PCIe slot. Ensure the retention clip clicks.
- CMOS Reset: If your PC doesn’t boot at all, try resetting your motherboard’s CMOS (refer to your motherboard manual).
- Integrated Graphics Test: If you have integrated graphics, temporarily plug your monitor into the motherboard’s video output. If you get a display, it indicates an issue with the new GPU, its drivers, or its power.
- System Crashes/Freezes:
- Driver Issues: Re-run DDU in Safe Mode to completely uninstall all display drivers, then perform a clean installation of the new GPU’s drivers.
- Insufficient PSU Power: If your system crashes under load, your PSU might not be providing enough stable power. Check PSU wattage and consider an upgrade if necessary.
- Overheating: Monitor temperatures. Ensure case airflow is adequate and GPU fans are spinning.
- Poor Performance/Stuttering:
- Incorrect Drivers: Double-check that you installed the correct and latest drivers for your specific GPU model.
- Bottleneck: As mentioned earlier, your CPU might be limiting your GPU’s performance.
- Background Processes: Close unnecessary background applications.
- Game Settings: Ensure game settings are not excessively high for your card, or that resolution/refresh rate isn’t mismatched.

Further Optimization
To truly maximize your experience, consider these additional steps:
- GPU Control Panel Settings: Explore the Nvidia Control Panel or AMD Adrenalin Software. You can often fine-tune settings like image quality, anti-aliasing, VSync, and power management profiles on a global or per-application basis.
- Game-Specific Settings: Most games have their own graphics settings. Experiment with these to find the optimal balance between visual fidelity and frame rate for your specific hardware.
- Overclocking (Advanced): For experienced users, minor GPU overclocking can yield additional performance. Use reputable software like MSI Afterburner, proceed cautiously, and monitor temperatures closely. Understand the risks involved, as it can void warranties if done improperly.
- Regular Driver Updates: Keep your graphics drivers updated. Manufacturers frequently release new drivers that offer performance improvements, bug fixes, and optimizations for new game titles.
Upgrading your graphics card is a rewarding experience that significantly enhances your computing performance and visual enjoyment. By meticulously following these steps, from pre-installation checks to post-setup optimization, you can confidently undertake this upgrade and unlock the full potential of your PC. Enjoy your boosted frame rates, stunning visuals, and immersive experiences!
aViewFromTheCave is a participant in the Amazon Services LLC Associates Program, an affiliate advertising program designed to provide a means for sites to earn advertising fees by advertising and linking to Amazon.com. Amazon, the Amazon logo, AmazonSupply, and the AmazonSupply logo are trademarks of Amazon.com, Inc. or its affiliates. As an Amazon Associate we earn affiliate commissions from qualifying purchases.