In the digital realm, fonts are more than just characters on a screen; they are the silent architects of our visual communication. Whether you’re a seasoned graphic designer crafting a brand identity, a student meticulously preparing a presentation, or simply someone who wants to personalize their documents, the ability to install and utilize new fonts on your PC can significantly elevate your creative output and overall digital experience. This guide will walk you through the straightforward process of installing fonts on your Windows PC, unlocking a world of typographic possibilities.
Understanding Font Formats and Sources
Before we dive into the installation process, it’s crucial to understand what you’re working with. Fonts come in various file formats, with the most common for Windows being TrueType Fonts (.ttf) and OpenType Fonts (.otf).

-
TrueType Fonts (.ttf): Developed by Apple and later adopted by Microsoft, TrueType fonts are a widely compatible format. They are known for their scalability and are designed to render smoothly on both screens and printers. Most fonts you’ll encounter will be in this format.
-
OpenType Fonts (.otf): A more modern and versatile format, OpenType is an extension of TrueType, developed jointly by Adobe and Microsoft. OpenType fonts offer enhanced features such as ligatures, stylistic alternates, small caps, and support for a broader range of characters, making them a favorite among professional designers.
Where to Find Fonts:
The digital landscape is brimming with free and paid font resources. Knowing where to look can help you discover the perfect typeface for your project:
-
Free Font Websites:
- Google Fonts: A vast, high-quality, and completely free library of open-source fonts. You can browse, preview, and download fonts directly from their website.
- DaFont: A popular repository of free fonts, often submitted by independent designers. While many are free for personal use, always check the licensing for commercial projects.
- Font Squirrel: Offers a curated collection of free fonts that are licensed for commercial use. They also provide a handy web font generator.
- 1001 Free Fonts: As the name suggests, this site offers a large selection of free fonts across various categories.
-
Paid Font Marketplaces:
- Adobe Fonts: Included with Adobe Creative Cloud subscriptions, this service offers a massive library of high-quality, licensed fonts that integrate seamlessly with Adobe applications.
- MyFonts: A leading marketplace for professional fonts, offering a vast selection from foundries worldwide.
- Fontspring: Another excellent source for premium fonts with flexible licensing options.
- Creative Market: A platform where independent creators sell their digital assets, including a wide array of unique fonts.
When downloading fonts, always be mindful of the licensing. Free fonts often come with restrictions on commercial use. Paid fonts typically offer more comprehensive licensing that covers various usage scenarios.
Installing Fonts: The Direct Approach
The most common and straightforward method for installing fonts on a Windows PC involves directly placing the font files into the Windows Fonts folder. This method works for both .ttf and .otf files.
Method 1: Using the Fonts Folder
This is often the quickest and most intuitive way to install a single font or a small batch of fonts.
-
Locate Your Downloaded Fonts: After downloading your chosen font files (e.g., from Google Fonts, DaFont), they will likely be in a
.ziparchive. You’ll need to extract these files first. Right-click on the.zipfile and select “Extract All…” or use your preferred extraction software. Navigate to the folder where you’ve extracted the font files. You should see files with.ttfor.otfextensions. -
Open the Windows Fonts Folder:
- Via File Explorer: Open File Explorer (you can press
Windows key + E). In the address bar, typeC:WindowsFontsand press Enter. - Via Control Panel: Open the Control Panel (search for “Control Panel” in the Start menu). Under the “Appearance and Personalization” category, click on “Fonts.”
- Via File Explorer: Open File Explorer (you can press
-
Install the Fonts: Now you have two primary ways to get the fonts into the Fonts folder:
- Drag and Drop: Select the font files (
.ttfor.otf) from your extracted download folder. Drag these selected files directly into the open Windows Fonts folder. - Copy and Paste: Select the font files in your download folder, copy them (
Ctrl + C). Go to the Windows Fonts folder and paste them (Ctrl + V).
As you drag, drop, copy, or paste, Windows will automatically register and install the fonts. You might see a progress bar indicating that the fonts are being installed.
- Drag and Drop: Select the font files (
-
Verify Installation: Once the process is complete, you can verify that your fonts have been installed correctly.
- Within the Fonts Folder: Your newly installed font should appear in the list within the
C:WindowsFontsdirectory or the Control Panel’s Fonts applet. You can double-click on the font’s icon to see a preview of it. - In an Application: Open an application where you use fonts, such as Microsoft Word, Adobe Photoshop, or even Notepad. Look for your newly installed font in the font selection dropdown menu. It might take a moment for applications that were already open to recognize the new fonts. Restarting the application is often a good way to ensure it refreshes its font list.
- Within the Fonts Folder: Your newly installed font should appear in the list within the
Installing Fonts: Alternative and Advanced Methods
While the Fonts folder method is the most common, Windows offers other ways to manage and install fonts, particularly useful for managing larger collections or for users who prefer a more organized approach.
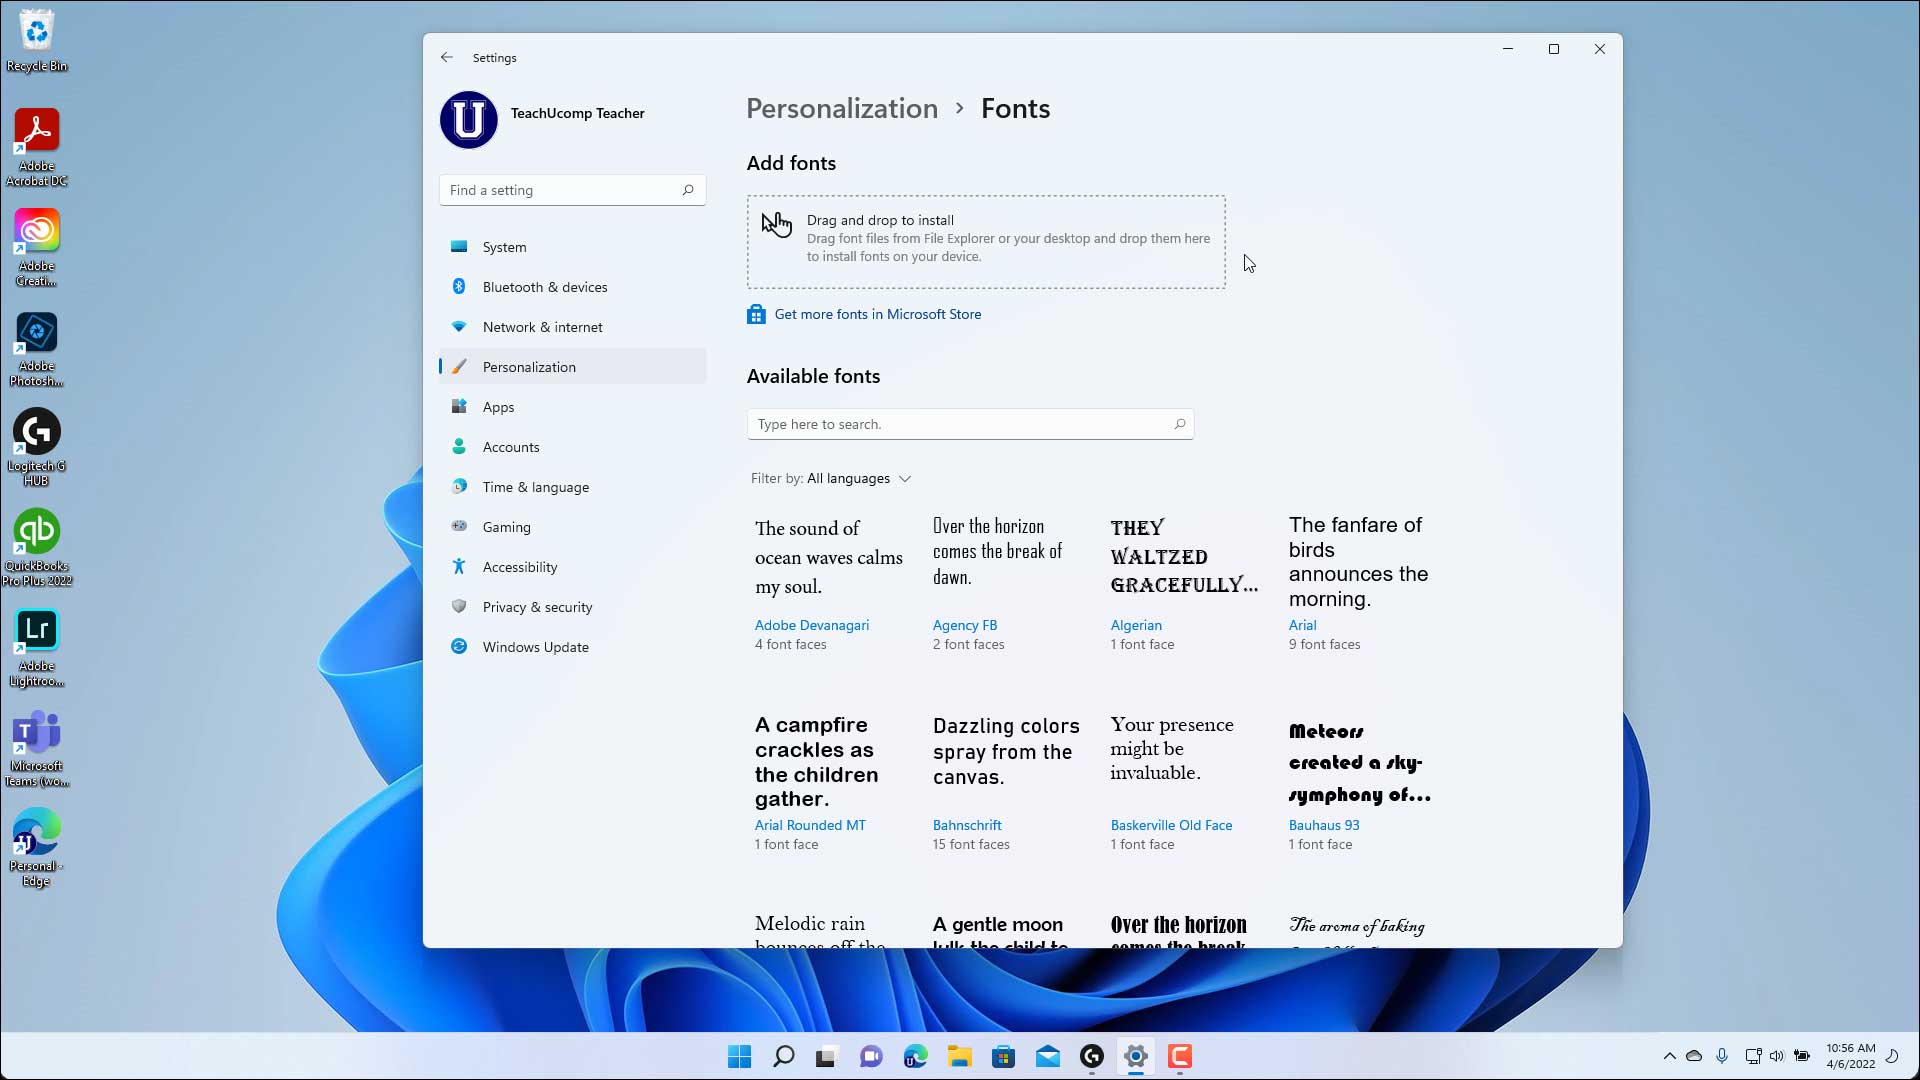
Method 2: Using the Settings App
Windows 10 and Windows 11 offer a more modern interface for managing fonts through the Settings app. This method is also very user-friendly.
- Open the Settings App: Press
Windows key + Ito open the Settings app.

-
Navigate to Personalization: In the Settings window, click on “Personalization.”
-
Select Fonts: On the left-hand sidebar of the Personalization settings, click on “Fonts.”
-
Drag and Drop to Install: You will see a section labeled “Add fonts.” You can either click the “Browse” button to manually select font files or, more conveniently, drag and drop your
.ttfor.otffont files directly into the designated area. -
Confirmation: As the fonts are dropped into the area, Windows will automatically install them. A preview of the installed font will appear below the “Add fonts” section, confirming successful installation.
Method 3: Right-Click Installation
This is a quick shortcut for installing individual font files without needing to open the Fonts folder or the Settings app explicitly.
-
Locate Font Files: Find the
.ttfor.otffont file(s) that you want to install. -
Right-Click: Right-click on the font file.
-
Select “Install”: From the context menu that appears, select the “Install” option. If you have administrative privileges, this will install the font for all users. If you want to install it only for your current user account, look for an “Install for all users” option, which might appear if you right-click and then select “Show more options” in Windows 11.
Windows will then install the font, and it will become available in your applications.
Managing Your Font Library
As you accumulate more fonts, managing them becomes important for both system performance and creative organization.
Font Preview and Management
Both the C:WindowsFonts folder and the Settings app’s Fonts section provide ways to preview and manage your installed fonts.
-
Previewing: Double-clicking any font file in the Fonts folder or clicking on a font in the Settings app will open a preview window. This window shows you the font in various sizes and styles, often including sample sentences.
-
Uninstalling Fonts: If you decide you no longer need a font, you can uninstall it to free up disk space and keep your font menu cleaner.
- Via Fonts Folder: Open
C:WindowsFonts. Select the font(s) you want to remove, right-click, and choose “Delete.” - Via Settings App: Go to Settings > Personalization > Fonts. Click on the font you wish to uninstall, and then click the “Uninstall” button.
- Via Fonts Folder: Open
Font Usage in Applications
Once installed, fonts become available system-wide. This means any application that allows you to choose fonts will now list your newly installed typefaces.
- Word Processors (Microsoft Word, Google Docs): You’ll find your fonts in the font selection dropdown on the toolbar.
- Presentation Software (PowerPoint, Google Slides): Similar to word processors, fonts are selected from a dropdown menu.
- Graphic Design Software (Photoshop, Illustrator, GIMP): These applications have robust text tools where you can select from all installed system fonts.
- Web Design: While you can install fonts on your PC for design purposes, for websites, you’ll typically use web fonts (like those from Google Fonts) or embed custom fonts using CSS. The fonts installed on your PC are primarily for your local use.
Troubleshooting Common Font Issues
Occasionally, you might encounter problems with font installation or usage. Here are a few common issues and their solutions:
-
Font Not Appearing in Applications:
- Restart the Application: As mentioned, many applications load their font lists on startup. If the application was open during installation, close and reopen it.
- Restart Your PC: A full system restart can resolve temporary glitches and ensure all system components recognize the new fonts.
- Check Font Validity: Ensure the font file you downloaded is not corrupted. Try downloading it again from a reliable source.
-
Corrupted Font Files: If you encounter an error message during installation, the font file might be corrupt. Try downloading it again. Sometimes, incomplete downloads or extraction errors can cause this.
-
Duplicate Fonts: If you install a font that is already present, Windows usually handles it gracefully, either by overwriting or asking for confirmation. However, having multiple versions of the same font can sometimes lead to unexpected behavior in certain applications. It’s good practice to uninstall older versions if you’re sure you’re installing an updated one.
-
Licensing Issues: Remember that while you can install any font on your PC, using them commercially might require a specific license. Always check the font’s EULA (End-User License Agreement) if you plan to use it in marketing materials, logos, or any for-profit project.
By mastering the simple process of installing fonts, you gain a powerful tool to enhance your digital creations, personalize your workflow, and express your unique style. Whether you’re focusing on Tech to leverage new digital tools, Brand to create a compelling visual identity, or simply looking to make your documents more engaging, the right typeface is a cornerstone of effective communication.
aViewFromTheCave is a participant in the Amazon Services LLC Associates Program, an affiliate advertising program designed to provide a means for sites to earn advertising fees by advertising and linking to Amazon.com. Amazon, the Amazon logo, AmazonSupply, and the AmazonSupply logo are trademarks of Amazon.com, Inc. or its affiliates. As an Amazon Associate we earn affiliate commissions from qualifying purchases.