In the ever-evolving digital landscape, the term “ISO file” often surfaces, particularly when dealing with software installations, operating system upgrades, or even digital backups. But what exactly is an ISO file, and more importantly, how do you effectively install or use one? This guide aims to demystify ISO files, providing a clear, step-by-step approach for users across various operating systems and technological needs. Whether you’re a tech enthusiast looking to install a new operating system, a gamer wanting to set up a retro gaming environment, or simply someone who has received an ISO file and is unsure of its purpose, this article will equip you with the knowledge to proceed confidently.
The technical realm of computing often presents us with acronyms and file extensions that can seem daunting. An ISO file, short for International Organization for Standardization, is essentially a digital archive file that contains the complete contents of an optical disc, such as a CD, DVD, or Blu-ray. Think of it as a perfect snapshot or a clone of the original disc. This means it holds not just the data, but also the file system and boot sector information, making it a powerful tool for replicating and distributing disc-based content. Its primary advantage lies in its ability to preserve the exact structure and data of the original disc, allowing for flawless replication.
Understanding the Versatility of ISO Files
The utility of ISO files extends far beyond simple data storage. Their nature as disc images makes them invaluable for a multitude of purposes, impacting various aspects of your digital life, from productivity and entertainment to even a deeper understanding of your technological tools.
Operating System Installations and Upgrades
One of the most common and critical uses of ISO files is for the installation or upgrade of operating systems. When you download an operating system like Windows or Linux, it’s often provided as an ISO file. This allows you to create a bootable USB drive or burn the image onto a DVD, which your computer can then use to boot from and initiate the installation process. This is particularly relevant in the Tech category, where staying updated with the latest software and operating systems is crucial for maintaining optimal performance and security. For example, installing a new version of Windows or a popular Linux distribution like Ubuntu requires an ISO file to create the installation media. This process is fundamental for anyone looking to build a new PC, refresh an existing one, or explore different operating systems.
Software Distribution and Archiving
Software developers and distributors frequently use ISO files to package their applications. This ensures that all the necessary files, configurations, and even executables are bundled together in a single, easily transferable file. For businesses and individuals focused on Productivity, having software readily available and installable from an ISO can streamline deployment and management. Furthermore, ISO files are excellent for archiving software, ensuring that you have a pristine, uncorrupted copy of an application for future use, especially if the original distribution method is no longer available. This also touches upon Digital Security, as verified ISO files from reputable sources can provide a safer way to acquire software compared to downloading from less trustworthy websites.
Gaming and Emulation
For gamers, particularly those interested in retro gaming, ISO files are indispensable. Many older games were distributed on CD-ROMs or DVDs, and their ISO images are now commonly used with emulators to play those classic titles on modern hardware. This brings a significant element of Apps and Reviews into play, as users will often seek out ISOs for specific games and then review the emulators and the gaming experience itself. Whether you’re reliving the glory days of PlayStation 1 gaming with an emulator like ePSXe or exploring the vast library of PC games from the 90s, ISO files are the gateway to these experiences.
Data Backup and Recovery
ISO files can also serve as a powerful tool for backing up the contents of an entire optical disc. If you have important data on a CD or DVD that you want to preserve, creating an ISO image is an effective method. This backup can then be stored safely and later used to recreate the original disc if needed. This is particularly relevant for Digital Security and Productivity, ensuring that critical data is not lost. In a business context, having ISO backups of important software licenses or configuration discs can be a lifesaver.
Installing and Using ISO Files: A Practical Approach
The method for “installing” an ISO file depends on its intended use. Unlike executable files that you directly run, ISO files typically require a specific approach to access their contents or to make them bootable.
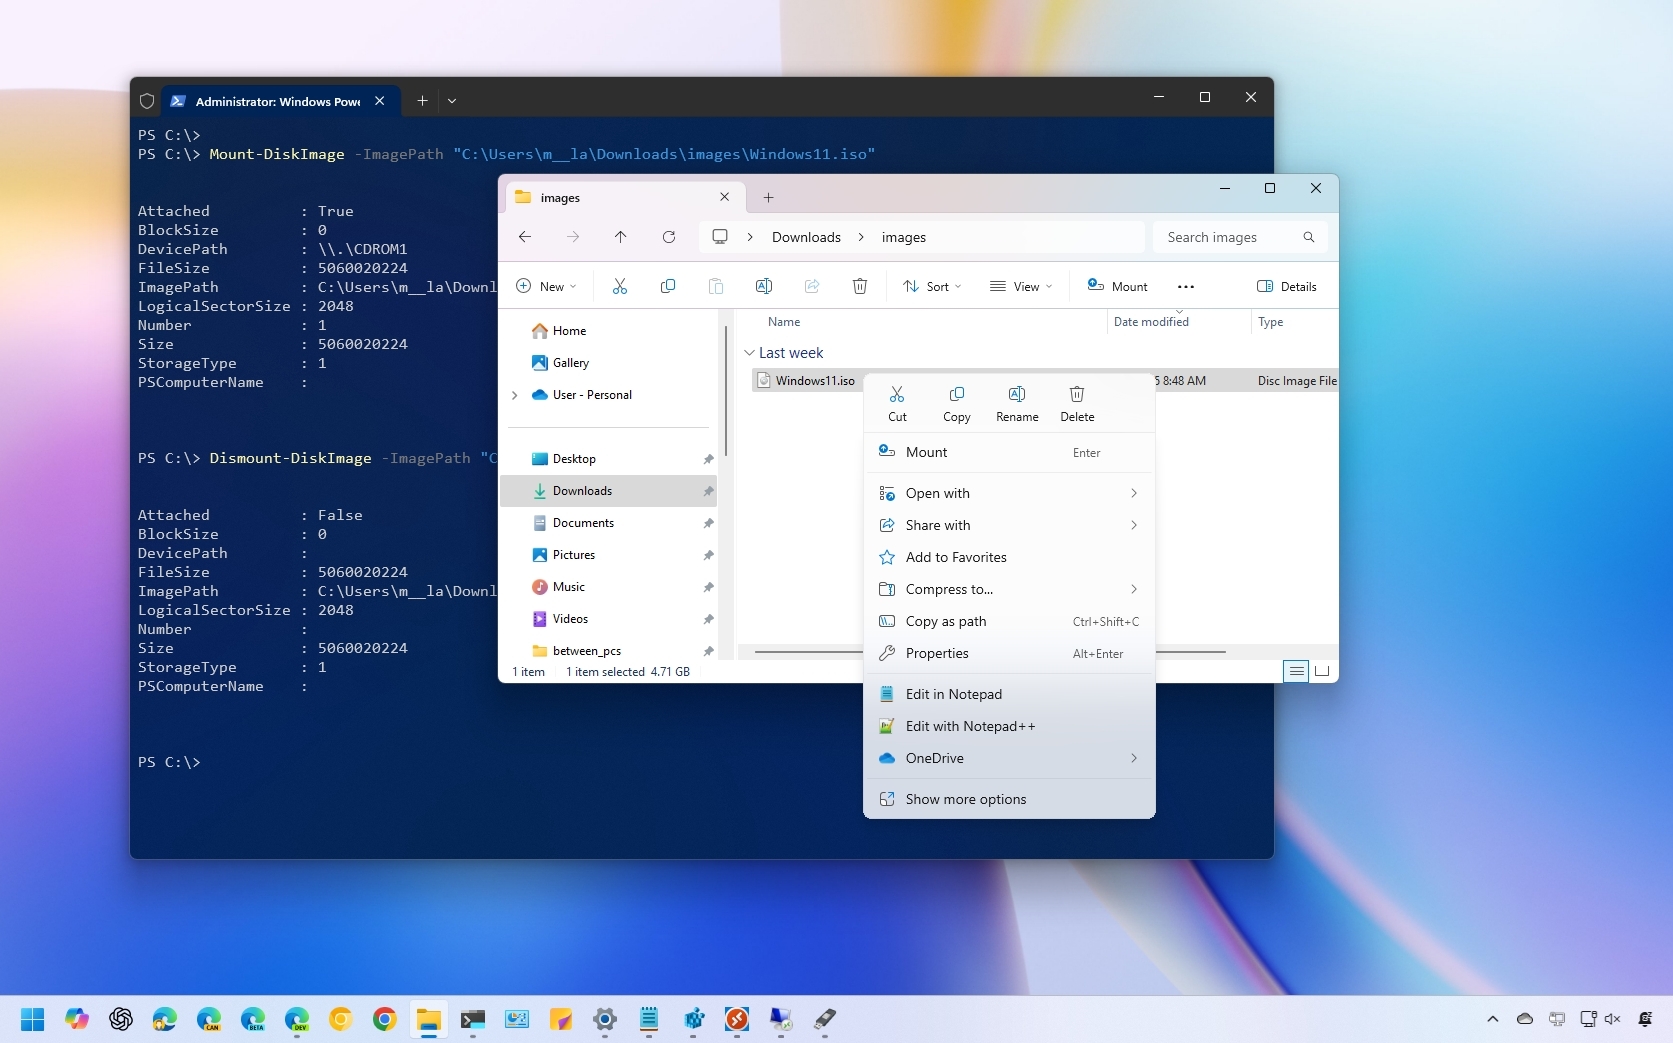
Mounting ISO Files (Windows 8 and Later, macOS, Linux)
For modern operating systems, the most straightforward way to access the contents of an ISO file is to “mount” it. Mounting an ISO file essentially makes the operating system treat the ISO as if it were a physical disc inserted into a drive. This eliminates the need for third-party software in many cases.
On Windows (8 and Later):
- Locate the ISO file: Navigate to the folder where your ISO file is saved.
- Double-click the ISO file: In Windows 8, 10, and 11, a simple double-click will often mount the ISO image.
- Access the virtual drive: A new virtual DVD drive will appear in File Explorer (This PC), containing the contents of the ISO. You can now browse the files or run installers directly from this virtual drive.
- To unmount: Right-click on the virtual DVD drive in File Explorer and select “Eject.”
On macOS:
- Locate the ISO file: Find the ISO file in Finder.
- Double-click the ISO file: macOS has built-in support for mounting ISO images.
- Access the mounted image: The ISO will appear as a mounted drive on your Desktop and in the Finder sidebar. You can then access its contents.
- To unmount: Drag the mounted drive icon to the Trash in the Dock (which will change to an eject symbol) or right-click on it and select “Eject.”
On Linux:
Linux distributions offer several ways to mount ISO files, often using the command line or graphical tools.
-
Using the command line:
- Create a mount point (a directory where the ISO will be accessed):
bash

sudo mkdir /mnt/iso
- Mount the ISO file:
bash

sudo mount -o loop /path/to/your/file.iso /mnt/iso
Replace/path/to/your/file.isowith the actual path to your ISO file. The-o loopoption tells the mount command to treat the file as a block device. - Access the contents in
/mnt/iso. - To unmount:
bash

sudo umount /mnt/iso
- Create a mount point (a directory where the ISO will be accessed):
-
Using graphical file managers: Many Linux file managers (like Nautilus in GNOME or Dolphin in KDE) allow you to simply double-click an ISO file to mount it, similar to Windows and macOS.
Creating Bootable Media (USB Drives or DVDs)
When the ISO file is intended for booting a computer (e.g., for an operating system installation), you need to create bootable media. This typically involves using specialized software to write the ISO image to a USB drive or a DVD. This is a core Tutorial for anyone venturing into custom PC builds or OS management.
Using Rufus (Windows)
Rufus is a popular, free, and open-source utility for creating bootable USB drives. It’s highly recommended for its simplicity and effectiveness.
- Download Rufus: Go to the official Rufus website and download the latest version.
- Run Rufus: Launch the Rufus application.
- Select your USB drive: Under “Device,” choose the USB drive you want to use. Ensure it’s empty or that you’ve backed up its contents, as it will be formatted.
- Select the ISO image: Click the “SELECT” button next to “Boot selection” and browse to your ISO file.
- Configure options (usually default is fine): For most OS installations, the default settings for Partition scheme (MBR/GPT) and Target system (BIOS/UEFI) will work. Rufus often automatically detects the correct settings.
- Start the process: Click the “START” button. Rufus will warn you that all data on the USB drive will be destroyed. Confirm to proceed.
- Wait for completion: Rufus will write the ISO image to the USB drive, making it bootable. Once done, you can safely remove the USB drive.
Using Etcher (Windows, macOS, Linux)
Etcher is another excellent, user-friendly tool for flashing OS images, including ISOs, to SD cards and USB drives. It’s known for its safety features, preventing accidental writes to your main hard drives.
- Download Etcher: Visit the BalenaEtcher website and download the version for your operating system.
- Install and run Etcher.
- “Flash from file”: Click this option and select your ISO file.
- “Select target”: Choose the USB drive you want to use. Etcher will usually automatically detect available drives and highlight them.
- “Flash!”: Click this button to begin the process. Etcher will write and then validate the image, ensuring it was written correctly.
Burning to a DVD (Windows, macOS)
While USB drives are now the preferred method for bootable media due to speed and capacity, burning an ISO to a DVD is still a viable option.
-
On Windows:
- Locate the ISO file.
- Right-click the ISO file and select “Burn disc image.”
- The Windows Disc Image Burner will open.
- Insert a blank DVD into your DVD burner.
- Select your DVD burner from the dropdown menu.
- Click “Burn.”
-
On macOS:
- Locate the ISO file.
- Insert a blank DVD into your optical drive.
- Control-click (or right-click) the ISO file and select “Burn [ISO File Name] to Disc.”
- Follow the on-screen prompts.
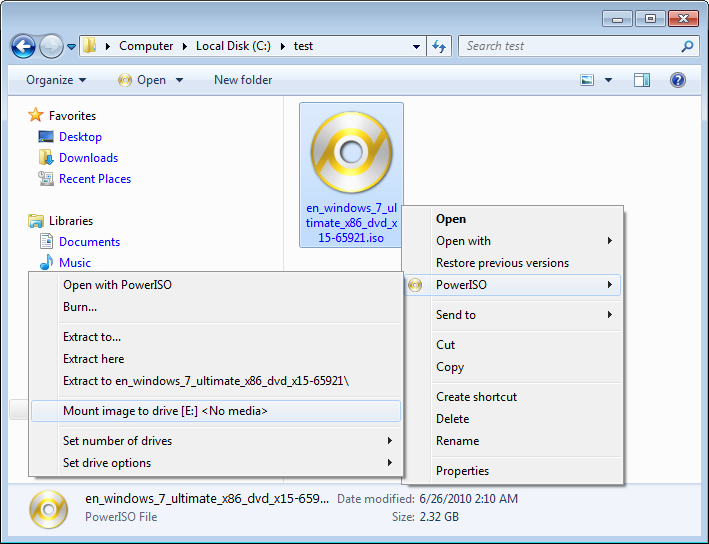
Using Third-Party Software for Older Systems or Specific Needs
For older versions of Windows (prior to Windows 8) or for more advanced control, third-party tools are often necessary.
- Daemon Tools Lite: A long-standing and popular tool for mounting ISOs and creating virtual drives. It offers both free and paid versions.
- PowerISO: Another feature-rich utility for creating, mounting, and editing ISO files. It also offers a trial version.
These tools can be particularly useful for managing a large library of ISO files, especially if you’re frequently working with disc images for gaming or software development. This ties into the Apps and Reviews aspects, as users often compare and review these utilities based on their features and performance.
Troubleshooting Common ISO Installation Issues
While the process is generally straightforward, you might encounter a few snags. Understanding these common issues and their solutions can save you considerable time and frustration.
Corrupted ISO File
- Symptom: The installation fails, files are missing, or you receive read errors.
- Solution: The most common cause is a corrupted download. Re-download the ISO file from a reliable source. Ensure your internet connection is stable during the download. If possible, compare the checksum (MD5, SHA1, or SHA256) of your downloaded file with the one provided by the source to verify its integrity.
Incorrectly Created Bootable Media
- Symptom: The computer doesn’t boot from the USB drive or DVD, or the boot menu doesn’t recognize it.
- Solution: Re-create the bootable media using a different USB drive or a new DVD. Try using a different flashing tool (e.g., switch from Rufus to Etcher or vice-versa). Ensure you followed the instructions precisely and selected the correct ISO file and target drive.
BIOS/UEFI Settings
- Symptom: The computer bypasses the bootable media and boots from the existing operating system or shows a “No bootable device” error.
- Solution: You need to access your computer’s BIOS or UEFI settings to change the boot order.
- Restart your computer.
- Press the appropriate key during startup (often F2, F10, F12, DEL, or ESC – the screen usually indicates which key).
- Navigate to the Boot section or Boot Order settings.
- Set your USB drive or DVD drive as the first boot device.
- Ensure Secure Boot is disabled if you are installing an older OS or some Linux distributions that might not be compatible with it.
- Save changes and exit the BIOS/UEFI. Your computer should now attempt to boot from the media you created.
Insufficient Disk Space
- Symptom: The installation process fails midway with disk space errors.
- Solution: Ensure you have enough free space on the target drive for the operating system or application you are installing. ISO files themselves can be quite large, and the installation process will require additional space for extracted files and system configurations.

Conclusion: Empowering Your Digital Endeavors
Mastering the installation and use of ISO files opens up a world of possibilities in the digital realm. From seamless operating system installations that keep your Technology at the cutting edge, to leveraging powerful Apps for gaming and productivity, and even understanding the core of software distribution, ISO files are a fundamental component of modern computing. By understanding their nature and employing the right tools and techniques, you can confidently navigate these digital archives, enhancing your technical capabilities and making your digital life more efficient and enjoyable. Whether you’re a seasoned IT professional or a curious beginner, the ability to effectively handle ISO files is a valuable skill in today’s tech-driven world.
aViewFromTheCave is a participant in the Amazon Services LLC Associates Program, an affiliate advertising program designed to provide a means for sites to earn advertising fees by advertising and linking to Amazon.com. Amazon, the Amazon logo, AmazonSupply, and the AmazonSupply logo are trademarks of Amazon.com, Inc. or its affiliates. As an Amazon Associate we earn affiliate commissions from qualifying purchases.