The world of technology is constantly evolving, and for many of us, the heart of our digital experience lies within the PC. Whether you’re a gamer seeking to immerse yourself in breathtaking virtual worlds, a creative professional pushing the boundaries of digital art and video editing, or simply someone looking to enhance their everyday computing power, upgrading or installing a new video card (also known as a GPU or graphics card) is often the most impactful step you can take.
The title “how do I install a video card” might seem straightforward, but the process involves more than just plugging in a new component. It’s a journey into the intricate workings of your PC, a blend of hardware, software, and a touch of careful execution. This guide, rooted in the broader themes of Tech, aims to demystify the installation process, ensuring you can confidently breathe new life into your system. We’ll navigate through the essential considerations, the physical installation, and the crucial post-installation steps, empowering you to achieve optimal performance and a visually stunning computing experience.

Before You Begin: Essential Preparations and Considerations
Embarking on a video card installation is an exciting prospect, but haste can lead to frustration. Before you even think about opening your PC case, a series of crucial preparations will ensure a smooth and successful upgrade. This phase touches upon the Tech aspect by ensuring compatibility and understanding the limitations and capabilities of your current and potential new hardware.
Understanding Your System: Compatibility is Key
The most critical step before purchasing a new video card is to understand your existing system’s compatibility. This isn’t a one-size-fits-all upgrade. Several factors come into play:
- Motherboard Slot: Modern video cards primarily utilize a PCI Express (PCIe) slot. Most motherboards have at least one PCIe x16 slot, which is what your new GPU will require. Older systems might have different slot types, so it’s essential to check your motherboard’s specifications. Newer, high-end cards often benefit from PCIe 4.0 or even PCIe 5.0, so ensure your motherboard supports the generation of the card you intend to buy for optimal performance.
- Power Supply Unit (PSU): Video cards are power-hungry components. Your PSU must have enough wattage to support the new GPU and the rest of your system. Manufacturers typically list the recommended PSU wattage for each of their graphics cards. Don’t underestimate this; an insufficient PSU can lead to system instability, performance throttling, or even hardware damage. Additionally, check if your PSU has the necessary PCIe power connectors (6-pin or 8-pin) that your new video card requires.
- Case Size: Graphics cards come in various lengths and heights. Your PC case needs to physically accommodate the new card. Measure the available space within your case, particularly the length from the expansion slot bracket to the front of the case and the clearance for the card’s height.
- CPU Bottleneck: While less of a direct installation concern, it’s worth considering if your CPU can keep up with the processing demands of a significantly more powerful GPU. A weak CPU might “bottleneck” the new video card, meaning the CPU can’t process data fast enough for the GPU to reach its full potential. Researching CPU-GPU pairings can help you make informed decisions for a balanced system.
Gathering Your Tools and Materials
Once you’ve confirmed compatibility, it’s time to gather what you’ll need for the physical installation. This is where the hands-on Tech aspect comes into play.
- Your New Video Card: The star of the show! Ensure it’s well-packaged and handled with care.
- Screwdriver Set: A Phillips head screwdriver is usually sufficient. Some cases might require specialty bits, so having a small set is beneficial.
- Anti-Static Wrist Strap: This is crucial for preventing electrostatic discharge (ESD), which can damage sensitive electronic components. Connect it to a grounded metal part of your computer case.
- User Manuals: Keep the manuals for your motherboard, PSU, and the new video card handy. They often contain specific diagrams and instructions.
- Flashlight (Optional but Recommended): To illuminate the dark corners of your PC case.
- Small Container or Magnetic Tray: To keep track of screws.
Preparing Your Workspace and System
A clean and organized workspace is essential for a smooth installation.
- Choose a Well-Lit Area: Good lighting will help you see what you’re doing.
- Ground Yourself: Before touching any internal components, touch a grounded metal object (like your PC case, once it’s unplugged) to discharge any static electricity. Wearing an anti-static wrist strap is highly recommended.
- Power Down Completely: Shut down your computer, turn off the power supply switch on the back of the PSU, and unplug the power cord from the wall outlet.
- Open Your PC Case: Most cases have side panels secured by screws or latches. Consult your case manual if you’re unsure.
The Physical Installation: Slotting In Your New Graphics Powerhouse
This is the core of the “how do I install a video card” question. The physical process, while requiring a steady hand, is generally straightforward. It’s a hands-on engagement with the internal Tech of your PC.
Removing the Old Video Card (If Applicable)
If you’re upgrading an existing video card, this is your first step.
- Locate the Current GPU: It will be plugged into the longest PCIe slot on your motherboard and will typically have display outputs (HDMI, DisplayPort) on the back of your case.
- Disconnect Cables: Unplug any power cables connected to the GPU from the PSU. These are usually 6-pin or 8-pin connectors.
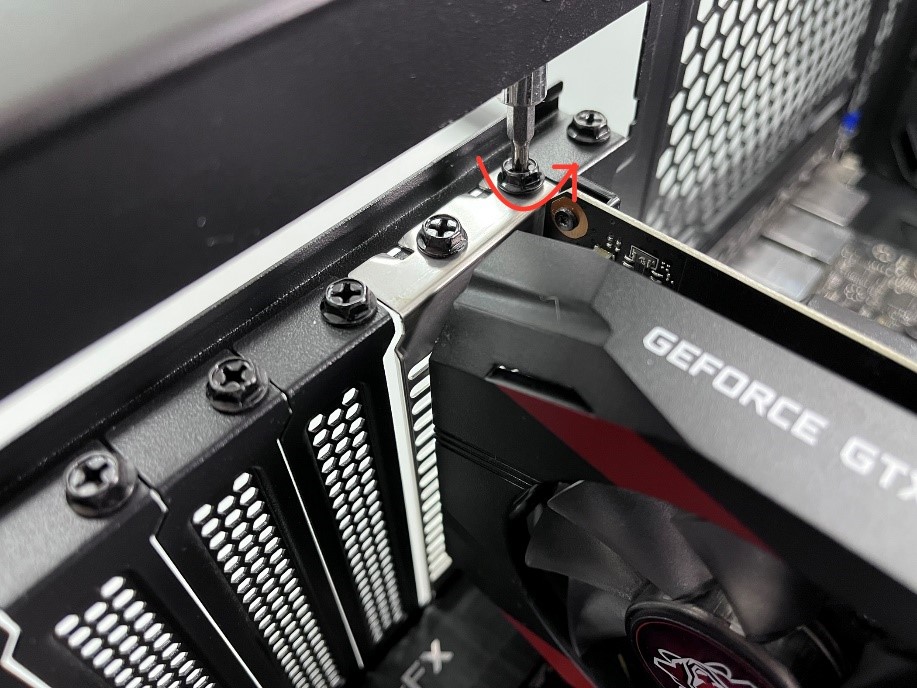
- Unscrew the Retention Bracket: The video card is secured to the back of the PC case by one or two small screws. Remove these.
- Release the PCIe Slot Latch: Most PCIe slots have a small latch or clip at the end that locks the GPU in place. Gently press or slide this latch to release the card.
- Gently Pull Out the GPU: With the screws removed and the latch released, carefully and evenly pull the video card straight out of the slot. Avoid wiggling it excessively.
Installing the New Video Card
Now for the exciting part: installing your new GPU.
- Prepare the Case for the New Card: If your new card requires more expansion slot covers than your old one, you’ll need to remove the appropriate metal brackets from the back of your PC case. These are usually held in place by screws or a tool-less locking mechanism.
- Align the New GPU with the PCIe Slot: Carefully align the gold connectors on the bottom of your new video card with the PCIe x16 slot on your motherboard. Ensure the card is oriented correctly.
- Insert the GPU Firmly: Gently but firmly press the video card straight down into the slot until it’s fully seated. You should hear a click as the PCIe slot latch engages, securing the card.
- Secure the GPU to the Case: Re-install the screws that hold the video card’s retention bracket to the back of your PC case. This provides crucial physical stability.
- Connect Power Cables: Connect the required PCIe power cables from your PSU to the power connectors on the new video card. Ensure they are securely plugged in.
Post-Installation: Drivers, Software, and Optimization
You’ve physically installed your video card, but the job isn’t quite done. The next phase involves bridging the hardware with the software, a critical aspect of Tech that unlocks the full potential of your new component.
Installing Graphics Drivers: The Key to Performance
Drivers are the software intermediaries that allow your operating system and applications to communicate with your hardware. Outdated or incorrect drivers are a common cause of performance issues and instability.
- Download the Latest Drivers: Visit the website of your video card’s manufacturer (e.g., NVIDIA, AMD, Intel). Navigate to their support or driver download section. Select your specific GPU model and operating system to download the latest stable driver package. It’s generally recommended to download directly from the manufacturer rather than relying solely on Windows Update.
- Uninstall Old Drivers (Recommended): If you’re replacing an old GPU, it’s best practice to remove the old drivers first to prevent conflicts. You can do this through the “Add or remove programs” feature in Windows or by using a driver uninstaller utility like Display Driver Uninstaller (DDU) for a cleaner removal.
- Run the Driver Installer: Once the old drivers are removed (or if this is a fresh install), run the driver package you downloaded. Follow the on-screen prompts. You’ll typically have the option for a “Clean Install,” which is highly recommended.
- Restart Your Computer: After the driver installation is complete, a system restart is usually required to finalize the changes.
Configuring and Testing Your New Video Card
With drivers installed, it’s time to ensure everything is working as it should.
- Check Display Settings: Once your computer restarts, your display resolution might be reset to a lower setting. Right-click on your desktop and select “Display settings” to adjust your resolution to your monitor’s native setting.
- Open GPU Control Panel: Both NVIDIA and AMD provide dedicated control panels (NVIDIA Control Panel and AMD Radeon Software, respectively). These allow you to fine-tune graphics settings, adjust refresh rates, and manage multiple displays. Explore these options to optimize your experience.
- Run Benchmarks and Games: To truly test your new video card, run some demanding applications. Gaming benchmarks (like FurMark, Unigine Heaven/Superposition) or your favorite graphically intensive games are excellent ways to push the GPU and monitor its performance. Observe frame rates, temperatures, and overall stability.

Troubleshooting Common Issues
Even with careful preparation, you might encounter minor hiccups.
- No Display: Ensure the video card is fully seated in the PCIe slot and that all power cables are connected securely. Double-check that your monitor is plugged into the new video card’s outputs, not the motherboard’s.
- System Not Booting: This could indicate an insufficient PSU, a faulty GPU, or improper installation. Re-seat the card and re-check all connections. If the problem persists, try installing the old GPU to see if the system boots.
- Poor Performance or Artifacts: This often points to driver issues. Ensure you have the latest drivers installed and that you performed a clean installation. Overheating can also cause performance problems; ensure your case has adequate airflow and that the GPU’s fans are spinning.
Upgrading your video card is a rewarding process that can significantly enhance your PC’s capabilities. By following these steps, from understanding compatibility to the final driver installation, you’ll be well-equipped to answer the question “how do I install a video card” with confidence and achieve a more powerful and visually impressive computing experience. This technical endeavor not only improves your digital life but also offers a tangible understanding of the hardware that powers your virtual world.
aViewFromTheCave is a participant in the Amazon Services LLC Associates Program, an affiliate advertising program designed to provide a means for sites to earn advertising fees by advertising and linking to Amazon.com. Amazon, the Amazon logo, AmazonSupply, and the AmazonSupply logo are trademarks of Amazon.com, Inc. or its affiliates. As an Amazon Associate we earn affiliate commissions from qualifying purchases.