In the modern digital landscape, knowing how to manage your hardware is more than just a technical skill—it is a cornerstone of digital literacy. Whether you are a creative professional building a high-end workstation to enhance your personal brand, a budget-conscious student looking to revive an old laptop, or a tech enthusiast exploring the latest software trends, mastering the installation of Windows is essential.
A fresh installation of Windows can breathe new life into a sluggish machine, remove intrusive bloatware, and provide a secure foundation for your digital life. This guide will walk you through the entire process, from preparation and media creation to post-installation optimization, ensuring your PC runs at peak performance.
1. Preparation: Setting the Stage for Success
Before diving into the technical steps, preparation is paramount. A botched installation can lead to data loss or a non-functional machine. Taking the time to verify your hardware and secure your files is a wise investment in your digital security and peace of mind.
System Requirements and Compatibility
Microsoft’s latest operating systems, particularly Windows 11, have specific hardware requirements that differ significantly from previous versions. To ensure a smooth experience, your PC must meet the following minimum specifications:
- Processor: 1 GHz or faster with 2 or more cores on a compatible 64-bit processor.
- RAM: At least 4 GB (8 GB or more is recommended for modern productivity and AI tools).
- Storage: 64 GB or larger storage device.
- System Firmware: UEFI, Secure Boot capable.
- TPM: Trusted Platform Module (TPM) version 2.0.
- Graphics Card: Compatible with DirectX 12 or later with a WDDM 2.0 driver.
If you are installing Windows 10, the requirements are more lenient, but the shift toward Windows 11 is recommended for those prioritizing the latest security features and integration with modern apps.
Backing Up Your Data (Digital Security and Peace of Mind)
The most critical step in any OS installation is backing up your data. A “Clean Install” involves wiping your primary hard drive, meaning all files, photos, and professional documents will be erased.
- Cloud Storage: Utilize services like OneDrive, Google Drive, or Dropbox to sync your most important documents.
- External Hardware: For larger files or sensitive corporate identity assets, use an external SSD or HDD.
- The Golden Rule: Always follow the 3-2-1 backup rule: keep three copies of your data, on two different media types, with one copy off-site.
Securing Your Product Key
From a financial perspective, you want to ensure you aren’t paying for a license you already own. Most modern laptops have the Windows product key embedded in the BIOS/UEFI. However, if you are building a custom PC, ensure you have your 25-digit product key ready. If you are upgrading, your digital license is likely linked to your Microsoft account, making the reactivation process seamless once you log in.
2. Creating the Installation Media
Gone are the days of installing software via dozens of floppy disks or even DVDs. The modern standard is a bootable USB flash drive. This method is faster, more reliable, and allows you to include the latest updates directly in the installation package.
Using the Windows Media Creation Tool
Microsoft provides a free, official “Media Creation Tool” that automates the process of turning a standard USB drive into a bootable Windows installer.
- Requirement: You will need a USB flash drive with at least 8 GB of space. Note that this drive will be formatted, so ensure it contains no important files.
- Download: Visit the official Microsoft software download page and download the tool for either Windows 10 or Windows 11.
- Execution: Run the tool and select “Create installation media (USB flash drive, DVD, or ISO file) for another PC.”
- Configuration: Choose your desired language, edition, and architecture (usually 64-bit).
- Completion: The tool will download the necessary files and prepare the USB. This may take anywhere from 10 to 30 minutes depending on your internet speed.
Choosing the Right Version: Home vs. Pro
During the setup, you may be asked which version of Windows you wish to install. From a brand strategy and business perspective, the choice matters:
- Windows Home: Perfect for personal use, gaming, and basic productivity.
- Windows Pro: Essential for professionals and businesses. It includes BitLocker drive encryption (crucial for digital security), Remote Desktop, and advanced management tools like Group Policy Editor. If you handle sensitive financial data or client information, the Pro version is a worthy investment.
3. The Installation Process Step-by-Step
With your bootable USB ready and your data backed up, it is time to perform the actual installation. This is the “heart” of the tutorial.
Booting from Your USB Drive
To start the installation, you must tell your PC to boot from the USB drive instead of the internal hard drive.
- Insert the USB: Plug it into a USB 3.0 port (usually blue) for the fastest speeds.
- Restart and Enter BIOS/UEFI: As the computer starts, repeatedly tap the BIOS key—common keys include F2, F10, F12, or Del.
- Change Boot Order: Navigate to the “Boot” tab and move your USB flash drive to the top of the priority list.
- Save and Exit: The PC will restart and load the Windows Setup environment.
The Setup Wizard and Partitioning
Once the Windows logo appears, follow these steps:
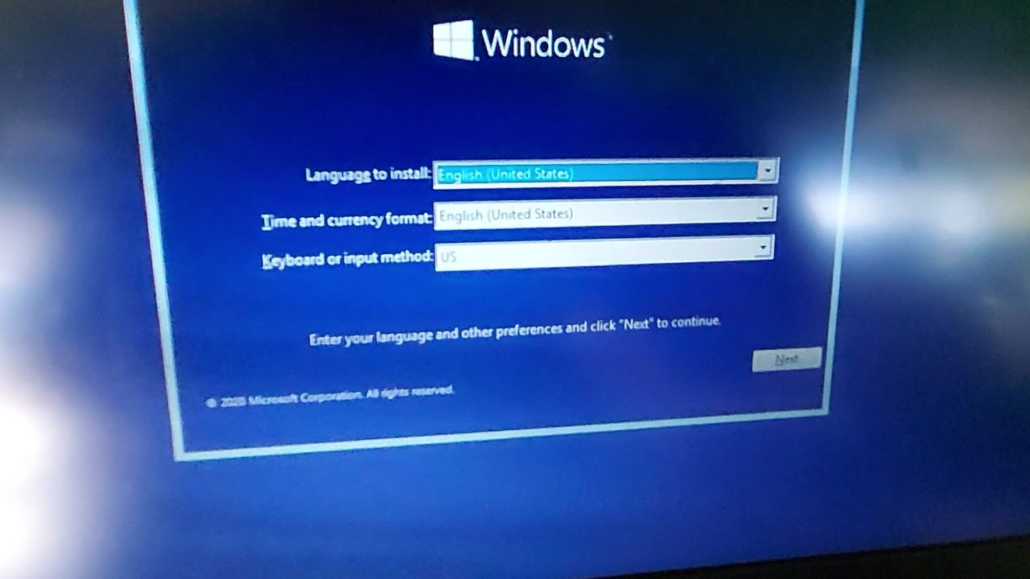
- Select Language and Region: This ensures your keyboard layout and currency settings (important for personal finance apps) are correct.
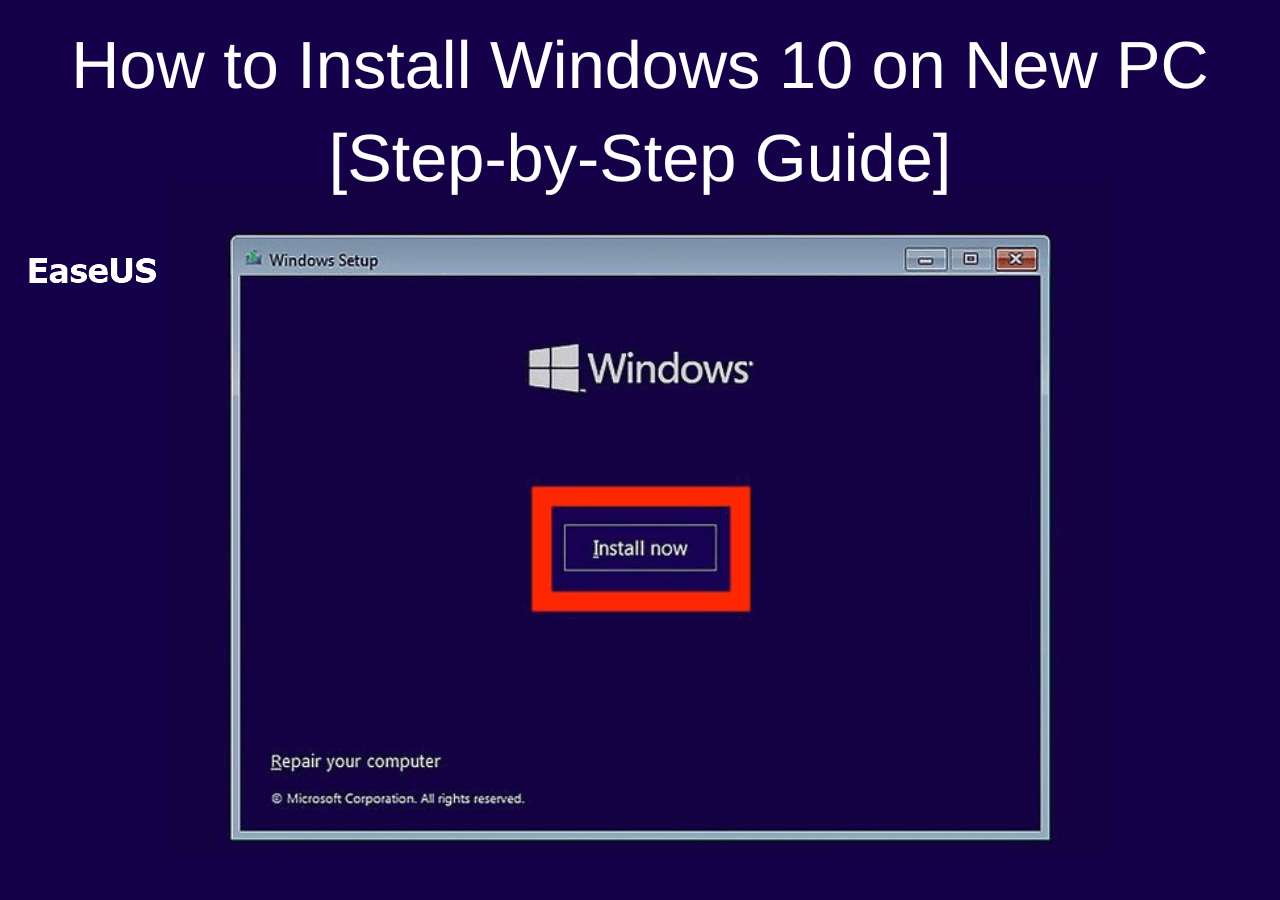
- Install Now: Click the central button to begin.
- Activation: Enter your product key. If you don’t have one handy, click “I don’t have a product key” to skip this step; you can activate it later in the settings.
- Installation Type: Crucial Step. Select “Custom: Install Windows only (advanced).” This allows for a clean install, which is far superior to an “Upgrade” for long-term system stability.
- Drive Partitioning: You will see a list of drives and partitions. For a truly clean start, select each partition on your primary drive and click “Delete” until you have “Unallocated Space.” Select that space and click “Next.”
Windows will now begin copying files and installing features. The computer will restart several times during this process. Do not turn off your PC or unplug the USB until you reach the Out-of-Box Experience (OOBE) screen.
4. Post-Installation: Optimizing for Performance and Productivity
Installing the OS is only half the battle. To turn your PC into a powerhouse for marketing, investing, or content creation, you need to configure it correctly.
Essential Drivers and Security Updates
The first thing you should do after reaching the desktop is connect to the internet and run Windows Update.
- Drivers: Windows is excellent at finding generic drivers, but for specialized gadgets and high-end GPUs, visit the manufacturer’s website (NVIDIA, AMD, Intel) to download the latest software.
- Security: Ensure Windows Defender is active. In the modern age of digital security threats, having a baseline of protection is non-negotiable.
Curating Your Software Ecosystem
To maximize productivity and personal branding, avoid the temptation to install “everything.” Be intentional:
- Browsers: While Edge is efficient, many professionals prefer Chrome or Brave for specific extensions related to SEO, brand strategy, or financial tracking.
- Productivity Tools: Install your essential suite, whether it’s Microsoft 365 for business finance or Adobe Creative Cloud for design.
- AI Tools: Leverage modern technology by installing AI-integrated apps that can automate tedious tasks, allowing you to focus on high-level strategy.
Personalization and Privacy
Take ten minutes to dive into the “Privacy & Security” settings. Disable telemetry and advertising IDs if you prefer a more private experience. This not only protects your data but can also slightly improve system performance by reducing background processes.
5. Troubleshooting and Long-Term Maintenance
Even with a perfect installation, technology can be unpredictable. Maintaining your system ensures your investment—both in time and money—continues to pay off.
- System Restore Points: Once you have your PC configured exactly how you like it, create a “System Restore Point.” This allows you to “roll back” time if a future software update or app causes issues.
- Managing Startup Apps: Use the Task Manager (Ctrl + Shift + Esc) to disable unnecessary apps from starting with Windows. This keeps your boot times fast and your RAM free for intensive tasks.
- Disk Cleanup: Periodically use the “Storage Sense” feature to remove temporary files and keep your drive lean.

Conclusion: The Value of a Clean Setup
Mastering the installation of Windows is a foundational skill in the tech world. It empowers you to take control of your hardware, ensuring that your tools serve your goals rather than hindering them. By following this guide, you have not only saved money on professional tech services but have also built a secure, high-performance environment tailored to your personal brand and professional needs.
Whether you are tracking side hustles in a spreadsheet or designing the next big corporate identity, a clean Windows installation provides the stability and speed required to excel in today’s fast-paced digital economy. Stay curious, keep your drivers updated, and enjoy the pristine efficiency of your newly installed PC.
aViewFromTheCave is a participant in the Amazon Services LLC Associates Program, an affiliate advertising program designed to provide a means for sites to earn advertising fees by advertising and linking to Amazon.com. Amazon, the Amazon logo, AmazonSupply, and the AmazonSupply logo are trademarks of Amazon.com, Inc. or its affiliates. As an Amazon Associate we earn affiliate commissions from qualifying purchases.