Embarking on the journey to install Windows on a new hard drive might seem like a formidable task, a challenge reserved only for seasoned tech enthusiasts. However, whether you’re breathing new life into an aging system with an SSD upgrade, replacing a failing drive to salvage your digital world, or meticulously assembling a brand-new PC from scratch, this comprehensive guide is designed to demystify the process. It will empower you with the knowledge and confidence to navigate each step, transforming what appears to be a complex procedure into a manageable and rewarding DIY project. Understanding this fundamental aspect of PC management is not just about functionality; it’s about gaining a deeper insight into your computer’s core, ensuring optimal performance, and maintaining digital security. Let’s delve into the specifics and get your new system up and running with a fresh installation of Windows.
Preparing for Your Windows Installation
Before you dive into the actual installation process, meticulous preparation is key. Skipping these foundational steps can lead to frustrating roadblocks and potential data loss. Think of this as laying the groundwork for a successful and seamless operating system deployment.
Essential Pre-Installation Checks
Before anything else, gather your tools and vital information. This phase is about ensuring you have everything you need and mitigating potential risks.
-
Backup Your Data: A Critical First Step
If you’re replacing an existing hard drive, the importance of backing up your data cannot be overstated. All files on the old drive will become inaccessible once the new drive is in place and formatted. Take the time to create a complete backup of all important documents, photos, videos, and other personal files. Utilize external hard drives, network-attached storage (NAS) devices, or reputable cloud services like OneDrive, Google Drive, or Dropbox. This redundancy ensures that your precious memories and critical work remain safe and accessible, regardless of what happens during the installation. This isn’t just a recommendation; it’s a fundamental tenet of digital security and data management. -
Obtain Your Windows Installation Media: The Key to Entry
You’ll need a bootable device containing the Windows installation files. The most common and recommended method is a USB flash drive with at least 8GB of storage capacity. Alternatively, a DVD can be used if your system supports optical media. Microsoft provides an official “Media Creation Tool” which is specifically designed for this purpose, simplifying the process of downloading the correct Windows version and preparing the bootable media. Ensure you download this tool from Microsoft’s official website to avoid any security risks associated with unofficial sources. -
Secure Your Windows Product Key: For Activation and Authenticity
The product key is a 25-character code essential for activating your copy of Windows, verifying its legitimacy, and unlocking all its features. Its location depends on how you acquired Windows:- OEM Systems: Often found on a sticker attached to your PC casing (especially older models).
- Digital Licenses: Linked to your Microsoft account. You might not need to enter it during installation if you sign in with the associated account.
- Retail Purchases: Usually on a label inside the product packaging or in a confirmation email if purchased digitally.
- Pre-built PCs: Sometimes embedded in the UEFI firmware, meaning Windows activates automatically once connected to the internet.
Have this key readily available, as you might need to enter it during the setup process or later for activation.
-
Verify Hardware Requirements: Ensuring Compatibility
Before installing, quickly check if your computer’s hardware meets the minimum specifications for the version of Windows you intend to install (e.g., Windows 10 or Windows 11). Key requirements typically include processor speed, RAM, hard disk space, and graphics card capabilities. While most modern PCs will comfortably exceed these, it’s a quick check to prevent compatibility issues down the line. Installing an OS on under-spec hardware will result in a sluggish and frustrating user experience. -
Stable Internet Connection: For Updates and Drivers
A reliable internet connection isn’t strictly necessary for the core installation, but it is highly recommended. Windows setup often downloads crucial updates and essential drivers during the process. Post-installation, it’s vital for downloading security patches, feature updates, and any missing device drivers, ensuring your system is secure and fully functional from day one. -
Proactive Driver Downloads: A Safety Net
While Windows has improved significantly in automatically detecting and installing drivers, certain critical drivers might be missing or generic after a fresh install, especially for newer or specialized hardware. Network adapters (Ethernet or Wi-Fi) and chipset drivers are often the most crucial. Visit your motherboard manufacturer’s website (e.g., ASUS, MSI, Gigabyte) or the websites of your specific component manufacturers (e.g., NVIDIA, AMD for graphics cards) and download the latest drivers onto a separate USB drive. Having these on hand ensures you can get online and install other drivers even if Windows doesn’t immediately recognize your network hardware. This foresight can save you significant troubleshooting time.
Crafting Your Bootable Windows USB
The Windows Media Creation Tool simplifies the process of creating bootable installation media. Follow these steps meticulously:
- Download the Media Creation Tool: Navigate to Microsoft’s official Windows download page (e.g., for Windows 10 or Windows 11) and locate the “Download tool now” button. Save the executable file to your computer.
- Run the Tool: Double-click the downloaded file (e.g.,
MediaCreationTool22H2.exe). You’ll likely be prompted by User Account Control; click “Yes” to allow it to run. Read and accept the license terms to proceed. - Choose Your Action: Select the option “Create installation media (USB flash drive, DVD, or ISO file) for another PC” and click “Next.” This tells the tool you want to create a bootable installer.
- Define Language, Edition, and Architecture: The tool will often suggest recommended options based on your current PC. If you need to install a different version, uncheck “Use the recommended options for this PC” and select your preferred language, Windows edition (e.g., Windows 10 Home/Pro, Windows 11), and architecture (64-bit is standard for most modern PCs). Click “Next.”
- Select Media Type: Choose “USB flash drive” as your media option. This is the most convenient and widely compatible choice. Click “Next.”
- Identify Your USB Drive: A list of detected USB drives will appear. Crucially, select the correct USB drive. Be absolutely certain, as all data on the selected drive will be permanently erased during this process. If you have multiple USB drives plugged in, unplug any non-essential ones to minimize confusion.
- Initiate Creation: Click “Next” to begin the process. The tool will first download the Windows installation files from Microsoft’s servers, which can take some time depending on your internet speed. After the download is complete, it will then format your USB drive and copy the necessary files, making it bootable. Once finished, you will receive a confirmation message. Safely remove the USB drive.
The Physical and Digital Setup: Integrating Your New Drive
With your bootable media ready, the next phase involves physically installing the new hard drive into your computer and then configuring your system to boot from the installation media.
Physically Installing Your New Hard Drive
This step requires a bit of hands-on work inside your PC. Always prioritize safety.
- Power Off and Unplug: Crucial Safety Step. Completely shut down your computer from the operating system, then unplug the power cable from the wall outlet and the back of your PC. It’s also wise to unplug any peripherals like monitors, keyboards, and mice to clear your workspace.
- Discharge Static Electricity: Before touching any internal components, ground yourself to discharge static electricity, which can damage sensitive electronics. Touch an unpainted metal surface of your PC case while it’s still plugged into the wall (but powered off), or wear an anti-static wrist strap.
- Open the PC Case: Locate the screws or latches holding the side panel of your computer case (usually the left side when viewed from the front). Remove them and carefully slide or swing open the panel.
- Locate Drive Bay: Inside the case, identify an available drive bay. These are typically cages or slots designed to hold 2.5-inch drives (for SSDs) or 3.5-inch drives (for traditional HDDs). NVMe SSDs, which look like sticks of RAM, will slot directly into an M.2 slot on your motherboard.
- Mount the Drive:
- 2.5-inch/3.5-inch Drives: Slide your new drive into an available bay. Many modern cases feature tool-less drive trays or sleds that click into place. For older cases or more secure mounting, use the provided screws to secure the drive firmly within the bay. Proper mounting prevents vibration and ensures stable connections.
- NVMe SSDs: Locate an M.2 slot on your motherboard. Carefully insert the NVMe drive into the slot at an angle, then gently push it down until it’s flat against the motherboard. Secure it with the small screw provided with your motherboard or NVMe drive.
- Connect Cables (SATA Drives Only):
- SATA Data Cable: Connect one end of a SATA data cable to the new hard drive and the other end to an available SATA port on your motherboard. These ports are usually labeled and often clustered together.
- SATA Power Cable: Connect a SATA power cable from your power supply unit (PSU) to the new hard drive. These cables typically come from the PSU and have a distinct flat, wide connector.
- Close Case: Once all connections are secure and the drive is mounted, carefully replace the side panel of your PC case and secure it with its screws or latches. Reconnect all power and peripheral cables.
Configuring BIOS/UEFI for USB Boot
Now that the new drive is in, your computer needs to be told to start from the USB installation media.
- Insert USB: Plug the bootable Windows USB drive into an available USB port on your computer. Use a USB 2.0 port if you encounter issues with USB 3.0/3.1 ports on older motherboards, though most modern systems are fine with any USB port.
- Power On and Enter BIOS/UEFI: Turn on your PC. Immediately and repeatedly press the designated key to enter your computer’s BIOS (Basic Input/Output System) or UEFI (Unified Extensible Firmware Interface) setup utility. Common keys include
Del,F2,F10,F12, orEsc. The specific key often flashes briefly on the screen during boot-up. If you miss it, restart and try again. - Navigate to Boot Options: Once in BIOS/UEFI, use your keyboard (or mouse, in modern UEFI interfaces) to navigate through the menus. Look for a tab or section labeled “Boot,” “Boot Order,” “Boot Priority,” or “Startup.”
- Change Boot Order: Within the boot options, you’ll see a list of detected boot devices. Your goal is to move the USB drive (it might be listed by its brand name, model, or as “USB HDD/Flash Drive”) to the top of the boot priority list. This tells the computer to attempt booting from the USB drive before trying the installed hard drives.
- Save and Exit: After adjusting the boot order, locate the option to “Save Changes and Exit” (often mapped to a function key like
F10). Confirm your choice. Your computer will restart and, if configured correctly, should now boot directly from the USB installation media, initiating the Windows Setup.
Navigating the Windows Installation Process
Once your PC successfully boots from the USB drive, you’ll be guided through the software portion of the Windows installation. This is where you configure the operating system to your preferences and prepare the new hard drive for use.
The Guided Setup: From Language to Licenses
The initial screens are straightforward configuration steps.
- Windows Setup Screen: The first screen will prompt you to select your language, time and currency format, and keyboard or input method. Choose your preferred settings, then click “Next.”
- Initiate Installation: On the next screen, click the prominent “Install now” button to begin the setup.
- Enter Product Key: A window will appear asking for your Windows product key. Enter the 25-character key you prepared earlier. If you don’t have it immediately available or plan to activate later (e.g., if Windows is linked to your Microsoft account), you can click “I don’t have a product key.” Windows will install, but you’ll need to activate it post-installation to unlock all features.
- Accept License Terms: Read through the Microsoft Software License Terms. If you agree, check the “I accept the license terms” box and click “Next.” This is a necessary step to proceed.
- Choose Installation Type: This is a critical decision. For a clean installation on a new hard drive, select “Custom: Install Windows only (advanced).” Do NOT select “Upgrade” as it’s meant for upgrading an existing Windows installation and could lead to issues on a new, unformatted drive. The “Custom” option allows you to manage partitions and ensures a fresh start.
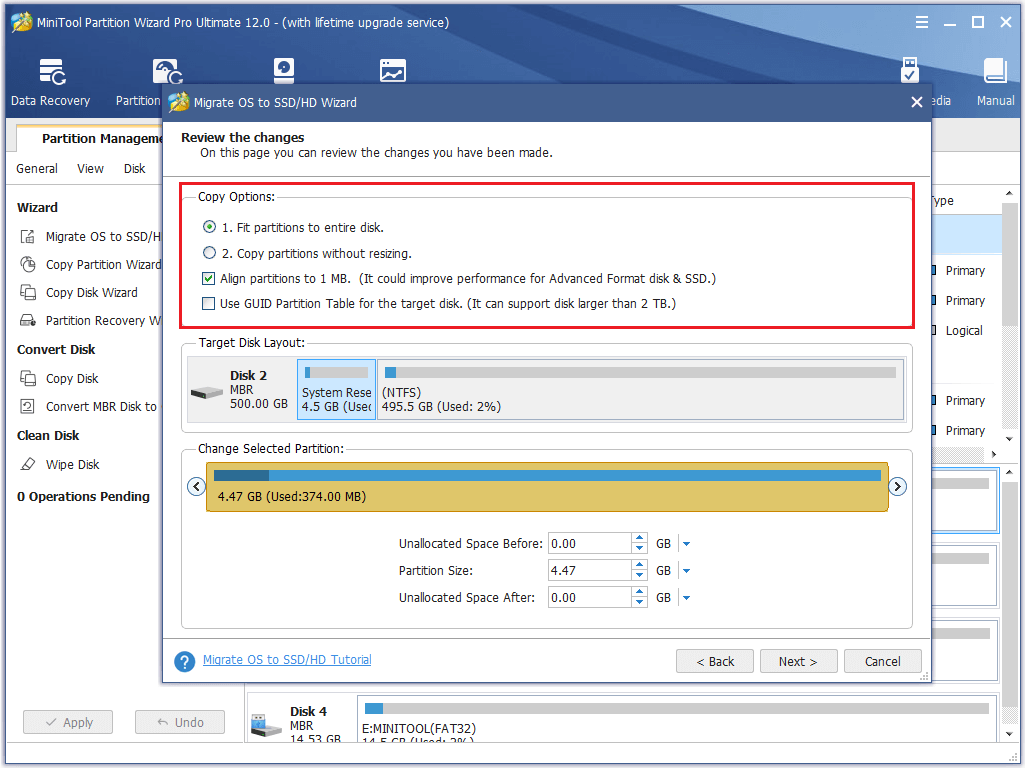
Partitioning Your Drive and Initiating Installation
This is where you tell Windows where to reside on your new hard drive.
- Drive Selection and Partitioning: You will now see a list of drives and any existing partitions. Your new hard drive will likely appear as “Drive 0 Unallocated Space” (or a similar designation, sometimes “Drive 1” if you have an older boot drive still connected).
- Select this “Unallocated Space.”
- Click “New” to create a new partition. Windows will typically suggest creating a primary partition that spans the entire unallocated space. Accept the default size (unless you have a specific reason to create multiple partitions) and click “Apply.”
- Windows will then inform you that it needs to create additional system partitions (e.g., recovery, MSR, system reserved) for proper operation. Click “OK” to allow this. These small partitions are essential for Windows to boot and function correctly.
- You will now see several partitions, including a “Primary” partition (e.g., “Drive 0 Partition 2” or similar) which is the largest one.
- Select Target Partition: Make sure the primary partition (the largest one you just created) is selected. This is where Windows will be installed. Click “Next.”
- Installation Begins: Windows will now begin copying files and installing itself onto your new hard drive. This process involves several stages, including copying Windows files, getting files ready for installation, installing features, installing updates, and finishing up. Your PC will restart multiple times during this phase. It is important to NOT remove the USB drive until after the first restart, when the screen says “Getting devices ready.” If you leave it in, your PC might try to boot back into the installer instead of continuing the setup from the hard drive.
First Boot and Initial System Configuration
After the core installation is complete and your PC restarts for the final time from the new hard drive, you’ll go through the initial out-of-box experience (OOBE).
- Region and Keyboard Layout: Windows will prompt you to confirm your region and keyboard layout. Make your selections and click “Yes” and “Skip” (if applicable) to proceed.
- Network Connection: Connect to a Wi-Fi network or plug in an Ethernet cable. An internet connection is beneficial for subsequent steps and updates.
- Microsoft Account Sign-in (or Offline Account):
- Microsoft Account: You’ll be asked to sign in with your Microsoft account (Outlook, Hotmail, Live). This links your Windows installation to your digital license and allows for cloud synchronization of settings.
- Offline Account: If you prefer not to use a Microsoft account immediately, look for options like “Offline account,” “Domain join instead,” or “Sign-in options” > “Limited experience.” This allows you to create a local user account without an internet connection or Microsoft account.
- Privacy Settings: Review the privacy settings (e.g., location, diagnostic data, tailored experiences). Choose your preferences, understanding how they impact your data, and click “Accept.”
- Cortana Setup (Optional): You might be asked if you want to enable Cortana, Microsoft’s virtual assistant. You can choose to enable it or decline.
- Security Questions or PIN: Set up security questions for password recovery or create a PIN for faster login, enhancing your system’s security.
- Desktop: Finally, after a few more moments of “Getting things ready,” you’ll be greeted by the familiar Windows desktop. Congratulations, Windows is now installed on your new hard drive!
Optimizing Your New System: Post-Installation Essentials
Installing Windows is just the beginning. To ensure optimal performance, security, and a personalized experience, several post-installation steps are crucial.
System Updates and Driver Management
A fresh install often means you’re running on a basic set of drivers and an older version of Windows.
- Update Windows: This is paramount. Go to “Settings” > “Update & Security” (or “Windows Update” in Windows 11) > “Windows Update” and click “Check for updates.” Install all pending updates, including cumulative updates, security patches, and feature updates. This can take some time and multiple restarts, but it’s essential for system stability, performance, and protection against known vulnerabilities.
- Install Essential Drivers: While Windows Update will often find many drivers, it might miss crucial ones or install generic versions. Now is the time to install the specific drivers you downloaded earlier:
- Chipset Drivers: Always install these first from your motherboard manufacturer’s website. They enable proper communication between your CPU, RAM, and other components.
- Graphics Card Drivers: Download the latest drivers from NVIDIA, AMD, or Intel’s website for optimal display performance and gaming.
- Network Drivers: If your Wi-Fi or Ethernet isn’t working, use the drivers you pre-downloaded.
- Audio Drivers: For improved sound quality and features.
- Other Peripheral Drivers: Install drivers for printers, webcams, or specialized input devices.
- Restart your PC after installing major drivers to ensure they take effect.
Restoring Your Digital Life
With the system updated and drivers in place, it’s time to make your PC truly yours.
- Install Your Essential Software: Begin reinstalling your frequently used applications. This includes web browsers (Chrome, Firefox, Edge), office suites (Microsoft Office, LibreOffice), communication tools (Discord, Zoom), media players, and any other productivity or entertainment software you rely on. Download these directly from their official websites to ensure authenticity and avoid bundled malware.
- Restore Your Data: Now, retrieve your backed-up personal files. Copy your documents, photos, music, and videos from your external drive or cloud storage back to their appropriate folders on your new Windows installation. This is where all that initial backup effort pays off.
- Activate Windows (If Skipped): If you chose “I don’t have a product key” during installation, activate Windows now. Go to “Settings” > “Update & Security” > “Activation” (or “System” > “Activation” in Windows 11). Enter your product key or sign in with your Microsoft account if your license is digitally linked. Activation ensures you receive all updates and access to personalized features.
Troubleshooting Common Issues and Final Thoughts
Even with careful preparation, unforeseen issues can sometimes arise. Knowing how to diagnose and address them can save you a lot of frustration.
Common Hurdles and Their Solutions
Here are some typical problems users encounter during or after installation:
- Installation Media Not Booting:
- Solution: Re-enter BIOS/UEFI and meticulously re-check the boot order. Ensure the USB drive is listed and set as the primary boot device. Try different USB ports (especially USB 2.0 vs. USB 3.0/3.1). If still unsuccessful, recreate the installation media from scratch using the Media Creation Tool, as the previous attempt might have been corrupted.
- “Driver Missing” Error During Installation:
- Solution: This usually happens when the Windows installer can’t find drivers for essential hardware, like your storage controller. Ensure any necessary drivers (especially chipset or SATA controller drivers for RAID setups) are pre-downloaded onto a separate USB drive. When the error appears, browse to this drive to load the drivers.
- Hard Drive Not Detected by Windows Setup:
- Solution: Power down and unplug your PC. Open the case and visually inspect the SATA data and power cable connections to the new hard drive and motherboard. Ensure they are firmly seated. For NVMe drives, check that it’s correctly seated in the M.2 slot and secured. If the issue persists, the drive itself might be faulty, or your motherboard’s BIOS might need an update to support newer drives.
- Windows Freezes or Crashes During Installation:
- Solution: This can indicate underlying hardware issues or a corrupted installation media.
- Memory (RAM) Issues: Run a memory diagnostic tool (Windows has a built-in one you can access during boot, or use MemTest86 from a bootable USB). Faulty RAM is a common cause of system instability.
- Corrupted Media: Recreate the bootable USB drive, ensuring a stable internet connection during the download phase.
- Overheating: Ensure your PC’s cooling system (fans, heatsinks) is clean and functioning correctly, especially if the freezing occurs after extended periods.
- Solution: This can indicate underlying hardware issues or a corrupted installation media.

Conclusion
Installing Windows on a new hard drive, while involving several steps, is a deeply satisfying and empowering experience. By meticulously following this guide, you’ve not only successfully deployed a new operating system but also gained a deeper understanding of your computer’s architecture and maintenance. You’ve prepared your system for peak performance, enhanced its storage capabilities, and taken a significant stride in your journey of digital self-reliance.
This foundational skill empowers you to troubleshoot future issues, perform upgrades, and confidently manage your own technology infrastructure. Enjoy the speed, stability, and fresh start that your newly installed Windows system offers. Remember, regular updates, driver maintenance, and robust backups will ensure your system remains a reliable and secure hub for all your digital endeavors. Happy computing!
aViewFromTheCave is a participant in the Amazon Services LLC Associates Program, an affiliate advertising program designed to provide a means for sites to earn advertising fees by advertising and linking to Amazon.com. Amazon, the Amazon logo, AmazonSupply, and the AmazonSupply logo are trademarks of Amazon.com, Inc. or its affiliates. As an Amazon Associate we earn affiliate commissions from qualifying purchases.