In today’s fast-evolving digital landscape, the ability to experiment with different operating systems, test software securely, or even develop in varied environments without altering your primary setup is invaluable. This capability is made possible through virtualization, a technology that allows you to run multiple operating systems on a single physical machine. Among the most popular and accessible tools for personal virtualization is Oracle VM VirtualBox, a powerful, open-source hypervisor. When paired with Ubuntu, a renowned Linux distribution known for its user-friendliness and robust features, VirtualBox transforms your computer into a versatile testing ground, development sandbox, or secure workspace.
This comprehensive guide will walk you through the entire process of installing Ubuntu on VirtualBox, from initial setup to post-installation optimization. Whether you’re a seasoned tech enthusiast looking to broaden your horizons, a developer needing a Linux environment, or simply curious about the world of open-source, mastering this skill can significantly enhance your digital productivity and expand your technological toolkit. It’s a foundational step that not only builds technical proficiency but also subtly aligns with cultivating a flexible and adaptive approach to technology – a hallmark of a strong personal brand in the tech world.
Understanding the Power of Virtualization: Why Ubuntu on VirtualBox?
Before diving into the technical steps, it’s crucial to grasp the fundamental concepts behind virtualization and why this specific combination of Ubuntu and VirtualBox is so potent. Understanding the “why” often illuminates the “how” and empowers you to leverage these tools more effectively.
What is VirtualBox and Why Use It?
VirtualBox, developed by Oracle, is a Type 2 hypervisor. This means it runs on top of an existing operating system (your host OS, like Windows, macOS, or Linux) and allows you to create and manage virtual machines (VMs). Think of a VM as a complete, isolated computer system existing entirely within a file or set of files on your host machine. Each VM has its own virtual hardware – CPU, RAM, hard disk, network interface – which it uses to run a “guest” operating system.
The advantages of using VirtualBox are numerous:
- Isolation and Security: VMs are isolated from your host system. If a guest OS crashes, gets infected with malware, or you make a configuration error, it won’t affect your primary operating system. This makes it ideal for testing new software, visiting suspicious websites, or experimenting with risky configurations.
- Cost-Effective Experimentation: Instead of buying separate hardware for each operating system you want to try, VirtualBox lets you run multiple OSes on your existing machine, saving you money and physical space. This is a practical application of “money-saving tech” strategies.
- Software Development and Testing: Developers frequently use VMs to test their applications across different operating systems or to create specific development environments without cluttering their main system. This ensures compatibility and reduces setup headaches.
- Running Legacy Software: If you need to run an old application that only works on a specific, outdated operating system, a VM provides a safe way to do so without compromising your modern host system.
- Multi-OS Environments: Perhaps you prefer Windows for gaming but need Linux for specific development tasks. VirtualBox allows you to switch between environments seamlessly without dual-booting.
The Allure of Ubuntu: A Gateway to Open-Source
Ubuntu is arguably the most popular and user-friendly distribution of Linux. Based on Debian, it offers a robust, stable, and secure operating system that is completely free and open-source. For newcomers to Linux, Ubuntu provides an excellent entry point due to its intuitive graphical user interface (GUI), extensive software repositories, and a massive, supportive community.
Key reasons to choose Ubuntu:
- User-Friendly: Ubuntu’s desktop environment (typically GNOME, though others are available) is aesthetically pleasing and straightforward to navigate, making the transition from Windows or macOS smoother.
- Security: Linux systems are generally considered more secure than proprietary operating systems, with a strong emphasis on open-source scrutiny and rapid patching of vulnerabilities.
- Software Availability: Ubuntu boasts a vast ecosystem of free and open-source software for nearly every task, from office suites (LibreOffice) to graphic design tools (GIMP) and web browsers (Firefox, Chromium).
- Developer-Friendly: For coders, Ubuntu provides a powerful command-line interface, easy access to development tools, and a stable environment for programming in various languages.
- Community Support: With millions of users worldwide, finding help, tutorials, or solutions to problems is usually just a quick search away.
Synergies: Unleashing Productivity and Experimentation
Combining Ubuntu with VirtualBox creates a powerful synergy. You gain the flexibility and security benefits of virtualization alongside the stability, power, and open-source ethos of Ubuntu. This setup is not just about running another OS; it’s about expanding your digital capabilities, learning new skills, and efficiently managing diverse computing needs. For individuals building a “tech-savvy brand,” demonstrating proficiency in such tools signals adaptability and a forward-thinking mindset. It’s an investment in your technical literacy that pays dividends in flexibility and problem-solving prowess.
Essential Preparations: Gathering Your Tools
Before embarking on the installation journey, ensuring you have all the necessary components and that your system meets the basic requirements will prevent common pitfalls and ensure a smooth experience. Think of this as laying the financial groundwork before investing – proper preparation minimizes risks and maximizes returns.
Downloading and Installing VirtualBox
Your first step is to acquire the VirtualBox software. It’s free and readily available from the official Oracle VirtualBox website.
- Visit the Official Website: Open your web browser and navigate to
www.virtualbox.org. - Download the Latest Version: Look for the “Downloads” section. You’ll typically find links for various host operating systems (Windows, macOS, Linux distributions, Solaris). Select the package appropriate for your host operating system. For example, if you’re running Windows, download the “Windows hosts” installer.
- Download VirtualBox Extension Pack: On the same downloads page, locate and download the “VirtualBox Extension Pack.” This separate package provides additional functionalities like USB 2.0/3.0 support, webcam pass-through, and disk encryption. It’s crucial for a fully featured VM experience and should always match your VirtualBox version.
- Install VirtualBox:
- Windows: Run the downloaded
.exefile. The installation process is straightforward; generally, you can accept the default options. You might see warnings about network adapters; allow the installation to proceed as it needs to install virtual network drivers. Restart your computer if prompted. - macOS: Open the downloaded
.dmgfile and run the VirtualBox installer package. Follow the prompts. You may need to grant security permissions in your System Preferences/Settings during or after installation, especially regarding kernel extensions. - Linux: Depending on your distribution, you’ll either use a package manager (e.g.,
apt install virtualboxon Debian/Ubuntu-based systems, though downloading from the site is often preferred for the latest version) or install the specific.debor.rpmpackage provided on the VirtualBox site.
- Windows: Run the downloaded
- Install Extension Pack: Once VirtualBox is installed, open it. Go to
File > Preferences > Extensions. Click the “Add” button (usually a small plus icon) and select the Extension Pack file (.vbox-extpack) you downloaded. Accept the license agreement to complete the installation.
Acquiring the Ubuntu ISO Image
Next, you’ll need the installation media for Ubuntu. This comes in the form of an ISO file, which is a disk image of the operating system.
- Visit the Official Ubuntu Website: Go to
ubuntu.com/download. - Choose the LTS Version: For most users, especially beginners, the Long Term Support (LTS) version is highly recommended. LTS releases are supported for five years, offering greater stability and requiring fewer upgrades compared to interim releases. As of writing, Ubuntu 22.04 LTS (“Jammy Jellyfish”) or a newer LTS is likely available.
- Download the ISO: Click the download button for the appropriate LTS desktop version. The file size is typically around 4-5 GB, so ensure you have a stable internet connection and sufficient disk space.
- Verify the Download (Optional but Recommended): For critical installations, it’s good practice to verify the integrity of the downloaded ISO file using its SHA256 checksum, which can usually be found on the Ubuntu download page. This ensures the file wasn’t corrupted during download or tampered with.
System Requirements: Ensuring a Smooth Experience
While VirtualBox and Ubuntu are relatively light, a smooth virtualized experience depends on your host machine having sufficient resources.
- RAM (Memory): A minimum of 8 GB of RAM on your host system is recommended. This allows you to allocate at least 2-4 GB to your Ubuntu VM while leaving enough for your host OS. More RAM is always better.
- CPU (Processor): A modern multi-core processor (Intel i5/i7/i9 or AMD Ryzen 5/7/9 or equivalent) is ideal. Crucially, your CPU must support hardware virtualization extensions (Intel VT-x or AMD-V). Most modern CPUs do, but it might need to be enabled in your computer’s BIOS/UEFI settings.
- Disk Space: You’ll need at least 20-30 GB of free hard drive space for the Ubuntu VM’s virtual disk, plus additional space for the VirtualBox installer and Ubuntu ISO. SSDs (Solid State Drives) are highly recommended for significantly better performance compared to traditional HDDs.
- Operating System: Your host OS (Windows 10/11, macOS, recent Linux distributions) should be up-to-date.
Setting Up Your Ubuntu Virtual Machine
With VirtualBox installed and the Ubuntu ISO downloaded, you’re ready to create and configure your virtual machine. This stage is akin to building the foundation of a house – meticulous planning here ensures stability later.
Creating a New Virtual Machine Instance
- Open VirtualBox Manager: Launch the VirtualBox application.
- Click “New”: In the VirtualBox Manager window, click the “New” button (usually a blue icon with a star). This will launch the “Create Virtual Machine” wizard.
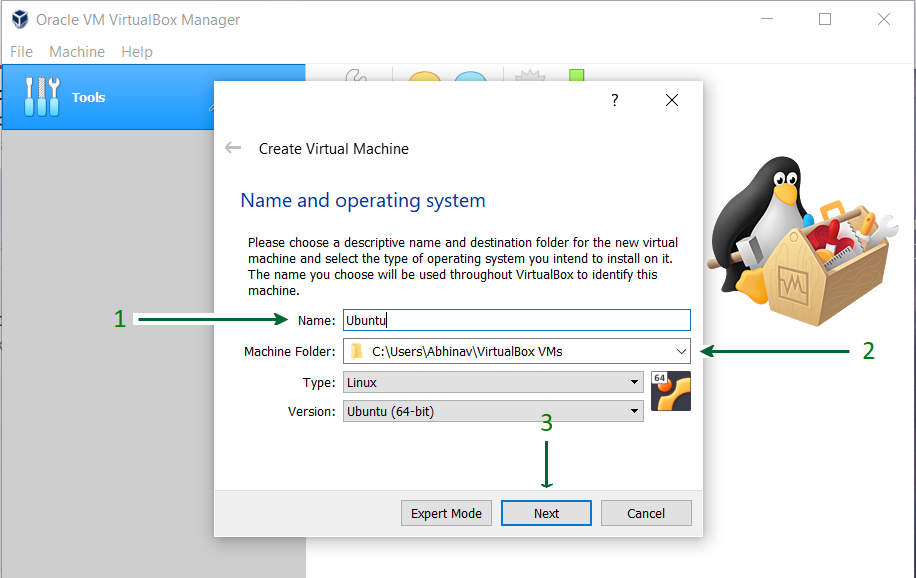
- Name and Operating System:
- Name: Give your VM a descriptive name, e.g., “Ubuntu 22.04 LTS.”
- Machine Folder: This is where your VM’s files will be stored. You can leave the default or choose a different location.
- ISO Image: Click the dropdown arrow next to “ISO Image” and select “Other…” Navigate to where you saved the Ubuntu ISO file and select it. VirtualBox is usually smart enough to pre-fill “Type” (Linux) and “Version” (Ubuntu 64-bit) once you select the ISO. If not, manually select them.
- Skip Unattended Installation: For this guide, uncheck the “Skip Unattended Installation” option if it appears. We’ll do a manual install.
- Click “Next.”
Configuring Virtual Hardware: RAM, CPU, and Storage
This is a critical step where you allocate your host machine’s resources to the VM. The goal is to provide enough resources for Ubuntu to run smoothly without starving your host system.

- Base Memory (RAM):
- VirtualBox will suggest a default (often 1-2 GB). For a comfortable Ubuntu desktop experience, allocate at least 2048 MB (2 GB) of RAM. If your host has 16 GB or more RAM, allocating 4096 MB (4 GB) is even better.
- Important: Do not allocate more than half of your host system’s RAM, and never exceed the green zone in the slider, as this can severely impact your host’s performance.
- Click “Next.”
- Processors (CPU):
- Allocate at least 2 CPU cores to your VM. If your host has a quad-core or higher processor, allocating 2 or 4 cores is safe. Again, avoid allocating all your host’s cores.
- Click “Next.”
- Hard Disk:
- VirtualBox will prompt you to create a virtual hard disk. Select “Create a Virtual Hard Disk now.”
- Disk Size: Allocate a minimum of 25-30 GB. For more room to install software and store files, 40-50 GB is safer.
- Hard Disk File Type: Leave as VDI (VirtualBox Disk Image).
- Storage on Physical Hard Disk: Select “Dynamically Allocated.” This means the virtual disk file will only grow as you use space inside the VM, rather than immediately taking up the full allocated size on your host. This saves space on your host machine.
- Click “Next” and then “Finish.”
You’ve now successfully created a virtual machine skeleton!
Fine-Tuning Settings Before First Boot (Optional but Recommended)
Before starting the VM, you can further optimize its settings:
- Select your VM: In the VirtualBox Manager, select your newly created Ubuntu VM.
- Click “Settings”:
- System > Motherboard: Ensure “Enable I/O APIC” is checked. You can uncheck “Floppy” drive if you wish, as it’s rarely used.
- System > Processor: Double-check the number of processors. Ensure “Enable PAE/NX” is checked.
- Display > Screen: Increase “Video Memory” to at least 64 MB, or ideally 128 MB. Check “Enable 3D Acceleration” for better graphical performance, especially if using a modern desktop environment.
- Storage: Verify your Ubuntu ISO is mounted to the virtual CD/DVD drive.
- Network: The default “NAT” setting is usually fine for internet access within the VM. If you need advanced networking (e.g., direct access to your local network, static IP), you might explore “Bridged Adapter” later.
- Click “OK” to save any changes.
The Ubuntu Installation Process within VirtualBox
Now, the exciting part: installing Ubuntu itself. This is very similar to installing Ubuntu on a physical machine, but within the safe confines of your virtual environment.
Navigating the Ubuntu Installer
- Start the VM: Select your Ubuntu VM in VirtualBox Manager and click the “Start” button (the green arrow).
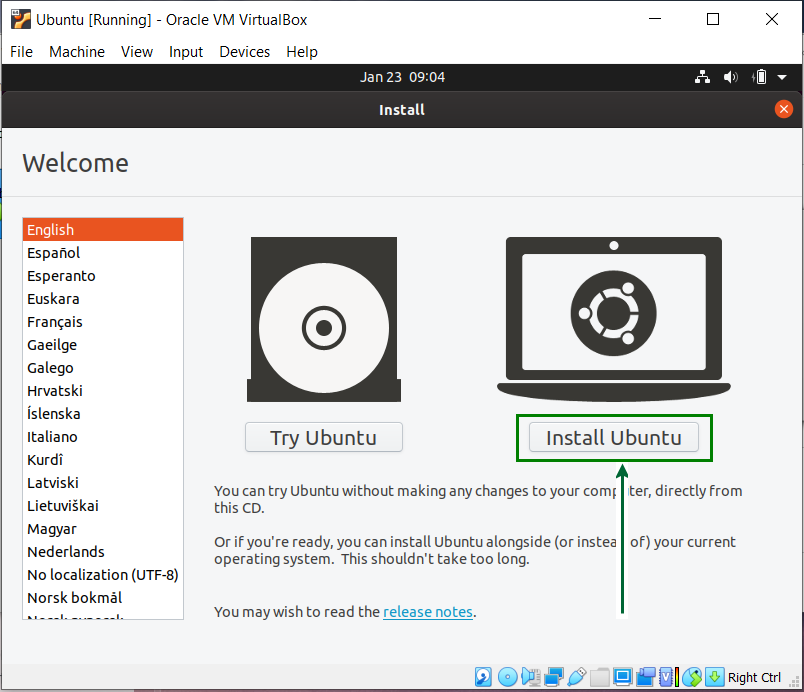
- Initial Boot: The VM will boot from the Ubuntu ISO. You’ll see an initial screen. Choose your language and then select “Try or Install Ubuntu.”
- Welcome Screen: Once Ubuntu Desktop loads, you’ll see a welcome screen. Select your language on the left.
- Choose “Install Ubuntu” (not “Try Ubuntu,” although you could try it first to ensure compatibility, which is less of an issue in a VM).
- Keyboard Layout: Select your keyboard layout (e.g., “English (US)”) and click “Continue.”
- Updates and Other Software:
- Normal Installation: Select “Normal installation” to include a web browser, office suite, media players, etc.
- Download updates while installing Ubuntu: It’s generally good to check this if you have a stable internet connection; it saves time later.
- Install third-party software for graphics and Wi-Fi hardware and additional media formats: It’s highly recommended to check this box, as it installs necessary proprietary drivers and codecs.
- Click “Continue.”
Disk Partitioning and User Setup
This is a critical step, but remember, you are partitioning the virtual hard disk you created, not your physical hard drive.
- Installation Type:
- You will see an option like “Erase disk and install Ubuntu.” This is the recommended option for a VM. It will erase the entire virtual disk you allocated and set up Ubuntu automatically. Remember, this only affects the virtual disk, not your host machine’s hard drive.
- Do not choose “Something else” unless you are an advanced user familiar with manual partitioning and have specific requirements.
- Click “Install Now.” A summary of the changes to the virtual disk will appear; click “Continue.”
- Location: Select your geographical location on the map to set the correct time zone and click “Continue.”
- Who are you?:
- Enter your name, desired username, and a strong password.
- Choose whether to “Require my password to log in” (recommended for security) or “Log in automatically.”
- Click “Continue.”
Completing the Installation and First Boot
The installation process will now begin, copying files and configuring the system. This can take anywhere from 15 to 45 minutes, depending on your host system’s performance and the speed of your virtual disk.
- Wait for Installation to Complete: Monitor the progress bar.
- Restart Now: Once the installation is finished, you’ll see a message prompting you to “Restart Now.” Click it.
- Remove Installation Media: Before the VM restarts, VirtualBox will usually automatically prompt you to remove the installation media (the Ubuntu ISO). If it doesn’t, or if the VM boots back into the installer, manually remove it:
- Go to
Devices > Optical Drivesin the VirtualBox VM window menu. - Uncheck the Ubuntu ISO or select “Remove disk from virtual drive.”
- Then, press Enter in the VM window to proceed with the restart.
- Go to
- First Boot into Ubuntu: Your Ubuntu VM should now boot from its newly installed virtual hard disk. You’ll be presented with the login screen (if you chose to require a password). Enter your password, and you’ll be greeted by the Ubuntu desktop!
Congratulations! You’ve successfully installed Ubuntu on VirtualBox.
Post-Installation Essentials: Optimizing Your Virtual Environment
While Ubuntu is now installed, a few crucial post-installation steps will significantly enhance your experience, making the VM more integrated and performant with your host system.
Installing VirtualBox Guest Additions: The Key to Seamless Integration
VirtualBox Guest Additions are a set of device drivers and system applications that improve the performance and usability of guest operating systems. They enable features like better video support, mouse pointer integration, shared clipboard, shared folders, and automatic display resizing. This is arguably the most important post-installation step.
- Start Your Ubuntu VM: Log into your Ubuntu desktop.
- Insert Guest Additions CD Image: In the VirtualBox VM window menu, go to
Devices > Insert Guest Additions CD Image.... - Run the Installer:
- In Ubuntu, a disk icon named “VBoxGAs…” should appear on your desktop or in your file manager.
- Open this folder. You’ll likely see an executable script named
VBoxLinuxAdditions.run. - Open a terminal (Ctrl+Alt+T). Navigate to the mounted Guest Additions directory. For example, if it mounted to
/media/yourusername/VBox_GAs_..., you would usecd /media/yourusername/VBox_GAs_.... - Run the installer with superuser privileges:
sudo sh ./VBoxLinuxAdditions.run. - Enter your password when prompted. The script will compile and install the necessary modules. This may take a few minutes.
- Restart the VM: Once the installation finishes, you must restart your Ubuntu VM for the changes to take effect (
sudo rebootin the terminal, or use the GUI restart option).
After restarting, you should notice a significant improvement: the display will automatically resize when you change the VM window size, the mouse pointer will move seamlessly between host and guest, and your resolution options will be much broader.
Enhancing Usability: Shared Folders and Clipboard
With Guest Additions installed, you can now enable convenient features that bridge your host and guest OS.
- Shared Clipboard:
- In the VirtualBox VM window menu, go to
Devices > Shared Clipboard. - Select “Bidirectional.” This allows you to copy text from your host and paste it into Ubuntu, and vice-versa.
- In the VirtualBox VM window menu, go to
- Drag’n’Drop:
- Similarly, go to
Devices > Drag'n'Drop. - Select “Bidirectional” to enable dragging files between your host and guest.
- Similarly, go to
- Shared Folders:
- Shared folders allow you to easily exchange files between your host and guest OS, acting like a network share.
- In the VirtualBox VM window menu, go to
Devices > Shared Folders > Shared Folder Settings.... - Click the “Add new shared folder” icon (usually a folder with a plus sign).
- Folder Path: Choose a folder on your host machine that you want to share.
- Folder Name: VirtualBox will suggest a name; you can change it.
- Check “Auto-mount” and “Make Permanent.” “Read-only” is optional if you don’t want the VM to modify files in that folder.
- Click “OK” and then “OK” again.
- Accessing in Ubuntu: To access the shared folder in Ubuntu, you typically need to add your user to the
vboxsfgroup. Open a terminal in Ubuntu and type:sudo usermod -aG vboxsf yourusername(replaceyourusernamewith your actual Ubuntu username). - Restart the VM after adding your user to the group.
- After restarting, the shared folder should appear in your Ubuntu file manager (e.g., under
/media/sf_YourFolderName).
Staying Current: Updating Ubuntu and Software
Regularly updating your Ubuntu VM is crucial for security, stability, and access to the latest features.
- Open Terminal: Press Ctrl+Alt+T.
- Update Package Lists: Run
sudo apt update. This command downloads the latest package information from Ubuntu’s repositories. - Upgrade Installed Packages: Run
sudo apt upgrade. This command installs newer versions of all installed packages. You may be prompted to confirm; typeYand press Enter. - Reboot if Necessary: If a kernel update or other critical system components are upgraded, the system might recommend a reboot.
It’s a good practice to run these commands weekly or bi-weekly, just as you would update software on your host system.
Conclusion: Empowering Your Digital Journey with Virtualization
Installing Ubuntu on VirtualBox is more than just a technical exercise; it’s an investment in your digital versatility and security. By following this comprehensive guide, you’ve unlocked the power of virtualization, creating a secure, flexible environment to experiment with open-source software, develop applications, or simply explore a different operating system without impacting your primary workflow.
This skill transcends mere technical competency; it reflects an adaptive mindset, a willingness to explore new tools, and a commitment to optimizing your digital workspace. In an age where digital security and efficiency are paramount, the ability to compartmentalize computing tasks and leverage diverse OS environments becomes a significant asset – whether you’re managing personal finances securely, testing out new AI tools, or honing your coding skills for professional growth. Embracing virtualization with Ubuntu and VirtualBox empowers you to not just keep pace with technology, but to master it, turning your computer into a true innovation hub. This capability subtly but effectively contributes to building a robust personal brand rooted in technological acumen and forward-thinking problem-solving.
aViewFromTheCave is a participant in the Amazon Services LLC Associates Program, an affiliate advertising program designed to provide a means for sites to earn advertising fees by advertising and linking to Amazon.com. Amazon, the Amazon logo, AmazonSupply, and the AmazonSupply logo are trademarks of Amazon.com, Inc. or its affiliates. As an Amazon Associate we earn affiliate commissions from qualifying purchases.