In today’s increasingly connected world, smart home security has moved beyond mere convenience to become an essential component of modern living. Among the myriad of devices designed to enhance our safety and peace of mind, video doorbells stand out as a frontline defense, offering a visible deterrent to potential intruders and providing immediate awareness of who is at your doorstep, whether you’re home or miles away. The Ring Battery Doorbell Plus, a popular and user-friendly option, has garnered significant attention for its robust feature set, including its wire-free installation and advanced motion detection. This guide aims to demystify the installation process, transforming what might seem like a daunting technical task into a straightforward and rewarding DIY project.
Whether you’re a seasoned tech enthusiast or embarking on your first smart home setup, this comprehensive tutorial will walk you through every step, from unboxing and preparation to the final connection and testing. We will delve into the necessary tools, optimal placement strategies, and crucial configuration steps to ensure your Ring Battery Doorbell Plus operates flawlessly, providing you with enhanced security and seamless remote monitoring. Beyond the technical intricacies, understanding the value proposition of such a device, particularly in relation to personal finance and brand reputation, adds another layer to its importance in a contemporary lifestyle.
Preparing for Installation
Before you even think about mounting your new Ring Battery Doorbell Plus, a crucial phase of preparation is essential. This initial stage sets the foundation for a smooth and successful installation, minimizing potential frustrations and ensuring optimal performance of your device. Skipping these preparatory steps can lead to troubleshooting headaches down the line, so it’s well worth the time invested upfront.
Unboxing and What’s Inside
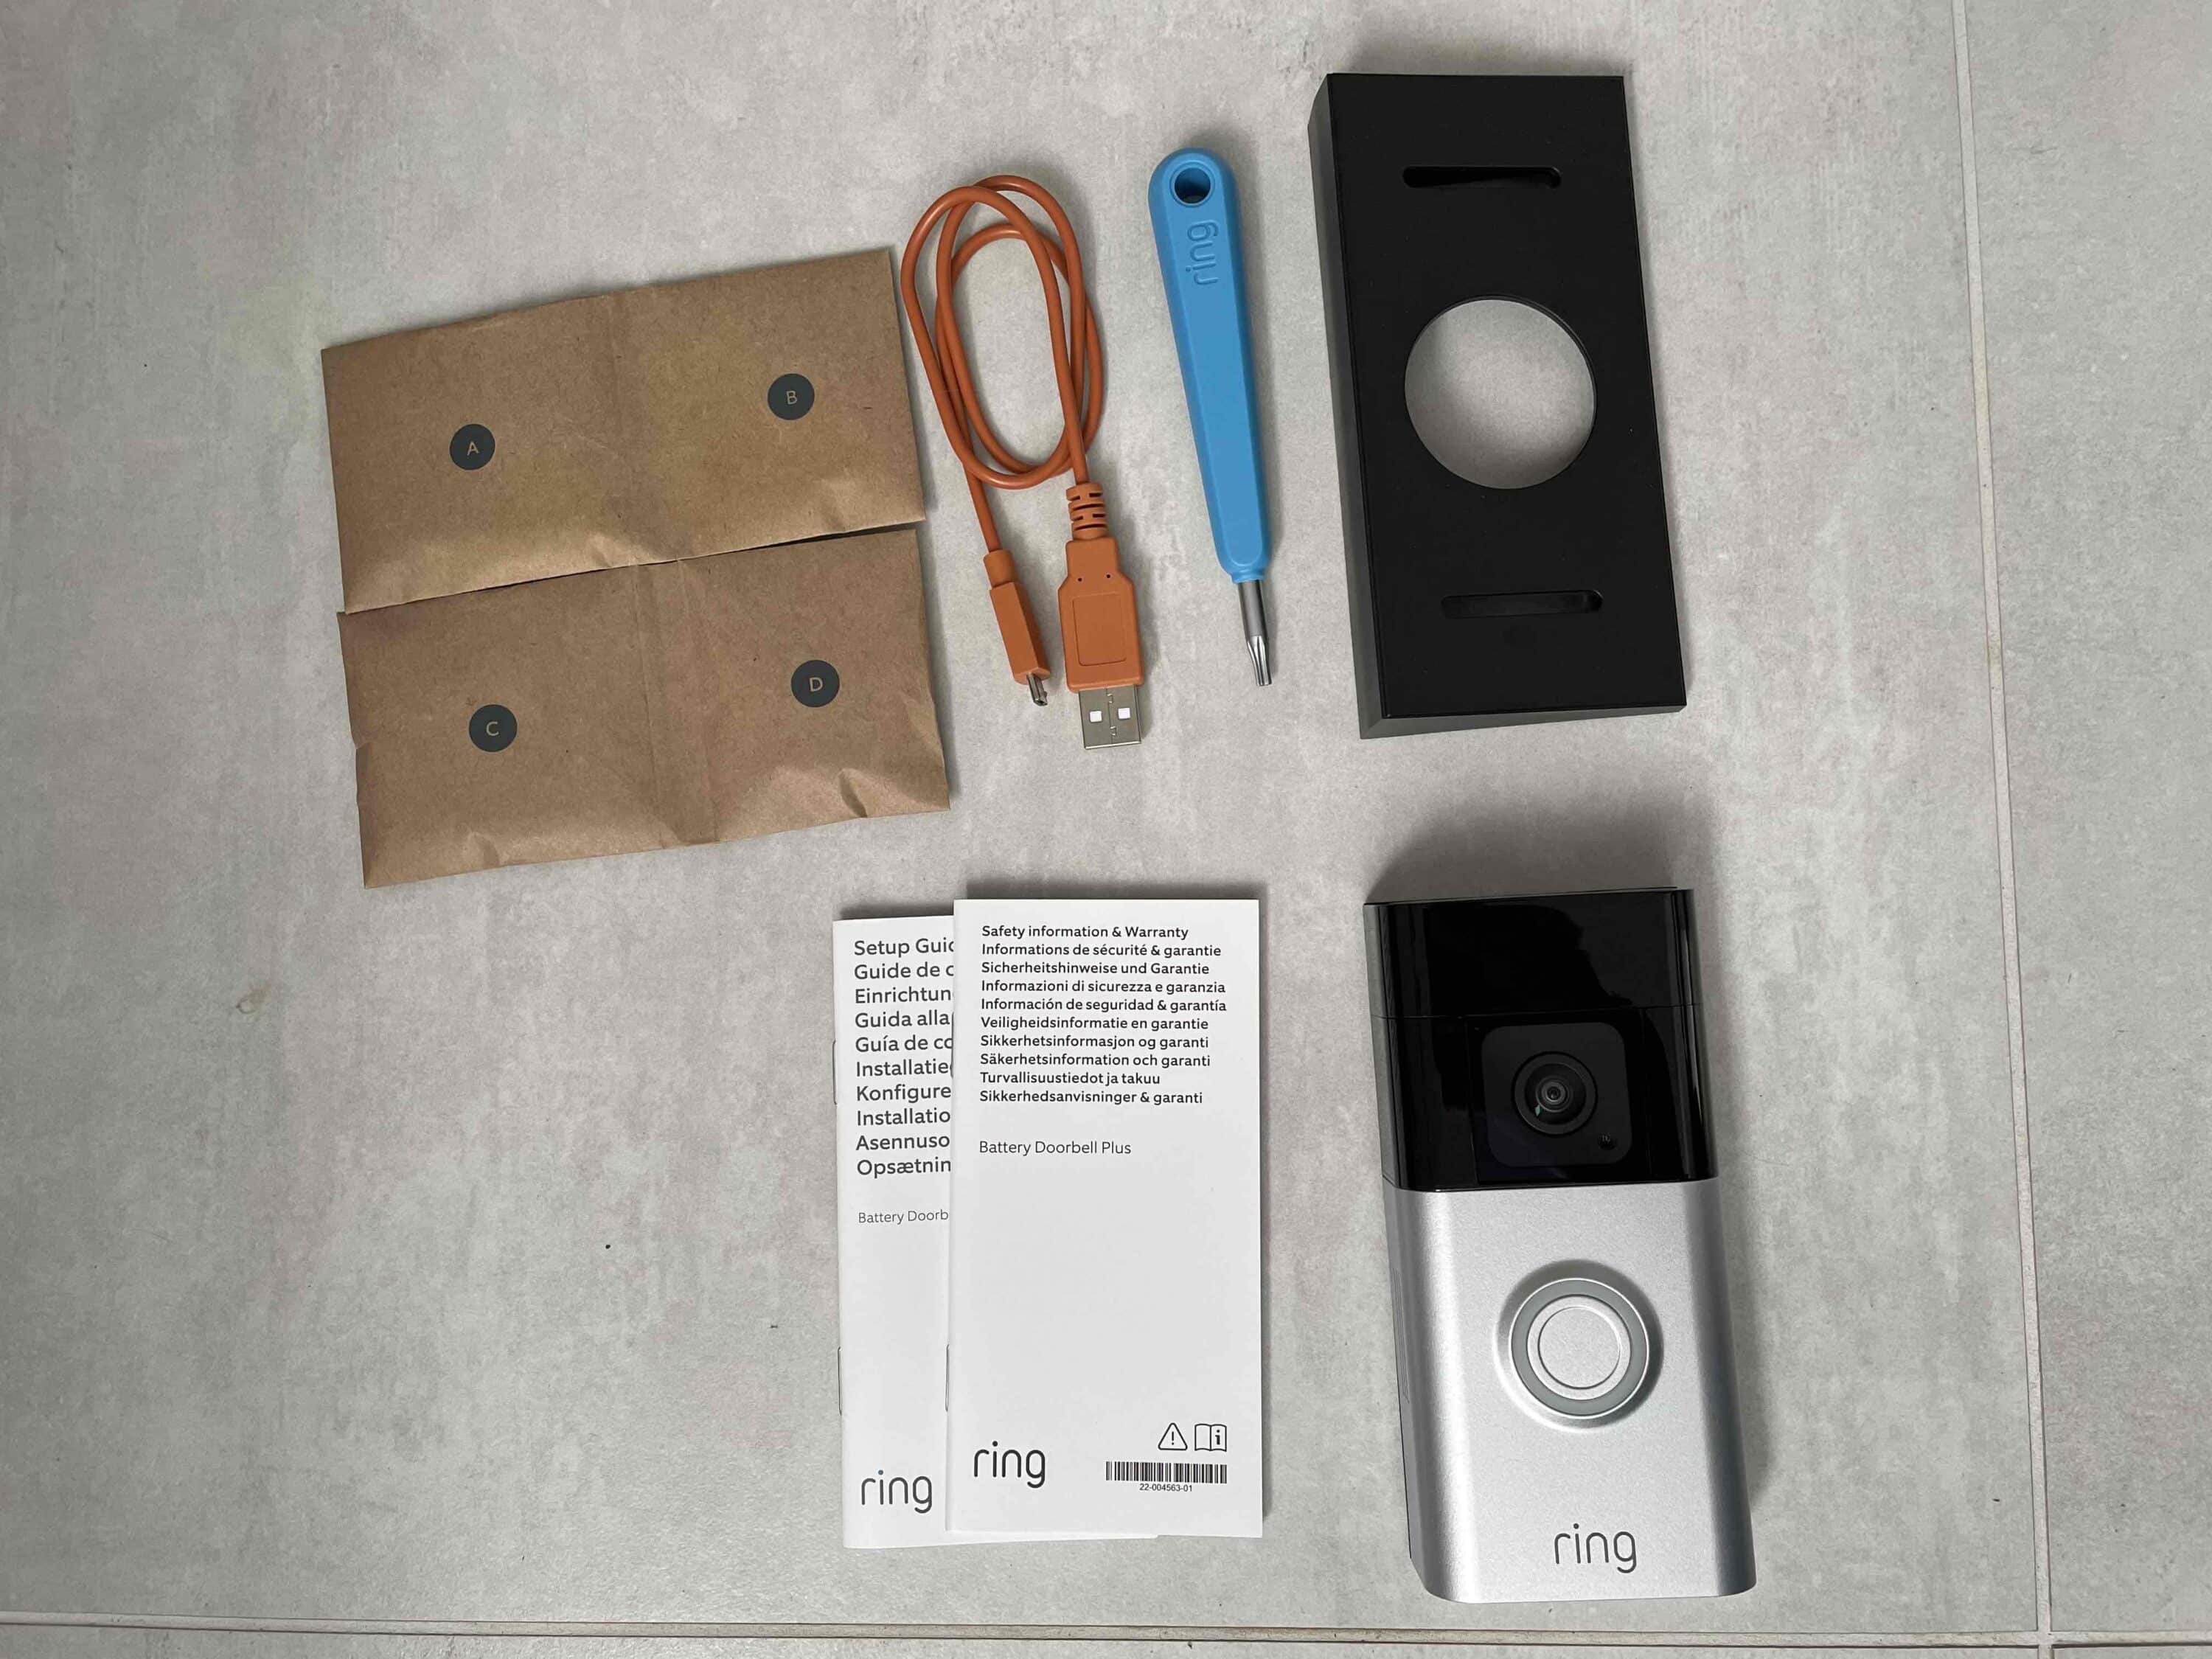
The moment of truth arrives with the unboxing. Carefully open the Ring Battery Doorbell Plus packaging. Inside, you should find the doorbell unit itself, a rechargeable battery pack, a mounting bracket, an installation tool kit (which typically includes screws, anchors, and a screwdriver bit), a USB charging cable for the battery, and a quick start guide. Take a moment to familiarize yourself with each component. Ensure all listed items are present and undamaged. The doorbell unit is designed to be relatively lightweight yet feel robust, indicating a quality build. The battery pack, once charged, will be the power source, eliminating the need for wired connections, which is a significant advantage for many homeowners.
Charging the Battery
A fully charged battery is paramount for immediate functionality. Locate the included USB charging cable and connect it to the battery pack. You can then plug the other end into a standard USB power adapter (like the one you’d use for your smartphone) or a powered USB port on a computer. The battery pack usually has an indicator light that will show its charging status – typically red while charging and green or off when fully charged. Allow ample time for the battery to reach full charge before proceeding with the installation. This can take a few hours, so it’s advisable to start this process well in advance of your planned installation time.
Downloading the Ring App and Account Setup
The Ring Battery Doorbell Plus operates in tandem with the Ring mobile application. If you haven’t already, download the Ring app from your device’s app store (available for both iOS and Android). Once downloaded, open the app and follow the on-screen prompts to create a new Ring account or log in if you already have one. This account will be your central hub for managing your doorbell, viewing live feeds, reviewing recorded events, and customizing settings. During the account setup, you’ll be guided through linking your new doorbell to your account, which typically involves scanning a QR code found on the device or its packaging.
Tools and Materials You’ll Need
While the Ring kit provides most of what you’ll need, having a few additional tools can make the job easier and more precise.
- Drill and Drill Bits: For pre-drilling holes for the mounting screws, especially if you’re mounting on brick, stucco, or other hard surfaces. The appropriate drill bit size will depend on the anchors provided.
- Level: To ensure your doorbell is mounted straight, both horizontally and vertically. A crooked doorbell can look unprofessional and may affect the camera’s field of view.
- Pencil: For marking drilling locations.
- Ladder: If your desired mounting location is at a higher elevation. Ensure it’s stable and used safely.
- Optional: Mounting Wedge or Corner Kit: If your doorway has an unusual angle or you want to expand the camera’s viewing angle to capture more of your property, Ring offers optional accessories. These can be purchased separately.
Having these items at hand before you start will prevent interruptions and ensure a professional-looking installation.
Mounting the Ring Battery Doorbell Plus
With all your preparations complete, it’s time to physically attach the Ring Battery Doorbell Plus to your home. This section will guide you through choosing the best location and securely mounting the device.
Choosing the Optimal Location
The placement of your doorbell is critical for its effectiveness. Consider the following factors:
- Height: The ideal mounting height is typically around 4 feet (1.2 meters) from the ground. This height allows the camera to capture faces clearly and provides a good view of the ground in front of your door, deterring package theft. If you have children or a lot of visitors who are shorter, you might consider a slightly lower position.
- Field of View: Ensure the chosen location offers a clear, unobstructed view of your entryway, sidewalk, and any approach to your door. Avoid mounting it directly facing harsh sunlight, which can cause glare and make video footage difficult to see. Also, consider any obstructions like large plants or decorative features that might block the camera’s view.
- Proximity to Wi-Fi: For reliable performance, the doorbell needs a strong Wi-Fi signal. Before permanently mounting, use the Ring app to test the Wi-Fi strength at your chosen location. The app usually has a tool to help with this. If the signal is weak, you might need to consider relocating the doorbell, repositioning your router, or investing in a Wi-Fi extender.
- Security and Accessibility: While you want to deter unwanted visitors, ensure the doorbell is still accessible for battery changes and maintenance. Avoid placing it in a location that is too difficult to reach.
Installing the Mounting Bracket
Once you’ve identified the perfect spot, it’s time to attach the mounting bracket.
- Mark Drilling Holes: Hold the mounting bracket against the wall at your chosen height and use a level to ensure it’s perfectly straight. Using a pencil, mark the positions of the screw holes on the wall.
- Drill Pilot Holes: If you’re mounting on a solid surface like brick or stucco, use a drill with an appropriate drill bit to create pilot holes at your marked locations. Insert the provided wall anchors into these holes. If you’re mounting on wood, you might not need anchors, but pre-drilling will still help prevent the wood from splitting.
- Secure the Bracket: Align the mounting bracket with the pilot holes or anchors and use the screws provided in the installation kit to firmly secure it to the wall. Ensure the bracket is flush against the surface and doesn’t wobble.
Attaching the Doorbell Unit
Now, it’s time to attach the Ring Battery Doorbell Plus itself to the bracket.
- Insert the Battery: Ensure your fully charged battery pack is properly inserted into the bottom of the doorbell unit. It should click into place.
- Align and Snap: Align the doorbell unit with the mounted bracket. Most Ring doorbells have a system where you slide the unit down onto the bracket and then push it firmly until it clicks securely into place.
- Secure with Security Screw: Ring doorbells usually come with a small security screw that is inserted into the bottom of the unit to prevent it from being easily removed. Use the provided screwdriver bit to tighten this screw. This step is crucial for device security.
Configuring Your Ring Battery Doorbell Plus
With the physical installation complete, the next critical step is to configure your Ring Battery Doorbell Plus through the Ring app. This is where you tailor its features to your specific needs and preferences, ensuring optimal performance and security.
Connecting to Your Wi-Fi Network
Within the Ring app, you’ll be guided through the process of connecting your doorbell to your home Wi-Fi network. This is a vital step for enabling live viewing, receiving motion alerts, and accessing recorded video.
- Initiate Setup in the App: In the Ring app, tap “Set Up a Device” and select “Doorbells.” Choose your specific doorbell model.
- Scan QR Code: The app will prompt you to scan the QR code located on the doorbell unit or its packaging. This code helps the app identify your device.
- Follow On-Screen Instructions: The app will then guide you through connecting the doorbell to your Wi-Fi. You’ll need to select your Wi-Fi network from a list and enter your Wi-Fi password. Ensure you have your Wi-Fi password readily available.
- Test Connection: Once connected, the app will confirm the connection and may run a brief test to ensure the signal is strong enough for operation.
Customizing Motion Detection Settings
One of the most powerful features of the Ring Battery Doorbell Plus is its advanced motion detection. Customizing these settings ensures you receive relevant alerts without being overwhelmed by false notifications.
- Motion Zones: Within the app’s settings for your doorbell, you can define specific “Motion Zones.” These are areas within the camera’s field of view that you want the doorbell to monitor for motion. By setting custom zones, you can exclude areas that frequently trigger false alerts, such as busy streets, swaying trees, or pets that don’t need to be constantly reported. For example, you might draw a zone around your porch and the walkway leading to it, but exclude a garden bed or a public sidewalk further away.
- Motion Sensitivity: You can also adjust the sensitivity of the motion detection. A higher sensitivity will detect smaller movements, while a lower sensitivity will only trigger for larger movements. Experiment with different sensitivity levels to find the sweet spot for your environment.
- Motion Frequency: Some Ring devices allow you to set a “Motion Frequency” or “Motion Snooze” feature. This can help reduce the number of alerts you receive within a certain timeframe after an initial motion event is detected, preventing a barrage of notifications for a single occurrence.
Setting Up Alert Preferences and Notifications
Personalizing your notification preferences ensures you’re alerted to events that matter most to you, in a way that suits your lifestyle.
- Notification Types: The Ring app allows you to choose what types of events you want to be notified about. This typically includes motion detection and when someone rings the doorbell.
- Notification Schedule: You can often set up schedules for when you want to receive notifications. For instance, you might want alerts during working hours but less frequent alerts at night.
- Push Notifications vs. Email Alerts: Decide whether you prefer immediate push notifications directly on your smartphone or tablet, or if email alerts are sufficient. Most users opt for push notifications for real-time awareness.
- Linking with Other Ring Devices: If you have other Ring devices, such as cameras or a Ring Alarm system, you can link them within the app. This allows for more integrated security responses, such as having multiple cameras start recording when the doorbell detects motion.
Understanding Ring Protect Plans
While the Ring Battery Doorbell Plus offers basic functionality out of the box, a Ring Protect subscription plan unlocks advanced features, particularly concerning video storage and review.
- Cloud Storage: Without a subscription, you can view live feeds and receive real-time alerts, but recorded events are not saved for later viewing. A Ring Protect plan provides cloud storage for your recorded video clips, allowing you to review them at your convenience.
- Video History: Plans typically offer 60 days of video history, meaning your recorded clips are stored for two months before being automatically deleted.
- Rich Notifications: Some plans include “Rich Notifications” which can display a snapshot preview of the motion event directly in the notification.
- Professional Monitoring (for Ring Alarm users): If you have a Ring Alarm system, certain Protect plans can include professional monitoring services.
It’s important to review the different Ring Protect plans and their associated costs to determine which best fits your budget and security needs. This is where the “Money” aspect of the website’s topics comes into play, as it involves a recurring cost for enhanced functionality.
Maintaining and Troubleshooting Your Ring Battery Doorbell Plus
Even with a smooth installation, ongoing maintenance and occasional troubleshooting are part of owning any smart home device. Regular care ensures your Ring Battery Doorbell Plus continues to function optimally and provides reliable security.
Battery Management and Charging
The primary advantage of the Battery Doorbell Plus is its wire-free nature, which relies entirely on its rechargeable battery.
- Monitoring Battery Level: The Ring app will provide a real-time indicator of your battery’s charge level. It’s advisable to charge the battery when it drops below 20% to avoid unexpected power loss.
- Charging Procedure: To charge, you’ll need to remove the doorbell unit from its bracket. This usually involves unscrewing the security screw at the bottom and then sliding the unit upwards. Once removed, disconnect the battery pack, connect it to the USB charging cable, and plug it into a power source. A full charge typically takes several hours.
- Battery Swapping: For uninterrupted coverage, consider purchasing a second rechargeable battery pack. This allows you to swap batteries quickly when one needs charging, minimizing downtime. Ensure the spare battery is also fully charged.
Software Updates and App Features
Ring regularly releases software updates for its devices and the Ring app. These updates often bring new features, performance improvements, and crucial security patches.
- Automatic Updates: The Ring Battery Doorbell Plus is designed to download and install software updates automatically when connected to Wi-Fi and when the battery has sufficient charge. You can usually check the firmware version of your device within the Ring app settings.
- App Updates: Ensure your Ring app on your smartphone or tablet is also kept up-to-date. App updates are vital for accessing the latest features and ensuring compatibility with your devices.

Common Troubleshooting Tips
Despite the reliability of Ring devices, you might occasionally encounter issues. Here are some common troubleshooting steps:
- Wi-Fi Connectivity Problems: If your doorbell is offline, first check your home Wi-Fi router. Ensure it’s powered on and functioning correctly. Restarting your router can often resolve connectivity issues. If the problem persists, check the Wi-Fi signal strength in the Ring app at the doorbell’s location. You may need to move your router closer, use a Wi-Fi extender, or consider a wired doorbell if persistent Wi-Fi issues are a concern.
- Motion Alerts Not Working: Review your motion detection settings in the Ring app. Ensure motion zones are properly configured and that motion sensitivity is set appropriately for your environment. Check that notifications are enabled for motion events in both the app and your phone’s system settings.
- Poor Video Quality: Poor video quality can be due to weak Wi-Fi signal or camera lens obstruction. Clean the camera lens with a soft, lint-free cloth. If the issue is signal-related, refer to the Wi-Fi troubleshooting steps.
- Doorbell Not Responding: If the doorbell is completely unresponsive, ensure the battery is fully charged and properly inserted. If issues persist after charging, try performing a device reset (refer to Ring’s support documentation for specific reset procedures for your model).
By understanding these maintenance and troubleshooting steps, you can ensure your Ring Battery Doorbell Plus remains a reliable guardian of your home, offering peace of mind and enhanced security for years to come. The integration of technology, brand reliability, and the financial considerations of ongoing subscriptions all contribute to the overall value and utility of such smart home devices in our modern lives.
aViewFromTheCave is a participant in the Amazon Services LLC Associates Program, an affiliate advertising program designed to provide a means for sites to earn advertising fees by advertising and linking to Amazon.com. Amazon, the Amazon logo, AmazonSupply, and the AmazonSupply logo are trademarks of Amazon.com, Inc. or its affiliates. As an Amazon Associate we earn affiliate commissions from qualifying purchases.