Python, a versatile and powerful programming language, has become indispensable for a wide range of applications, from web development and data science to artificial intelligence and automation. Its clear syntax and extensive libraries make it an excellent choice for beginners and experienced developers alike. If you’re looking to harness the power of Python on your Windows 11 machine, this comprehensive guide will walk you through the entire installation process, ensuring you’re set up for success.
This article falls squarely within our “Tech” domain, focusing on practical tutorials and software installations to empower our readers in their digital endeavors. While Python itself is a powerful tool for innovation, its applications can extend into “Money” through areas like financial modeling or automated trading, and even touch upon “Brand” through the creation of unique digital products or marketing tools. For now, however, our primary focus is on getting this essential programming language up and running on your Windows 11 system.
Downloading the Official Python Installer for Windows 11
The first and most crucial step in installing Python on Windows 11 is to obtain the official installer directly from the Python Software Foundation. This ensures you’re getting the most stable and secure version of the language, free from any third-party modifications.
Finding the Latest Python Release
To begin, open your preferred web browser and navigate to the official Python website: https://www.python.org/. Once on the homepage, you’ll typically see a prominent “Downloads” section. Hovering over or clicking on this section will reveal available download options.
For Windows users, you’ll want to select the link that directs you to the Windows-specific downloads. The website is designed to automatically detect your operating system, so it should present you with the latest stable release of Python for Windows. As of this writing, the latest stable versions are often designated with a version number like Python 3.10, 3.11, or 3.12. It is highly recommended to install the latest stable release. Avoid beta or release candidate versions unless you have a specific reason and understand the potential for bugs.
When you click on the download link for the latest Python for Windows, you will be presented with several installer options. For most users, the “Windows installer (64-bit)” is the correct choice, as the vast majority of modern Windows 11 systems are 64-bit. If you have a very old or specific 32-bit system, you would choose the “Windows installer (32-bit)”, but this is increasingly rare.
The download will be an executable file (e.g., python-3.11.4-amd64.exe). Save this file to a location on your computer where you can easily find it, such as your Downloads folder.
Understanding Python Versions: 2 vs. 3
It’s important to be aware that there are two major versions of Python: Python 2 and Python 3. Python 2 is no longer officially supported and has reached its end-of-life. Therefore, you should always install Python 3. All new development and tutorials will be based on Python 3. Installing Python 2 is strongly discouraged due to security vulnerabilities and lack of ongoing updates. The Python website exclusively promotes and provides downloads for Python 3.
Executing the Python Installer on Windows 11
Once the installer file has been downloaded, the next step is to run it and follow the on-screen prompts to complete the installation. This process is generally straightforward, but there are a few key options you should pay attention to for a smooth experience.
Launching the Installer
Locate the downloaded Python installer file (e.g., python-3.11.4-amd64.exe) and double-click on it to launch the installer. You might see a User Account Control (UAC) prompt asking for permission to make changes to your device. Click “Yes” to proceed.
Crucial Installation Options
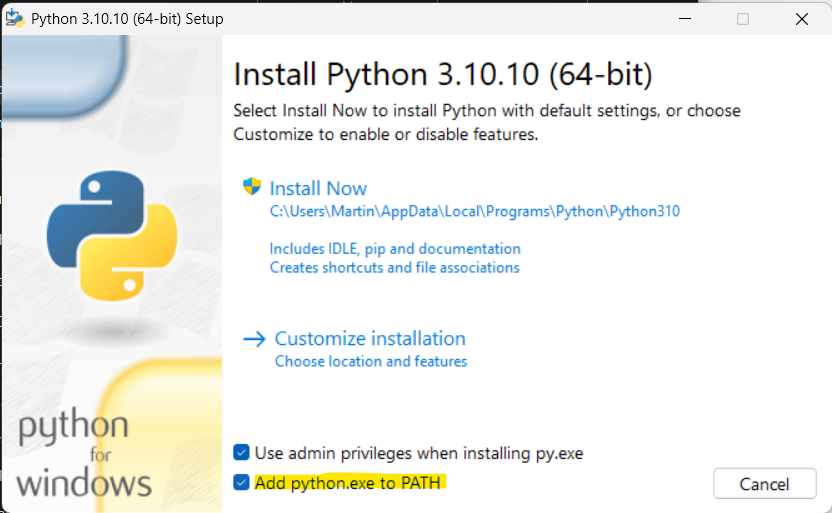
The Python installer window will appear. Before you click “Install Now,” there are two critical options you should consider:
-
“Install launcher for all users (recommended)”: This option is usually checked by default and is generally a good idea. It installs the Python launcher for all user accounts on your computer, making Python accessible to everyone.
-
“Add Python [version number] to PATH”: This is the most important option to check! Checking this box will automatically configure your system’s environment variables to recognize Python. This means you can run Python commands from any directory in your Command Prompt or PowerShell without needing to specify its full installation path. If you forget to check this, you’ll have to manually add Python to your PATH later, which can be a more complex process.
Recommendation: Always check “Add Python [version number] to PATH” before proceeding with the installation.
Customizing Your Installation (Optional)
For most users, the default “Install Now” option is sufficient and recommended. It installs Python with standard features, including the IDLE integrated development environment (IDE), pip (the Python package installer), and documentation.
However, if you need more control over what gets installed or where Python is located, you can click on “Customize installation.” This will present you with several screens allowing you to:
- Optional Features: Here you can choose which components to install. Ensure “pip” is checked, as it’s essential for installing third-party Python packages. IDLE is also highly recommended for beginners.
- Advanced Options: This screen allows you to specify the installation location. The default is usually in
C:Users<YourUsername>AppDataLocalProgramsPythonPythonXX(where XX is the Python version). You can change this if you prefer a different directory, but be sure to remember where you install it.
For a typical user, sticking with “Install Now” after ensuring “Add Python to PATH” is checked is the easiest and most effective approach.
Completing the Installation
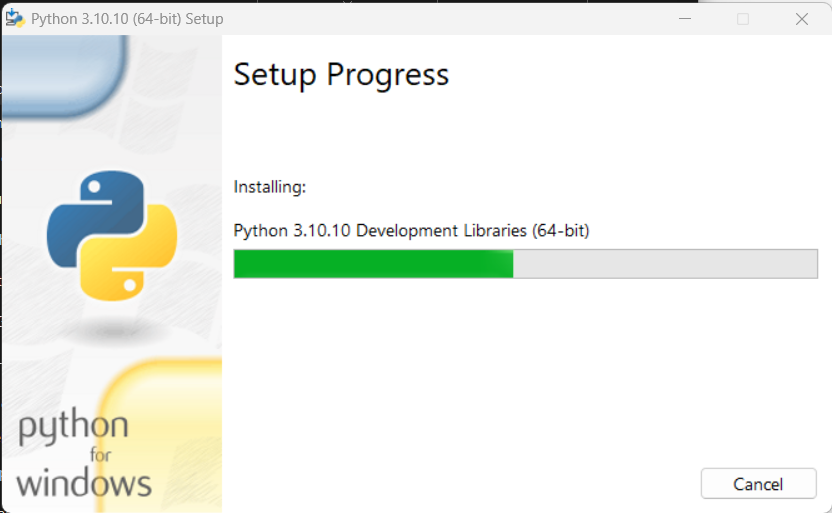
After selecting your desired options, click “Install Now” (or “Next” and then “Install” if you chose “Customize installation”). The installer will proceed to copy files and set up Python on your system. This process usually takes a few minutes.
Once the installation is complete, you will see a “Setup was successful” message. You might also see an option to “Disable path length limit.” Clicking this is recommended, as it removes a limitation in Windows that can sometimes cause issues with long file paths, which can occur with Python projects. Click on this option if it appears.
Finally, click “Close” to exit the installer.
Verifying Your Python Installation on Windows 11
After completing the installation, it’s crucial to verify that Python has been installed correctly and that it’s accessible from your command line. This step ensures that the “Add Python to PATH” option worked as intended.
Using the Command Prompt or PowerShell
-
Open Command Prompt or PowerShell: You can do this by searching for “Command Prompt” or “PowerShell” in the Windows search bar and selecting the appropriate application.
-
Check Python Version: In the command-line window, type the following command and press Enter:
python --versionAlternatively, you can try:
py --versionIf the installation was successful and Python was added to your PATH, you should see the installed Python version displayed (e.g.,
Python 3.11.4). If you get an error like “‘python’ is not recognized as an internal or external command,” it means Python was not added to your PATH correctly, and you might need to manually configure it or reinstall Python, making sure to check the “Add Python to PATH” option. -
Check Pip Version: Pip is Python’s package installer, and it should have been installed along with Python. To verify its installation, type the following command and press Enter:
pip --versionThis should display the installed pip version and its associated Python version.
-
Launch the Python Interpreter: You can also start an interactive Python session by typing:
pythonor
pyThis will launch the Python interpreter, indicated by the
>>>prompt. You can type Python code here directly. For example, typeprint("Hello, Python!")and press Enter. You should see the outputHello, Python!. To exit the interpreter, typeexit()and press Enter.
Troubleshooting Common Installation Issues
-
“Python is not recognized” error: This is almost always due to Python not being added to the system’s PATH environment variable.
- Solution: Re-run the Python installer. This time, make sure to check the box that says “Add Python to PATH.” You might need to uninstall the previous installation first by going to “Apps” > “Installed apps” in Windows Settings, searching for Python, clicking the three dots, and selecting “Uninstall.”
- Manual PATH Configuration (Advanced): If you prefer not to reinstall, you can manually add Python to your PATH. Search for “environment variables” in Windows, click “Edit the system environment variables,” click the “Environment Variables” button. Under “System variables,” find the “Path” variable, select it, and click “Edit.” Click “New” and add the path to your Python installation directory (e.g.,
C:Users<YourUsername>AppDataLocalProgramsPythonPython311) and also theScriptssubdirectory within it (e.g.,C:Users<YourUsername>AppDataLocalProgramsPythonPython311Scripts). Remember to replace<YourUsername>andPython311with your actual username and Python version. You’ll need to restart your Command Prompt or PowerShell for these changes to take effect.
-
Installation Fails with Errors: This could be due to insufficient disk space, conflicts with other software, or corrupted download files.
- Solution: Ensure you have enough free disk space, try re-downloading the installer, and temporarily disable your antivirus software during installation if it’s causing interference (remember to re-enable it afterward).
By successfully completing these verification steps, you’ve confirmed that Python is correctly installed on your Windows 11 system and ready for you to start coding, exploring data, or building your next innovative project.
Getting Started with Python Development on Windows 11
Now that Python is installed and verified, you’re ready to embark on your Python journey. This section will briefly touch upon the tools and initial steps you can take to begin writing and running your Python code effectively on Windows 11.
Using IDLE: Your First Python Editor
IDLE (Integrated Development and Learning Environment) is a beginner-friendly IDE that comes bundled with Python. It provides a simple way to write, run, and debug Python code.
- Launching IDLE: You can find IDLE by searching for it in the Windows search bar.
- Python Shell: When you open IDLE, you’ll typically see the Python Shell, which is an interactive interpreter similar to what you used in the Command Prompt. You can type Python commands here and see the results immediately.
- Creating a New File: To write more extensive programs, go to
File > New Filein IDLE. This will open a separate editor window where you can type your Python script. - Running Your Script: Save your script with a
.pyextension (e.g.,my_script.py). Then, go toRun > Run Module(or press F5) to execute your code. The output will appear in the Python Shell window.
Exploring Alternatives: More Advanced Code Editors and IDEs
While IDLE is great for starting, you might eventually want to explore more powerful code editors and Integrated Development Environments (IDEs) that offer advanced features like code completion, debugging tools, version control integration, and more. Some popular choices for Python development on Windows include:
- Visual Studio Code (VS Code): A free, lightweight, yet powerful source-code editor developed by Microsoft. It has excellent Python support through extensions.
- PyCharm: A dedicated Python IDE developed by JetBrains. It offers a comprehensive set of tools for professional Python development, with a free Community Edition available.
- Spyder: Often used by data scientists, Spyder provides an advanced scientific Python development environment.
Each of these tools has its own installation process, which you can find on their respective websites. Installing them is typically straightforward and involves downloading an installer and following the on-screen prompts, much like the Python installation itself.

Your First Python Program
Let’s write a simple “Hello, World!” program to celebrate your successful installation:
-
Open IDLE or your chosen code editor.
-
Type the following line of code:
print("Hello, Windows 11 Python Developer!") -
Save the file as
hello.py. -
Run the file.
You should see the message “Hello, Windows 11 Python Developer!” printed to your console. Congratulations, you’ve just written and executed your first Python program on Windows 11!
With Python installed, a world of possibilities opens up. You can now dive into learning Python programming concepts, explore libraries for web development (like Flask or Django), data analysis (like Pandas and NumPy), machine learning (like TensorFlow and PyTorch), and much more. Happy coding!
aViewFromTheCave is a participant in the Amazon Services LLC Associates Program, an affiliate advertising program designed to provide a means for sites to earn advertising fees by advertising and linking to Amazon.com. Amazon, the Amazon logo, AmazonSupply, and the AmazonSupply logo are trademarks of Amazon.com, Inc. or its affiliates. As an Amazon Associate we earn affiliate commissions from qualifying purchases.