In the ever-evolving landscape of web development, PHP continues to stand as a pillar, powering a vast percentage of the internet’s most dynamic websites and applications. From popular content management systems like WordPress and Drupal to robust e-commerce platforms and custom web solutions, PHP’s versatility, ease of use, and extensive community support make it an indispensable tool for developers worldwide. If you’re looking to embark on your web development journey, explore server-side scripting, or simply need to set up a local environment for an existing PHP project, installing PHP is your foundational first step.
This comprehensive tutorial will guide you through the process of installing PHP on various operating systems, ensuring you have a solid understanding of the prerequisites, step-by-step procedures, and essential post-installation configurations. Whether you’re a seasoned developer or a curious beginner, by the end of this guide, you’ll have a fully functional PHP environment ready to bring your web projects to life.
Why PHP Still Matters: An Enduring Force in Web Development
Before we dive into the technicalities of installation, it’s worth reflecting on why PHP, despite the emergence of numerous new technologies, maintains its prominence. Understanding its role can further motivate your setup process and highlight its value in your tech toolkit.
The Enduring Power of PHP
PHP, an acronym for “PHP: Hypertext Preprocessor,” is a server-side scripting language designed specifically for web development. Its open-source nature, coupled with its robust ecosystem, has allowed it to adapt and thrive for over two decades. Recent versions have introduced significant performance improvements, enhanced type safety, and modern language features, cementing its place as a powerful and efficient language for building complex applications.
PHP’s strengths lie in its:
- Ubiquity: It runs on virtually every web server, making deployment straightforward and cost-effective.
- Ease of Learning: Its syntax is relatively intuitive, especially for those familiar with C-like languages, making it accessible for beginners.
- Rich Ecosystem: A vast array of frameworks (Laravel, Symfony, CodeIgniter), libraries, and tools significantly speed up development.
- Strong Community Support: An active global community provides extensive documentation, forums, and resources for troubleshooting and learning.
- Scalability: Capable of handling high-traffic websites and complex applications, evident in its use by giants like Facebook (originally built on PHP).
For developers, knowing PHP means unlocking opportunities in content management, e-commerce, API development, and much more. It’s a foundational skill that opens doors to a wide range of projects and career paths in the tech industry.
Who Needs to Install PHP?
Anyone involved in web development or managing web content will likely need PHP. This includes:
- Web Developers: To build, test, and deploy dynamic websites and web applications.
- Front-End Developers: To interact with back-end services or work on projects where the front-end is tightly integrated with PHP.
- System Administrators: To manage and maintain web servers hosting PHP applications.
- Bloggers & Content Creators: If using self-hosted platforms like WordPress, a local PHP environment is invaluable for testing themes, plugins, or developing custom functionalities before going live.
- Students & Learners: For educational purposes, understanding server-side scripting, and experimenting with web technologies.
Installing PHP isn’t just about getting a piece of software; it’s about gaining access to a powerful engine that drives a significant portion of the modern internet.
Preparing for Your PHP Installation: Laying the Groundwork
Before you embark on the installation process, it’s crucial to prepare your system. This involves understanding your operating system, ensuring you have necessary prerequisites, and deciding on your development environment setup. Proper preparation can save you considerable time and frustration later on.
System Requirements and Tools
PHP itself has relatively modest system requirements. Most modern computers will have more than enough processing power and memory. However, you will need:
- An Operating System: Windows, macOS, or a Linux distribution (Ubuntu, Debian, CentOS, Fedora, etc.).
- A Web Server: PHP is a server-side language, meaning it needs a web server to interpret its code and serve web pages to clients. The most common choices are Apache HTTP Server or Nginx.
- A Database (Optional but Recommended): For dynamic web applications, a database is almost always required. MySQL/MariaDB and PostgreSQL are popular choices that integrate seamlessly with PHP.
- A Text Editor or IDE: While not strictly for installation, you’ll need one to write and edit your PHP code (e.g., VS Code, Sublime Text, PHPStorm, Notepad++).
- Administrative Privileges: You’ll need
sudoaccess on Linux/macOS or administrator rights on Windows to install software and configure system files.
Choosing Your PHP Environment
There are several ways to set up a PHP development environment, ranging from all-in-one packages to manual, component-by-component installations. Your choice often depends on your operating system, experience level, and specific project needs.
-
All-in-One Local Server Stacks (Recommended for Beginners):
- XAMPP (Windows, macOS, Linux): Stands for Apache, MariaDB, PHP, and Perl. It’s an excellent choice for quickly setting up a complete development environment.
- WAMP (Windows): Windows, Apache, MySQL, PHP. Similar to XAMPP but Windows-specific.
- MAMP (macOS): Macintosh, Apache, MySQL, PHP. Similar to XAMPP but macOS-specific.
These packages bundle Apache, a database (usually MySQL/MariaDB), and PHP into a single, easy-to-install application, simplifying the setup significantly.
-
Package Managers (Recommended for Linux/macOS Users):
apt(Debian/Ubuntu),yum/dnf(CentOS/RHEL/Fedora): Linux distributions have robust package managers that can install PHP and its dependencies with simple commands.- Homebrew (macOS): A popular package manager for macOS that makes installing command-line tools and software like PHP incredibly easy.
-
Manual Installation:
- Installing PHP binaries, configuring Apache/Nginx, and setting up a database separately. This method offers the most control but is more complex and generally recommended for experienced users or specific production environments.
For the purpose of this guide, we will cover the most common and accessible methods for each operating system.
Step-by-Step Installation Guides
Now, let’s get into the practical steps for installing PHP on different operating systems. We’ll focus on the most common and recommended approaches.
Installing PHP on Windows
For Windows users, the easiest and most recommended method is to use an all-in-one local server stack like XAMPP or WAMP.
Using XAMPP (Recommended for Most Users)
XAMPP simplifies the process by bundling Apache, MariaDB (a fork of MySQL), PHP, and Perl into a single installer.
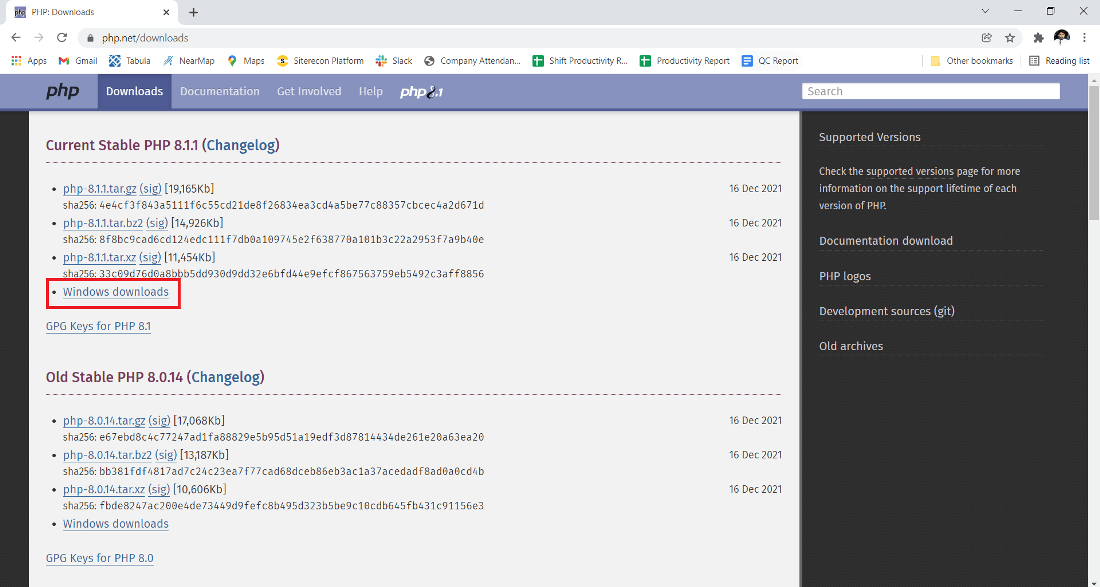
- Download XAMPP: Go to the official Apache Friends website (apachefriends.org) and download the latest version of XAMPP for Windows. Choose the installer that matches your system architecture (32-bit or 64-bit).
- Run the Installer: Once downloaded, double-click the
.exefile to start the installation. - Follow the Setup Wizard:
- You might get a warning about UAC (User Account Control); click “OK.”
- Select the components you want to install. By default, Apache, MySQL, PHP, and phpMyAdmin are selected, which is usually what you need. Click “Next.”
- Choose your installation directory (e.g.,
C:xampp). Click “Next.” - Uncheck the “Learn more about Bitnami for XAMPP” if you don’t need it. Click “Next.”
- The installation will proceed. This might take a few minutes.
- Start the Control Panel: After installation, you’ll be prompted to start the XAMPP Control Panel. If not, search for “XAMPP Control Panel” in your Start menu and open it.
- Start Services: In the Control Panel, click the “Start” buttons next to “Apache” and “MySQL.” Their status indicators should turn green.
- Verify Installation: Open your web browser and navigate to
http://localhost/. You should see the XAMPP dashboard. To verify PHP, openhttp://localhost/dashboard/phpinfo.php(or create your ownphpinfo.phpinC:xampphtdocs).
Manual Installation (Advanced)
For a manual installation, you would download PHP binaries, configure IIS or Apache, and set up your database separately. This is generally more complex and often unnecessary for a local development environment.
Installing PHP on macOS
For macOS, Homebrew is the most convenient way to install and manage PHP versions. MAMP is also a popular all-in-one solution.
Using Homebrew (Recommended for Developers)
Homebrew is a package manager that simplifies installing developer tools on macOS.
- Install Homebrew (if you haven’t already): Open Terminal and run the following command:
bash

/bin/bash -c "$(curl -fsSL https://raw.githubusercontent.com/Homebrew/install/HEAD/install.sh)"
Follow the on-screen instructions, which may involve entering your password and installing Xcode Command Line Tools. - Update Homebrew:
bash

brew update
- Install PHP: You can install a specific PHP version (e.g., PHP 8.2) or the latest stable version.
bash

brew install php@8.2 # To install PHP 8.2

# Or for the latest stable PHP version, just 'brew install php'
Homebrew will also install necessary dependencies. - Link PHP (if needed): Homebrew often symlinks the newly installed PHP version. If you have multiple PHP versions, you might need to link the one you want to use:
bash

brew link php@8.2 --force --overwrite
- Verify Installation:
bash

php -v
You should see the PHP version you just installed. - Integrate with Web Server (e.g., Apache): macOS comes with Apache pre-installed. You’ll need to configure it to use your Homebrew-installed PHP.
- Open Apache’s configuration file:
sudo nano /etc/apache2/httpd.conf - Uncomment (remove
#) the line:LoadModule rewrite_module libexec/apache2/mod_rewrite.so - Add or update the PHP module loading (ensure it points to your Homebrew PHP):
apache

LoadModule php_module /usr/local/opt/php@8.2/lib/httpd/modules/libphp.so

<IfModule libphp.c>

    AddHandler application/x-httpd-php .php

</IfModule>
(Adjustphp@8.2to your installed version if different). - Also, adjust the
DirectoryIndexto includeindex.php. - Restart Apache:
sudo apachectl restart - Create a test file
info.phpin/Library/WebServer/Documents/(or your preferred web root) with<?php phpinfo(); ?>. - Access
http://localhost/info.phpin your browser.
- Open Apache’s configuration file:
Using MAMP
MAMP is an excellent alternative, providing a graphical interface for managing Apache, Nginx, MySQL, and PHP.
- Download MAMP: Visit the official MAMP website (mamp.info) and download MAMP (the free version is sufficient for most).
- Install MAMP: Drag and drop the MAMP application to your Applications folder.
- Start Servers: Open MAMP, click “Start Servers.” Apache and MySQL will start.
- Verify: Access
http://localhost:8888/MAMP/in your browser. MAMP’s dashboard will confirm PHP is running. You can create aphpinfo.phpfile in/Applications/MAMP/htdocsto test.
Installing PHP on Linux (Ubuntu/Debian Example)
Linux distributions use package managers, making PHP installation straightforward. This example uses apt for Debian/Ubuntu, but yum/dnf commands are similar for CentOS/RHEL.
- Update Package List: It’s always a good practice to update your system’s package list before installing new software.
bash

sudo apt update

sudo apt upgrade
- Install Apache (if not already installed):
bash

sudo apt install apache2
- Install PHP and Required Modules: To install PHP and common modules, including the Apache module and MySQL support:
bash

sudo apt install php libapache2-mod-php php-mysql
This command typically installs the default PHP version available in your distribution’s repositories (e.g., PHP 8.1 or 8.2).
If you need a specific version not in the default repos (e.g., a newer version than what your OS provides), you might need to add a PPA (Personal Package Archive) likeondrej/php:
bash

sudo apt install software-properties-common

sudo add-apt-repository ppa:ondrej/php

sudo apt update

sudo apt install php8.2 libapache2-mod-php8.2 php8.2-mysql php8.2-cli php8.2-curl php8.2-mbstring php8.2-xml php8.2-zip
(Adjustphp8.2to your desired version). - Enable PHP Module (if not automatically enabled) and Restart Apache:
bash

sudo a2enmod php8.2 # Replace php8.2 with your installed version

sudo systemctl restart apache2
- Verify Installation:
- Check PHP version from the command line:
php -v - Create a PHP info file:
sudo nano /var/www/html/info.phpand add<?php phpinfo(); ?>. Save and exit. - Open your browser and go to
http://localhost/info.php.
- Check PHP version from the command line:
Installing PHP on Nginx (Linux)
If you prefer Nginx as your web server (known for its performance), PHP runs as a FastCGI Process Manager (FPM).
- Install Nginx (if not already installed):
bash

sudo apt install nginx
- Install PHP-FPM and PHP Modules:
bash

sudo apt install php-fpm php-mysql

# Or for a specific version:

sudo apt install php8.2-fpm php8.2-mysql php8.2-cli php8.2-curl php8.2-mbstring php8.2-xml php8.2-zip
- Configure Nginx to use PHP-FPM:
- Open your Nginx default site configuration file:
sudo nano /etc/nginx/sites-available/default - Find the
location ~ .php$block. Uncomment it and modify it to look like this (ensurefastcgi_passpoints to your PHP-FPM socket):
nginx

location ~ .php$ {

    include snippets/fastcgi-php.conf;

    fastcgi_pass unix:/var/run/php/php8.2-fpm.sock; # Adjust version as needed

}
- Save the file and exit.
- Open your Nginx default site configuration file:
- Restart Nginx and PHP-FPM:
bash

sudo systemctl restart nginx

sudo systemctl restart php8.2-fpm # Adjust version
- Verify: Create
info.phpin your Nginx web root (e.g.,/var/www/html/) and accesshttp://localhost/info.php.
Verifying Your PHP Installation
Regardless of your operating system or installation method, verifying that PHP is correctly installed and configured is a crucial final step. This ensures your web server can process PHP files and display their output.
The phpinfo() Function
The most common and comprehensive way to verify your PHP installation is by creating a simple PHP file that calls the phpinfo() function. This function outputs a large amount of information about the current state of PHP, including its version, build options, extensions, server information, and environment.
- Create a File: In your web server’s document root (e.g.,
C:xampphtdocsfor XAMPP,/Library/WebServer/Documentsfor macOS Apache,/var/www/htmlfor Linux Apache/Nginx), create a new file namedinfo.php(or any other.phpextension). - Add PHP Code: Open
info.phpwith your text editor and add the following single line of code:
php

<?php phpinfo(); ?>
- Access in Browser: Open your web browser and navigate to the URL corresponding to your
info.phpfile.- XAMPP/WAMP:
http://localhost/info.php - MAMP:
http://localhost:8888/info.php(orhttp://localhost/info.phpif virtual hosts are configured) - Apache/Nginx (default setup):
http://localhost/info.php
- XAMPP/WAMP:
If you see a beautifully formatted page detailing your PHP configuration, congratulations! Your PHP installation is successful. This page is incredibly useful for debugging and checking active modules. Important: Remember to delete this info.php file from your live server once you’re done verifying, as it exposes sensitive information about your server.
Command Line Verification
You can also quickly check your PHP version from the command line, which confirms that the PHP CLI (Command Line Interface) is correctly installed and accessible in your system’s PATH.
Open your Terminal or Command Prompt and type:
php -v
You should see output similar to this:
PHP 8.2.1 (cli) (built: Jan 17 2023 10:25:31) (NTS)
Copyright (c) The PHP Group
Zend Engine v4.2.1, Copyright (c) Zend Technologies
    with Zend OPcache v8.2.1, Copyright (c), by Zend Technologies
This indicates that the PHP interpreter is installed and ready to execute scripts directly from the command line, which is essential for running Composer, artisan commands (Laravel), or other CLI-based PHP tools.
Post-Installation & Best Practices
Installing PHP is just the beginning. To optimize your development environment and ensure your applications run smoothly and securely, there are a few post-installation steps and best practices to consider.
Configuring PHP (php.ini)
The php.ini file is PHP’s main configuration file. It controls many aspects of PHP’s behavior, including resource limits, error reporting, and module loading.
- Locating
php.ini: The exact location varies by installation.- XAMPP:
C:xamppphpphp.ini - MAMP:
/Applications/MAMP/bin/php/php[version]/conf/php.ini - Homebrew (macOS):
/usr/local/etc/php/[version]/php.ini - Linux (apt/yum): Typically
/etc/php/[version]/apache2/php.ini(for Apache) or/etc/php/[version]/fpm/php.ini(for Nginx/FPM) and/etc/php/[version]/cli/php.ini(for CLI).
You can find its exact path by looking for “Loaded Configuration File” in yourphpinfo()output.
- XAMPP:
- Common Settings to Adjust (for development):
memory_limit = 256M: Increases the maximum amount of memory a script can consume.upload_max_filesize = 64M: Sets the maximum size of files that can be uploaded.post_max_size = 64M: Sets the maximum size of POST data that PHP will accept.max_execution_time = 300: Increases the maximum time a script is allowed to run.date.timezone = America/New_York: Set your specific timezone to avoid warnings.display_errors = On: During development, this is useful for seeing errors directly in your browser. Always set toOffin production environments for security.error_reporting = E_ALL: Reports all PHP errors.
After making changes to php.ini, you must restart your web server (Apache, Nginx, or PHP-FPM) for the changes to take effect.
Integrating with Web Servers (Recap and Extensions)
While we covered basic integration, sometimes you might need more advanced setup.
- Apache: Ensure the
mod_phpmodule is loaded and correctly configured in yourhttpd.confor a dedicated PHP configuration file (e.g.,php.conf). CheckDirectoryIndexforindex.php. - Nginx: PHP-FPM is crucial. Verify the
fastcgi_passdirective in your Nginx configuration points to the correct PHP-FPM socket (e.g.,unix:/var/run/php/php8.2-fpm.sock). - Virtual Hosts: For developing multiple projects, configuring virtual hosts (Apache) or server blocks (Nginx) is highly recommended. This allows you to assign different domain names (e.g.,
myproject.test) to different project folders, keeping your development environment organized.
Common Pitfalls and Troubleshooting
Even with careful steps, you might encounter issues. Here are some common problems and solutions:
- PHP page downloads instead of executing: This usually means your web server isn’t configured to send
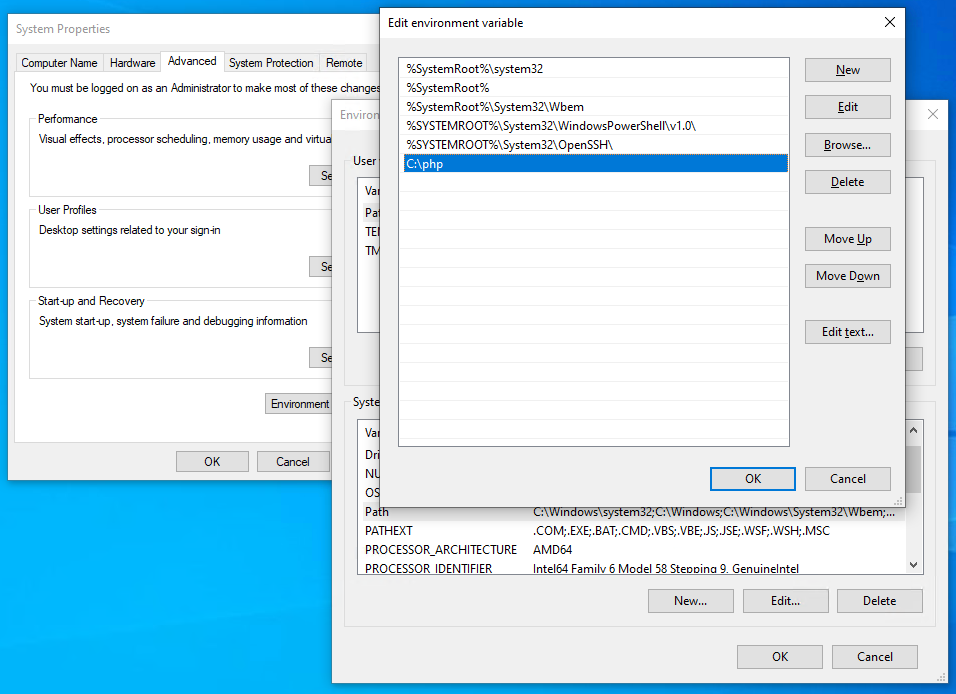
.phpfiles to the PHP interpreter. Double-check your Apache (LoadModule,AddHandler) or Nginx (fastcgi_pass) configurations and restart the web server. - “PHP module not found” or “Command not found”: This indicates PHP isn’t installed correctly or its path isn’t in your system’s
PATHenvironment variable. For Homebrew, ensure it’s linked. For manual installs, add the PHP executable’s directory toPATH. - 500 Internal Server Error: Check your web server’s error logs (e.g.,
/var/log/apache2/error.logfor Apache,/var/log/nginx/error.logfor Nginx). Also, temporarily enabledisplay_errors = Oninphp.inianderror_reporting = E_ALLto see specific PHP errors. - Missing Extensions: If a PHP application requires a specific extension (e.g.,
gd,curl,mbstring,intl), you’ll need to install it separately. Forapt/yum/Homebrew, this usually meanssudo apt install php-[extension-name]orbrew install php-[extension-name]. - Permissions Issues: Ensure your web server user (e.g.,
www-dataon Linux) has read access to your PHP files and write access to any directories PHP needs to write to (e.g.,uploads,cache).
Always remember to restart your web server or PHP-FPM service after making configuration changes.
Installing PHP is a fundamental step for anyone diving into web development or needing a robust server-side environment. While the specifics may vary slightly across operating systems and chosen methods, the core principles remain consistent. By following this guide, you should now have a fully functional PHP setup, ready to power your web applications, explore frameworks like Laravel or Symfony, or simply host your WordPress site locally. With your development environment in place, the exciting world of dynamic web creation is now at your fingertips. Happy coding!
aViewFromTheCave is a participant in the Amazon Services LLC Associates Program, an affiliate advertising program designed to provide a means for sites to earn advertising fees by advertising and linking to Amazon.com. Amazon, the Amazon logo, AmazonSupply, and the AmazonSupply logo are trademarks of Amazon.com, Inc. or its affiliates. As an Amazon Associate we earn affiliate commissions from qualifying purchases.