In an increasingly interconnected digital world, ensuring the security and integrity of data is paramount. From browsing your favorite websites to sending sensitive information, encryption plays a silent but critical role in protecting our online interactions. At the heart of much of this digital security infrastructure lies OpenSSL – a powerful, open-source cryptographic toolkit that provides robust implementations of the SSL/TLS protocols.
Whether you’re a developer securing web applications, a system administrator managing servers, or simply a tech enthusiast keen on understanding the tools that underpin digital security, knowing how to install and utilize OpenSSL is a fundamental skill. This comprehensive guide will walk you through the process of installing OpenSSL on major operating systems, ensuring you have this essential tool ready to safeguard your digital presence and projects.
1. Understanding OpenSSL: The Backbone of Digital Security
Before diving into the installation process, it’s crucial to understand what OpenSSL is and why it holds such a significant position in the realm of digital security and technology.
1.1 What is OpenSSL?
OpenSSL is a full-featured toolkit for the Transport Layer Security (TLS) and Secure Sockets Layer (SSL) protocols. These protocols are the cryptographic backbone for secure communication over computer networks, ensuring privacy, authentication, and data integrity. Essentially, when you see “HTTPS” in your browser’s address bar, OpenSSL or a similar technology is likely working behind the scenes to encrypt that connection.
More than just a protocol implementation, OpenSSL is a command-line tool and a library of cryptographic functions. It allows users and applications to perform a wide array of cryptographic tasks, including:
- Generating private keys: The secret ingredients for encryption.
- Creating Certificate Signing Requests (CSRs): Essential for obtaining SSL/TLS certificates from Certificate Authorities (CAs).
- Managing SSL/TLS certificates: Used to verify the identity of servers and clients.
- Encrypting and decrypting data: Protecting information from unauthorized access.
- Computing message digests (hashes): Ensuring data integrity.
- Testing SSL/TLS connections: Diagnosing security configurations.
Its open-source nature means it’s continuously reviewed, improved, and adopted by a vast community, making it a reliable and transparent choice for cryptographic operations.
1.2 Why is OpenSSL Essential?
OpenSSL’s importance extends across virtually every facet of digital technology and security. Its functionalities are integral to:
- Web Servers: Apache, Nginx, and other popular web servers rely on OpenSSL to provide HTTPS encryption, securing communication between web servers and clients. Without it, your online banking, shopping, and sensitive data transmissions would be vulnerable to eavesdropping.
- Email Servers: Protocols like SMTPS, POP3S, and IMAPS leverage OpenSSL to encrypt email communications, protecting your messages from interception.
- Virtual Private Networks (VPNs): Many VPN solutions use OpenSSL to establish secure, encrypted tunnels for private browsing and remote access.
- Secure Shell (SSH): While SSH primarily uses its own cryptographic protocols, OpenSSL components can be integrated for certain key management and host authentication tasks.
- Software Development: Developers use OpenSSL libraries to build secure applications, integrate encryption features, and handle digital certificates within their software.
- Digital Security Auditing: Security professionals utilize OpenSSL for testing the strength of SSL/TLS configurations, identifying vulnerabilities, and verifying certificates.
In essence, OpenSSL is a foundational building block for digital security, enabling trust and privacy across the internet. Installing it provides you with a powerful utility to manage and understand these critical security aspects, aligning perfectly with the digital security and software focus of our website.
2. Preparing for Installation: Prerequisites and Considerations
Before you embark on installing OpenSSL, a few preliminary steps and considerations will ensure a smoother process. Taking these into account can save you from common pitfalls and ensure compatibility with your system.
2.1 System Requirements
OpenSSL is remarkably lightweight and has minimal system requirements. It can run on virtually any modern operating system with sufficient memory and disk space, which for most users, will not be an issue. The primary “requirement” is simply having administrative privileges on your machine, as installation often involves modifying system files or directories.
2.2 Choosing Your Installation Method
The method you choose for installing OpenSSL will largely depend on your operating system and your comfort level with command-line tools or package managers.
- Package Managers (Recommended): For Linux and macOS users, package managers like
apt,yum,dnf, orHomebrewoffer the easiest and most reliable way to install OpenSSL. They handle dependencies, updates, and system-wide availability automatically. - Binary Distributions (Windows): For Windows users, while there isn’t a native package manager as robust as those on Unix-like systems, tools like Chocolatey (a package manager for Windows) provide a similar streamlined experience. Alternatively, you can download pre-compiled binary distributions.
- Compiling from Source: This method, while offering the most control and customization, is generally recommended only for advanced users or specific development scenarios. It involves downloading the source code, configuring it, and compiling it manually. For the vast majority of users, pre-compiled binaries or package manager installations are sufficient and much simpler.
For this guide, we will focus on the most straightforward and common installation methods for each major operating system, prioritizing ease of use and system compatibility.
3. Step-by-Step Installation Guides for Major Operating Systems
This section provides detailed instructions for installing OpenSSL on Windows, macOS, and various Linux distributions. Follow the instructions relevant to your operating system.
3.1 Installing OpenSSL on Windows
Windows does not ship with OpenSSL pre-installed, nor does it have a built-in package manager like Linux or macOS. However, there are a couple of straightforward methods to get OpenSSL up and running.
3.1.1 Using Chocolatey (Recommended)
Chocolatey is a popular package manager for Windows that simplifies software installation. If you don’t have Chocolatey installed, visit chocolatey.org for installation instructions (it usually involves running a command in PowerShell as an administrator).
- Open PowerShell as Administrator: Search for “PowerShell” in the Start Menu, right-click, and select “Run as administrator.”
- Install OpenSSL: Once Chocolatey is installed, simply run the following command:
powershell

choco install openssl
- Confirm Installation: Chocolatey will download and install the latest stable version of OpenSSL, handling all necessary path configurations. You might need to restart your terminal or even your computer for the changes to take effect globally.
3.1.2 Manual Installation from Binary Distributions
If you prefer not to use Chocolatey, you can manually download and install a pre-compiled OpenSSL binary.
- Download a Binary Distribution: OpenSSL itself does not provide official binaries, but several third-party organizations do. A commonly trusted source is
wiki.openssl.org/index.php/Binaries. Look for versions compiled by reputable sources likeShining Light Productions(e.g.,https://slproweb.com/products/Win32OpenSSL.html). Choose the appropriate version for your system (e.g., Win64 OpenSSL vX.X.X Light). - Run the Installer: Double-click the downloaded
.msifile and follow the on-screen instructions.- Accept the license agreement.
- Choose an installation directory (the default
C:Program FilesOpenSSL-Win64is usually fine). - Select whether to install DLLs to “The OpenSSL binaries (/bin) directory” or “The Windows system directory.” Installing to the binaries directory is generally safer and less prone to conflicts.
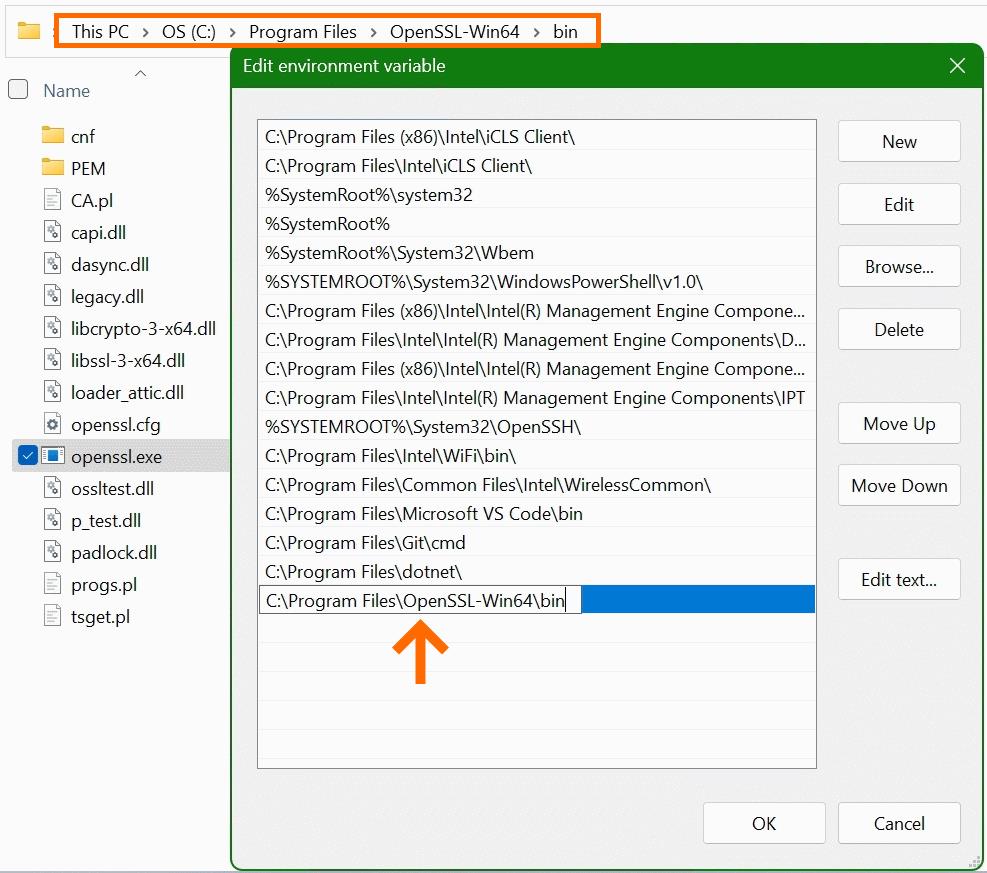
- Add OpenSSL to System PATH: This is a crucial step to allow you to run OpenSSL commands from any directory in your command prompt.
- Search for “Environment Variables” in the Start Menu and select “Edit the system environment variables.”
- Click “Environment Variables…”
- Under “System variables,” find and select the
Pathvariable, then click “Edit…” - Click “New” and add the path to your OpenSSL
bindirectory (e.g.,C:Program FilesOpenSSL-Win64bin). - Click “OK” on all open windows to save the changes.
- Restart Command Prompt/PowerShell: Close and reopen any active command prompts or PowerShell windows for the new
PATHvariable to be recognized.
3.2 Installing OpenSSL on macOS
macOS includes a version of LibreSSL (a fork of OpenSSL) by default, but it’s often an older version and not the full OpenSSL toolkit. For up-to-date functionality and compatibility, it’s highly recommended to install the official OpenSSL via Homebrew.
3.2.1 Using Homebrew (Recommended)
Homebrew is the unofficial package manager for macOS and is the easiest way to install a wide range of software, including OpenSSL. If you don’t have Homebrew, install it by running the command found on brew.sh in your Terminal.
- Open Terminal: You can find it in Applications/Utilities or search for it with Spotlight (Cmd + Space).
- Install OpenSSL: Run the following command:
bash

brew install openssl@3
Note: Homebrew often distinguishes betweenopenssl(which might link to an older version or conflict with system tools) andopenssl@3for the latest major version (version 3.x). Usingopenssl@3is generally recommended for modern applications. - Follow Homebrew’s Instructions for PATH: After installation, Homebrew will likely provide instructions on how to link OpenSSL into your
PATHor specify its location, as macOS prioritizes its own LibreSSL. You’ll typically see something like this:
bash

echo 'export PATH="/opt/homebrew/opt/openssl@3/bin:$PATH"' >> ~/.zshrc # For zsh shell

echo 'export PATH="/opt/homebrew/opt/openssl@3/bin:$PATH"' >> ~/.bash_profile # For bash shell
Choose the command appropriate for your shell (most modern macOS systems use zsh by default). This command adds the Homebrew OpenSSL path to your shell’s configuration file, ensuring it’s found before the system’s LibreSSL. - Apply Changes: Restart your Terminal or run
source ~/.zshrc(orsource ~/.bash_profile) to apply the changes to your current session.
3.2.2 Verifying the Installation on macOS
After installation, it’s crucial to verify that the Homebrew version of OpenSSL is being used, not the system’s LibreSSL.
- Run
which openssl. It should output/opt/homebrew/opt/openssl@3/bin/openssl(or similar Homebrew path). If it shows/usr/bin/openssl, then yourPATHvariable isn’t configured correctly. - Run
openssl version -a. The output should clearly indicate the OpenSSL version (e.g.,OpenSSL 3.x.x) and mentionbuilt on:with a date, and thebuilt for:should referencedarwinormacOS.
3.3 Installing OpenSSL on Linux Distributions
Linux distributions typically have OpenSSL pre-installed, but it might not be the latest version or might lack certain development headers. Updating or installing the latest stable version is usually done through the distribution’s native package manager.
3.3.1 Debian/Ubuntu-based Systems (apt)
For Debian, Ubuntu, Linux Mint, and other apt-based distributions:
- Open Terminal: Access your terminal application.
- Update Package Lists: It’s always a good practice to update your package lists first:
bash

sudo apt update
- Install OpenSSL: Install the
opensslpackage. If it’s already installed, this command will ensure it’s updated to the latest available version in your repositories. You might also want to installlibssl-devif you plan to compile software that links against OpenSSL.
bash

sudo apt install openssl libssl-dev
- Enter Password: You will be prompted for your user password to authorize the installation.
3.3.2 Red Hat/CentOS/Fedora-based Systems (yum/dnf)
For Red Hat Enterprise Linux (RHEL), CentOS, Fedora, and other yum or dnf-based distributions:
-
Open Terminal: Access your terminal application.
-
Install OpenSSL: Use
dnf(for Fedora 22+ and RHEL 8+) oryum(for older CentOS/RHEL) to install OpenSSL. Again, include the development package (openssl-devel) if you intend to use OpenSSL for compiling other software.# For newer systems (Fedora, RHEL 8+, CentOS Stream 8+) sudo dnf install openssl openssl-devel # For older systems (CentOS 7, RHEL 7) sudo yum install openssl openssl-devel -
Enter Password: You will be prompted for your user password.
3.3.3 Verifying the Installation on Linux
After installation or update, verification is straightforward:
- Run
openssl version -a. The output should show the OpenSSL version (e.g.,OpenSSL 3.0.x), its build date, andbuilt for:indicating your Linux distribution architecture.
4. Verifying Your OpenSSL Installation
Regardless of your operating system or installation method, the final and most important step is to verify that OpenSSL has been installed correctly and is accessible from your command-line interface.
4.1 Checking the Version
The most basic way to confirm a successful installation is to check the installed OpenSSL version. This command will display detailed information about your OpenSSL build.
Open your command prompt, PowerShell, or Terminal and type:
openssl version -a
You should see output similar to this (the version number and build details will vary):
OpenSSL 3.0.12 24 Oct 2023 (Library: OpenSSL 3.0.12 24 Oct 2023)
built on: Mon Oct 23 16:51:24 2023 UTC
built by: Visual Studio
platform: VC-WIN64A
options:  bn(64,64)
compiler: cl /Z7 /Ot /GR /EHsc /W3 /wd4090 /nologo /O2 /MD /Zi /FP:fast /DNDEBUG /Gs0 /GF /Gy /arch:AVX2 /Oi /Zc:sizedDealloc- /std:c++17
(Example for Windows)
Or for Linux/macOS:
OpenSSL 3.0.11 19 Sep 2023 (Library: OpenSSL 3.0.11 19 Sep 2023)
built on:  Mon Oct 23 09:39:52 2023 UTC
built by:  macports build (build-macports@MacPorts.org)
platform:  darwin64-arm64-cc
options:  bn(64,64)
compiler:  clang -fPIC -arch arm64 -O2 -L/opt/local/lib -Wl,-headerpad_max_install_names -arch arm64 -Wl,-rpath,/opt/local/lib -I/opt/local/include -Xclang -target-feature -Xclang +neon -DDSO_DLFCN -DHAVE_DLFCN_H -DNDEBUG -DOPENSSL_USE_NODELETE -DOPENSSL_PIC -DOPENSSL_THREADS -D_REENTRANT -DDSO_DLFCN -DHAVE_DLFCN_H -DL_ENDIAN -DOPENSSL_BN_ASM_MONT -DOPENSSL_BN_ASM_GF2m -DOPENSSL_NO_ERR -DOPENSSL_RC4_ASM -DOPENSSL_SHA512_ASM -DOPENSSL_UNION_ASM -DOPENSSL_ZLIB -DMODULE_PROCESSOR_ARCH_"arm64" -DOPENSSL_NO_SECURE_MEMORY -DOPENSSL_BUILD_MAYBE_SHARED
(Example for macOS Homebrew)
If you receive an error like “command not found” or “openssl is not recognized,” it typically indicates a problem with your system’s PATH environment variable. Refer back to the installation steps for your OS to ensure the OpenSSL binary directory is correctly added to your PATH and that you’ve restarted your terminal/shell.
4.2 Running a Basic Command
Beyond just checking the version, you can run a simple cryptographic command to confirm OpenSSL’s functionality. For example, you can generate a random string:
openssl rand -hex 16
This command will output a 32-character hexadecimal string, demonstrating that the OpenSSL command-line tool is operational and capable of performing cryptographic functions.
5. Post-Installation: What Next with OpenSSL?
Now that OpenSSL is successfully installed, you have a powerful tool at your fingertips. While a full exploration of OpenSSL’s capabilities is beyond the scope of this installation guide, here are a few common applications to get you started and understand its utility, especially regarding digital security and productivity.
5.1 Generating SSL/TLS Certificates
One of the most frequent uses of OpenSSL is for managing SSL/TLS certificates, which are crucial for securing websites, APIs, and other network services.
- Generating a Private Key:
bash

openssl genrsa -out private.key 2048
This command creates a 2048-bit RSA private key, a fundamental component of any SSL/TLS certificate. - Creating a Certificate Signing Request (CSR):
bash

openssl req -new -key private.key -out csr.csr
You’ll be prompted for information (country, organization, common name, etc.) that will be embedded in the CSR. This file is then submitted to a Certificate Authority (CA) to obtain a signed SSL/TLS certificate. - Generating a Self-Signed Certificate: For development or internal testing environments, you might generate a self-signed certificate, which acts as its own CA.
bash

openssl x509 -req -days 365 -in csr.csr -signkey private.key -out certificate.crt
This creates a certificate valid for 365 days.
5.2 Encryption and Decryption
OpenSSL can also be used for general-purpose encryption and decryption of files, providing an added layer of digital security for sensitive data.
- Encrypting a file:
bash

openssl enc -aes-256-cbc -salt -in plaintext.txt -out encrypted.enc
You’ll be prompted to enter a passphrase, which serves as your encryption key. - Decrypting a file:
bash

openssl enc -aes-256-cbc -d -in encrypted.enc -out decrypted.txt
You’ll need to enter the same passphrase used for encryption.
These examples only scratch the surface of OpenSSL’s capabilities. Its extensive features make it an invaluable tool for developers, system administrators, and anyone invested in maintaining robust digital security practices.

5.3 Troubleshooting Common Issues
Even with clear instructions, issues can sometimes arise during installation or initial usage. Here are a few common problems and their solutions:
- “openssl: command not found” (Linux/macOS) or “‘openssl’ is not recognized” (Windows): This is almost always a
PATHenvironment variable issue.- Windows: Ensure the OpenSSL
bindirectory is correctly added to your system’sPATH. Remember to restart your command prompt/PowerShell after modifyingPATH. - macOS/Linux: Confirm that the directory containing the
opensslexecutable is in your shell’sPATH. For Homebrew on macOS, ensure you’ve sourced the~/.zshrcor~/.bash_profilefile after updating it with Homebrew’s suggestedexport PATHcommand.
- Windows: Ensure the OpenSSL
- Using an older version of OpenSSL (macOS): If
openssl version -ashows LibreSSL or an outdated OpenSSL version, double-check yourPATHconfiguration on macOS. The Homebrew OpenSSL path (/opt/homebrew/opt/openssl@3/bin) must appear before/usr/binin yourPATHvariable. - Permissions errors: If you encounter permission denied errors during installation (especially on Linux/macOS), ensure you’re using
sudofor commands that require elevated privileges (e.g.,sudo apt installorsudo dnf install). - Conflicts with other SSL libraries: In rare cases, having multiple SSL libraries installed might cause conflicts. If you experience unexpected behavior, check if other SSL-related packages are installed and consider their compatibility.
By understanding these common issues, you can quickly diagnose and resolve problems, ensuring your OpenSSL installation functions smoothly.
In conclusion, installing OpenSSL is a foundational step for anyone serious about digital security, secure communication, and a wide array of cryptographic tasks. By following this guide, you’ve equipped your system with a powerful, versatile tool that underpins much of the internet’s security infrastructure. Embrace its capabilities to enhance your projects, secure your data, and deepen your understanding of the technological landscape.
aViewFromTheCave is a participant in the Amazon Services LLC Associates Program, an affiliate advertising program designed to provide a means for sites to earn advertising fees by advertising and linking to Amazon.com. Amazon, the Amazon logo, AmazonSupply, and the AmazonSupply logo are trademarks of Amazon.com, Inc. or its affiliates. As an Amazon Associate we earn affiliate commissions from qualifying purchases.