Chromebooks have become ubiquitous in educational settings, lauded for their simplicity, affordability, and robust integration with Google’s ecosystem. They offer a secure and easy-to-manage platform for students, providing access to essential productivity tools and web-based learning resources. However, their very simplicity, rooted in the Chrome OS ecosystem, can sometimes feel restrictive for users seeking more advanced software, deeper customization, or a richer development environment. This is particularly true for students interested in programming, graphic design, or exploring open-source applications that aren’t natively available on Chrome OS.
For those eager to expand their Chromebook’s capabilities beyond its default boundaries, installing Linux presents a compelling solution. Linux, with its vast repositories of free and open-source software, offers a world of possibilities, from powerful development tools and advanced productivity suites to specialized applications for scientific computing or multimedia editing. This guide will walk you through the process of bringing the power of Linux to your school Chromebook, exploring the “why,” the “how,” and the critical considerations to ensure a smooth and responsible transition.
Why Consider Linux on Your School Chromebook?
The decision to install Linux on a school-issued device isn’t just about curiosity; it often stems from a genuine need to enhance functionality and learning opportunities. While Chrome OS excels at web browsing and cloud-based tasks, Linux unlocks a new dimension of computing.
Expanding Software Capabilities
One of the primary motivations for installing Linux is access to a broader range of software. Chrome OS, while supporting Android apps and a growing number of web applications, still has limitations. Linux, by contrast, boasts an enormous library of applications that can cater to almost any need:
- Development Tools: For aspiring programmers, Linux is a paradise. You can install full-featured Integrated Development Environments (IDEs) like VS Code, Eclipse, or IntelliJ IDEA, along with compilers for languages like Python, Java, C++, and Ruby. This transforms a basic Chromebook into a powerful coding workstation, enabling students to learn and build without hardware limitations.
- Productivity Suites: While Google Docs is excellent, sometimes a full-fledged office suite is required. LibreOffice, a free and open-source alternative to Microsoft Office, runs perfectly on Linux, offering advanced features for word processing, spreadsheets, presentations, and database management.
- Graphic Design and Multimedia: Applications like GIMP (GNU Image Manipulation Program) for photo editing, Inkscape for vector graphics, and Audacity for audio editing are professional-grade tools readily available on Linux, far surpassing the capabilities of most web-based alternatives.
- Specialized Software: Many scientific and engineering applications, simulation tools, and niche utilities are often built for Linux first, making it an essential platform for students in STEM fields.
Enhancing Productivity and Customization
Linux distributions are renowned for their flexibility and deep customization options. Unlike the relatively locked-down Chrome OS, a Linux environment allows users to tailor nearly every aspect of their operating system to suit their workflow and preferences.
- True Multitasking: While Chrome OS has improved, Linux offers a more robust multitasking experience, especially with multiple windows and demanding applications.
- Desktop Environments: Linux provides a choice of desktop environments (like XFCE, GNOME, KDE Plasma), each offering a distinct look, feel, and set of features. This level of personalization can significantly enhance user comfort and efficiency.
- Advanced File Management: Linux file systems offer more granular control and a deeper understanding of how a computer organizes data, which can be invaluable for advanced users and those learning about operating systems.
- Command Line Interface (CLI): Mastering the Linux command line is a crucial skill for anyone pursuing a career in technology. It provides unparalleled power and efficiency for managing files, automating tasks, and interacting with the system at a fundamental level. Installing Linux on a Chromebook offers a safe sandbox to develop these vital skills.
Learning Opportunity for Budding Technologists
Beyond the practical applications, installing and using Linux is an incredible learning experience in itself. It introduces students to open-source philosophy, system administration basics, and problem-solving in a real-world computing environment. Understanding Linux can be a significant advantage, as it powers most of the world’s servers, supercomputers, and embedded devices. For students considering careers in IT, cybersecurity, software development, or data science, early exposure to Linux is highly beneficial.
Understanding the Landscape: School Restrictions and Technical Considerations
Before diving into the technical steps, it’s crucial to understand the unique challenges and considerations that come with modifying a school-issued device. Unlike a personal Chromebook, a school Chromebook often comes with specific policies, hardware configurations, and management tools that can impact your ability to install Linux.
The “School” Factor: Policies, Permissions, and Potential Pitfalls
School Chromebooks are typically managed by the institution’s IT department. This means they are often configured with:
- Device Management Policies: Schools use Google Admin Console to push policies to devices, which can restrict access to developer mode, block certain websites, or even prevent the installation of non-approved software.
- Security Measures: These devices are designed to be secure environments for students, often with monitoring capabilities or restricted access to system settings.
- Acceptable Use Policies (AUPs): Your school will have an AUP outlining what is and isn’t permitted with their equipment. Modifying the operating system without explicit permission could violate this policy, leading to consequences such as loss of device privileges, disciplinary action, or even a requirement to pay for damages if the device is rendered unusable.
Crucial Advice: Before proceeding, always check your school’s official policy regarding modifying school-issued devices. If possible, seek explicit permission from the IT department or a relevant administrator. Transparency is key. Some schools might even offer official ways to enable Linux on student devices, or they might prefer you use school-provided virtual machines for such activities. Proceeding without permission could lead to severe repercussions. Additionally, note that putting a Chromebook into developer mode often wipes all local user data and may void the device’s warranty.
Chromebook Architecture and Linux Compatibility
Chromebooks run Chrome OS, which is based on the Linux kernel. This fundamental compatibility is what makes installing Linux relatively straightforward. There are generally two main approaches:
- Crostini (Linux (Beta)): This is Google’s official and most recommended way to run Linux applications on newer Chromebooks. It creates a lightweight virtual machine (VM) that runs a full Debian Linux environment alongside Chrome OS, without requiring developer mode or compromising the security of the primary system.
- Crouton (Chroot Environment): For older Chromebooks or those wanting a deeper integration, Crouton uses a “chroot” environment. This allows you to run a full Linux distribution simultaneously with Chrome OS, effectively switching between them. However, it requires enabling “developer mode,” which lowers the device’s security posture and can be flagged by school management systems.
The method you choose will depend on your Chromebook’s age, model, and your comfort level with potential risks. For most students and school-issued devices, Crostini is the preferred and safer option if supported.
Essential Preparations Before You Begin
Regardless of the method you choose, some preparatory steps are universally important:
- Back Up Your Data: Enabling developer mode (for Crouton) or even just encountering an unforeseen issue during Crostini setup can potentially lead to data loss. Ensure all important files, documents, and projects are backed up to Google Drive or an external storage device.
- Check for Updates: Ensure your Chromebook is running the latest version of Chrome OS. Go to
Settings > About Chrome OS > Check for updates. Updates often bring new features, bug fixes, and improved compatibility. - Charge Your Chromebook: The installation process can be power-intensive and lengthy. Ensure your device is fully charged or plugged into a power source to prevent unexpected shutdowns.
- Sufficient Storage Space: Linux installations, especially with additional applications, require significant storage. Crostini typically needs at least 10 GB, while a full Crouton installation might need more. Check your available storage in
Settings > Device > Storage management. - Stable Internet Connection: You will need a reliable internet connection to download Linux components and applications.
Method 1: Harnessing Crostini (Built-in Linux Support)
Crostini, officially known as “Linux (Beta),” is Google’s preferred and most secure method for running Linux applications on compatible Chromebooks. It provides a virtualized Linux environment that runs securely alongside Chrome OS without requiring developer mode, making it an ideal choice for school devices.
Verifying Crostini Compatibility
Crostini is available on most Chromebooks released after 2018. To check if your device supports it:
- Open your Chromebook’s Settings.
- Scroll down to the “Linux (Beta)” section. If you see this option, your Chromebook is compatible. If not, you might need to consider the Crouton method (if your school permits developer mode) or accept that your device may not support Linux this way.
Enabling Linux (Beta) on Your Chromebook
The process to enable Crostini is straightforward:
- Open Settings: Click on the time in the bottom right corner of your screen, then click the gear icon to open Settings.
- Navigate to Linux (Beta): In the left-hand menu, scroll down and click on “Linux (Beta).”
- Turn On: Click the “Turn on” button.
- Follow On-Screen Prompts: A setup window will appear. Click “Next.” You’ll be prompted to choose a username (this can be anything, but it’s often best to use a simple, lowercase name) and set a disk size for your Linux environment. The default disk size is usually sufficient to start, but you can adjust it if you plan to install many large applications. A minimum of 10 GB is recommended, but 20-30 GB provides more breathing room.
- Install: Click “Install.” The system will now download and install the necessary Linux components. This process can take several minutes, depending on your internet speed and Chromebook’s performance. You’ll see a terminal window appear once the installation is complete.
Congratulations! You now have a Debian-based Linux environment running on your Chromebook.
Installing and Managing Linux Applications
Once Linux (Beta) is enabled, you can interact with it primarily through the terminal, though graphical applications will integrate into your Chrome OS app launcher.
- Open the Terminal: You can find the “Terminal” app in your Chrome OS app launcher (usually in a folder named “Linux apps”).
- Update Your System (Crucial First Step): Before installing any software, it’s good practice to update the package lists and upgrade existing packages. In the terminal, type:
bash

sudo apt update

sudo apt upgrade
sudogrants administrative privileges,apt updaterefreshes the list of available packages, andapt upgradeinstalls newer versions of your installed packages. You may be prompted to confirm with ‘Y’ or ‘N’. - Install Applications: You can now install a vast array of Linux software using the
apt installcommand. For example:- To install the popular GIMP image editor:
sudo apt install gimp - To install Visual Studio Code: You’ll typically download the
.debpackage from the VS Code website and install it usingsudo dpkg -i package_name.debor by double-clicking the downloaded file in the Chrome OS Files app, which will offer to install it in your Linux environment. - To install LibreOffice:
sudo apt install libreoffice
- To install the popular GIMP image editor:
Installed graphical applications will automatically appear in your Chrome OS app launcher, making them easy to launch just like any other app. They run in their own windows, separate from Chrome OS, but integrate well into the desktop environment.
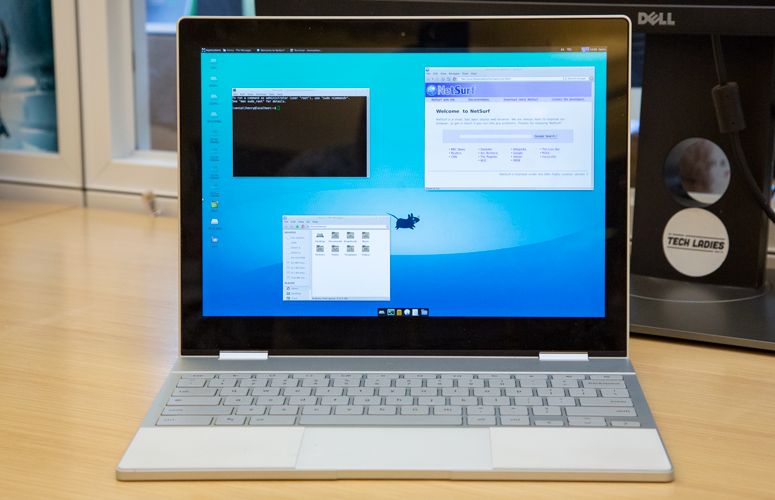
Method 2: Crouton for Broader Linux Integration (For Older Devices or Specific Needs)
Crouton (Chromium OS Universal Chroot Environment) is an older, but still viable, method for installing a full Linux distribution alongside Chrome OS. It’s particularly useful for older Chromebooks that don’t support Crostini or for users who require a deeper level of integration and control over their Linux environment. However, it comes with the significant caveat of requiring “developer mode.”
Understanding Crouton: Chroot Environments
Crouton works by creating a “chroot” (change root) environment. This means it essentially creates a separate directory on your Chromebook’s hard drive that acts as an isolated Linux installation. It shares the same kernel as Chrome OS but has its own user-space applications, libraries, and settings. This allows you to switch seamlessly between Chrome OS and your Linux desktop environment without rebooting.
Entering Developer Mode (Crucial Step)
WARNING: Entering developer mode is a critical step for Crouton, and it carries significant implications:
- Data Wipe: It will factory reset your Chromebook, deleting all local data. Ensure everything is backed up.
- Reduced Security: Developer mode disables Chrome OS’s verified boot, meaning the operating system no longer checks if it has been tampered with. This makes your device less secure.
- Boot Screen: Every time you boot, you’ll see a warning screen (often indicating that “OS verification is OFF”). You’ll have to press
Ctrl+D(or wait 30 seconds) to proceed to Chrome OS or your Linux environment.
Steps to Enter Developer Mode:
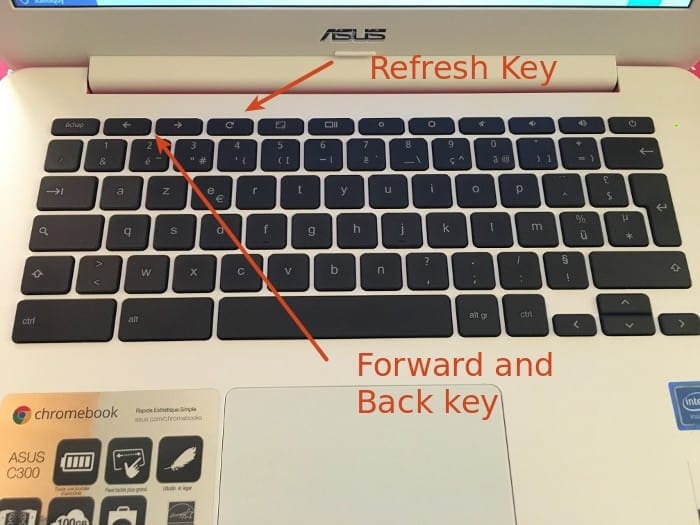
- Power off your Chromebook.
- Hold down the Esc and Refresh (F3) keys, then press the Power button. This will put your Chromebook into recovery mode.
- On the recovery screen, press Ctrl + D.
- You’ll be asked to confirm turning OS verification off. Press Enter.
- Your Chromebook will restart and begin the process of transitioning to developer mode, which can take 10-15 minutes as it wipes and reconfigures the system. Do NOT power off during this process.
- Once complete, it will boot to the warning screen. Press
Ctrl+Dto continue and set up Chrome OS again as if it were new.
Downloading and Running the Crouton Script
Once in developer mode and Chrome OS is set up:
- Download Crouton: Go to the official Crouton GitHub page:
https://github.com/dnschneid/croutonand click on the “crouton” link to download the latestcroutonscript. It will download to yourDownloadsfolder. - Open Crosh: Press
Ctrl + Alt + Tto open the Chrome OS shell (Crosh). - Enter Shell Mode: In the Crosh window, type
shelland press Enter. - Install Crouton: Now, use the Crouton script to install your desired Linux distribution and desktop environment. A common choice for Chromebooks is XFCE, a lightweight desktop environment. For example, to install Ubuntu with XFCE:
bash

sudo sh ~/Downloads/crouton -t xfce
-t xfcespecifies the XFCE desktop environment. You can add other targets for additional features, e.g.,-t xfce,keyboard,audio,chrome- The installation will begin and can take a considerable amount of time (30 minutes to over an hour), depending on your internet speed and Chromebook.
- During the process, you will be prompted to create a new username and password for your Linux environment. Make sure to remember them.
Switching Between Chrome OS and Linux
Once Crouton is installed:
- To enter your Linux desktop: Open Crosh (
Ctrl + Alt + T), typeshell, and thensudo startxfce. - To switch back to Chrome OS from Linux:
- For Intel/AMD Chromebooks:
Ctrl + Alt + Shift + Back(Back arrow key) - For ARM Chromebooks:
Ctrl + Alt + Back(Back arrow key)
- For Intel/AMD Chromebooks:
- To switch back to Linux from Chrome OS:
- For Intel/AMD Chromebooks:
Ctrl + Alt + Shift + Forward(Forward arrow key) - For ARM Chromebooks:
Ctrl + Alt + Forward(Forward arrow key) - Note: Some newer Intel/AMD Chromebooks might use
Ctrl + Alt + Back/Forwardas well. Experiment if theShiftcombination doesn’t work.
- For Intel/AMD Chromebooks:
Navigating Potential Challenges and Best Practices
Installing Linux, especially on a school Chromebook, can sometimes present challenges. Being prepared and following best practices can help ensure a smooth experience.
Common Installation Issues and Troubleshooting Tips
- Insufficient Disk Space: If your installation fails, check your available storage. You might need to free up space or re-run the Crostini setup with a smaller disk allocation, or for Crouton, ensure you have adequate free space before starting.
- Network Connectivity Problems: A dropped Wi-Fi connection during downloads can corrupt files. Ensure a stable connection, and if issues persist, try connecting to a different network.
- Dependency Errors (Crouton): Sometimes, a specific package might fail to install due to missing dependencies. The error message will usually guide you. A common fix in Linux is
sudo apt --fix-broken installfollowed bysudo apt update && sudo apt upgrade. - Frozen Screen or Performance Issues: If your Linux environment becomes unresponsive, try closing some applications or restarting the Linux container (for Crostini) by going to
Settings > Linux (Beta) > Stop. For Crouton, you might need to switch back to Chrome OS and restart the chroot. - “OS verification is OFF” Warning (Crouton): This is normal after enabling developer mode. Press
Ctrl + Dto bypass it.
Maintaining Digital Security and Device Integrity
- Regular Updates: Regardless of whether you use Crostini or Crouton, regularly update your Linux environment. In the Linux terminal, run
sudo apt update && sudo apt upgradeto keep your software secure and bug-free. - Responsible Software Installation: Only install software from trusted repositories and sources. Be cautious about downloading and running arbitrary scripts from the internet.
- Understand Developer Mode Risks (Crouton): If you’ve enabled developer mode, be aware that your device is less secure. Avoid storing highly sensitive personal data on it.
- Adhere to School Policies: The most important security and integrity measure is to respect your school’s policies. Using the device in ways that violate their terms could lead to your Linux installation being wiped or your device being confiscated.
The Importance of Backups and Responsible Use
Even after a successful installation, continuous responsible use is vital:
- Regular Backups: Make a habit of backing up important files from both your Chrome OS and Linux environments. Google Drive is convenient for Chrome OS, and you can easily share folders between Chrome OS and Linux for backup purposes.
- Resource Management: Linux can be resource-intensive, especially if you run heavy applications. Monitor your Chromebook’s performance and close unnecessary programs to keep it running smoothly.
- Learn and Explore: Linux offers a fantastic opportunity to learn about operating systems and command-line tools. Start with basic commands, explore the file system, and experiment in a controlled manner.
- Be Prepared to Revert: Understand that if your school’s IT department needs to service your Chromebook, they may wipe the device, removing your Linux installation. For Crouton, they might even disable developer mode, effectively returning the device to its default, secure state. Always have a plan for how you would recover your work if this happens.
Conclusion: Empowering Your Educational Journey with Linux
Installing Linux on your school Chromebook can be a transformative experience, unlocking a world of advanced software, customization, and learning opportunities. Whether you’re an aspiring coder, a digital artist, or simply someone who wants more control over their computing environment, Linux provides the tools to push the boundaries of what your Chromebook can do.
By carefully considering your school’s policies, understanding the technical implications of each installation method (Crostini for security and ease, Crouton for deeper integration on older devices), and adhering to best practices for maintenance and responsible use, you can successfully integrate a powerful Linux environment into your educational toolkit. This journey not only enhances your device’s utility but also cultivates valuable technical skills and a deeper appreciation for the open-source world, empowering you to tackle complex projects and expand your digital horizons.
aViewFromTheCave is a participant in the Amazon Services LLC Associates Program, an affiliate advertising program designed to provide a means for sites to earn advertising fees by advertising and linking to Amazon.com. Amazon, the Amazon logo, AmazonSupply, and the AmazonSupply logo are trademarks of Amazon.com, Inc. or its affiliates. As an Amazon Associate we earn affiliate commissions from qualifying purchases.