In an increasingly digitized world, the choice of operating system profoundly impacts our productivity, security, and overall digital experience. While Windows has long dominated the desktop landscape, an increasing number of users are exploring the powerful, flexible, and open-source world of Linux. Whether you’re a developer seeking a robust environment, a security enthusiast looking for greater control, or simply curious about an alternative, installing Linux can unlock a new realm of possibilities. This comprehensive guide will walk you through the various methods of installing Linux while you’re currently running Windows, offering insights into each approach to help you choose the one that best fits your needs. From dual-booting for dedicated performance to virtual machines for safe experimentation and the Windows Subsystem for Linux (WSL) for seamless integration, prepare to embark on a journey that could redefine your computing habits.
Preparing Your System for a Seamless Linux Installation
Before diving into the installation process, thorough preparation is paramount. Rushing through these initial steps can lead to data loss or frustrating complications. This phase focuses on safeguarding your existing data, optimizing your disk space, and configuring your system’s firmware for a smooth transition.
Backup Your Precious Data
This cannot be stressed enough: always back up your data before making significant changes to your operating system or disk partitions. While the installation processes outlined in this guide are generally robust, unforeseen issues like power outages, corrupted media, or accidental misclicks can lead to irreversible data loss. Create a full system image or, at the very least, copy all critical documents, photos, videos, and project files to an external hard drive, cloud storage (like Google Drive, OneDrive, or Dropbox), or a network-attached storage (NAS) device. Tools like Windows File History or third-party backup software can streamline this process. Consider this step your digital insurance policy; it’s better to have it and not need it than to need it and not have it.
Free Up Space and Create a Bootable USB Drive
For most Linux installations, especially dual-booting, you’ll need dedicated space on your hard drive or solid-state drive.
- Shrink Your Windows Partition: Open the Disk Management tool in Windows (search for “Create and format hard disk partitions”). Locate your main Windows partition (usually
C:drive), right-click it, and select “Shrink Volume.” Enter the amount of space you wish to allocate for Linux. A minimum of 50-100 GB is recommended for a comfortable experience, especially if you plan to install applications and store files. This will create “unallocated space.” - Download Your Chosen Linux Distribution: There are hundreds of Linux distributions (distros) available, each tailored for different user preferences and use cases. Popular choices for beginners include:
- Ubuntu: User-friendly, well-documented, and a vast community.
- Linux Mint: Based on Ubuntu, offers a more traditional desktop experience, often likened to Windows.
- Fedora: Bleeding-edge features, excellent for developers and power users.
- Pop!_OS: Ubuntu-based, geared towards creators and developers, with strong NVIDIA support.
Download the.isofile for your chosen distribution from its official website.
- Create a Bootable USB Drive: This USB drive will contain the Linux installer. You’ll need a USB flash drive with at least 8GB capacity. Download a reliable utility for creating bootable drives:
- Rufus (Windows only): An excellent, fast, and feature-rich tool for creating bootable USB drives.
- Etcher (Balena Etcher – cross-platform): Simple, intuitive, and works on Windows, macOS, and Linux.
Insert your USB drive, open the utility, select your downloaded.isofile, choose your USB drive, and start the process. This will erase all data on the USB drive, so ensure it’s empty or contains nothing you need.
Adjust BIOS/UEFI Settings
Modern computers use UEFI (Unified Extensible Firmware Interface) instead of the older BIOS, though the terms are often used interchangeably. To boot from your newly created USB drive and ensure a smooth Linux installation, you might need to adjust some firmware settings:
- Access BIOS/UEFI Settings: Restart your computer and repeatedly press the designated key to enter setup (commonly F2, F10, F12, DEL, or ESC). The specific key varies by manufacturer (e.g., Dell, HP, Lenovo, ASUS).
- Disable Secure Boot: Secure Boot is a UEFI feature designed to prevent unauthorized operating systems from booting. While some Linux distributions are compatible with Secure Boot, disabling it often simplifies the installation process, especially for dual-booting. Look for “Secure Boot” in the “Boot,” “Security,” or “Authentication” sections and set it to “Disabled.”
- Disable Fast Startup (in Windows): Windows’ Fast Startup feature can prevent Linux from accessing shared NTFS partitions and cause issues. Search for “Power & sleep settings” in Windows, then “Additional power settings” -> “Choose what the power buttons do” -> “Change settings that are currently unavailable.” Uncheck “Turn on fast startup (recommended).”
- Set Boot Order: In your BIOS/UEFI settings, navigate to the “Boot Options” or “Boot Priority” section. Ensure your USB drive is listed as the primary boot device. Alternatively, you can use the “Boot Menu” key (often F12, F10, or ESC during startup) to manually select the USB drive without changing the permanent boot order.
- Save and Exit: Save your changes and exit the BIOS/UEFI utility. Your computer should now attempt to boot from the USB drive.
Three Pathways to Linux: Choose Your Installation Method
With your system prepared, it’s time to choose how you want to experience Linux. Each method offers distinct advantages and caters to different user needs.
Method 1: Dual-Booting Linux Alongside Windows
Dual-booting is the classic approach, allowing you to have both Windows and Linux installed on the same physical machine. When you start your computer, you’ll be presented with a boot menu (GRUB, the Grand Unified Bootloader) to choose which operating system to load. This method provides full native performance for both OSes but requires careful partitioning.
- Boot from USB: With your bootable USB drive inserted and BIOS/UEFI configured, restart your computer. You should see the boot menu for your Linux distribution (e.g., “Try Ubuntu without installing,” “Install Ubuntu”). Select “Install [Your Distro].”
- Language, Keyboard, and Network: Follow the on-screen prompts to select your preferred language, keyboard layout, and connect to a Wi-Fi network (recommended for downloading updates during installation).
- Installation Type (Crucial Step): This is where you configure your disk partitions.
- “Install alongside Windows Boot Manager”: This option is convenient if your installer detects your Windows installation and can automatically create partitions for Linux in the unallocated space you created earlier. It’s often the easiest for beginners.
- “Something else”: This option gives you full control over partitioning. Select the “free space” you created, then click the ‘+’ button to create new partitions:
- Root Partition (
/): This is where the core Linux system files will reside. Allocate at least 20-30 GB. Choose “Ext4 journaling file system” and set the mount point to/. - Swap Area: Acts as virtual RAM. A common recommendation is to allocate an amount equal to your RAM (e.g., 8 GB if you have 8 GB RAM), or a bit less if you have a lot of RAM (e.g., 4 GB for 16 GB+ RAM). Choose “swap area.”
- Home Partition (
/home– optional but recommended): This is where your personal files and user settings will be stored. If you ever reinstall Linux, you can preserve this partition. Allocate the remaining unallocated space, choose “Ext4,” and set the mount point to/home.
- Root Partition (
- Who Are You?: Create your username, password, and computer name. Choose whether to log in automatically or require a password.
- Review and Install: Review your choices. Once you click “Install Now,” the process will begin. Do not power off your computer during this stage.
- Installation Complete: After the installation finishes, you’ll be prompted to restart your computer. Remove the USB drive when instructed.
- GRUB Bootloader: Upon restarting, you should now see the GRUB boot menu, allowing you to choose between Linux and Windows.
Method 2: Running Linux in a Virtual Machine (VM)
A virtual machine provides an isolated environment within your existing Windows operating system. This is an excellent option for testing Linux, running specific Linux applications without dual-booting, or for development where you need a clean, reproducible environment. It’s safer for beginners as it doesn’t directly touch your Windows partitions.
- Install Virtualization Software: Download and install a virtualization application. Popular free options include:
- VirtualBox (Oracle VM VirtualBox): Free, open-source, and widely used.
- VMware Workstation Player: Free for non-commercial use, robust features.
- Enable Virtualization in BIOS/UEFI: Ensure “Intel VT-x” (for Intel CPUs) or “AMD-V” (for AMD CPUs) is enabled in your BIOS/UEFI settings. This is usually found under “CPU Configuration,” “Security,” or “Advanced” settings.
- Create a New Virtual Machine:
- Open your virtualization software (e.g., VirtualBox).
- Click “New” to create a new VM.
- Give it a name (e.g., “Ubuntu Linux”), select “Linux” as the type and your specific distribution as the version.
- Allocate RAM: Assign a reasonable amount of RAM (e.g., 4GB for Ubuntu, more if your system allows).
- Create a Virtual Hard Disk: Choose “Create a virtual hard disk now,” select VDI (VirtualBox Disk Image) or a similar format, and dynamically allocated storage (which grows as needed). Allocate at least 20-30GB for the virtual disk.
- Mount the Linux ISO:
- In the VM settings, go to “Storage.”
- Under “Controller: IDE” or “SATA,” click the empty CD icon.
- Choose “Choose a disk file…” and navigate to your downloaded Linux
.isofile.
- Start the VM and Install Linux:
- Start your newly created virtual machine. It will boot from the mounted ISO file, similar to booting from a USB drive for dual-booting.
- Follow the standard Linux installation steps as outlined in Method 1, but instead of partitioning your physical drive, you’ll be partitioning the virtual hard disk you created within the VM.
- When prompted for the installation type, choose “Erase disk and install [Distro]” as this refers only to the virtual disk.
- Install Guest Additions (VirtualBox) / VMware Tools (VMware): After installation, install these tools within your VM. They improve performance, enable features like shared clipboards, drag-and-drop, and seamless screen resizing.

Method 3: Windows Subsystem for Linux (WSL) for a Seamless Integration
WSL allows you to run a full Linux command-line environment directly on Windows, without the overhead of a virtual machine or the complexities of dual-booting. It’s perfect for developers, system administrators, or anyone who primarily needs Linux command-line tools and utilities.
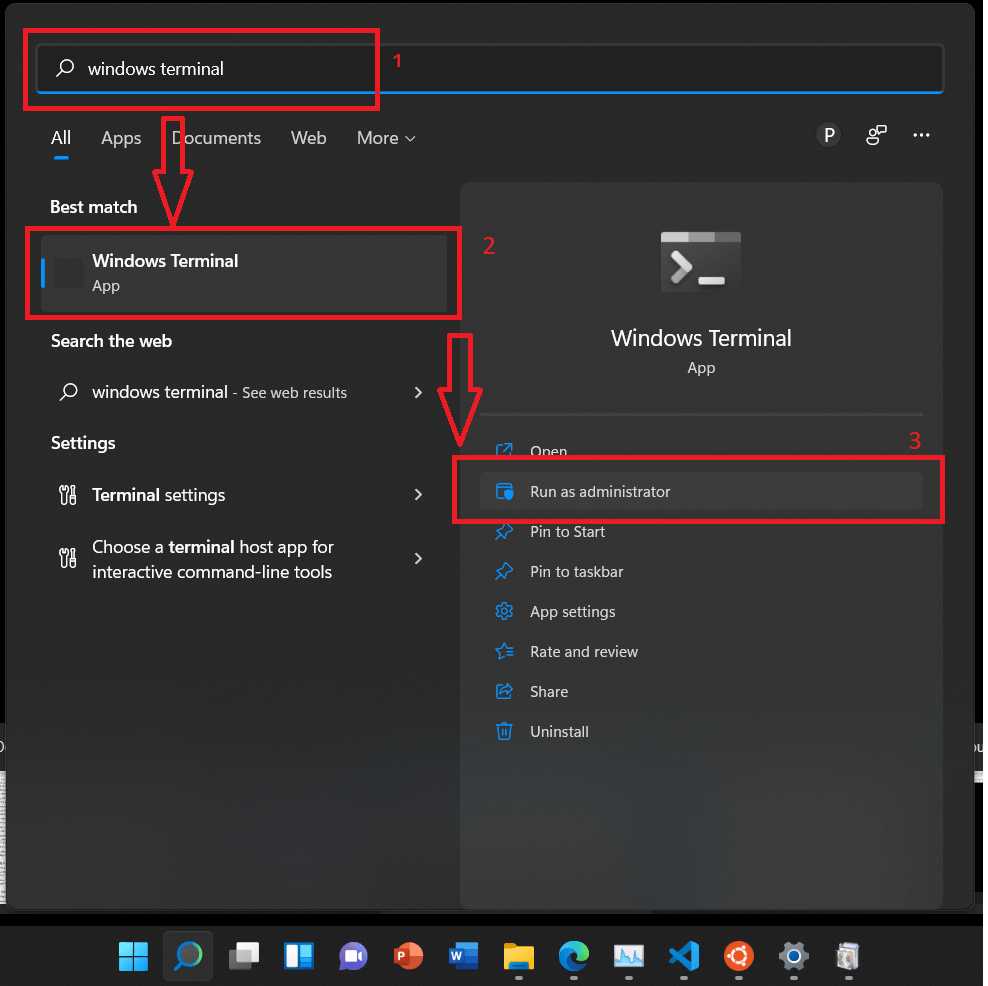
- Enable WSL Features:
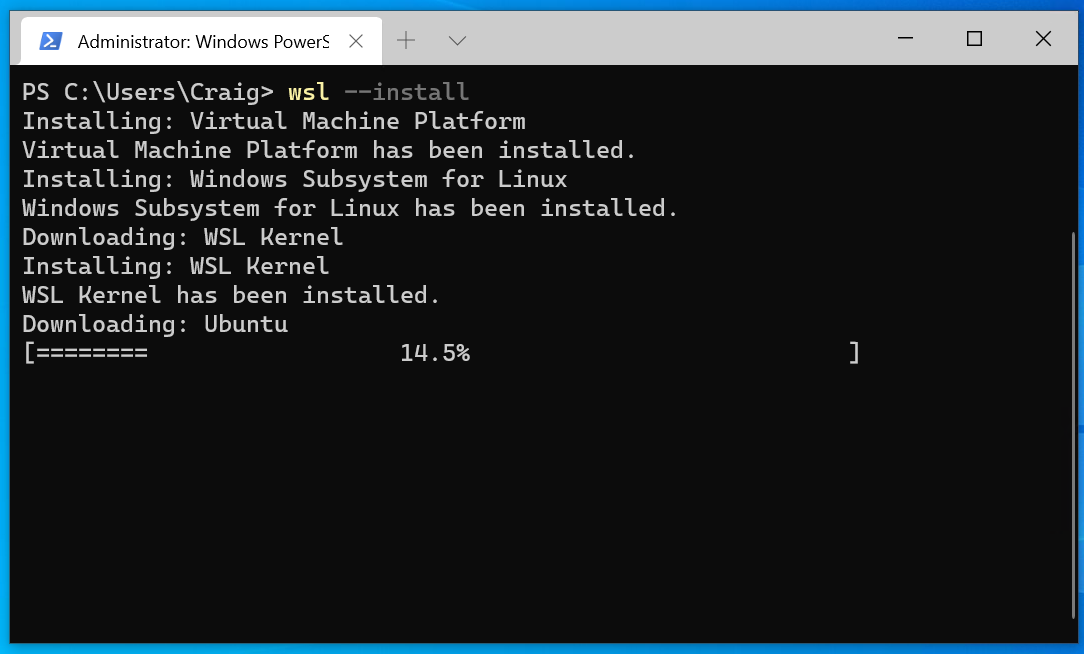
- Open PowerShell as an administrator.
- To install WSL 2 (recommended) with a default Ubuntu distribution, simply run:
powershell

wsl --install
This command will enable the necessary features (Virtual Machine Platform and Windows Subsystem for Linux), download the latest Linux kernel, and install Ubuntu. - If you want to install a different distribution or manually enable features:
powershell

dism.exe /online /enable-feature /featurename:Microsoft-Windows-Subsystem-Linux /all /norestart

dism.exe /online /enable-feature /featurename:VirtualMachinePlatform /all /norestart
Restart your computer if prompted.
- Set WSL 2 as Default (if not using
wsl --install):
powershell

wsl --set-default-version 2
- Install a Linux Distribution from the Microsoft Store:
- Open the Microsoft Store.
- Search for your desired Linux distribution (e.g., Ubuntu, Debian, Kali Linux, SUSE Linux Enterprise Server).
- Click “Get” or “Install.”
- Launch Your Linux Distribution:
- Once installed, click “Launch” from the Microsoft Store, or search for your distro in the Start Menu and open it.
- The first time you launch it, you’ll be asked to create a Unix username and password.
- Start Using Linux: You now have a functional Linux command-line environment. You can install packages using
apt(for Debian/Ubuntu based distros), run scripts, and access your Windows files from within Linux (they are usually mounted under/mnt/c,/mnt/d, etc.). WSL allows for remarkable productivity gains by integrating the best of both worlds.
Post-Installation: What to Do After Installing Linux
Congratulations! You’ve successfully installed Linux. Now it’s time to fine-tune your new operating system, ensuring it’s secure, up-to-date, and tailored to your preferences.
Update, Drivers, and Essential Software
- Update Your System: This is the most critical first step. Open a terminal (usually Ctrl+Alt+T) and run:
bash

sudo apt update

sudo apt upgrade
(For Ubuntu/Debian-based systems. Other distros use different package managers, e.g.,sudo dnf updatefor Fedora,sudo pacman -Syufor Arch-based.) This fetches the latest software updates and security patches. - Install Graphics Drivers: If you have an NVIDIA or AMD dedicated graphics card, installing proprietary drivers will significantly improve performance and stability, especially for gaming or demanding graphical tasks. Most distributions offer an “Additional Drivers” or “Software & Updates” tool to easily detect and install these.
- Install Essential Software: Many popular applications are available for Linux. Some common recommendations include:
- Web Browsers: Firefox (usually pre-installed), Google Chrome, Brave.
- Office Suite: LibreOffice (usually pre-installed), WPS Office, OnlyOffice.
- Media Players: VLC Media Player, SMPlayer.
- Communication: Discord, Slack, Zoom, Microsoft Teams (via web or unofficial clients).
- Development Tools: VS Code, Git, Docker.
- You can install most software through your distribution’s software center/store or via the terminal using your package manager.
Customizing Your Linux Experience
One of Linux’s greatest strengths is its unparalleled customizability.
- Explore Desktop Environments (DEs): If you dual-booted, you likely installed a specific DE (e.g., GNOME with Ubuntu, Cinnamon with Linux Mint). If you want a different look and feel, you can install other DEs (KDE Plasma, XFCE, MATE, LXQt) and switch between them at the login screen. Each offers a unique workflow and aesthetic.
- Themes, Icons, and Fonts: Dive into the appearance settings to change themes, icon sets, and fonts to personalize your desktop. Websites like GNOME-Look.org or KDE Store offer a plethora of customization options.
- Productivity Tools: Install any specific productivity software you rely on. Linux offers robust alternatives for almost any Windows application. For example, GIMP for image editing, Krita for digital painting, DaVinci Resolve or Kdenlive for video editing, and various note-taking apps.
- Shell Customization: For command-line enthusiasts, tools like Zsh with Oh My Zsh, Starship, and custom aliases can dramatically enhance terminal productivity and aesthetics.
Troubleshooting Common Installation Hiccups
Even with careful preparation, issues can arise. Knowing how to diagnose and fix common problems will save you a lot of frustration.
Addressing Boot Issues and GRUB Recovery
- “No bootable device found” or Boots Directly to Windows:
- Recheck your BIOS/UEFI boot order to ensure your Linux disk or the GRUB bootloader is prioritized.
- Verify Secure Boot and Fast Startup are disabled.
- If you installed Linux on a separate drive, ensure that drive is recognized and bootable.
- GRUB Rescue Prompt: This usually indicates GRUB can’t find its configuration or the Linux kernel.
- Boot from your live Linux USB.
- Use a tool like Boot-Repair (often available in the live environment or installable with
sudo add-apt-repository ppa:yannubuntu/boot-repair && sudo apt update && sudo apt install -y boot-repair && boot-repair) to automatically detect and fix GRUB issues. This is often the quickest solution. - Alternatively, you can manually reinstall GRUB from the live environment by mounting your Linux partitions and running GRUB commands.
Dealing with Driver and Hardware Compatibility
- Wi-Fi Not Working: This is a common issue, especially with newer or less common wireless adapters.
- Connect via an Ethernet cable first (if possible).
- Run system updates (as
sudo apt update && sudo apt upgrade) as driver fixes are often included. - Check your distribution’s “Additional Drivers” or “Software & Updates” utility for proprietary wireless drivers.
- Search online forums (e.g., Ask Ubuntu, Arch Wiki) for your specific Wi-Fi adapter model and Linux distribution.
- Graphics Issues (Low Resolution, Tearing, No Hardware Acceleration):
- Ensure proprietary graphics drivers (NVIDIA, AMD) are installed as mentioned in the post-installation steps.
- Check the display settings for resolution and refresh rate options.
- Sometimes, specific kernel parameters are needed; consult forums for your hardware.
- Touchpad/Keyboard Not Functioning Correctly:
- Ensure your system is fully updated.
- Check system settings for touchpad/keyboard configurations.
- Some specific laptops might require kernel module parameters or firmware updates.
For any specific issue, the Linux community is vast and incredibly helpful. Detailed searches using your specific hardware model, Linux distribution, and the error message will almost always yield solutions on forums, wikis, and community sites.
By carefully following these steps and understanding the nuances of each installation method, you’ll be well-equipped to integrate Linux into your computing life. Whether for enhancing productivity, exploring new software, or simply expanding your technological horizons, Linux offers a powerful and rewarding experience. Embrace the journey, and enjoy the freedom and flexibility that comes with this incredible open-source operating system.
aViewFromTheCave is a participant in the Amazon Services LLC Associates Program, an affiliate advertising program designed to provide a means for sites to earn advertising fees by advertising and linking to Amazon.com. Amazon, the Amazon logo, AmazonSupply, and the AmazonSupply logo are trademarks of Amazon.com, Inc. or its affiliates. As an Amazon Associate we earn affiliate commissions from qualifying purchases.