In the rapidly evolving landscape of technology, GitHub stands as a colossal pillar, a central hub where developers worldwide collaborate, innovate, and share their creations. From groundbreaking AI tools and productivity applications to essential libraries and experimental gadgets, an immense wealth of software resides within GitHub’s repositories. For anyone looking to tap into this treasure trove – whether to test out a new utility, contribute to an open-source project, or simply learn how a specific piece of software works – understanding how to properly install projects from GitHub is a fundamental skill.
This guide will demystify the process, walking you through the essential steps, tools, and best practices required to successfully install software directly from GitHub. We’ll delve into the foundational prerequisites, explore the various installation methods, and cover crucial post-installation steps to ensure your projects run smoothly. By the end, you’ll be well-equipped to navigate GitHub with confidence, enriching your tech toolkit and broadening your horizons in the digital world.
Setting Up Your Environment: The Essential Prerequisites
Before you can embark on the journey of installing projects from GitHub, it’s crucial to ensure your local development environment is properly configured. This involves installing key tools that facilitate interaction with GitHub repositories and the software they contain. These prerequisites are the bedrock of efficient and secure GitHub project management.
Understanding Git: The Version Control Powerhouse
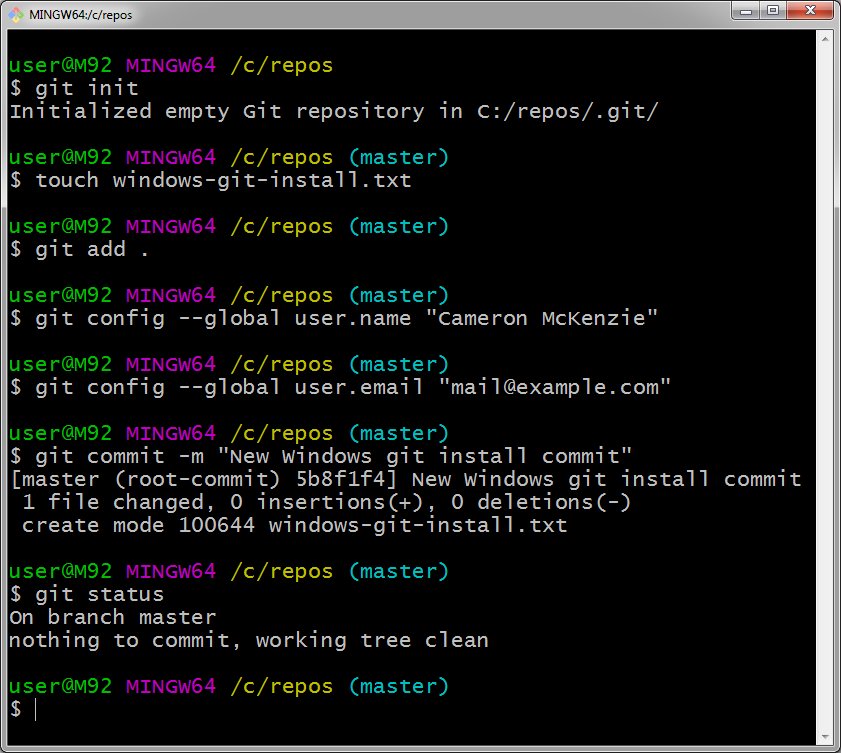
At the heart of GitHub lies Git, a distributed version control system. Git is not GitHub itself, but rather the technology that allows multiple developers to work on the same project simultaneously, track changes, and merge their contributions seamlessly. GitHub is essentially a web-based hosting service for Git repositories. Therefore, having Git installed on your system is non-negotiable for most installation methods.
Why is Git essential?
- Cloning Repositories: The most common way to “install” a project from GitHub is by cloning its repository. This process creates a local copy of the entire project, including its history, branches, and files, directly on your machine.
- Keeping Up-to-Date: Git allows you to easily pull updates from the remote repository, ensuring your local copy always reflects the latest changes made by the project maintainers.
- Contribution: If you ever decide to contribute to an open-source project, Git is the tool you’ll use to manage your changes, create new branches, and submit your contributions.
How to Install Git:
- Windows: Download the installer from the official Git website (git-scm.com). The installation wizard is straightforward.
- macOS: You can install Git by installing Xcode Command Line Tools (run
xcode-select --installin your terminal) or by using Homebrew (brew install git). - Linux: Use your distribution’s package manager. For Debian/Ubuntu, it’s
sudo apt-get install git. For Fedora,sudo dnf install git. - Verification: After installation, open your terminal or command prompt and type
git --version. You should see the installed Git version, confirming it’s ready for use.
Mastering the Command Line Interface (CLI)
While some operations on GitHub can be performed through graphical user interfaces (GUIs), the command line interface (CLI) remains the most powerful, efficient, and versatile way to interact with Git and manage projects. Familiarity with basic CLI commands is a fundamental skill for any developer or tech enthusiast.
Essential CLI Commands for GitHub Projects:
cd <directory>: Change directory. You’ll use this extensively to navigate into your project folders.ls(Linux/macOS) ordir(Windows): List files and directories in the current location.mkdir <directory_name>: Create a new directory. Useful for organizing your downloaded projects.pwd(Linux/macOS) orcd(Windows): Print working directory; shows your current location.
Practicing these commands will significantly streamline your workflow, allowing you to quickly navigate to where you want to clone or run your projects. Think of the CLI as your direct communication channel with your computer’s operating system, providing granular control that GUIs often abstract away.
Installing Language Runtimes and Package Managers
Many projects on GitHub are written in specific programming languages (e.g., Python, JavaScript, Ruby, Go, Java) and rely on various external libraries or dependencies. To run these projects, you’ll often need to install the corresponding language runtime and its associated package manager.
-
Python & Pip: Python is incredibly popular for data science, AI tools, web development, and scripting. If a project is in Python, you’ll need a Python interpreter installed.
pip(Python’s package installer) is used to install libraries defined in arequirements.txtfile.- Install Python from python.org.
pipusually comes bundled with modern Python installations. - Verify:
python --versionandpip --version.
- Install Python from python.org.
-
Node.js & npm/yarn: JavaScript projects, especially those for web development (front-end or back-end with Node.js), rely on
npm(Node Package Manager) oryarnto manage dependencies.- Install Node.js from nodejs.org (this includes
npm). - You can then install Yarn globally via
npm install -g yarnif preferred. - Verify:
node --version,npm --version,yarn --version.
- Install Node.js from nodejs.org (this includes
-
Other Ecosystems: Depending on the project, you might need:
- Ruby and Bundler (
gem install bundler) for Ruby projects. - Go and its module system for Go projects.
- Java Development Kit (JDK) and Maven/Gradle for Java projects.
- Rust and Cargo for Rust projects.
- Ruby and Bundler (
Always check the project’s README.md file on GitHub; it will explicitly state the required language runtimes and how to install dependencies. Failing to install these can lead to frustrating errors when trying to run the software.
The Primary Methods for Acquiring GitHub Projects
Once your environment is set up, you’re ready to start acquiring projects. There are generally three main methods, each suited for different scenarios. Understanding which method to use will save you time and potential headaches.
Method 1: Cloning a Repository (The Standard Approach)
This is the most common and recommended way to get a project from GitHub, especially if you intend to keep it updated or potentially contribute to it. Cloning uses Git to download a full copy of the repository.
Locating the Repository and Copying the Clone URL
- Navigate to the Repository: Go to the project’s page on GitHub (e.g.,
github.com/username/repository-name). - Find the “Code” Button: On the repository page, look for a green “Code” button, usually on the right side above the file list.
- Copy the URL: Click the “Code” button. A dropdown will appear, offering various ways to clone.
- HTTPS (Recommended for beginners): This is the easiest for public repositories and usually requires no additional setup beyond Git. Copy the URL starting with
https://. - SSH: More secure for contributors and private repositories, but requires generating and adding an SSH key to your GitHub account.
- GitHub CLI: If you have GitHub CLI installed, you can use
gh repo clonewhich can simplify authentication.
For this guide, we’ll primarily focus on the HTTPS method.
- HTTPS (Recommended for beginners): This is the easiest for public repositories and usually requires no additional setup beyond Git. Copy the URL starting with
Executing the git clone Command
- Open Your Terminal/Command Prompt: Navigate to the directory where you want to store your project. For example, you might have a
~/Projectsfolder.
bash

cd ~/Projects
- Execute the Clone Command: Type
git clonefollowed by the URL you copied.
bash

git clone https://github.com/username/repository-name.git
Replacehttps://github.com/username/repository-name.gitwith the actual URL. - Wait for Download: Git will download all the files and the entire version history of the project into a new folder named after the repository (e.g.,
repository-name).
Navigating into the Project Directory
Once the clone is complete, you’ll have a new directory. You need to change into this directory to access the project files and perform further setup.
cd repository-name
Now you are inside the project folder and can see its contents using ls or dir.
Method 2: Downloading the Repository as a ZIP File (For Quick Access)
This method is suitable if you only need a snapshot of the code at a specific point in time, don’t plan to update it regularly using Git, or don’t intend to contribute. It’s a quick and simple way to get the files, but you lose the version control benefits of Git.
Finding the “Download ZIP” Option
- Navigate to the Repository: Go to the project’s page on GitHub.
- Click the “Code” Button: Just like with cloning, click the green “Code” button.
- Select “Download ZIP”: In the dropdown menu, you’ll find an option to “Download ZIP.” Click this.
- Save the File: Your browser will download a
.ziparchive containing the project’s current files.
Extracting the Archive and Preparing for Use
- Locate the Downloaded File: Find the
.zipfile in your downloads folder. - Extract the Contents: Right-click the
.zipfile and choose “Extract All” (Windows) or double-click (macOS/Linux) to extract its contents. This will create a new folder (e.g.,repository-name-mainorrepository-name-branchname). - Navigate to the Project: Open this newly extracted folder. You’ll find all the project files inside.
From this point, the process of installing dependencies and running the application is similar to the cloning method, though you won’t be able to use git pull to update it.
Method 3: Installing as a Package (When Applicable)
Some projects on GitHub are designed to be installed and used as libraries or command-line tools through language-specific package managers rather than cloned directly as standalone applications. This is common for reusable code modules.
Identifying Installable Packages
- Check the
README.md: The project’sREADME.mdfile will explicitly mention if it’s an installable package and provide the specific commands. - Look for Package Manager Files: Files like
setup.py(Python),package.json(Node.js), orgemspec(Ruby) indicate it’s a package.
Using Package Managers (e.g., pip install, npm install)
If a project is meant to be installed as a package, you typically won’t clone it unless you want to modify its source code. Instead, you’ll use a simple command:
-
Python:
pip install package-name(Sometimes
pip install git+https://github.com/username/repository-name.gitfor direct installation from GitHub, though less common for public packages.) -
Node.js:
npm install package-name # or yarn add package-name -
Global Installation (for CLI tools):
bash

npm install -g package-name

# or

pip install --user package-name
Installing globally makes the package’s command-line interface available anywhere in your terminal.
This method is ideal for integrating existing tools or libraries into your own projects, significantly boosting your productivity by leveraging pre-built solutions.
Post-Installation: Dependencies, Execution, and Maintenance
Acquiring the project files is only the first step. To make the software functional, you often need to install its internal dependencies and learn how to run it. Maintaining the project by keeping it updated is also crucial for security and access to new features.
Resolving Dependencies: The Crucial Next Step
Most non-trivial software projects rely on other smaller pieces of software, known as dependencies, to function correctly. These dependencies must be installed after you’ve cloned or extracted the main project.
Python Projects: requirements.txt and pip
Python projects commonly list their dependencies in a file named requirements.txt within the project root.
- Navigate to Project Directory: Ensure you are in the cloned or extracted project folder.
- Install Dependencies: Use
pipto install all listed packages:
bash

pip install -r requirements.txt
It’s often recommended to use a virtual environment (venv) for Python projects to isolate dependencies and avoid conflicts.
bash

python -m venv venv

source venv/bin/activate # On Windows: .venvScriptsactivate

pip install -r requirements.txt
JavaScript Projects: package.json and npm/yarn
JavaScript projects use a package.json file to define their dependencies.
- Navigate to Project Directory: Make sure you are in the project folder.
- Install Dependencies: Use
npmoryarn:
bash

npm install

# or

yarn install
This command reads thepackage.jsonfile and downloads all necessary packages into anode_modulesfolder.
Other Ecosystems and Build Tools
- Ruby:
bundle install(requires Bundler,gem install bundler). - Go: Dependencies are usually managed by Go modules;
go mod downloadmight be needed. - Java: Projects often use Maven (
mvn install) or Gradle (./gradlew build). - C/C++: These might require complex build steps using
make,cmake, or other build systems. - General Rule: Always consult the project’s
README.mdfile for specific instructions on installing dependencies and building the project. This documentation is your most reliable source of information.
Running Your Newly Installed Application
After dependencies are resolved, the README.md file will typically provide instructions on how to run the application. This could vary widely:
- Python Scripts:
python main.pyor a specific script. - Node.js Applications:
npm start,node index.js, or a custom script defined inpackage.json. - Web Applications: Might involve starting a development server (e.g.,
npm run dev,flask run). You’ll then typically access it via a web browser at an address likehttp://localhost:3000. - Executable Binaries: Compiled projects might generate an executable file you can run directly.
- Command-Line Tools: If it’s a global package, you might just type the command name (e.g.,
my-cli-tool --version).
Carefully read the README.md for the exact command or procedure.
Keeping Your Project Up-to-Date: The git pull Command
One of the significant advantages of cloning a repository with Git is the ability to easily update it. Developers frequently push new features, bug fixes, and security patches. Keeping your local copy current is crucial for performance, security, and leveraging the latest improvements.
-
Navigate to Project Directory: Go to the root of your cloned project.
-
Pull Latest Changes: Execute the
git pullcommand:
bash

git pull
This command fetches the latest changes from the remote repository and automatically merges them into your local branch. If there are conflicts (which is rare if you haven’t made local changes), Git will guide you through resolving them. -
Reinstall Dependencies (if necessary): If the
git pullcommand brings in significant changes, especially to dependency files (likerequirements.txtorpackage.json), it’s a good practice to reinstall or update your dependencies:# For Python pip install -r requirements.txt # For Node.js npm installThis ensures you have any new or updated libraries required by the latest version of the code.
Best Practices and Troubleshooting Common Issues
While installing from GitHub is generally straightforward, encountering issues is a natural part of the learning process. Adopting best practices and knowing how to troubleshoot can save you considerable time and frustration.
Verifying Project Integrity and Digital Security
In the digital realm, especially with open-source software, security should always be a top priority. While GitHub hosts millions of legitimate projects, it’s also a platform where malicious code could theoretically be distributed.
- Check the Source: Before cloning or downloading any project, consider its source. Is it from a reputable organization, a well-known developer, or a project with a large, active community?
- Examine the Repository: Look at the star count, the number of forks, and recent commit activity. A well-maintained project with many contributors is generally safer.
- Read the Code (if possible): For critical projects, or if you have any doubts, taking a quick look at the main scripts can reveal suspicious activity (e.g., scripts trying to access unusual system locations, or making unexpected network requests).
- Use Virtual Environments/Containers: For Python projects,
venvis crucial. For more complex projects, consider using Docker or other containerization technologies. This isolates the project’s environment from your main system, containing potential issues. This aligns with “Digital Security” in the Tech category.
Navigating Common Installation Errors
- “git is not recognized”: Git is not installed or not added to your system’s PATH. Reinstall Git, ensuring it’s added to PATH during installation.
- “command not found: npm” / “command not found: python”: The respective language runtime or package manager is not installed or not correctly configured in your PATH. Install them according to the instructions above.
- Dependency Installation Errors: Often caused by missing build tools (e.g., C++ compilers, Python header files). For Python, on Linux,
sudo apt-get install build-essential python3-devoften helps. On Windows, installing “Build Tools for Visual Studio” can resolve this. - Permission Denied:
- File Permissions: You might not have the necessary permissions to write files in the directory you’re trying to clone into. Try cloning into a user-owned directory (e.g.,
~/Documents/Projects). - Global Package Installation: Avoid using
sudo npm install -gunless absolutely necessary. Instead, configurenpmto install global packages in a user-owned directory.
- File Permissions: You might not have the necessary permissions to write files in the directory you’re trying to clone into. Try cloning into a user-owned directory (e.g.,
- Network Issues: Ensure your internet connection is stable. Proxies or firewalls can also interfere with
git cloneor package manager downloads.
When troubleshooting, carefully read the error messages. They often provide valuable clues. Searching the exact error message on Google or Stack Overflow will almost always yield relevant solutions.
Contributing Back and Engaging with the Community
Once you’ve successfully installed and experimented with projects from GitHub, consider taking the next step: engagement. This ties into the “Brand” aspect of our website topics, as contributing to open source can significantly boost your personal brand as a developer.
- Open Issues: If you find a bug, a missing feature, or have a suggestion, open an issue on the project’s GitHub page. Provide clear, detailed information.
- Submit Pull Requests: If you fix a bug, add a feature, or improve documentation, you can contribute your changes back to the original project by submitting a pull request. This involves:
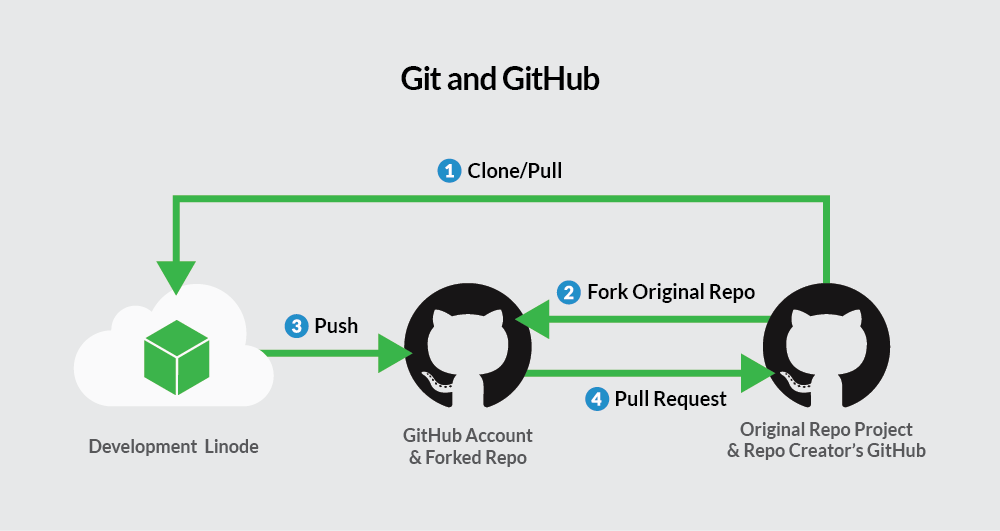
- Forking the repository (creating your own copy).
- Cloning your fork.
- Making your changes.
- Pushing changes to your fork.
- Creating a pull request from your fork to the original repository.
- Join Discussions: Participate in community forums, Gitter chats, or Discord servers related to the project. This helps you learn, share knowledge, and build connections.
Contributing not only helps the open-source community but also serves as an excellent way to learn, showcase your skills, and build a public portfolio, directly enhancing your professional brand and potentially opening doors to new opportunities.
Conclusion: Empowering Your Tech Journey with GitHub
GitHub is more than just a code repository; it’s a vibrant ecosystem that drives innovation across the entire technology sector. From enabling the development of cutting-edge AI tools to fostering communities around essential productivity apps and facilitating global collaboration on countless software projects, its impact is undeniable.
By mastering the art of installing from GitHub, you unlock direct access to this world of innovation. You gain the ability to experiment with new technologies, integrate powerful tools into your workflows, and even contribute your own expertise to projects that resonate with you. This foundational skill empowers you to stay abreast of “Technology Trends,” enhance your “Productivity,” and deepen your understanding of software development – all core tenets of a thriving tech enthusiast or professional.
Whether you’re a seasoned developer, an aspiring coder, or simply someone keen to explore the latest digital gadgets and software, the steps outlined in this guide provide a clear pathway to harnessing the immense power of GitHub. Embrace the command line, understand your dependencies, and always remember to check the README.md. With these principles in mind, you’re not just installing software; you’re building a stronger, more capable version of your tech-savvy self. Happy coding!