Minecraft has captivated millions with its boundless creativity and infinite possibilities. Yet, for many seasoned players, the vanilla experience, as robust as it is, merely scratches the surface of what the game can offer. This is where Minecraft Forge steps in – a gateway to an expansive universe of user-created content, known as mods. If you’re looking to enhance your Minecraft 1.19.2 gameplay with new blocks, items, creatures, mechanics, or even entirely new dimensions, installing Forge is your essential first step.
This comprehensive guide will walk you through every aspect of installing Minecraft Forge for version 1.19.2, from understanding its purpose to troubleshooting common issues and ensuring a smooth, secure modding experience. As a website focused on Technology, we understand the importance of clear, actionable tutorials, and we’ll delve into the technical underpinnings to help you not just follow instructions, but understand the “why” behind them. We’ll also touch upon best practices for digital security and system optimization, ensuring your venture into modding is both exciting and stable.
Understanding Minecraft Forge and Its Ecosystem
Before we dive into the installation process, it’s crucial to grasp what Minecraft Forge is, why it’s so vital for modding, and what you need to consider before embarking on your modding journey.
What is Minecraft Forge?
At its core, Minecraft Forge is an open-source modding API (Application Programming Interface) for Minecraft: Java Edition. In simpler terms, it’s a special layer of software that sits between the vanilla Minecraft game and the mods you want to install. Think of it as a universal translator and organizer. Without Forge, most mods wouldn’t know how to interact with Minecraft, and Minecraft wouldn’t know how to load or run these modifications. Forge provides the necessary framework, libraries, and tools that mod developers use to create their content, ensuring that mods can function correctly and, ideally, coexist harmoniously within the game.
Forge handles numerous complexities behind the scenes:
- Mod Loading: It loads all compatible mods when Minecraft starts.
- API for Developers: It offers a standardized set of functions and structures that mod developers can use, preventing them from having to reverse-engineer the entire game for every single mod.
- Conflict Resolution (to an extent): While not foolproof, Forge provides mechanisms that help mods interact without immediately crashing the game, even if they modify similar aspects.
The existence of Forge has been instrumental in the growth of the Minecraft modding community, allowing for an incredible diversity and sophistication of mods that dramatically transform the game.
Why Install Forge? The World of Mods
The primary reason to install Forge is to unlock the vast potential of Minecraft mods. Mods can introduce an astonishing array of changes and additions:
- New Content: Imagine exploring new biomes, battling mythical creatures, or crafting advanced machinery. Mods like “Twilight Forest” add entire dimensions, while others introduce hundreds of new blocks, items, and crafting recipes.
- Quality of Life Improvements: Enhancements that make the game more enjoyable without drastically altering its core. Examples include minimaps, inventory management tools, improved UI elements, or client-side performance optimizers.
- Technical Expansions: For those who love automation and complex systems, mods like “Applied Energistics” or “IndustrialCraft” introduce intricate power generation, item storage, and processing networks.
- Visual Enhancements: While not strictly texture packs or shaders (which can often be used alongside Forge), some mods enhance graphical elements or add unique animations.
For Minecraft 1.19.2, there’s a thriving community of mod developers constantly releasing new content. Installing Forge allows you to tap into this creative wellspring and tailor your Minecraft experience precisely to your liking. It transforms Minecraft from a game into a platform for endless personalized adventures.
Compatibility and Version Management
One of the most critical aspects of modding is understanding compatibility. Minecraft Forge is version-specific. This means a Forge installer designed for Minecraft 1.19.2 will only work with Minecraft 1.19.2. Similarly, mods created for Minecraft 1.19.2 will only work if you are running Forge for 1.19.2 (and sometimes even specific sub-versions).
Attempting to use a 1.19.2 mod with an older or newer version of Forge, or vice-versa, will almost certainly lead to crashes, errors, or mods simply not loading. This version dependency is vital to remember when downloading both Forge and any mods. Always double-check that the versions align perfectly. This meticulous approach to version management is a cornerstone of a stable modding setup.
The Importance of Official Sources
When dealing with software installations and external content, especially mods, digital security is paramount. Always download Minecraft Forge directly from its official website: files.minecraftforge.net. Never download Forge from third-party sites, as these may bundle malware, adware, or outdated versions that could compromise your system or gaming experience. Similarly, when downloading mods, prioritize official sources like CurseForge.com, which has robust moderation and virus scanning processes. Using unofficial or suspicious download sites can expose your computer to significant risks. Treat these downloads with the same caution you would any other software installation on your system.
Essential Prerequisites Before You Begin
Before you can successfully install Forge, your system needs to meet a few basic requirements. Ensuring these prerequisites are in place will prevent many common errors and make the installation process much smoother.
Minecraft 1.19.2 Client Installation
This might seem obvious, but to install Forge for Minecraft 1.19.2, you must first have the vanilla Minecraft 1.19.2 client installed and launched at least once.
- Open your Minecraft Launcher.
- Select the “Installations” tab.
- Ensure you have a profile for “1.19.2” (or create one if not).
- Launch Minecraft 1.19.2 at least once. This step is crucial because it generates all the necessary game files and folders that Forge needs to modify. If these folders don’t exist, Forge won’t have a place to install itself, leading to errors. Playing the game briefly and then closing it is sufficient.
Java Development Kit (JDK) or JRE for Minecraft 1.19.2
Minecraft: Java Edition, as its name implies, runs on Java. Forge, being a Java application itself, also requires a compatible Java Runtime Environment (JRE) or Java Development Kit (JDK) to function. For Minecraft 1.19.2, Oracle Java 17 is the required version. While the latest Minecraft Launcher often bundles its own Java runtime for the game itself, Forge and many mods rely on a system-wide Java installation.
How to check and install Java 17:
- Check current Java version: Open your Command Prompt (Windows) or Terminal (macOS/Linux) and type
java -version. If you see “Java 17” or higher, you might be good. If not, or if you get an error that Java is not recognized, you need to install it. - Download Java 17: Visit the official Oracle website or an OpenJDK distribution like Adoptium (formerly AdoptOpenJDK) and download the JDK 17 (LTS) for your operating system.
- Oracle Java: oracle.com/java/technologies/downloads
- Adoptium (Recommended for open-source): adoptium.net/temurin/releases
- Install Java: Run the downloaded installer. Follow the on-screen prompts. It’s often recommended to install the JDK rather than just the JRE, as the JDK includes development tools that some advanced modding setups might implicitly use. Ensure it’s added to your system’s PATH variable during installation (this is usually a checkbox during the setup process, ensure it’s checked).
- Verify installation: After installation, restart your Command Prompt/Terminal and type
java -versionagain. You should now see “Java 17” or a later compatible version.
Having the correct Java version is arguably the most common hurdle for new modders. Take your time with this step. Incorrect Java versions are a leading cause of Forge installer not opening or Minecraft crashing immediately.
Preparing Your System for Modding
While not strictly a prerequisite, preparing your system can save you headaches later:
- Administrative Rights: Ensure you have administrative privileges on your computer, as installing software and modifying game files often requires them.
- Disable Antivirus (Temporarily): Occasionally, overzealous antivirus software might flag the Forge installer or certain mods as suspicious, preventing them from running. If you encounter issues, try temporarily disabling your antivirus during the installation process, but remember to re-enable it immediately afterward. Be extremely cautious and only do this if you are absolutely sure of the source of your downloads (official Forge website, CurseForge).
- Backup Your Worlds: Before making any significant changes to your Minecraft installation, it’s always good practice to back up your existing Minecraft worlds. You can find your saves folder in your
.minecraftdirectory (%appdata%.minecraftsaveson Windows,~/Library/Application Support/minecraft/saveson macOS). Copy this folder to a safe location. This ensures that even if something goes wrong with your modded installation, your vanilla progress remains untouched.
Step-by-Step Guide: Installing Minecraft Forge 1.19.2
With all prerequisites met, we can now proceed with the core installation of Minecraft Forge. Follow these steps carefully to ensure a successful setup.
Downloading the Official Forge Installer
- Navigate to the Official Forge Website: Open your web browser and go to files.minecraftforge.net.
- Select Minecraft 1.19.2: On the left-hand sidebar, you’ll see a list of Minecraft versions. Click on “1.19” and then specifically “1.19.2”.
- Choose Your Installer: You’ll typically see two main options: “Download Latest” and “Download Recommended.”
- Recommended: This version has undergone more testing and is generally more stable. It’s the safest bet for most users.
- Latest: This is the most recent build and may include newer features or bug fixes but might also be less stable.
- Crucially, select the “Installer” option. Do NOT click on “Installer-Win” (which is often adware) or “Source” or “Universal.” Just click the “Installer” button for the recommended build.
- Wait for AdFocus: Forge uses an ad service called AdFocus. You’ll be redirected to a page with an ad. DO NOT click anything on this page except for the “SKIP” button in the top right corner. This button usually appears after a 5-second countdown.
- Save the File: Your browser will then prompt you to download a
.jarfile (e.g.,forge-1.19.2-XXXX-installer.jar). Save this file to a location you can easily find, such as your Downloads folder or your Desktop.
Running the Forge Installer
Once the .jar file is downloaded, installing Forge is typically a straightforward process:
- Locate the Forge Installer: Find the
.jarfile you just downloaded. - Run the Installer:
- Windows: Right-click the
.jarfile, select “Open with,” and choose “Java(TM) Platform SE Binary.” If Java isn’t listed, ensure Java 17 is installed correctly and its path is set (you might need to reboot your computer after installing Java). Alternatively, double-clicking usually works if Java is properly associated. - macOS/Linux: Double-click the
.jarfile. If it doesn’t open, open a Terminal, navigate to the directory where you saved the file (e.g.,cd ~/Downloads), and then run the command:java -jar forge-1.19.2-XXXX-installer.jar(replaceforge-1.19.2-XXXX-installer.jarwith the actual file name).
- Windows: Right-click the
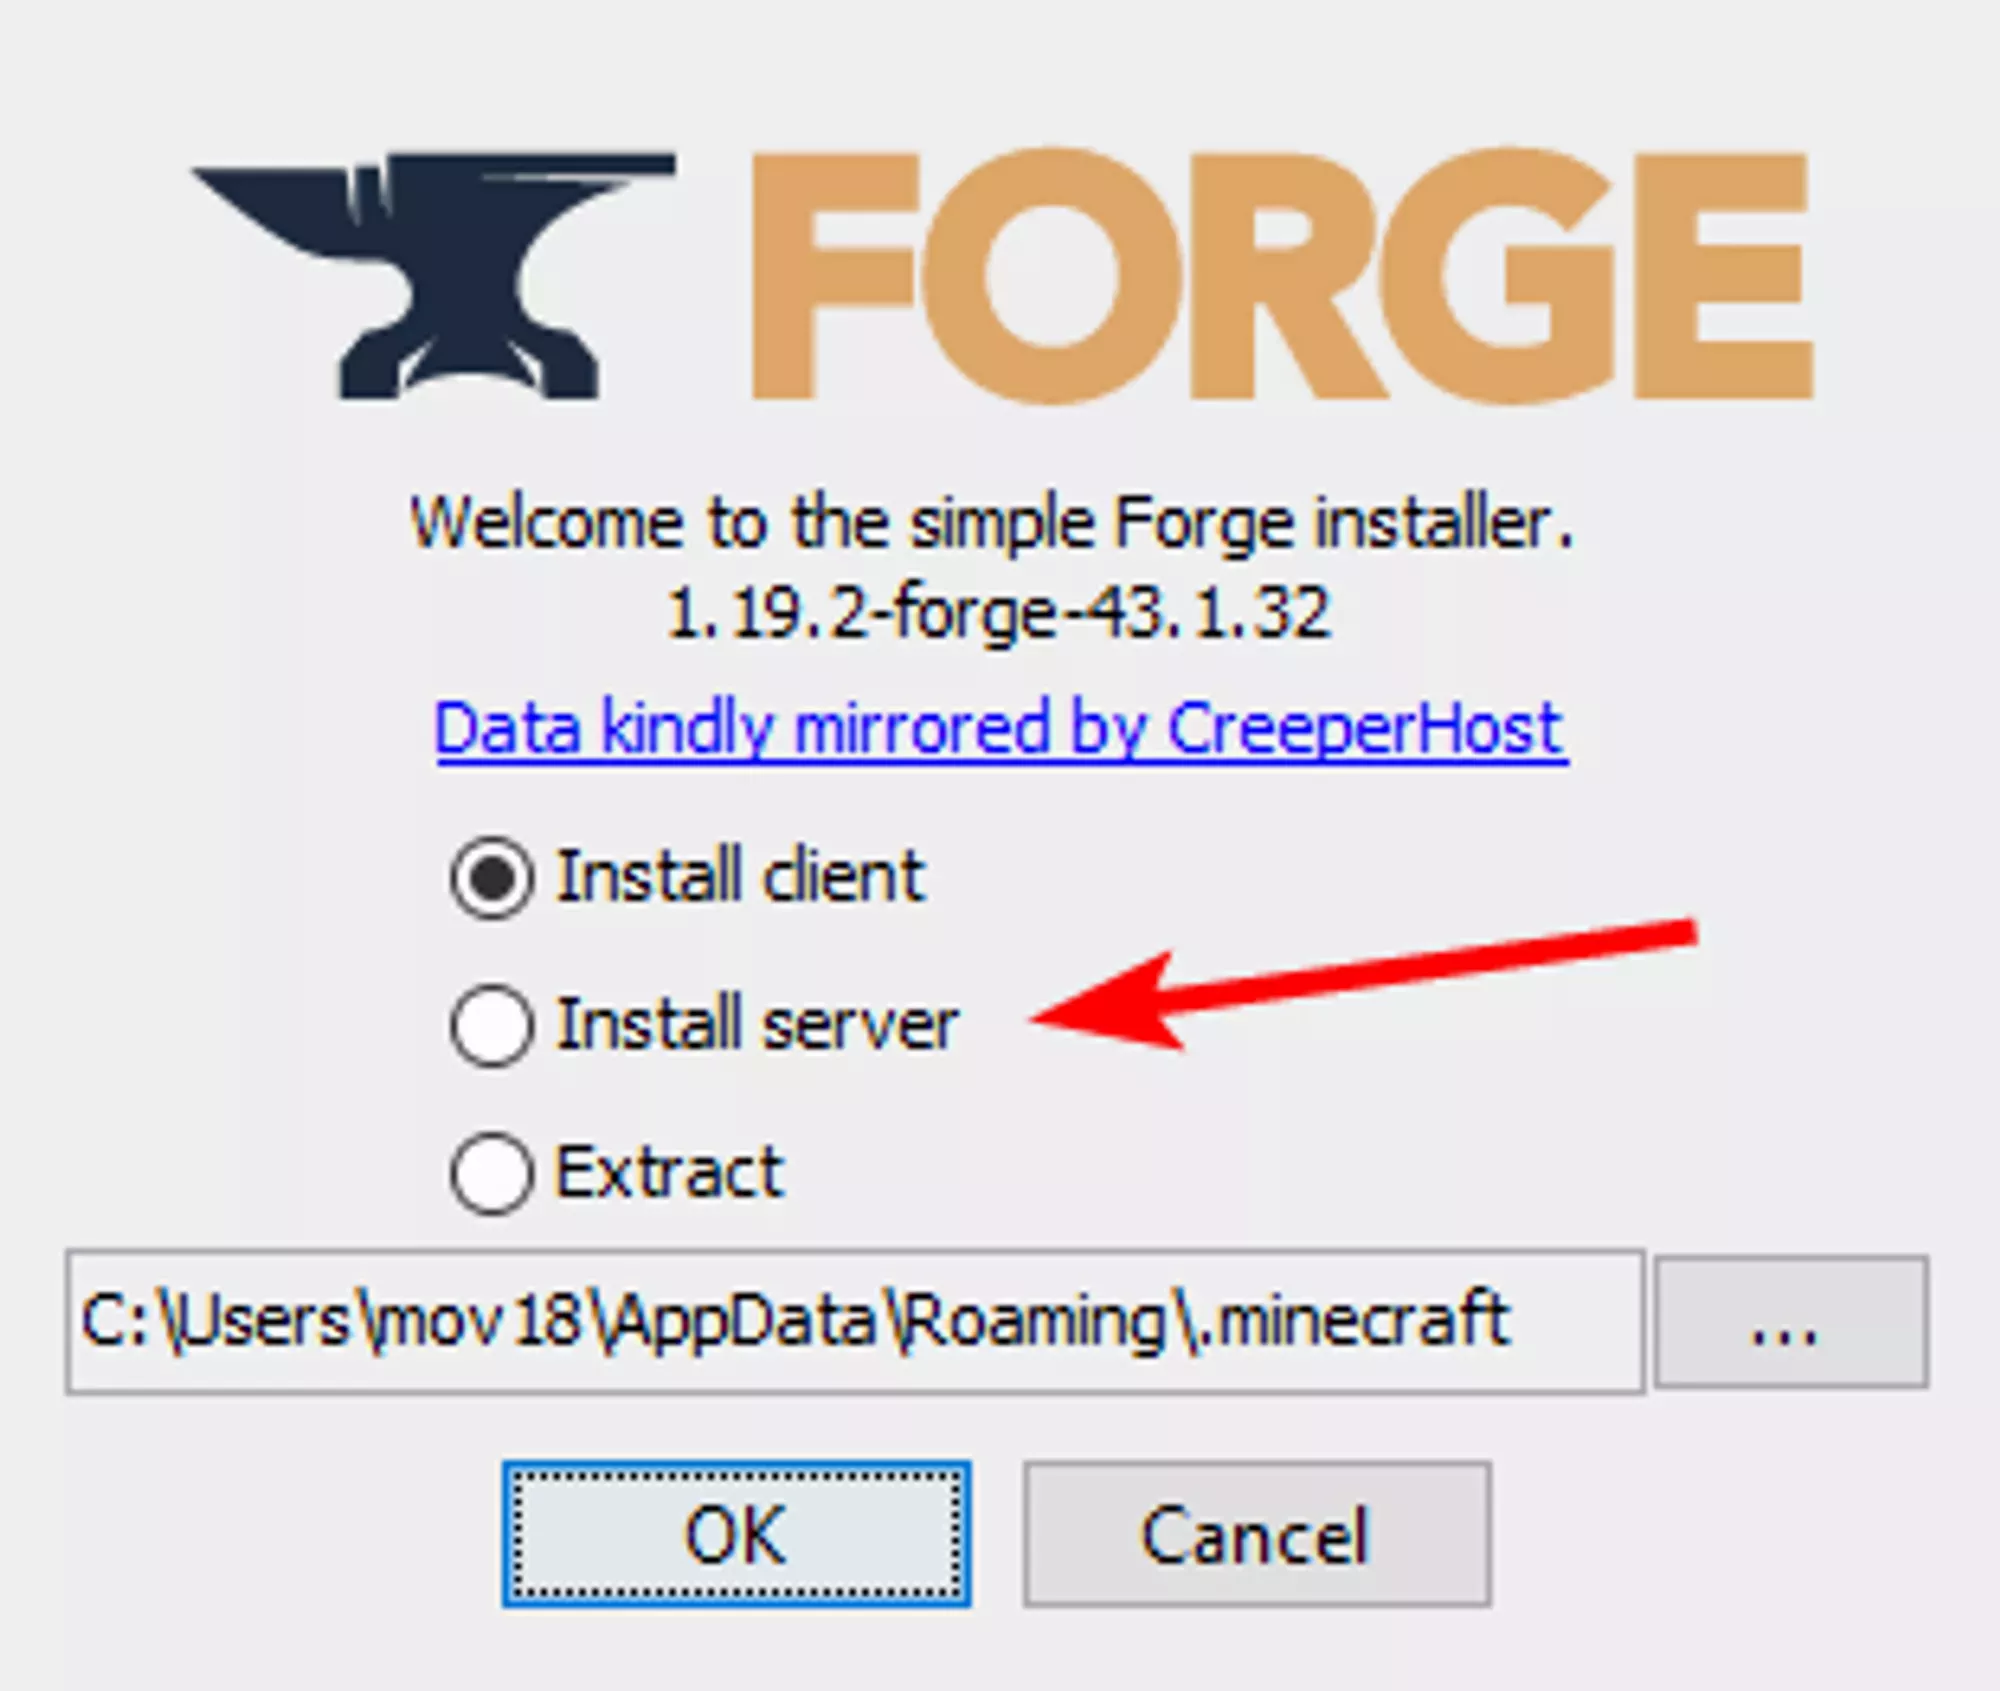
- Forge Installer Window: A small “Mod System Installer” window will appear.
- Select “Install client”: This is the default and correct option for most users. “Install server” is for setting up a dedicated modded server, and “Extract” is for advanced developers.
- Verify Installation Directory: Ensure the “Install directory” path points to your correct
.minecraftfolder (e.g.,C:Users[YourUsername]AppDataRoaming.minecrafton Windows). The installer usually detects this automatically, but it’s good to double-check.
- Start Installation: Click “OK.”
- Completion Message: The installer will download necessary files and integrate Forge into your Minecraft launcher. A message stating “Successfully installed client profile forge for 1.19.2 into launcher” will appear once it’s complete. Click “OK” to close the installer.
Verifying Your Forge Installation
Now that Forge is installed, you need to verify that it’s correctly integrated with your Minecraft Launcher.
- Open the Minecraft Launcher: Launch the official Minecraft Launcher.
- Check for the Forge Profile: On the launcher’s main screen, next to the “Play” button, you should see a dropdown menu that lists your Minecraft profiles. Click this dropdown.
- Select the Forge Profile: You should now see a new profile named “forge” (or “Forge 1.19.2”). Select it.
- Launch Minecraft: Click the “Play” button. The first launch with Forge can take a little longer as it sets up its environment.
- Verify In-Game: Once Minecraft loads, on the main menu, you should see “Minecraft 1.19.2” in the bottom left corner, usually followed by “Forge” and a version number, and a “Mods” button. The presence of the “Mods” button is a clear indicator that Forge has been successfully installed and is running.
Congratulations! You have successfully installed Minecraft Forge for 1.19.2. The next step is to populate your game with exciting mods.
Expanding Your Game: Installing Minecraft Mods with Forge
Installing Forge is only half the battle; the real fun begins when you start adding mods. This section will guide you through safely acquiring and integrating mods into your Forge-powered Minecraft experience.
Finding and Downloading Compatible Mods
Just like Forge itself, mods are version-specific. Always ensure that the mod you download is specifically for Minecraft 1.19.2 and ideally for the Forge mod loader (some mods are for Fabric, another mod loader).
- Use Reputable Sources: The absolute best place to find Minecraft mods is CurseForge.com. It’s the largest and most reputable modding platform, with robust moderation and a strong focus on security. Avoid obscure websites that might host malicious files.
- Search for Mods: On CurseForge, use the search bar or browse categories. Filter by “Game Version” (select “1.19.2”) and “Modloader” (select “Forge”).
- Check Mod Details: Before downloading, always click on the mod’s page.
- Description: Read what the mod does.
- Dependencies: Some mods require other “library” mods to function. These will be listed on the mod page (e.g., “Requires CoFH Core”). Download and install these dependencies first.
- Downloads Tab: Go to the “Files” or “Downloads” tab on the mod’s page. Look for a file specifically listed for Minecraft 1.19.2 and the Forge modloader.
- Download the Mod: Click the download button for the correct file. It will usually be a
.jarfile. Save it to your computer.- Security Reminder: Even on CurseForge, always exercise caution. Read comments, check the mod’s update history, and stick to well-known, highly-downloaded mods if you’re unsure. This aligns with our focus on digital security.
Placing Mods in Your Minecraft Directory
Once you have downloaded your desired .jar mod files, installing them is remarkably simple.
- Locate Your
.minecraftFolder:- Windows: Press
Win + R, type%appdata%.minecraftand press Enter. - macOS: In Finder, click “Go” in the menu bar, hold down the
Optionkey, and click “Library.” Then navigate toApplication Support/minecraft. - Linux: Typically found at
~/.minecraft.
- Windows: Press
- Find the
modsFolder: Inside your.minecraftfolder, you should now see a new folder namedmods. This folder was created by Forge during its installation. If you don’t see it, ensure you launched Forge 1.19.2 at least once after installing it. If it’s still missing, you can manually create a new folder namedmods(all lowercase). - Drag and Drop Mods: Simply drag and drop the
.jarfiles of the mods you downloaded into thismodsfolder. Do not extract the.jarfiles; place them directly as they are.
Launching Minecraft with Your New Mods
With your mods in the mods folder, you’re ready to launch and enjoy your enhanced game.
- Open Minecraft Launcher:
- Select the Forge Profile: Ensure the “forge” profile for 1.19.2 is selected in the dropdown menu next to the “Play” button.
- Click “Play”: Minecraft will now start. This launch might take significantly longer than a vanilla launch, especially if you have many mods. Forge needs time to load and initialize each mod.
- Verify Mods In-Game: Once on the Minecraft main menu, click the “Mods” button. You should see a list of all the mods you installed. If they appear here, they are loaded!
- Start a New World (Recommended): While you can often load modded worlds into existing saves, it’s generally recommended to start a new world when you install a major mod pack or several significant mods. This ensures that new terrain generation, structures, or items from mods are properly integrated without conflicts with existing chunks. If you’re only adding client-side cosmetic mods or minor QoL mods, existing saves are usually fine.
Troubleshooting Common Issues and Optimizing Your Modded Experience
Even with the best preparation, modding can sometimes present challenges. Knowing how to troubleshoot common issues and adopting best practices will ensure a smoother, more enjoyable modded Minecraft experience, aligning with our website’s focus on productivity and efficient technology use.
Common Installation and Launch Errors
- Forge Installer Not Opening:
- Issue: Double-clicking the
.jarfile does nothing or opens it with an archive program (like WinRAR, 7-Zip). - Solution: This almost always indicates an incorrect or missing Java installation. Ensure you have Java 17 installed correctly and that
.jarfiles are associated with “Java(TM) Platform SE Binary.” You may need to reinstall Java, specifically opting for the option to set Java as the default for.jarfiles, or use the command linejava -jar [installer_name.jar].
- Issue: Double-clicking the
- “Error: A JNI error has occurred…” or “Unsupported major.minor version…”:
- Issue: This error typically appears when launching Minecraft with Forge.
- Solution: Your Minecraft Launcher’s Forge profile is trying to use an incompatible Java version. Ensure that Java 17 is installed on your system. In the Minecraft Launcher, go to “Installations,” hover over your Forge profile, click the three dots, select “Edit,” then click “More Options.” Under “Java Executable,” ensure it points to the
javaw.exefile within your Java 17 installation folder (e.g.,C:Program FilesJavajdk-17.0.Xbinjavaw.exe).
- Game Crashing on Launch (Before Menu):
- Issue: Forge loads, but Minecraft crashes to desktop before reaching the main menu, often with an “Exit Code: -1” or similar.
- Solution:
- No Mods: If it’s crashing without any mods in the
modsfolder, try a fresh installation of Forge or reinstall Java. - With Mods: This is almost always a mod conflict or an incompatible mod. Remove all mods from the
modsfolder and try launching. If it works, reintroduce mods one by one (or in small batches) to identify the culprit. Check dependencies carefully.
- No Mods: If it’s crashing without any mods in the
- “Mod ID x is missing…”:
- Issue: A mod requires another mod (a dependency) that you haven’t installed.
- Solution: Go back to the mod’s CurseForge page and check its “Dependencies” section. Download and install the missing library mod.
Addressing Mod Conflicts and Crashes
Once you have multiple mods, conflicts are almost inevitable at some point.
- Identify the Culprit: When a crash occurs, always check the
crash-reportsfolder within your.minecraftdirectory. The.txtfile will usually contain a “Stacktrace” or “Error Details” section that often points to the specific mod causing the issue. Look for mod IDs or file names. - Remove and Test: The most reliable method is to remove half of your mods from the
modsfolder, launch the game, and see if it crashes. If it crashes, the problematic mod is in the remaining half. If it doesn’t crash, the problem is in the half you removed. Repeat this “divide and conquer” method until you isolate the conflicting mod(s). - Check for Updates: An outdated mod might conflict with a newer Forge version or another mod. Check CurseForge for updated versions of your mods.
- Configuration Conflicts: Some mods have configuration files (often in the
configfolder within.minecraft). Sometimes, two mods might try to use the same item ID, block ID, or even dimension ID. You might need to manually edit these config files to resolve conflicts, though this is less common with modern Forge versions.
Best Practices for a Stable Modded Game
To minimize issues and ensure a smooth experience:
- Start Small: Begin with a few well-known, stable mods before attempting a massive modpack.
- Read Mod Descriptions Thoroughly: Pay attention to special installation instructions, known incompatibilities, and dependency requirements.
- Keep Forge Updated (Within Version): While you can’t jump Minecraft versions without reinstalling mods, ensure you’re using the recommended Forge build for 1.19.2 to benefit from bug fixes.
- Allocate More RAM: Modded Minecraft can be very resource-intensive. In your Minecraft Launcher’s Forge profile settings (under “More Options”), increase the “JVM Arguments”
-Xmxvalue. For heavily modded setups, 4GB, 6GB, or even 8GB of RAM might be necessary, assuming your system has enough physical RAM. (e.g., change-Xmx2Gto-Xmx6G). - Regular Backups: Make periodic backups of your modded worlds, especially before adding or removing significant mods.
- Stay Organized: Keep your downloaded mod
.jarfiles in a separate folder outside.minecraftso you know what you’ve installed.

Digital Security and Performance Considerations
As a tech-focused resource, we emphasize that digital security is paramount, even in gaming. Always be vigilant about where you download files from. Using reputable sources like CurseForge significantly reduces the risk of malware. Beyond security, modding can impact performance. Heavier mods can strain your CPU, GPU, and RAM. Monitor your system’s performance using tools like Task Manager (Windows) or Activity Monitor (macOS). If performance dips significantly, consider reducing the number of mods, optimizing game settings, or investing in hardware upgrades. Modding is a balance between added content and system stability.
In conclusion, installing Forge for Minecraft 1.19.2 is a straightforward process when you follow the steps carefully and understand the underlying requirements. It opens up an entirely new dimension of gameplay, allowing for unparalleled customization and creativity. By adhering to best practices, staying organized, and prioritizing digital security, you can enjoy a rich, stable, and endlessly entertaining modded Minecraft experience. Happy modding!
aViewFromTheCave is a participant in the Amazon Services LLC Associates Program, an affiliate advertising program designed to provide a means for sites to earn advertising fees by advertising and linking to Amazon.com. Amazon, the Amazon logo, AmazonSupply, and the AmazonSupply logo are trademarks of Amazon.com, Inc. or its affiliates. As an Amazon Associate we earn affiliate commissions from qualifying purchases.