In the academic and professional spheres, managing references and bibliographies efficiently is paramount. Whether you’re a student writing a dissertation, a researcher compiling a scientific paper, or a professional drafting a report, the sheer volume of citations can quickly become overwhelming. This is where reference management software like EndNote comes into play, transforming a tedious task into a streamlined process. EndNote, developed by Clarivate, is a powerful tool designed to help users create, organize, store, and share bibliographic references. Its true potential, however, is unlocked when seamlessly integrated with Microsoft Word, enabling the “Cite While You Write” (CWYW) feature that allows for instant citation insertion and bibliography generation directly within your document.

This comprehensive guide will walk you through the entire process of installing EndNote and ensuring its perfect integration with Microsoft Word. We’ll cover everything from preliminary checks and system requirements to the installation steps themselves, common troubleshooting tips, and how to leverage its features for maximum productivity. Given the website’s focus on Tech, Brand, and Money, this article specifically delves into the “Tech” aspect, providing a detailed tutorial that enhances your digital productivity and software mastery.
Understanding EndNote and Its Importance
Before diving into the technicalities of installation, let’s establish a clear understanding of what EndNote is and why its integration with Word is considered indispensable for anyone dealing with academic or research-heavy writing.
What is EndNote?
EndNote is a robust reference management software that acts as your personal research database. It allows you to collect, organize, and manage references from various sources – journal articles, books, websites, conference papers, and more. With EndNote, you can import references directly from online databases, create new ones manually, and attach full-text PDFs to your records. Beyond mere storage, it facilitates searching, de-duplication, and group creation, ensuring your research library is always well-maintained and accessible.
The core strength of EndNote lies in its ability to generate citations and bibliographies in thousands of different styles (APA, MLA, Chicago, Vancouver, etc.) with just a few clicks. This automation not only saves countless hours but also virtually eliminates errors in formatting, a common pitfall in academic writing. For anyone serious about maintaining scholarly rigor and presenting polished work, EndNote is an invaluable asset.
Why Integrate EndNote with Word?
While EndNote can manage your references independently, its synergy with Microsoft Word is where its true power for writers becomes apparent. The integration enables a feature called “Cite While You Write” (CWYW), which fundamentally alters the writing process for research papers, theses, articles, and reports.
With CWYW, an EndNote tab or toolbar appears directly within your Word interface. This allows you to:
- Insert Citations Instantly: As you write, you can search your EndNote library and insert citations into your document in real-time. EndNote automatically formats the in-text citation according to your chosen style.
- Build Bibliographies Automatically: Each time you insert a citation, EndNote adds the corresponding reference to a bibliography at the end of your document. This bibliography updates dynamically, meaning if you add, remove, or change citations, the bibliography adjusts itself without any manual intervention.
- Change Styles Effortlessly: Need to switch from APA to MLA? With EndNote, it’s a matter of selecting a new style from a dropdown menu. The entire document, including all in-text citations and the bibliography, re-formats itself instantly. This is a game-changer when submitting manuscripts to different journals or publishers with varying style requirements.
- Collaborate More Easily: For group projects, EndNote libraries can be shared, ensuring all team members are using the same reference database and maintaining consistency in citations.
In essence, integrating EndNote with Word transforms your word processor into a comprehensive research and writing platform, significantly boosting productivity and accuracy.
Pre-Installation Checklist: Ensuring a Smooth Setup
Before you begin the installation process, a few preparatory steps can prevent common issues and ensure a smooth, successful setup. Think of this as laying the groundwork for a robust technological integration.
System Requirements and Compatibility
Ensuring your system meets EndNote’s requirements is the first critical step. While EndNote is generally compatible with most modern systems, verifying specific versions can save you headaches later.
- Operating System: EndNote supports both Windows and macOS. Check the specific version of EndNote you are installing against your operating system version. Typically, recent versions of EndNote support the latest two or three versions of Windows (e.g., Windows 10, 11) and macOS (e.g., Monterey, Ventura, Sonoma).
- Microsoft Word Version: This is crucial. EndNote integrates with specific versions of Microsoft Word. Most current EndNote versions support Microsoft Word 2019, Word 2021, and Microsoft 365 (formerly Office 365). Ensure your Word application is up-to-date and compatible with the EndNote version you plan to install. Older versions of Word might require older versions of EndNote, or simply might not be supported.
- Processor and RAM: While EndNote isn’t excessively demanding, having a modern processor (Intel i5 equivalent or better) and sufficient RAM (8GB or more is recommended) will ensure the application runs smoothly, especially when dealing with large libraries.
- Hard Disk Space: You’ll need a modest amount of free disk space for the EndNote application itself (typically a few hundred MB), plus additional space for your reference libraries and any attached PDFs.
Always check the official Clarivate EndNote website for the most up-to-date system requirements for your specific EndNote version.
Backing Up Your Work
While EndNote installation is generally safe, it’s a best practice in any software installation process to back up important files, especially your existing Word documents or any EndNote libraries you might already have. This provides a safety net in the unlikely event of a system glitch or unexpected error during installation. For a tech-savvy user, this is a non-negotiable step in digital security and data management.
Closing Microsoft Word and Other Applications
Before initiating the EndNote installation, it is absolutely vital to close all instances of Microsoft Word. If Word is running during the installation, EndNote might not be able to install its necessary add-ins and components correctly into the Word application. This is one of the most common reasons why the EndNote tab might not appear in Word after installation. Additionally, it’s advisable to close any other major applications to free up system resources and prevent conflicts during the setup process.
Step-by-Step Guide to Installing EndNote and Integrating with Word
With the groundwork laid, let’s proceed with the installation itself. This section provides a detailed walkthrough, ensuring you understand each phase of the process.
Acquiring the EndNote Installer
The first step is to obtain the EndNote installer file.
- Purchase or License: EndNote is commercial software. You’ll typically acquire it through a university license, an institutional purchase, or a direct purchase from the Clarivate website.
- Download: Once licensed, you will usually receive a download link via email or access to a download portal. Download the installer file (e.g.,
EndNote_Installer.exefor Windows orEndNote_Installer.dmgfor macOS). It’s best to save it to a location you can easily find, such as your Downloads folder or Desktop. - Extract (if necessary): Sometimes, the downloaded file might be a compressed archive (like a .zip file). If so, right-click the file and select “Extract All” (Windows) or double-click (macOS) to extract its contents before proceeding.
Running the Installation Program
Once you have the installer ready, you can begin the installation process.
- Launch the Installer:
- Windows: Locate the
EndNote_Installer.exe(or similar) file, right-click it, and select “Run as administrator.” This ensures the installer has the necessary permissions to modify system files. - macOS: Double-click the
.dmgfile. A window will open, often showing an EndNote icon and an Applications folder. Drag the EndNote application icon into the Applications folder.
- Windows: Locate the
- Follow On-Screen Prompts (Windows Specific):
- Welcome Screen: Click “Next” to begin.
- License Agreement: Read the End-User License Agreement carefully. You must accept it to proceed with the installation. Select “I accept the terms in the license agreement” and click “Next.”
- Installation Type: You’ll typically be given options for “Typical” or “Custom” installation. For most users, “Typical” is recommended as it installs all standard components, including the Word add-ins. Choose “Typical” and click “Next.” If you choose “Custom,” ensure the “Cite While You Write” (CWYW) components for Word are selected.
- Destination Folder: The installer will suggest a default installation location (e.g.,
C:Program Files (x86)EndNote X_). While you can change this, it’s generally best to stick with the default unless you have specific reasons not to. Click “Next.” - Ready to Install: Review your selections and click “Next” or “Install” to begin copying files.
- Installation Progress: A progress bar will indicate the installation status. This might take several minutes.
- Installation Complete: Once finished, you’ll see a completion message. Click “Finish” or “Close.”
Initial Setup and Configuration
After installation, it’s good practice to launch EndNote for the first time.
- Open EndNote: Locate the EndNote icon on your Desktop, Start Menu (Windows), or Applications folder (macOS) and launch the program.
- Create/Open a Library:
- If you’re a new user, EndNote will likely prompt you to create a new library. Choose “Create a new library” and save it in a secure, easily accessible location (e.g., your Documents folder). Give it a meaningful name (e.g.,
My EndNote Library.enl). - If you’re an existing user, you can open your existing library.
- If you’re a new user, EndNote will likely prompt you to create a new library. Choose “Create a new library” and save it in a secure, easily accessible location (e.g., your Documents folder). Give it a meaningful name (e.g.,
- Register (Optional but Recommended): EndNote might prompt you to register your software. This helps with support and updates.
Verifying EndNote Integration in Microsoft Word
This is the most critical step to confirm a successful installation and integration.
- Open Microsoft Word: Launch Word after EndNote has been installed and opened at least once.
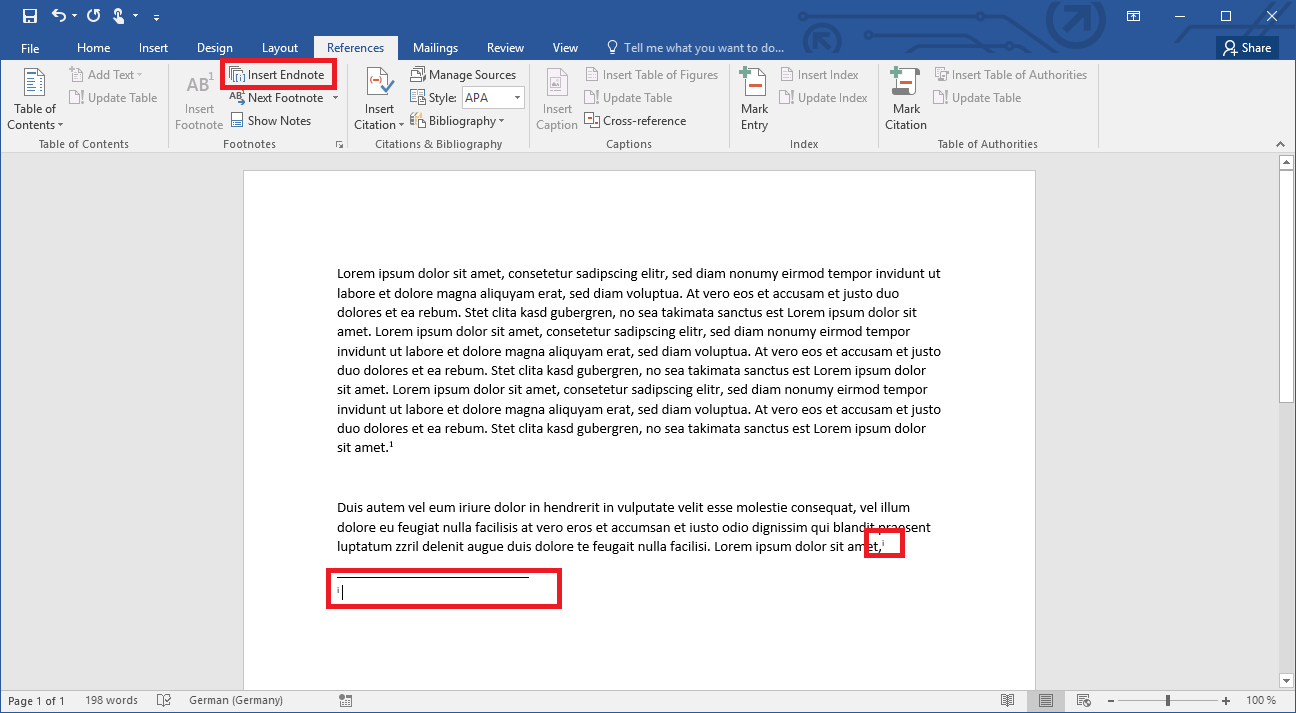
- Look for the EndNote Tab: In the Word ribbon interface, you should now see a new tab labeled “EndNote” (or “EndNote X_” with your version number).
- Windows: It typically appears between “References” and “Mailings” or near the end of the ribbon.
- macOS: It often appears as a separate menu item or within the “Tools” menu, or as a dedicated ribbon tab similar to Windows.
- Explore the Toolbar: Click on the “EndNote” tab. You should see various buttons related to EndNote functionalities, such as “Insert Citation,” “Go to EndNote,” “Update Citations and Bibliography,” and “Style.”
If you see this tab and its associated tools, congratulations! EndNote has been successfully installed and integrated with Microsoft Word, and you’re ready to harness its power.
Troubleshooting Common Installation Issues
Despite careful preparation, technical hiccups can sometimes occur. Here are some common problems encountered during or after EndNote installation and their solutions, aligning with digital security and productivity.
EndNote Tab Missing in Word
This is by far the most frequent issue.
- Cause 1: Word was open during installation.
- Solution: Close Word, restart your computer, then try opening Word again. If the tab is still missing, go to “Programs and Features” (Windows) or “Applications” (macOS), uninstall EndNote, restart, and then reinstall EndNote with Word definitively closed.
- Cause 2: The EndNote Add-in is disabled or not loaded.
- Solution (Windows):
- Open Word.
- Go to
File > Options > Add-ins. - At the bottom of the “Add-ins” window, next to “Manage:”, select “COM Add-ins” from the dropdown and click “Go…”.
- In the “COM Add-ins” dialog box, ensure that “EndNote Cite While You Write” (or similar) is checked. If it’s unchecked, check it and click “OK.”
- If it’s not listed, try selecting “Disabled Items” from the “Manage:” dropdown and click “Go…” to see if it’s been disabled. If so, enable it.
- Solution (macOS):
- Open Word.
- Go to
Tools > Templates and Add-ins. - In the “Templates and Add-ins” dialog, ensure that
EndNote CWYW.dotmorEndNote.dotmis checked. If it’s not listed or unchecked, you might need to manually add it. The file is usually located in/Applications/EndNote X#/Cite While You Write/.
- Solution (Windows):
- Cause 3: Corrupted installation.
- Solution: Perform a clean uninstall of EndNote, restart your computer, and then reinstall EndNote. Ensure you run the installer as an administrator on Windows.
- Cause 4: Multiple versions of Word or EndNote installed.
- Solution: Ensure you only have one primary version of Word installed and that the EndNote version is compatible with it. Older EndNote versions might conflict.
Compatibility Problems
If EndNote seems to install but doesn’t function correctly in Word, or you encounter frequent crashes.
- Cause 1: Incompatible Word or EndNote versions.
- Solution: Double-check the official EndNote website for compatibility charts. You might need to update Word or acquire a different version of EndNote.
- Cause 2: Conflicting add-ins.
- Solution: Other Word add-ins (especially other citation managers) can conflict. Temporarily disable other add-ins via
File > Options > Add-ins(Windows) orTools > Templates and Add-ins(macOS) to see if the issue resolves.
- Solution: Other Word add-ins (especially other citation managers) can conflict. Temporarily disable other add-ins via
- Cause 3: Outdated Word or OS.
- Solution: Ensure both your operating system and Microsoft Word are fully updated with the latest patches and service packs.
Installation Errors
Error messages during the installation process itself.
- Cause 1: Insufficient permissions.
- Solution: On Windows, always run the installer as an administrator (right-click, “Run as administrator”).
- Cause 2: Corrupted installer file.
- Solution: Re-download the installer file from the official source. Ensure your internet connection is stable during the download.
- Cause 3: Antivirus interference.
- Solution: Temporarily disable your antivirus software during the installation process. Remember to re-enable it immediately afterward.
For persistent issues, the EndNote technical support portal and community forums are excellent resources. Clarivate’s support team is usually very responsive to installation-related problems.
Maximizing Your Research Workflow with EndNote and Word
With EndNote successfully installed and integrated into Word, you’ve unlocked a powerful duo that can revolutionize your research and writing workflow. To truly leverage this technological advantage, consider these strategies.
Leveraging Cite While You Write (CWYW)
CWYW is the cornerstone of EndNote’s integration with Word. Master its use to save time and ensure accuracy.
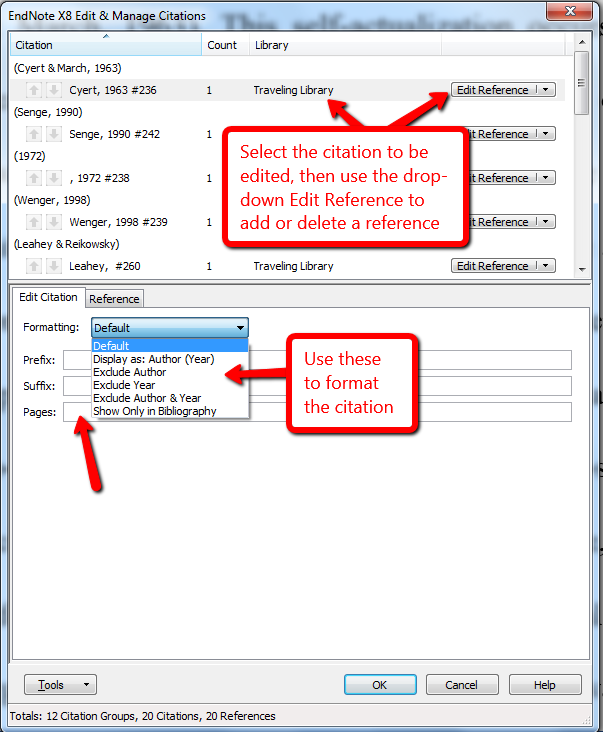
- Insert and Edit Citations: Use the “Insert Citation” button to search your EndNote library directly from Word. Select the reference(s) you need, and EndNote will insert the in-text citation and add it to your bibliography. To edit a citation (e.g., add page numbers, omit author), right-click the citation in Word and choose “Edit Citation.”
- Instant Bibliography Generation: EndNote automatically builds and updates your bibliography at the end of your document. No more manual typing or formatting of reference lists!
- Style Management: Familiarize yourself with the “Style” dropdown menu on the EndNote ribbon. Experiment with different styles to see how your entire document transforms. You can download additional styles from the EndNote website if your required style isn’t pre-installed.
- Convert to Plain Text: Before submitting your final document, especially to publishers, it’s often advisable to convert the document’s EndNote fields to plain text using the “Convert Citations and Bibliography > Convert to Plain Text” option. This removes the dynamic EndNote coding, ensuring the formatting is locked and cannot be accidentally altered by others who may not have EndNote. Always save a backup copy of your document before converting to plain text, as this action is irreversible.
Organizing Your References in EndNote
The efficiency of CWYW directly depends on how well-organized your EndNote library is.
- Groups: Create custom groups within your EndNote library to categorize references by project, topic, or stage of research. This makes it easier to find specific sets of references when working on different parts of a paper.
- Keywords: Utilize the “Keywords” field in each reference record to add descriptive terms. This significantly enhances your ability to search and retrieve relevant references quickly.
- Attachments: Attach full-text PDFs to your reference records. This creates a centralized hub for all your research materials, allowing you to easily access and annotate articles directly within EndNote.
- Find Full Text: EndNote has a feature to automatically search for and attach full-text PDFs for many of your references, further streamlining your workflow.
Advanced Features for Researchers
Beyond basic citation management, EndNote offers sophisticated features that cater to advanced research needs.
- Syncing and Cloud Access: EndNote allows you to sync your library to EndNote Web (a cloud-based version). This provides backup, access to your library from any computer with internet access, and facilitates collaboration.
- Sharing Libraries: You can share your entire EndNote library with up to 10 other EndNote users, making collaborative writing projects much more manageable and ensuring consistency across team members.
- Annotating PDFs: EndNote’s built-in PDF viewer allows you to highlight, underline, and add notes directly to attached PDFs, centralizing your reading and annotation process.
- Duplicate Detection: Use the “Find Duplicates” feature to clean up your library and prevent redundant entries, maintaining the integrity of your reference database.
Conclusion
The seamless integration of EndNote with Microsoft Word is a powerful technological asset for anyone involved in academic writing, research, or professional reporting. By following this comprehensive guide, you can confidently install EndNote, troubleshoot common issues, and unlock its full potential to streamline your reference management and citation process. From the initial setup to leveraging advanced features like Cite While You Write, EndNote empowers you to produce high-quality, accurately cited documents with unparalleled efficiency. Embrace this tool, and transform the way you approach research and writing, freeing up valuable time to focus on the content and quality of your work rather than the mechanics of formatting. This commitment to leveraging productivity software is a hallmark of effective digital literacy in today’s tech-driven landscape.
aViewFromTheCave is a participant in the Amazon Services LLC Associates Program, an affiliate advertising program designed to provide a means for sites to earn advertising fees by advertising and linking to Amazon.com. Amazon, the Amazon logo, AmazonSupply, and the AmazonSupply logo are trademarks of Amazon.com, Inc. or its affiliates. As an Amazon Associate we earn affiliate commissions from qualifying purchases.