In the intricate world of computing, where hardware components and operating systems must seamlessly communicate to function effectively, drivers act as the essential interpreters. For your motherboard, the central nervous system of your PC, having the correct and up-to-date drivers is not merely a recommendation but a fundamental requirement for optimal performance, stability, and access to all its features. Without these crucial software packages, your operating system might struggle to identify specific hardware, leading to diminished functionality, system crashes, or even complete failure of certain components like audio or network adapters.
This comprehensive guide will demystify the process of installing motherboard drivers, ensuring your system operates at its peak efficiency. Whether you’re building a new PC, performing a fresh operating system installation, or simply troubleshooting a nagging hardware issue, understanding how to properly manage these drivers is a vital skill for any tech enthusiast or professional. We’ll delve into what drivers are, why they matter, how to identify your motherboard, and provide a step-by-step walkthrough for installation, along with essential troubleshooting tips and best practices, all aimed at enhancing your digital security, productivity, and overall computing experience.
Understanding Motherboard Drivers and Their Importance
Before diving into the “how-to,” it’s crucial to grasp the “what” and “why” behind motherboard drivers. This foundational knowledge empowers you to make informed decisions and appreciate the impact these small software files have on your entire system.
What are Motherboard Drivers?
At its core, a driver is a piece of software that allows your operating system (like Windows, macOS, or Linux) to communicate with a specific hardware device. Think of it as a translator or a set of instructions. Your motherboard, being a complex piece of hardware, integrates numerous components such as the chipset, integrated audio, network interface controller (NIC) for Ethernet or Wi-Fi, USB controllers, SATA controllers, and various other input/output management units. Each of these components requires its own specific driver to function correctly and efficiently.
For instance, the chipset driver enables the operating system to interact with the motherboard’s core logic, managing data flow between the CPU, memory, and peripheral devices. The audio driver allows your sound card (integrated or dedicated) to produce sound through your speakers or headphones. Without the appropriate network driver, your PC won’t be able to connect to the internet. In essence, drivers bridge the gap between the generic commands of the operating system and the specific language and functionalities of your motherboard’s diverse hardware.
Why are They Essential?
The importance of properly installed and updated motherboard drivers cannot be overstated. They are critical for several reasons:
- Optimal Performance: Up-to-date drivers ensure that your hardware components operate at their intended speeds and efficiencies. Outdated drivers can lead to performance bottlenecks, causing slowdowns, lags, and reduced frame rates in games or slower processing in demanding applications.
- System Stability: Drivers play a significant role in system stability. Incorrect, corrupted, or missing drivers are a common cause of blue screens of death (BSODs), unexpected system crashes, and freezing. By providing the OS with the correct instructions, drivers help prevent these disruptive events.
- Full Feature Access: Many advanced features of your motherboard’s hardware, such as specific USB power delivery settings, high-definition audio enhancements, or advanced network functionalities (like prioritizing game traffic), are only accessible and fully functional when the correct drivers are installed.
- Security Patches: Manufacturers often release driver updates that include security patches to address vulnerabilities found in previous versions. Installing these updates helps protect your system from potential exploits and cyber threats, aligning perfectly with modern digital security best practices.
- Compatibility: Drivers ensure compatibility between your hardware and your operating system, especially after major OS updates or when installing a new version of Windows. They adapt the hardware’s behavior to meet the OS’s evolving requirements.
- Gaming and Professional Applications: For gamers and professionals using resource-intensive applications (video editing, 3D rendering), optimized drivers are paramount. They can directly impact frame rates, rendering times, and the overall responsiveness of their specialized software and hardware setups.
In essence, drivers are the silent workhorses that unlock your motherboard’s full potential, guaranteeing a smooth, reliable, and secure computing experience.
Pre-Installation Checklist: Preparing for Driver Installation
Before you begin the installation process, a little preparation can save you a lot of headaches. Gathering the right information and taking a few precautionary steps will ensure a smooth and successful driver installation.
Identify Your Motherboard Model
This is arguably the most critical step. Downloading and installing drivers for the wrong motherboard model can lead to instability, hardware malfunctions, and even system boot failures. Always verify your specific motherboard model with absolute certainty.
Here’s how you can identify your motherboard:
- Physical Inspection: If you built the PC yourself or are comfortable opening the case, the motherboard model number is usually printed clearly on the board itself, often near the CPU socket, RAM slots, or PCI-E slots.
- Original Packaging/Invoice: If you still have the motherboard’s retail box or your PC’s original invoice, the model number will be listed there.
- Software Tools:
- CPU-Z: A free, lightweight utility that provides detailed information about your system’s hardware, including your motherboard manufacturer and model number under the “Mainboard” tab.
- Speccy: Another excellent free tool from Piriform (makers of CCleaner) that offers a comprehensive overview of your PC’s hardware, including the motherboard details.
- HWInfo: A more advanced diagnostic tool providing extensive hardware information.
- Command Prompt/PowerShell: For a quick check without installing software, open Command Prompt or PowerShell and type:
wmic baseboard get product,manufacturer,version,serialnumber
This command will usually display the manufacturer and product name (model) of your motherboard.
Once you have the exact model number (e.g., ASUS ROG STRIX B550-F GAMING, MSI Z390-A PRO, Gigabyte AORUS X570 ELITE), write it down.
Gather Necessary Tools and Information
With your motherboard model identified, you’ll need a few other things:
- Internet Connection: Essential for downloading the latest drivers from the manufacturer’s website.
- USB Drive (Optional but Recommended): If you’re performing a fresh OS install and won’t have internet access immediately (due to a missing network driver), you’ll need a USB drive to transfer the downloaded network driver (and potentially others) from another computer.
- Motherboard Manual: Your motherboard’s manual can provide specific instructions for driver installation, a list of supported hardware, and sometimes even the order in which drivers should be installed.
- Operating System Version: Know your exact OS version (e.g., Windows 10, Windows 11) and whether it’s 32-bit or 64-bit. Most modern systems are 64-bit, but older ones might still be 32-bit, and drivers are OS-specific. You can check this in Windows by going to
Settings > System > About.
Backup Your System (Optional but Recommended)
Whenever you make significant changes to your system, especially driver updates, it’s a good practice to create a backup or a restore point. This provides a safety net in case a new driver causes instability or conflicts.
- System Restore Point: In Windows, you can create a System Restore Point. Search for “Create a restore point” in the Windows search bar, go to the “System Protection” tab, and click “Create.” This allows you to revert your system to a previous working state.
- Full System Image Backup: For ultimate peace of mind, consider a full system image backup using Windows’ built-in tools or a third-party solution.
While not strictly necessary for every driver update, these precautions are invaluable for maintaining digital security and system stability.
Step-by-Step Guide to Installing Motherboard Drivers
With your preparation complete, you’re ready to proceed with installing the drivers. We’ll outline the most reliable methods, starting with the universally recommended approach.
Method 1: Using the Manufacturer’s Website (Recommended)
This is the most reliable method as it ensures you get the latest, most compatible, and officially supported drivers directly from the source.
- Navigate to the Manufacturer’s Support Page: Open your web browser and go to the official website of your motherboard manufacturer (e.g., ASUS.com, MSI.com, Gigabyte.com, ASRock.com).
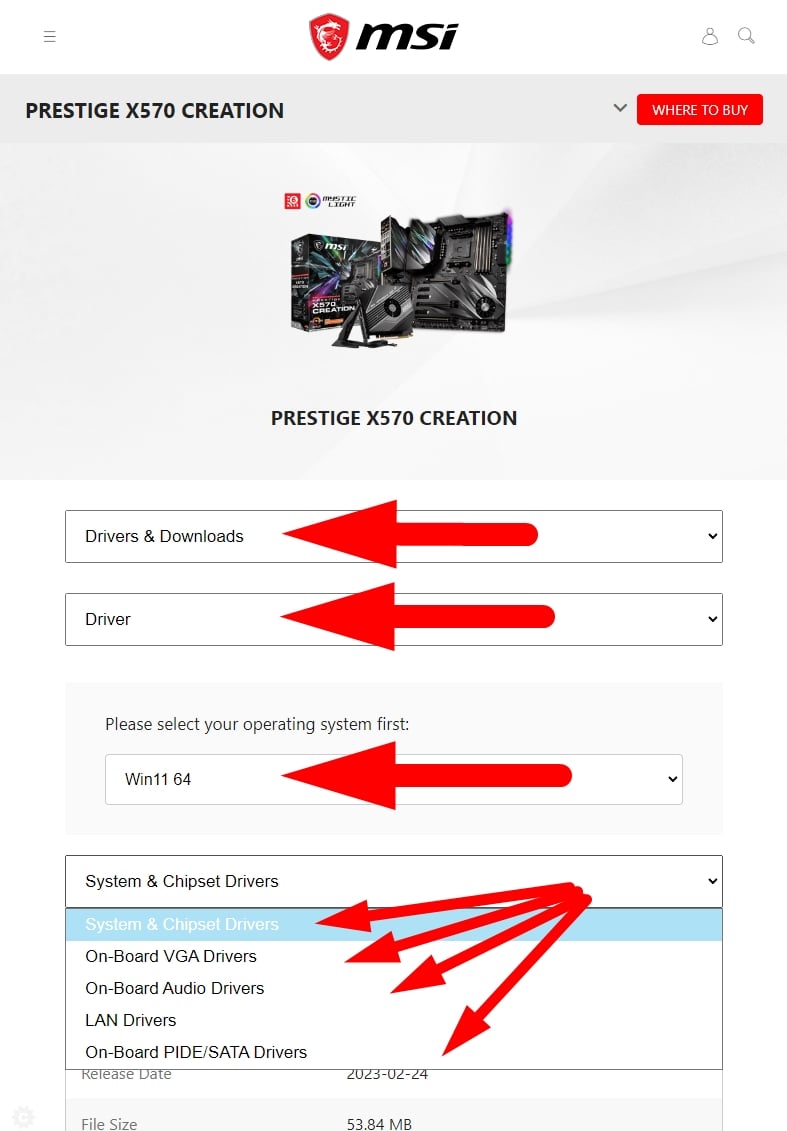
- Locate Your Motherboard Model: Find the “Support,” “Downloads,” or “Service” section. Here, you’ll typically find a search bar or a product selector. Enter your exact motherboard model number that you identified earlier.
- Select Your Operating System: On your motherboard’s specific support page, locate the “Drivers & Utilities” or “Downloads” tab. You’ll need to select your specific operating system (e.g., Windows 11 64-bit, Windows 10 64-bit) from a dropdown menu to ensure you download the correct versions.
- Download Essential Drivers:
Prioritize the following drivers, generally in this order:- Chipset Driver: This is the most crucial driver as it facilitates communication between the CPU and other components. Install this first.
- Management Engine Interface (MEI) Driver (if available): Often related to the chipset, install this next.
- LAN/Ethernet Driver (or Wi-Fi Driver): If you’re on a fresh OS install, you’ll need this to get online and download the rest. If you transferred it via USB, install it now.
- Audio Driver: For sound functionality.
- SATA/AHCI/RAID Driver: If you’re using specific storage configurations, although often handled by Windows during installation.
- USB Driver (if specific to your board): For optimal USB port functionality, especially for newer USB standards (e.g., USB 3.0/3.1/3.2).
- Other Peripheral Drivers: Any other integrated components like Thunderbolt, Bluetooth, card readers, or specific utilities.
- Installation Process:
- Extract Files: Most drivers will come in a zipped (.zip, .rar) archive. Use a program like 7-Zip or WinRAR (or Windows’ built-in zip extractor) to extract the contents to a folder on your desktop.
- Run Setup: Inside the extracted folder, look for an executable file named
setup.exe,install.exe, or a similar descriptive name. Right-click it and select “Run as administrator.” - Follow Prompts: The installation wizard will guide you through the process. Read each prompt carefully, accept licensing agreements, and choose default installation locations unless you have a specific reason not to.
- Restart When Prompted: After installing each major driver (especially chipset, network, and audio), it’s often recommended to restart your computer, or at least when the installer explicitly asks you to. This ensures the changes take effect correctly.
- Repeat for All Drivers: Go through the list, downloading and installing each essential driver sequentially.
Method 2: Using the Driver CD/DVD (If Available)
If your motherboard came with a driver CD/DVD, this can be an option, particularly if you don’t have immediate internet access after an OS installation.
- Insert the CD/DVD: Place the driver disc into your optical drive.
- Autorun or Manual Launch: The disc should autorun, presenting an installation menu. If not, open “This PC” or “My Computer,” navigate to your optical drive, and look for
setup.exeorautorun.exe. - Install Drivers: Follow the on-screen prompts. The disc usually has an option to install all recommended drivers or select specific ones.
- Important Caveat: Drivers on a CD/DVD are usually from when the motherboard was manufactured, meaning they are often outdated. Once you have internet access (via the LAN driver from the disc), always visit the manufacturer’s website to download and install the latest versions of all drivers. Consider the CD only as a temporary measure to get your system functional enough to access the internet.
Method 3: Using Windows Update (Limited Functionality)
Windows Update can sometimes automatically detect and install basic drivers for your motherboard components.
- Check for Updates: Go to
Settings > Update & Security > Windows Update(orSettings > Windows Updatein Windows 11) and click “Check for updates.” - Optional Updates: Sometimes, additional drivers might be listed under “View optional updates.” You can selectively install them.
- Limitations: While convenient, Windows Update drivers are often generic or not the absolute latest versions provided by the motherboard manufacturer. They may lack specific optimizations or features found in the official drivers. Use this as a supplemental source or a last resort if official drivers are unavailable or problematic.
Verifying Driver Installation
After installing drivers, it’s crucial to verify that they are correctly recognized and functioning.
- Device Manager: Press
Windows Key + Xand select “Device Manager.” Look for any yellow exclamation marks or red X symbols next to devices. These indicate a problem (missing, corrupted, or incompatible driver). - Check Driver Properties: Right-click on key devices (e.g., your network adapter, sound device, chipset components under “System devices”) and select “Properties.” Go to the “Driver” tab to see the driver provider, date, and version. Compare these against the versions you downloaded from the manufacturer’s website.
- Test Functionality:
- Audio: Play a sound or video.
- Network: Browse the internet.
- USB: Plug in a USB device and ensure it’s recognized.
- Other Peripherals: Test any specific features you’ve updated drivers for.
If everything looks good and functions as expected, you’ve successfully installed your motherboard drivers!
Common Issues and Troubleshooting Tips
Even with careful preparation, driver installation can sometimes throw a curveball. Here are some common problems and how to troubleshoot them effectively.
Driver Not Installing or Error Messages
- Incompatible OS Version: Double-check that the driver you downloaded matches your exact Windows version (10, 11) and architecture (64-bit). Downloading a Windows 10 driver for a Windows 11 system, or a 32-bit driver for a 64-bit OS, will almost certainly fail.
- Run as Administrator: Always run driver installers with administrative privileges. Right-click the setup file and choose “Run as administrator.”
- Corrupted Download: If the download was interrupted or corrupted, the installer might fail. Delete the downloaded file and redownload it from the manufacturer’s website.
- Antivirus/Firewall Interference: Temporarily disable your antivirus software and Windows Defender/firewall during installation, then re-enable them immediately afterward. Some security suites can interfere with driver installations.
- Previous Installation Issues: If you’re updating an existing driver, sometimes remnants of the old driver can cause conflicts. In Device Manager, right-click the problematic device, choose “Uninstall device,” and check the box to “Attempt to remove the driver for this device” (if available) before restarting and trying the new installation.
System Instability After Driver Update
- Rollback Driver: If your system becomes unstable (crashes, BSODs) immediately after installing a new driver, this is your first recourse.
- Go to Device Manager.
- Locate the device whose driver you just updated.
- Right-click on it and select “Properties.”
- Go to the “Driver” tab and click “Roll Back Driver.” This will revert to the previous version.
- Use System Restore Point: If rolling back isn’t an option or doesn’t resolve the issue, use the System Restore Point you hopefully created before the installation. Search for “Create a restore point” and then click “System Restore.”
- Boot into Safe Mode: If the system is too unstable to access Windows normally, try booting into Safe Mode (during startup, usually press F8 or Shift + Restart to access advanced startup options). From Safe Mode, you can uninstall the problematic driver or perform a System Restore.
- Try an Older Version: Sometimes, the newest driver isn’t always the most stable for your specific hardware configuration. Check the manufacturer’s website for an older, stable driver version.
No Internet Connection After OS Reinstallation
This is a very common scenario. If you’ve just reinstalled Windows and lack internet access, it’s almost certainly because your network adapter (LAN or Wi-Fi) driver is missing.
- Use Another PC: On a different computer with internet access, download the specific LAN (Ethernet) or Wi-Fi driver for your motherboard model from the manufacturer’s website.
- Transfer via USB: Save the downloaded driver file to a USB flash drive.
- Install the Driver: Transfer the USB drive to the problematic PC, copy the driver file, and install it. Once your network driver is installed, you’ll regain internet access and can proceed to download other drivers directly.
By systematically approaching these issues, you can usually resolve driver-related problems efficiently, minimizing downtime and ensuring your system’s productivity remains high.
Best Practices for Driver Management
Effective driver management isn’t just about the initial installation; it’s an ongoing process that contributes to your system’s long-term health, performance, and security.
Regular Updates vs. “If it ain’t broke, don’t fix it”
There’s a common debate in the tech community about the frequency of driver updates. The best approach often lies in striking a balance:
- Prioritize Critical Updates: Always prioritize driver updates that address critical security vulnerabilities, major bug fixes, or significant performance improvements. These are often highlighted by the manufacturer.
- Don’t Update Just for the Sake of It: If your system is stable, performing well, and you’re not experiencing any issues, there’s no urgent need to update every single driver the moment a new version is released. Sometimes, new drivers can introduce unforeseen bugs or conflicts.
- Check Changelogs: Before updating, always read the changelog or release notes provided by the manufacturer. This tells you what issues the new driver fixes and what new features it might introduce, helping you decide if the update is relevant to your needs.
- Stagger Updates: For critical systems, avoid updating all drivers at once. Update one or two at a time, test for stability, and then proceed with others.
Avoid Third-Party Driver Updaters (Generally)
While tempting, most third-party “driver updater” software should be approached with extreme caution, if not avoided altogether.
- Risks: Many of these tools are notorious for installing incorrect or generic drivers, bloatware, or even malware. They might promise to find “new” drivers that are actually older or less stable than what you already have.
- Stick to Official Sources: The safest and most reliable place to get drivers is directly from your motherboard manufacturer’s official support website. For graphics cards, always use the official NVIDIA, AMD, or Intel websites.
- Windows Update: As mentioned, Windows Update can provide basic drivers and is generally safe, although not always providing the absolute latest or most feature-rich versions.
Create a Driver Repository
For those who frequently reinstall operating systems or manage multiple PCs, creating a local repository of your essential drivers is an excellent practice.
- Organize a Folder: Create a clearly labeled folder on an external hard drive, USB stick, or cloud storage (e.g., “PC Drivers – [Motherboard Model] – Windows 11 64-bit”).
- Download and Store: After successfully installing all drivers from your manufacturer’s website, download the latest versions of the most crucial ones (chipset, LAN, Wi-Fi, audio) and save them into this repository.
- Future-Proofing: This ensures that you always have access to working drivers, even if the manufacturer’s website goes down, or if you’re in a situation without immediate internet access. It significantly speeds up the process of getting a fresh OS installation up and running efficiently.
By adhering to these best practices, you empower yourself with greater control over your system’s health, ensuring a consistently smooth, secure, and productive computing experience.
Conclusion
Installing and managing motherboard drivers is a fundamental aspect of maintaining a healthy and high-performing computer system. Far from being a mere technicality, these software interpreters are the linchpin that connects your sophisticated hardware with the intelligent commands of your operating system. From ensuring blazing-fast data transfers facilitated by chipset drivers to crystal-clear audio provided by sound drivers, and seamless internet connectivity enabled by network drivers, their proper installation unlocks the full potential of your motherboard.
By meticulously identifying your motherboard, following the step-by-step guidance for downloading from official manufacturer websites, and understanding the nuances of installation and verification, you gain not just functionality but also enhanced system stability and crucial digital security. And should issues arise, the troubleshooting tips provided equip you with the knowledge to swiftly diagnose and resolve common driver-related headaches.
Embracing these practices transforms you from a passive user into an informed system manager, capable of optimizing your PC for peak performance and longevity. In an era where technology constantly evolves, mastering driver management is a skill that directly translates into a more reliable, efficient, and ultimately, a more productive computing journey. So take the reins, keep your drivers updated (wisely!), and enjoy the seamless performance your motherboard was truly designed for.
aViewFromTheCave is a participant in the Amazon Services LLC Associates Program, an affiliate advertising program designed to provide a means for sites to earn advertising fees by advertising and linking to Amazon.com. Amazon, the Amazon logo, AmazonSupply, and the AmazonSupply logo are trademarks of Amazon.com, Inc. or its affiliates. As an Amazon Associate we earn affiliate commissions from qualifying purchases.