The landscape of modern technology is increasingly shaped by Artificial Intelligence (AI) and Machine Learning (ML). From sophisticated natural language processing models to intricate computer vision systems, the computational demands of these fields are immense. While CPUs can handle many tasks, the parallel processing power of Graphics Processing Units (GPUs) is indispensable for accelerating complex operations, particularly in deep learning. NVIDIA’s CUDA platform stands at the forefront of this revolution, providing developers with the tools to harness the incredible power of their GPUs.
For data scientists, machine learning engineers, and developers working on Windows, integrating CUDA with a robust environment manager like Anaconda is paramount. This combination offers a potent setup, enabling rapid experimentation, model training, and deployment. Anaconda simplifies the management of Python environments and essential data science libraries, while CUDA unlocks the raw computational horsepower of your NVIDIA GPU. This comprehensive guide will walk you through the entire process, ensuring a smooth and efficient installation so you can dive into the exciting world of accelerated computing.
Laying the Foundation: Prerequisites and System Preparation
Before embarking on the installation journey, it’s crucial to prepare your system and gather all the necessary components. A well-prepared foundation minimizes potential roadblocks and ensures a smoother setup process.
Understanding Your Hardware: NVIDIA GPU Compatibility
The most critical prerequisite for CUDA is, unsurprisingly, an NVIDIA GPU. CUDA is a proprietary platform developed by NVIDIA, meaning it is exclusively compatible with their graphics cards. If you own an AMD, Intel, or any other brand of GPU, CUDA will not function, and you’ll need to explore alternative parallel computing frameworks (like OpenCL or SYCL) or consider an NVIDIA GPU upgrade if AI acceleration is your primary goal.
To verify your GPU:
- Windows 10/11: Right-click on the Taskbar, select “Task Manager,” go to the “Performance” tab, and click on “GPU”. Your GPU model will be displayed at the top right.
- Alternatively, open “Device Manager” (search in Windows Start Menu), expand “Display adapters,” and note your GPU model.
- Ensure your NVIDIA GPU is a CUDA-enabled model. Most modern NVIDIA GPUs (GeForce GTX, RTX, Quadro, Tesla) are CUDA-enabled. You can check NVIDIA’s official website for a comprehensive list of CUDA-enabled GPUs if you have an older model.
Having a sufficiently powerful GPU is also important. While CUDA will technically install on many NVIDIA GPUs, deep learning tasks often demand GPUs with significant VRAM (Video RAM) and processing cores (CUDA Cores) for optimal performance. For serious AI development, consider GPUs with at least 8GB of VRAM, with 12GB or more being highly recommended for larger models.
Essential Software Downloads Checklist
To streamline the installation, it’s advisable to download all necessary files beforehand. Always aim for the latest stable versions unless a specific project or framework dictates an older version.
- NVIDIA GPU Driver: This is the foundational software that allows your operating system to communicate with your GPU. Always download the latest WHQL-certified Game Ready Driver or Studio Driver directly from the official NVIDIA Drivers website. Ensure you select the correct GPU series, model, and Windows version.
- CUDA Toolkit: This is NVIDIA’s development environment for C/C++ programming on CUDA-enabled GPUs. The specific version of the CUDA Toolkit is crucial as it needs to be compatible with the deep learning frameworks (like TensorFlow or PyTorch) you intend to use. Consult the documentation of your chosen framework for recommended CUDA versions. For instance, TensorFlow or PyTorch will often specify which CUDA version they were built with and tested against. Download the appropriate Windows installer from the NVIDIA CUDA Toolkit Archive.
- cuDNN (NVIDIA CUDA Deep Neural Network library): While the CUDA Toolkit provides the basic framework, cuDNN is an essential library for deep neural network operations. It provides highly optimized primitives for deep learning frameworks, dramatically speeding up operations like convolutions, pooling, and normalization. Download cuDNN from the NVIDIA Developer website (requires a free NVIDIA Developer account). Like CUDA, ensure the cuDNN version is compatible with your chosen CUDA Toolkit version.
- Anaconda Individual Edition: This is the leading open-source distribution for Python and R, widely used for data science and machine learning. It comes pre-packaged with hundreds of popular data science packages and provides the powerful
condapackage and environment manager. Download the latest 64-bit graphical installer for Windows from the Anaconda website.
System Requirements and Best Practices
To ensure a smooth installation and optimal performance, consider these system prerequisites and best practices:
- Operating System: Windows 10 or 11 (64-bit) is required. CUDA does not officially support 32-bit Windows.
- Administrator Privileges: You will need administrator rights to install drivers, CUDA Toolkit, and Anaconda.
- Disk Space: Ensure you have ample free disk space, at least 20-30 GB, for all installations and subsequent project files.
- Internet Connection: A stable internet connection is needed for downloads and during some parts of the installation process.
- Disable Fast Startup: Windows Fast Startup can sometimes interfere with driver installations or cause issues upon reboot. It’s good practice to disable it before major driver or system software installations. (Go to Control Panel > Power Options > Choose what the power buttons do > Change settings that are currently unavailable > Uncheck “Turn on fast startup”).
- Close Other Applications: Close all other applications before starting any major installation process to prevent conflicts.
Step-by-Step Installation Guide
With your system prepared and all necessary files downloaded, you can now proceed with the installation of the core components. Accuracy in following these steps is key to a successful setup.
Installing NVIDIA GPU Drivers
This is the very first step, as all other NVIDIA software relies on a functional GPU driver.
- Uninstall Previous Drivers (Optional but Recommended): If you are updating drivers or encountering issues, consider using Display Driver Uninstaller (DDU) in Windows Safe Mode to completely remove any remnants of previous drivers. This is often overkill but can resolve stubborn issues. For a standard update, simply proceed with the new driver installation.
- Run the Driver Installer: Locate the NVIDIA driver executable you downloaded and run it as an administrator.
- Extraction Path: The installer will first ask for an extraction path. You can use the default or specify your own.
- License Agreement: Accept the NVIDIA Software License Agreement.
- Installation Options:
- Express Installation: This is generally sufficient for most users and will install all recommended components.
- Custom (Advanced) Installation: If you want to selectively install components (e.g., you don’t need GeForce Experience if you’re only doing compute tasks), choose Custom. Crucially, within Custom installation, you’ll see an option for “Perform a clean installation.” Checking this box is highly recommended, as it removes all previous driver profiles and settings, ensuring a fresh start.
- Complete Installation and Restart: Follow the on-screen prompts. Your screen may flicker or go black temporarily during the installation. Once complete, restart your computer immediately to finalize the driver installation.
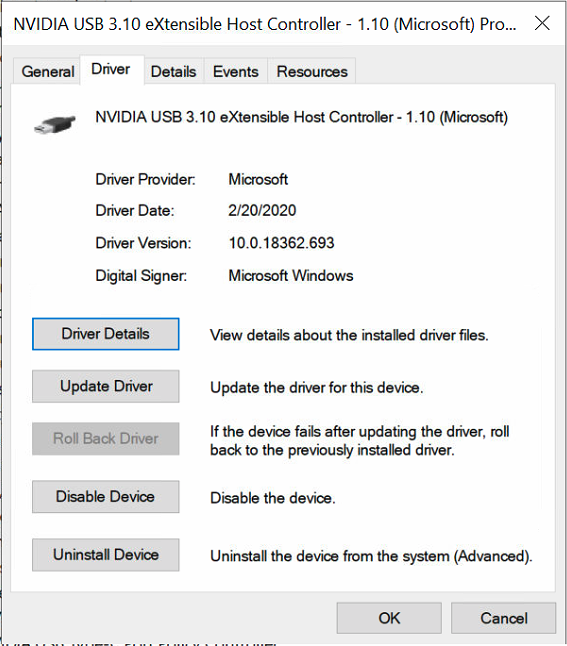
- Verify Driver Installation:
- Right-click on your desktop, and you should see “NVIDIA Control Panel” or “NVIDIA Display Settings.”
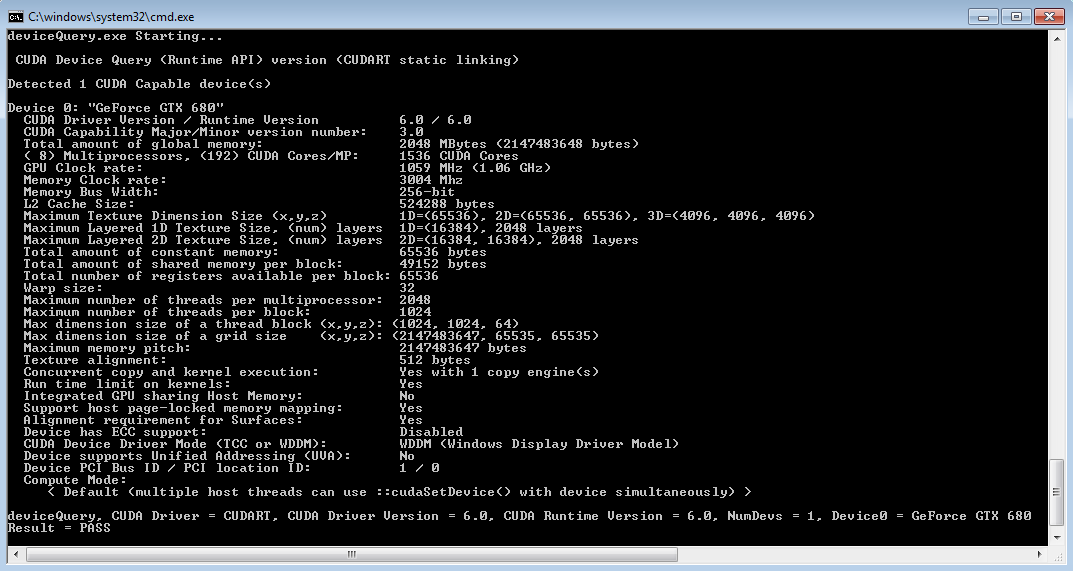
- Open Command Prompt or PowerShell and type
nvidia-smi. This command-line utility displays information about your GPU, including the driver version, CUDA version supported by the driver, and current GPU usage. If it runs successfully, your drivers are correctly installed.
Setting Up the CUDA Toolkit
Once your GPU drivers are confirmed, you can install the CUDA Toolkit.
- Run the CUDA Toolkit Installer: Locate the CUDA Toolkit executable you downloaded and run it as an administrator.
- Extraction Path: Similar to the driver, specify an extraction path.
- System Check: The installer will perform a system compatibility check.
- Installation Options:
- Express (Recommended): This installs all components to the default location. This is usually the best choice.
- Custom: Allows you to choose which components to install (e.g., samples, documentation, Visual Studio integration). Ensure “CUDA Development” is selected. Crucially, pay attention to the installation path, typically
C:Program FilesNVIDIA GPU Computing ToolkitCUDAvX.Y(where X.Y is the CUDA version). You’ll need this path later.
- Environment Variables: The CUDA installer usually sets the necessary environment variables (
CUDA_PATH,PATH) automatically. It’s a good idea to verify these later. - Complete Installation: Follow the prompts. No restart is typically required immediately after CUDA Toolkit installation, but it doesn’t hurt.
- Verify CUDA Installation:
- Open Command Prompt or PowerShell and type
nvcc --version. This command is the NVIDIA CUDA Compiler driver, and if it executes successfully, it will display the CUDA compiler version, confirming the toolkit is correctly installed and its path is accessible. - You can also check your system’s Environment Variables (search “Edit the system environment variables” in Windows Start Menu). Under “System variables,” look for
CUDA_PATHand verify it points to your CUDA installation directory. Also, check thePathvariable to ensure the CUDA bin and libnvvp directories are included.
- Open Command Prompt or PowerShell and type
Integrating cuDNN (Optional but Recommended for Deep Learning)
cuDNN is not installed via an executable but by copying its files into the CUDA Toolkit directory.
- Extract cuDNN: Locate the downloaded cuDNN zip file. Extract its contents. You should see three folders:
bin,include, andlib. - Copy Files:
- Navigate to your CUDA Toolkit installation directory (e.g.,
C:Program FilesNVIDIA GPU Computing ToolkitCUDAvX.Y). - Copy the contents (the files, not the folders themselves) from the
binfolder of the extracted cuDNN archive into thebinfolder of your CUDA Toolkit installation. - Do the same for the
includefolder: copy its contents into the CUDA Toolkit’sincludefolder. - And for the
libfolder: copy its contents into the CUDA Toolkit’slibfolder.
- Navigate to your CUDA Toolkit installation directory (e.g.,
- Environment Variables (Optional, often not needed for cuDNN): Unlike the CUDA Toolkit, cuDNN typically doesn’t require separate environment variables. It relies on being placed within the CUDA Toolkit’s structure, which is already referenced by
CUDA_PATH. Some frameworks might look for aCUDNN_PATHor similar, but this is less common with modern installations where cuDNN is directly integrated.
Mastering Your Environment: Anaconda Installation and Configuration
Anaconda provides a robust and isolated environment for your Python projects, making it easy to manage dependencies and switch between different setups without conflicts.
Installing Anaconda Individual Edition
- Run the Anaconda Installer: Locate the Anaconda executable you downloaded (e.g.,
Anaconda3-2023.09-Windows-x86_64.exe) and run it as an administrator. - License Agreement: Agree to the terms.
- Installation Type:
- Just Me (Recommended): Installs Anaconda for your user profile only.
- All Users: Installs for all users on the computer (requires administrator privileges). “Just Me” is generally preferred for personal development.
- Installation Location: You can choose the default or specify a custom location. Ensure the path does not contain spaces if you choose a custom location, though Anaconda is quite robust with default paths.
- Advanced Installation Options: This is a crucial step:
- “Add Anaconda3 to my PATH environment variable”: It is generally NOT recommended to check this box during installation. Adding Anaconda to your system PATH can interfere with other Python installations or system utilities. You should activate Anaconda environments explicitly using the Anaconda Prompt.
- “Register Anaconda3 as my default Python 3.x”: It is generally RECOMMENDED to check this box, as it ensures that Anaconda Python is recognized as your primary Python interpreter for conda-managed environments.
- Complete Installation: Follow the prompts. The installation can take several minutes as it installs hundreds of packages.
- Verify Anaconda Installation:
- Search for “Anaconda Prompt” in the Windows Start Menu and open it.
- In the Anaconda Prompt, type
conda --version. It should display the installed conda version. - Type
python --version. It should show the Python version managed by Anaconda. - You can also launch Anaconda Navigator from the Start Menu to see a graphical interface for managing environments and applications.
Creating a Dedicated Environment for CUDA Applications
Virtual environments are cornerstones of responsible data science development. They isolate project dependencies, preventing conflicts and ensuring reproducibility.
-
Open Anaconda Prompt: Always perform conda commands within the Anaconda Prompt or an activated environment in your terminal.
-
Create a New Environment:
bash

conda create -n my_cuda_env python=3.10
Replacemy_cuda_envwith a descriptive name for your environment (e.g.,tf_gpu_env,pytorch_gpu_env) and3.10with your preferred Python version, compatible with your target deep learning framework. -
Activate the Environment:
bash

conda activate my_cuda_env
Your prompt will change to show the active environment in parentheses (e.g.,(my_cuda_env) C:UsersYourUser>). -
Install Essential Data Science Packages:
bash

conda install numpy pandas matplotlib scikit-learn jupyterlab
This provides a standard set of data science tools. -
Install Deep Learning Frameworks with CUDA Support: This is where you connect your Python environment to your CUDA installation. The commands differ slightly for TensorFlow and PyTorch and often depend on the specific CUDA version you installed.
-
For TensorFlow (2.x and later):
Modern TensorFlow versions often simplify CUDA integration. You can usually install TensorFlow and its GPU dependencies directly viapip.pip install tensorflow[and-cuda]This command attempts to install TensorFlow along with its CUDA dependencies. Ensure your CUDA Toolkit and cuDNN versions are compatible with the TensorFlow version being installed. Refer to the TensorFlow installation guide for specific version compatibility matrices.
-
For PyTorch:
PyTorch provides specific installation commands tailored to your operating system, package manager, Python version, and CUDA version on its official website.
Go to PyTorch Get Started and select:- PyTorch Build: Stable
- Your OS: Windows
- Package: Conda
- Language: Python
- CUDA: Select the CUDA version you installed (e.g., CUDA 11.8).
The website will generate a command like:
bash

conda install pytorch torchvision torchaudio cudatoolkit=11.8 -c pytorch -c nvidia
Copy and paste this command into your activated Anaconda Prompt.
-
-
Verify CUDA Integration within Frameworks:
After installing your chosen framework, verify that it can detect and utilize your GPU.-
For PyTorch:
Activate your environment (conda activate my_cuda_env) and open a Python interpreter (python).import torch print(torch.cuda.is_available()) print(torch.cuda.device_count()) print(torch.cuda.get_device_name(0))If
torch.cuda.is_available()returnsTrue, anddevice_count()shows your GPU(s), then PyTorch is successfully using CUDA. -
For TensorFlow:
Activate your environment and open a Python interpreter.
python

import tensorflow as tf

print(tf.config.list_physical_devices('GPU'))
If this command lists your NVIDIA GPU, TensorFlow is successfully configured to use CUDA.
-
Troubleshooting Common Issues and Optimizing Your Setup
Even with careful execution, installation processes can sometimes encounter hitches. Knowing how to diagnose and resolve common issues, along with optimizing your setup, can save considerable time and frustration.
Diagnosing Installation Problems
- Driver Conflicts or Outdated Drivers:
- Symptom:
nvidia-smifails, CUDA programs don’t run, or applications report no GPU found. - Solution: Ensure your NVIDIA GPU driver is up-to-date and correctly installed. Perform a clean installation of the driver as described earlier. Check Windows Event Viewer for driver-related errors.
- Symptom:
- Incorrect CUDA/cuDNN Versions:
- Symptom: Deep learning frameworks fail to initialize with messages about
cudart64_XX.dllnot found or incompatible versions. - Solution: Carefully check the compatibility matrix for your chosen deep learning framework (TensorFlow/PyTorch) with both the CUDA Toolkit and cuDNN. If you installed CUDA 11.8, but your framework requires 11.2, you’ll need to reinstall the correct CUDA Toolkit and corresponding cuDNN.
- Symptom: Deep learning frameworks fail to initialize with messages about
- Environment Variable Issues:
- Symptom:
nvcc --versionfails, or Python frameworks report “no CUDA runtime found.” - Solution: Verify that
CUDA_PATHis set correctly to your CUDA installation directory and that thebinandlibnvvpdirectories of CUDA are included in your system’sPathenvironment variable. Also, ensure that the cuDNN files were correctly copied into the CUDA Toolkit directories.
- Symptom:
- TensorFlow/PyTorch Specific Compatibility:
- Symptom: Frameworks install but fail when trying to use the GPU.
- Solution: Some framework versions might have specific minor version dependencies for CUDA or cuDNN. Always consult the official installation guides for TensorFlow and PyTorch, as their requirements can change with updates.
- DLL Load Failed Error:
- Symptom: Python crashes with “DLL load failed” errors when importing TensorFlow or PyTorch.
- Solution: This often points to missing or incompatible Visual C++ Redistributables. Install the latest Microsoft Visual C++ Redistributable for Visual Studio 2015-2022 (x64) from Microsoft’s official website.
- Checking Logs:
- Windows Event Viewer (for system/driver issues).
- Anaconda and Python error messages in the console are often very descriptive. Search these error messages online; you’ll likely find similar cases and solutions.
Performance Considerations and Best Practices
- Keep Drivers Updated: Regularly check for new NVIDIA GPU drivers. Performance improvements and bug fixes are frequently released, which can significantly impact your AI workloads.
- Monitor GPU Usage: Tools like
nvidia-smi(in Command Prompt) or utilities like MSI Afterburner can help you monitor GPU utilization, memory usage, and temperature. This is crucial for understanding if your GPU is being fully utilized and to prevent overheating. - Optimize Code: While CUDA accelerates operations, inefficient code can still bottleneck performance. Techniques like batching data, using appropriate data types (e.g.,
float16for mixed-precision training), and optimizing data loading pipelines can drastically improve training speeds. - Resource Management with Anaconda:
- Dedicated Environments: Always create separate Anaconda environments for different projects or deep learning frameworks to avoid dependency hell.
- Clean Up: Remove unused packages or environments periodically to free up disk space.
conda env remove -n my_old_envandconda clean --all.
- Utilize Jupyter Notebooks/Labs: These web-based interactive environments (easily installed via Anaconda) are excellent for experimenting with deep learning models, visualizing data, and sharing your work.
By diligently following these steps and being prepared to troubleshoot, you can confidently set up a powerful and stable environment for your AI and data science endeavors on Windows, leveraging the full potential of your NVIDIA GPU with CUDA and the flexibility of Anaconda.

Conclusion
The journey of installing CUDA, NVIDIA GPU drivers, and Anaconda on a Windows system is a foundational step for anyone serious about engaging with AI, machine learning, and high-performance computing. We’ve navigated through understanding hardware prerequisites, meticulously installing the NVIDIA GPU drivers, the CUDA Toolkit, and the crucial cuDNN library, finally culminating in the strategic setup of Anaconda environments for deep learning frameworks like TensorFlow and PyTorch.
A properly configured setup liberates you from the constraints of CPU-bound computations, unlocking significant speedups for model training, data processing, and complex simulations. This empowerment translates into faster iteration cycles, the ability to work with larger datasets, and the exploration of more intricate models—all essential ingredients for breakthroughs in AI.
With your environment now robustly configured, the next exciting phase begins: diving into actual projects. Whether you’re building a convolutional neural network for image recognition, training a transformer for natural language processing, or developing predictive models, your NVIDIA GPU, accelerated by CUDA and managed by Anaconda, stands ready to tackle the challenges. Embrace this powerful toolset, experiment, learn, and contribute to the ever-evolving world of technology.
aViewFromTheCave is a participant in the Amazon Services LLC Associates Program, an affiliate advertising program designed to provide a means for sites to earn advertising fees by advertising and linking to Amazon.com. Amazon, the Amazon logo, AmazonSupply, and the AmazonSupply logo are trademarks of Amazon.com, Inc. or its affiliates. As an Amazon Associate we earn affiliate commissions from qualifying purchases.