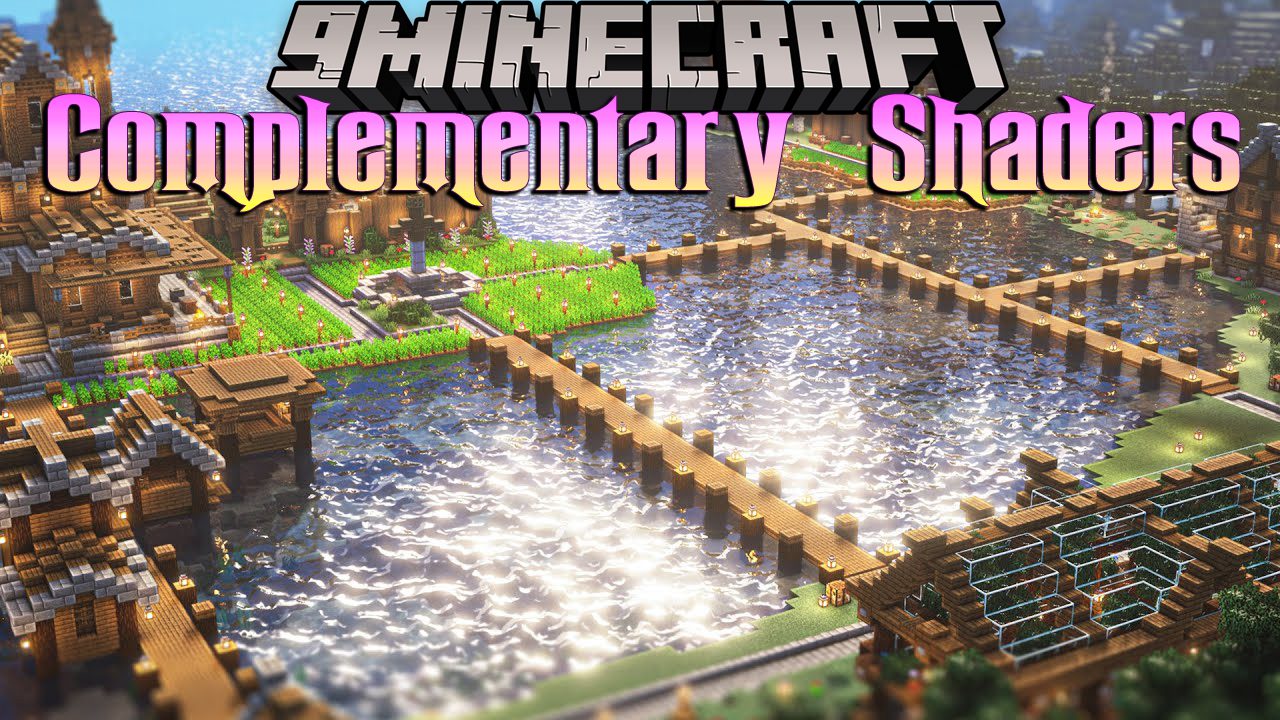
Minecraft, with its iconic blocky aesthetic, has captivated millions since its inception. While its pixelated charm is undeniable, many players crave a more immersive and visually rich experience. This is where shaders come into play – powerful graphical modifications that transform Minecraft’s world with realistic lighting, dynamic shadows, reflective surfaces, and breathtaking atmospheric effects. Among the vast array of shader packs available, Complementary Shaders have carved out a reputation for striking a superb balance between stunning visuals and commendable performance, making them a top choice for players looking to significantly upgrade their game’s appearance without completely sacrificing frame rates.
This comprehensive guide will walk you through every step of installing Complementary Shaders, ensuring you can unlock a new dimension of visual fidelity in your Minecraft world. We’ll cover everything from the prerequisites to the fine-tuning, allowing you to immerse yourself in a game that looks familiar yet astonishingly new.
Unveiling the Magic: What Are Complementary Shaders and Why Do You Need Them?
For the uninitiated, the concept of “shaders” might sound intimidating, but it’s essentially a set of instructions that tells your graphics card how to render the light, shadows, and various effects within a game. They operate much like advanced filters, dramatically altering the entire visual presentation of Minecraft.
Beyond Vanilla: The Transformative Power of Shaders
Vanilla Minecraft, by design, features relatively simple lighting and environmental effects. While functional, it doesn’t leverage the full potential of modern graphics hardware. Shaders bridge this gap, introducing a layer of graphical sophistication that includes:
- Dynamic and Realistic Lighting: Sunbeams filter through trees, torches cast flickering light, and the overall illumination of the world feels more natural and nuanced.
- Volumetric Clouds: Instead of flat textures, clouds gain depth, appearing as fluffy, three-dimensional masses that drift across the sky.
- Waving Foliage and Water: Grass, leaves, and water surfaces gently sway and ripple, adding a sense of life and motion to the environment. Water, in particular, becomes a highly reflective and translucent surface, often with mesmerizing wave patterns.
- Realistic Shadows: Objects cast accurate, soft, and dynamic shadows that change based on the position of the sun or moon, adding significant depth to the landscape.
- Screen Space Reflections (SSR): Certain surfaces can reflect their surroundings, creating stunning visual effects on water, ice, or polished blocks.
- Atmospheric Effects: Fog, haze, god rays, and even detailed rain and snow particles contribute to a more immersive and atmospheric world.
These enhancements don’t just make the game prettier; they fundamentally change how you perceive and interact with your environment, making exploration more rewarding and building projects more inspiring.
Why Complementary Shaders Stand Out
Among the multitude of shader packs, Complementary Shaders have garnered immense popularity for several compelling reasons:
- Optimized Performance: Many powerful shaders demand high-end hardware, but Complementary Shaders are renowned for their impressive optimization. They aim to provide high-quality visuals without crippling frame rates, making them accessible to a wider range of gaming PCs. This makes them an excellent choice for players seeking a balance between aesthetics and playability.
- Highly Customizable: The “complementary” aspect truly shines in its extensive configuration options. Players can tweak almost every visual parameter, from shadow quality and water reflections to bloom effects and anti-aliasing. This allows for personalized experiences, whether you prioritize buttery-smooth performance, cinematic visuals, or a unique artistic flair.
- Aesthetic Versatility: Complementary Shaders don’t impose a single stylistic vision. Instead, they enhance Minecraft’s existing art style, making it more vibrant and realistic while retaining its core identity. They complement the game, rather than completely overhaul it.
- Active Development and Compatibility: The pack is consistently updated, ensuring compatibility with new Minecraft versions and incorporating user feedback. This commitment to maintenance means a more stable and evolving experience.
Choosing Complementary Shaders is a decision to embrace a visually superior Minecraft without venturing into overly complex or performance-heavy alternatives right from the start.
Pre-Installation Checklist: Preparing Your System for a Visual Overhaul
Before diving into the installation process, it’s crucial to ensure your system meets the necessary requirements and is properly prepared. Skipping these preliminary steps can lead to frustrating issues down the line.
Essential Software and Hardware Requirements
To successfully install and run Complementary Shaders, you’ll need the following:
- Minecraft Java Edition: Shaders are primarily designed for the Java edition of Minecraft. The Bedrock edition has its own separate system for graphical enhancements (often called “render dragons” or “ray tracing packs”), which are not compatible with Java shaders. Ensure you own and have installed the Java version.
- OptiFine: This is a performance-enhancing mod for Minecraft that also serves as the primary loader for most shader packs, including Complementary Shaders. OptiFine is absolutely essential for shader functionality and significantly improves your game’s overall performance by providing numerous optimization settings.
- A Capable Graphics Card (GPU): While Complementary Shaders are optimized, rendering advanced lighting and effects is still graphically intensive.
- NVIDIA GeForce GTX 1050/AMD Radeon RX 560 or better: This would be a minimum recommendation for a decent experience at lower settings.
- NVIDIA GeForce GTX 1660 / RTX 3050 or AMD Radeon RX 580 / RX 6600 or better: These cards will provide a much smoother experience, allowing you to enjoy higher shader settings. Integrated graphics (like Intel Iris Xe) might run them at very low settings, but a dedicated GPU is highly recommended. Ensure your graphics card drivers are up to date!
- Sufficient RAM (Random Access Memory): Minecraft itself can be memory-intensive, and shaders add to that load.
- Minimum 8 GB RAM: While Minecraft can run on 4GB, 8GB is a comfortable minimum for playing with shaders.
- Recommended 16 GB RAM: This allows for a much smoother experience, especially if you have other applications running in the background.
- Java Development Kit (JDK) or Java Runtime Environment (JRE): Minecraft Java Edition runs on Java. OptiFine, being a .jar file, also requires Java to be installed on your system to run its installer. Most modern Windows installations come with Java, but it’s good to verify or install the latest version if needed.
Optimizing Your Current Setup for Success
Beyond the basic requirements, a few quick optimizations can significantly improve your shader experience:
- Update Your Graphics Drivers: This is perhaps the most crucial step. Outdated drivers are a common cause of performance issues, glitches, and even crashes with shaders. Visit the official website of your GPU manufacturer (NVIDIA, AMD, or Intel) and download the latest drivers for your specific graphics card model. Perform a clean installation if the option is available.
- Close Background Applications: Before launching Minecraft with shaders, close any unnecessary programs, especially those that consume significant CPU or RAM resources (e.g., web browsers with many tabs, video streaming services, other games). This frees up resources for Minecraft and your shaders.
- Allocate Sufficient RAM to Minecraft: By default, Minecraft might not be allocated enough RAM to handle shaders effectively. You can adjust this within the Minecraft Launcher:
- Open the Minecraft Launcher.
- Go to “Installations.”
- Hover over your OptiFine installation and click the three dots, then “Edit.”
- Click “More Options.”
- Locate the “JVM Arguments” section. The value
-Xmx2Gmeans 2 Gigabytes. Change2Gto4Gor6G(e.g.,-Xmx4G) depending on your system’s total RAM and how much you want to allocate. Do not allocate more than half of your total system RAM. For example, if you have 16GB RAM, allocating 6G or 8G is reasonable.
Taking these preparatory steps will lay a solid foundation for a smooth and enjoyable shader installation and gameplay experience.
The Installation Journey: A Step-by-Step Guide to Activating Complementary Shaders
With your system primed and ready, it’s time to embark on the installation process. Follow these steps carefully to integrate Complementary Shaders into your Minecraft world.
Step 1: Installing Java – The Foundation
If you don’t already have Java installed or are unsure, it’s a good idea to install the latest version, as OptiFine and Minecraft rely on it.

- Download Java: Visit the official Oracle Java website or OpenJDK (a popular open-source alternative). Download the latest stable version of the Java Runtime Environment (JRE) or Java Development Kit (JDK). For most users, the JRE is sufficient.
- Run the Installer: Execute the downloaded
.exefile and follow the on-screen prompts. Typically, it’s a straightforward “next, next, finish” process. - Verify Installation: You can open your command prompt (type
cmdin the Windows search bar) and typejava -version. If Java is correctly installed, it will display its version information.
Step 2: Empowering Minecraft with OptiFine
OptiFine is the cornerstone for running shaders and enhancing Minecraft’s performance.
- Download OptiFine: Go to the official OptiFine website (
optifine.net). - Select Correct Version: Crucially, download the OptiFine version that matches your Minecraft game version (e.g., if you play Minecraft 1.20.1, download OptiFine HD U I5 for 1.20.1). Look for the “Downloads” section.
- Download the Installer: Click “Download” next to the chosen version. You might encounter an ad page; wait for the “Skip” button in the top right corner and click it to proceed to the direct download link.
- Run the OptiFine Installer: Locate the downloaded
.jarfile (e.g.,OptiFine_1.20.1_HD_U_I5.jar). Double-click it. - Install OptiFine: A small installer window will appear. Ensure the path to your Minecraft installation is correct and click “Install.” A success message will appear shortly.
- Verify in Minecraft Launcher: Open your Minecraft Launcher. You should now see an “OptiFine” profile listed among your installations. Select this profile.
Step 3: Acquiring Complementary Shaders
Now it’s time to get the shader pack itself. Remember, do not extract the .zip file after downloading.
- Find Official Sources: The most reliable places to download Complementary Shaders are its official website (if available), CurseForge, or Modrinth. A quick search for “Complementary Shaders” will usually lead you to these.
- Choose Compatible Version: Similar to OptiFine, ensure the shader pack version you download is compatible with your Minecraft version. For example, “Complementary Shaders v4.x” might be designed for specific Minecraft versions like 1.16.5, 1.18.2, or 1.20.1. Read the description carefully.
- Download the
.zipFile: Click the download button. The file will typically be named something likeComplementaryShaders_v5.ziporComplementaryReimagined_r5.1.zip. Save it to a memorable location, like your Downloads folder.
Step 4: Integrating Shaders into Your Game
This step involves placing the downloaded shader pack into Minecraft’s designated shaders folder.
- Launch Minecraft with OptiFine: Open your Minecraft Launcher, ensure the “OptiFine” profile is selected, and click “Play.”
- Navigate to Video Settings: Once Minecraft loads to the main menu, go to “Options…” > “Video Settings…” > “Shaders…”.
- Open Shaders Folder: In the Shaders menu, you’ll see a button labeled “Shaders Folder” (or “Open Shader Packs Folder”). Click this button. This will open a file explorer window directly to Minecraft’s
shaderpacksdirectory. - Drag and Drop the Shader Pack: Locate the Complementary Shaders
.zipfile you downloaded in Step 3. Drag and drop this entire.zipfile into theshaderpacksfolder that just opened. Do not unzip it. Minecraft and OptiFine handle.zipfiles directly for shader packs.
Step 5: Activating and First Impressions
The final step is to activate the shaders within the game and witness the transformation.
- Select Complementary Shaders: Go back to the Minecraft Shaders menu. You should now see “ComplementaryShaders_vX.zip” (or similar) listed in the available shader packs. Click on it.
- Wait for Loading: Minecraft will momentarily freeze as it loads and compiles the shader pack. This can take anywhere from a few seconds to a minute or more, depending on your system’s speed and the complexity of the shader.
- Enjoy the New Visuals! Once loaded, the game will return to the menu, but with the shaders active. Load into a world, and prepare to be amazed by the stunning new visuals! The difference will be immediate and striking.
Fine-Tuning Your Experience: Customization and Optimization
Complementary Shaders offer extensive customization options, allowing you to tailor the visuals and performance to your liking. This is where you can truly make the shaders “complementary” to your specific hardware and aesthetic preferences.
Diving into Shader Options
Once Complementary Shaders are active, you can access their specific settings:
- Access Shader Options: In Minecraft, go to “Options” > “Video Settings” > “Shaders” > “Shader Options…” (while Complementary Shaders are selected).
- Explore Categories: You’ll find various categories for settings, such as “Quality,” “Performance,” “Atmosphere,” “Lighting,” “Water,” etc.
- Common Adjustments:
- Performance Profiles: Complementary Shaders often include built-in performance profiles (e.g., “Lite,” “Medium,” “High,” “Ultra”). Start with a lower profile if you experience low FPS, or jump to a higher one if your system is powerful.
- Shadow Quality: This has a significant impact on performance. Lowering shadow resolution or disabling specific shadow effects can greatly improve frame rates.
- Water Quality/Reflections: Adjusting water detail and reflection intensity can free up GPU resources.
- Bloom/Lens Flare: These are aesthetic effects you can toggle or adjust their intensity.
- Volumetric Clouds: While beautiful, volumetric clouds can be demanding. You can often reduce their quality or switch to simpler cloud rendering for a performance boost.
- Balance Visuals and Frame Rates: Experiment with these settings. Make one change at a time, apply, and then check your frame rate in-game (often shown by pressing F3) to understand its impact. The goal is to find a sweet spot where the visuals are stunning, but your game remains smooth and playable.
Troubleshooting Common Issues and Maximizing Performance
Even with careful installation, you might encounter issues. Here are solutions to common problems and tips for maintaining optimal performance.
Addressing Performance Bottlenecks
- Low FPS:
- Lower Shader Settings: This is the most effective solution. Reduce shadow quality, disable reflections, simplify water, and use a lower performance preset within the shader options.
- Update Graphics Drivers: Re-verify your drivers are up-to-date.
- Allocate More RAM: Ensure Minecraft has enough RAM assigned in the launcher settings (as discussed in the pre-installation section).
- Close Background Programs: Free up system resources.
- Reduce Minecraft Render Distance: In OptiFine’s Video Settings, lower your render distance.
- Consider a Stronger GPU: If you’ve tried everything and still experience poor performance, your hardware might be the limiting factor.
Resolving Installation Glitches
- Minecraft Crashes on Launch/Loading World:
- Version Incompatibility: Double-check that your Minecraft version, OptiFine version, and Complementary Shaders version are all compatible with each other. A mismatch is a frequent cause of crashes.
- Corrupted Download: Re-download OptiFine and/or the shader pack.
- Reinstall OptiFine: Sometimes, a fresh OptiFine installation can resolve issues.
- Too Much RAM Allocated: If you allocated too much RAM (e.g., more than half of your total system RAM), it can cause crashes. Try reducing it.
- Shaders Not Appearing in Game:
- Incorrect Folder: Ensure the
.zipfile was placed directly into theshaderpacksfolder, not a subfolder within it. - Unzipped File: Confirm the shader pack is still in its
.zipformat. OptiFine needs the.zipfile. - Launch with OptiFine: Verify you selected the “OptiFine” profile in the Minecraft launcher before playing.
- Incorrect Folder: Ensure the
- Black Screen or Visual Glitches:
- Outdated Graphics Drivers: This is a common culprit. Update your drivers.
- Incompatible Shader/OptiFine Version: Ensure all versions match.
- Restart Minecraft: A simple restart can sometimes clear up temporary visual bugs.

Conclusion
Installing Complementary Shaders is a relatively straightforward process that yields incredibly rewarding results. By following this guide, you’ve not only learned how to implement a powerful graphical overhaul but also understood the nuances of preparing your system, fine-tuning settings, and troubleshooting common hurdles.
Your Minecraft world is now transformed, boasting realistic lighting, dynamic shadows, and breathtaking environmental effects that breathe new life into every block. Whether you’re exploring vast landscapes, delving into intricate cave systems, or simply admiring your meticulously crafted builds, Complementary Shaders will undoubtedly enhance your entire gaming experience. So, dive in, explore your visually stunning new world, and enjoy Minecraft as you’ve never seen it before!
aViewFromTheCave is a participant in the Amazon Services LLC Associates Program, an affiliate advertising program designed to provide a means for sites to earn advertising fees by advertising and linking to Amazon.com. Amazon, the Amazon logo, AmazonSupply, and the AmazonSupply logo are trademarks of Amazon.com, Inc. or its affiliates. As an Amazon Associate we earn affiliate commissions from qualifying purchases.