In the vast and ever-evolving landscape of software development, managing project builds across different platforms and environments can be a significant challenge. This is where CMake steps in – an indispensable, open-source, cross-platform family of tools designed to build, test, and package software. Far more than just a build system, CMake acts as a build system generator, creating native build files (like Makefiles for Unix-like systems, Visual Studio projects on Windows, or Xcode projects on macOS) that are tailored to your specific environment. Its power lies in abstracting away the complexities of various native build systems, allowing developers to write a single, clean CMakeLists.txt file that can be used everywhere.
For developers seeking efficiency, portability, and robust control over their projects, mastering CMake is a crucial step. It enhances productivity by streamlining the build process, reducing setup time, and ensuring consistency across diverse development teams and operating systems. This guide will walk you through the essential steps of installing CMake on the most popular operating systems: Windows, macOS, and various Linux distributions. Whether you prefer official installers, convenient package managers, or even building from source for maximum control, we’ll cover the methods to get CMake up and running, ready to empower your development workflow. By the end of this tutorial, you’ll not only have CMake installed but also understand how to verify its installation and take your first steps towards integrating it into your projects, solidifying your technical foundation in modern software engineering.
Understanding CMake and Its Importance
Before diving into the installation process, let’s take a moment to fully appreciate what CMake is and why it has become a cornerstone in many development ecosystems, from individual projects to large-scale enterprise applications.
What Exactly is CMake?
At its core, CMake is a meta-build system. It doesn’t compile your code directly; instead, it generates the necessary files for other native build tools (like make, ninja, Visual Studio, or Xcode) to do the actual compilation. This abstraction layer is incredibly powerful. You define your project’s structure, dependencies, and compilation rules in a simple, human-readable CMakeLists.txt file using CMake’s own scripting language. CMake then reads this file and, based on your operating system and chosen generator, produces the specific build files needed for your environment.
This approach offers unparalleled flexibility:
- Cross-Platform Compatibility: Write your
CMakeLists.txtonce, and it works on Windows, macOS, Linux, and even embedded systems, abstracting away platform-specific quirks. - Modularity and Organization: CMake encourages structured project organization, making it easier to manage complex projects with multiple libraries and executables.
- Dependency Management: It simplifies the process of finding and linking external libraries, whether they are system-wide or project-specific.
- Integration with IDEs: Most modern Integrated Development Environments (IDEs) like Visual Studio, VS Code, CLion, and Xcode have excellent native support for CMake projects, allowing for seamless integration into your development cycle.
Why is CMake Indispensable for Modern Software Development?
In today’s diverse technological landscape, where teams often work across different operating systems and target various deployment environments, a robust build system generator like CMake is not just an advantage—it’s often a necessity.
- Boosts Developer Productivity: By automating the creation of build scripts, developers can focus more on writing code and less on configuring esoteric build environments. The time saved in setup and troubleshooting directly translates to increased output and faster project iterations.
- Ensures Build Consistency: A single
CMakeLists.txtguarantees that everyone on a team, regardless of their OS or preferred compiler, is building the project in the same way, drastically reducing “it works on my machine” issues. This consistency is crucial for quality assurance and reliable software delivery. - Facilitates Open Source Collaboration: Many major open-source projects rely on CMake, making it an essential skill for anyone contributing to or utilizing these projects. Its widespread adoption fosters a common language for build configuration across the global developer community.
- Scalability for Complex Projects: As projects grow in size and complexity, managing hundreds or thousands of source files, external dependencies, and multiple targets becomes unwieldy with simpler build systems. CMake’s hierarchical structure and powerful command set allow for elegant solutions to these challenges.
In essence, CMake empowers developers to write more portable, maintainable, and robust software, contributing directly to higher quality outputs and more efficient development cycles—a true boon for both individual tech enthusiasts and large corporate development teams.
Installing CMake on Various Operating Systems
CMake offers several installation methods to suit different preferences and operating systems. We’ll cover the most common and recommended approaches for Windows, macOS, and Linux.
Installation on Windows
Windows users typically have two primary methods for installing CMake: the official installer with a graphical user interface (GUI) or through a command-line package manager like Chocolatey.
Method 1: Using the Official Windows Installer (GUI)
This is the most straightforward method for most users, providing a familiar Windows installation experience.
-
Download the Installer:
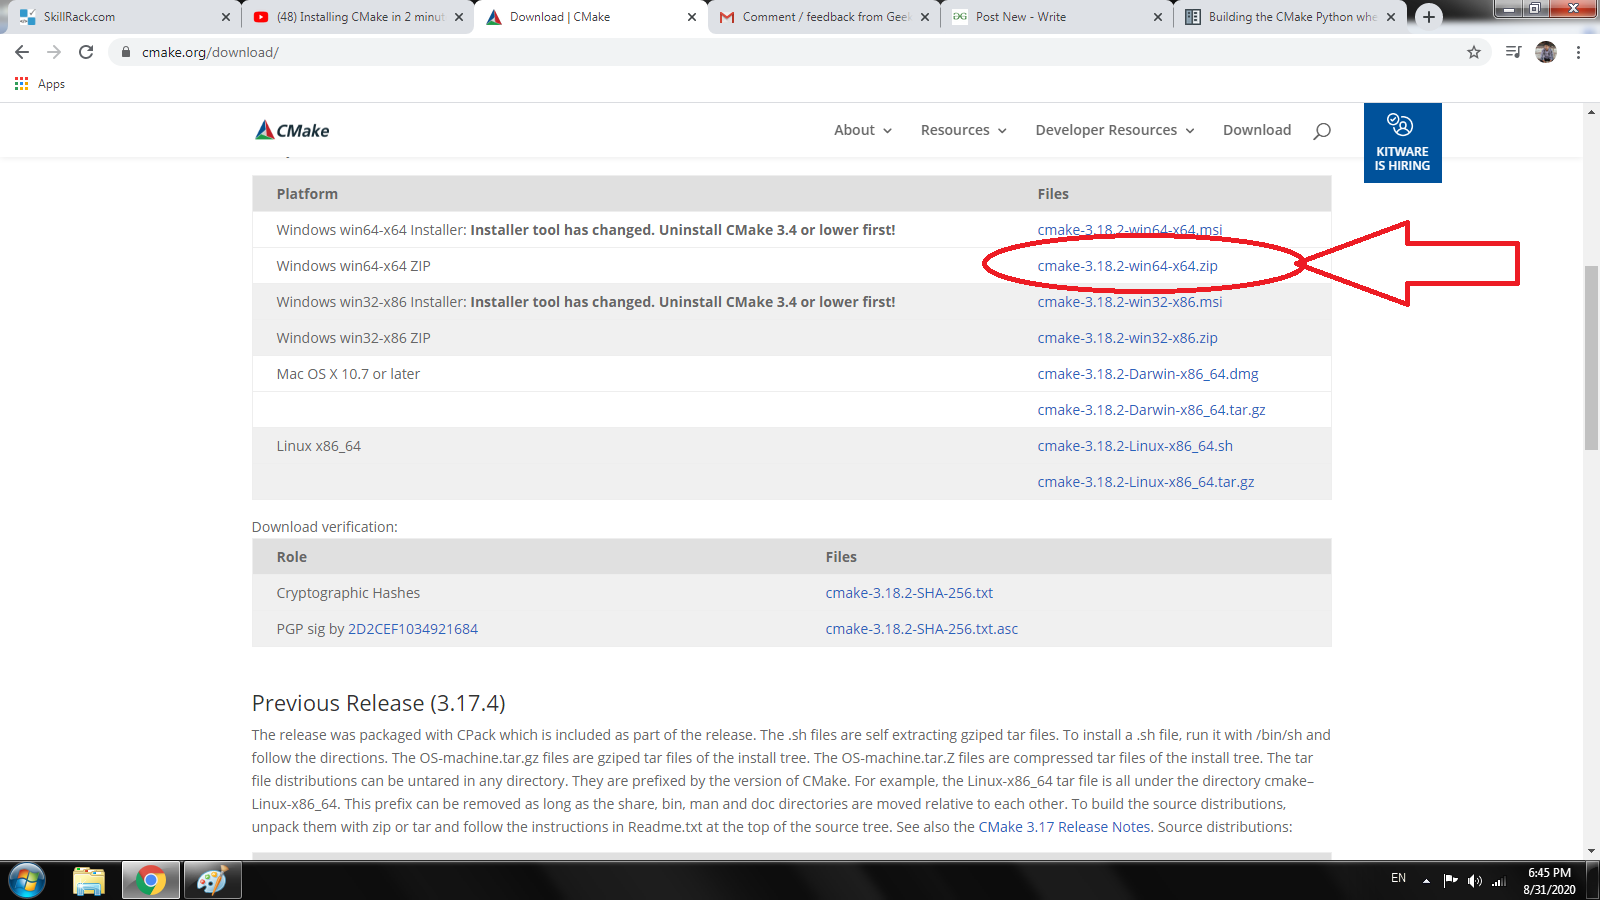
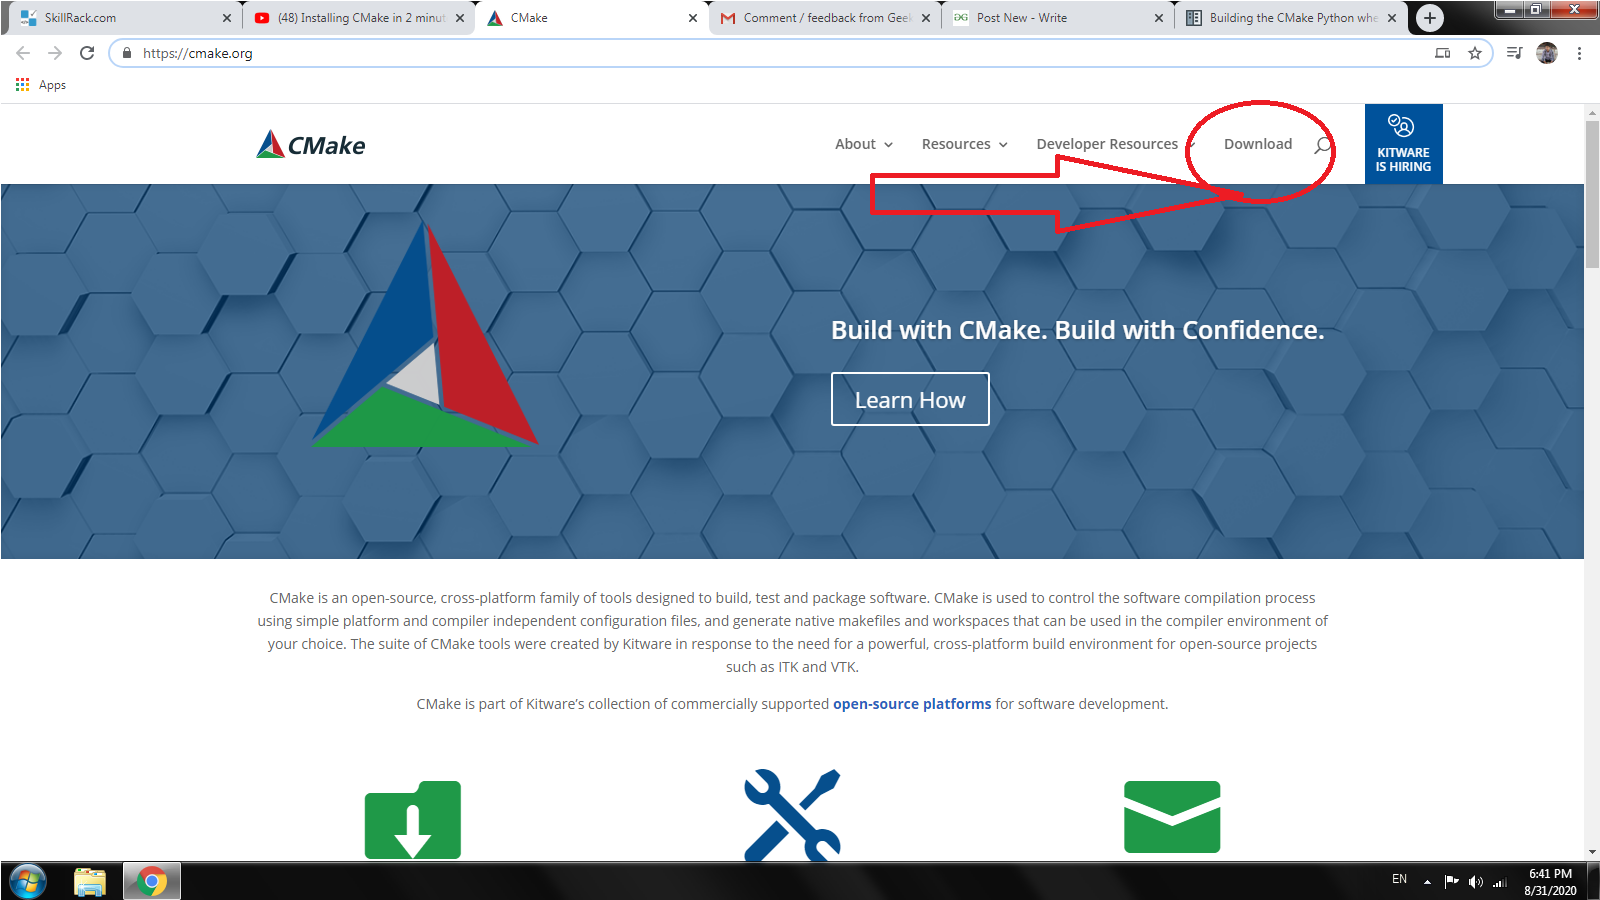
- Navigate to the official CMake download page.
- Under the “Latest Release” section, find the link for “Windows x64 Installer” (or “Windows win32 Installer” for 32-bit systems, though 64-bit is far more common today). Download the
.msifile.
-
Run the Installer:
- Locate the downloaded
.msifile and double-click it to start the installation wizard. - License Agreement: Accept the license agreement.
- Install Options: This is a crucial step. When prompted, select “Add CMake to the system PATH for all users” or “Add CMake to the system PATH for the current user.” It is highly recommended to add CMake to the PATH as this allows you to run CMake commands directly from any command prompt or PowerShell window without needing to navigate to its installation directory. If you miss this, you’ll need to add it manually later.
- Choose Installation Location: The default location (e.g.,
C:Program FilesCMake) is usually fine. - Complete Installation: Click “Install” and then “Finish” once the process is complete.
- Locate the downloaded
Method 2: Using Chocolatey (Command Line Package Manager)
For developers who prefer command-line tools and automated installations, Chocolatey is an excellent choice for managing software on Windows. If you don’t have Chocolatey installed, visit its official website for installation instructions.
-
Open PowerShell as Administrator:
- Search for “PowerShell” in the Start menu.
- Right-click on “Windows PowerShell” and select “Run as administrator.”
-
Install CMake:
- In the PowerShell window, execute the following command:
powershell

choco install cmake --installargs 'ADD_CMAKE_TO_PATH=System'
- The
ADD_CMAKE_TO_PATH=Systemargument ensures that CMake is added to your system’s PATH environment variable, making it accessible from any command line. - Chocolatey will download and install CMake, along with any necessary dependencies. Confirm any prompts by typing
Yand pressing Enter.
- In the PowerShell window, execute the following command:
Installation on macOS
macOS users also have multiple convenient options for installing CMake, with Homebrew being the most popular and recommended method.
Method 1: Using Homebrew (Recommended Package Manager)
Homebrew is the de facto package manager for macOS, simplifying the installation and management of command-line tools. If you don’t have Homebrew installed, open your Terminal and run: /bin/bash -c "$(curl -fsSL https://raw.githubusercontent.com/Homebrew/install/HEAD/install.sh)".
-
Open Terminal:
- You can find Terminal in
Applications/Utilitiesor by searching with Spotlight (Cmd + Space).
- You can find Terminal in
-
Install CMake:
- Run the following command:
bash

brew install cmake
- Homebrew will download and install the latest stable version of CMake and automatically add it to your system’s PATH.
- Run the following command:
-
Update CMake (Optional):
- To update CMake to its latest version in the future, simply run:
bash

brew upgrade cmake
- To update CMake to its latest version in the future, simply run:
Method 2: Using the Official macOS Installer (GUI)
Similar to Windows, an official installer is available for those who prefer a graphical installation.
-
Download the Installer:
- Go to the official CMake download page.
- Find the “macOS 64-bit Disk Image” link (e.g.,
cmake-*-macos-universal.dmg). Download the.dmgfile.
-
Mount the Disk Image:
- Double-click the downloaded
.dmgfile. This will mount a virtual disk and open a Finder window.
- Double-click the downloaded
-
Install CMake:
- Drag the
cmake.appapplication icon into yourApplicationsfolder. This installs the CMake GUI application. - Add Command Line Tools to PATH (Crucial): For command-line usage, you need to add the CMake binaries to your system’s PATH. Open a Terminal and run:
bash

sudo "/Applications/CMake.app/Contents/bin/cmake-gui" --install=/usr/local/bin
This command installs the command-line tools (cmake,cpack,ctest) into/usr/local/bin, making them globally accessible. You will be prompted for your administrator password.
- Drag the
Installation on Linux
Linux offers the most flexibility for installation, primarily through distribution-specific package managers or by building from source.
Method 1: Using Distribution-Specific Package Managers (Recommended)
This is the easiest and most common method, ensuring CMake is managed consistently with other system software.
For Debian/Ubuntu (APT):
-
Open Terminal:
- Use
Ctrl+Alt+Tor find it in your applications menu.
- Use
-
Update Package Lists:
- It’s good practice to update your package list first:
bash

sudo apt update
- It’s good practice to update your package list first:
-
Install CMake:
- Install CMake using
apt:
bash

sudo apt install cmake
- This will install a stable version of CMake available in your distribution’s repositories. Note that this might not always be the absolute latest version.
- Install CMake using
For Fedora/RHEL/CentOS (YUM/DNF):
-
Open Terminal.
-
Install CMake:
- On Fedora, use
dnf:
bash

sudo dnf install cmake
- On RHEL/CentOS 7 and older, use
yum:
bash

sudo yum install cmake
- On RHEL/CentOS 8 and newer,
dnfhas replacedyum.
- On Fedora, use
Method 2: Installing from Snap (Universal Linux Packaging)
Snap is a universal package manager that works across many Linux distributions, often providing newer versions of software than standard repositories.
-
Open Terminal.
-
Install CMake via Snap:
bash

sudo snap install cmake --classic
- The
--classicflag is necessary because CMake needs broader system access.
Method 3: Building CMake from Source (Advanced/Latest Version)
Building from source is ideal if you need the absolute latest version of CMake, specific build options, or if your distribution’s repositories offer an outdated version. This method is more involved and requires development tools.
-
Install Prerequisites:
- You’ll need a C++ compiler (like GCC or Clang) and development tools.
- On Debian/Ubuntu:
sudo apt install build-essential libssl-dev - On Fedora:
sudo dnf install @development-tools openssl-devel
-
Download Source Code:
- Go to the official CMake download page.
- Download the latest source code tarball (e.g.,
cmake-*-linux-x86_64.tar.gzorcmake-*-Source.tar.gz).
-
Extract and Build:
- Open Terminal and navigate to your Downloads directory (or wherever you saved the file).
- Extract the archive:
bash

tar -xvzf cmake-*-Source.tar.gz

cd cmake-*
- Configure, build, and install:
bash

./bootstrap

make -j$(nproc) # Use all available CPU cores for faster compilation

sudo make install
./bootstrapconfigures CMake for your system.makecompiles the source code.sudo make installinstalls CMake system-wide.
Verifying the Installation and First Steps
After installation, it’s crucial to verify that CMake is correctly installed and accessible from your command line.
How to Verify CMake Installation
-
Open a New Terminal/Command Prompt:
- It’s important to open a new window after installation, especially if you added CMake to your PATH, to ensure the changes are recognized.
-
Run the Version Command:
- Execute the following command:
bash

cmake --version
- Execute the following command:
-
Interpret the Output:
-
If CMake is installed correctly, you should see output similar to this:
cmake version 3.28.1 CMake suite "Separate" -
The version number displayed should match the version you intended to install (or the latest stable if using a package manager). If you see an error like “command not found” or “cmake is not recognized as an internal or external command,” it indicates an issue with your PATH environment variable or an incomplete installation.
-
Basic Usage: Your First CMake Project
Let’s create a minimal “Hello, CMake!” project to demonstrate CMake’s basic workflow. This helps confirm that your installation is fully functional and gives you a taste of its power.
-
Create a Project Directory:
- Open your terminal/command prompt and create a new folder:
bash

mkdir hello_cmake

cd hello_cmake
- Open your terminal/command prompt and create a new folder:
-
Create a Source File (
main.cpp):-
Inside the
hello_cmakedirectory, create a file namedmain.cppand add the following C++ code:#include <iostream> int main() { std::cout << "Hello, CMake!" << std::endl; return 0; }
-
-
Create a
CMakeLists.txtFile:-
In the same
hello_cmakedirectory, create a file namedCMakeLists.txt(case-sensitive) and add these lines:cmake_minimum_required(VERSION 3.10) # Specify the minimum CMake version project(HelloCMake VERSION 1.0) # Define your project name and version add_executable(hello_cmake main.cpp) # Define an executable target named 'hello_cmake' from 'main.cpp' -
This simple
CMakeLists.txttells CMake:- The minimum required CMake version is 3.10.
- The project is named
HelloCMakewith version 1.0. - It should build an executable named
hello_cmakefrom themain.cppsource file.
-
-
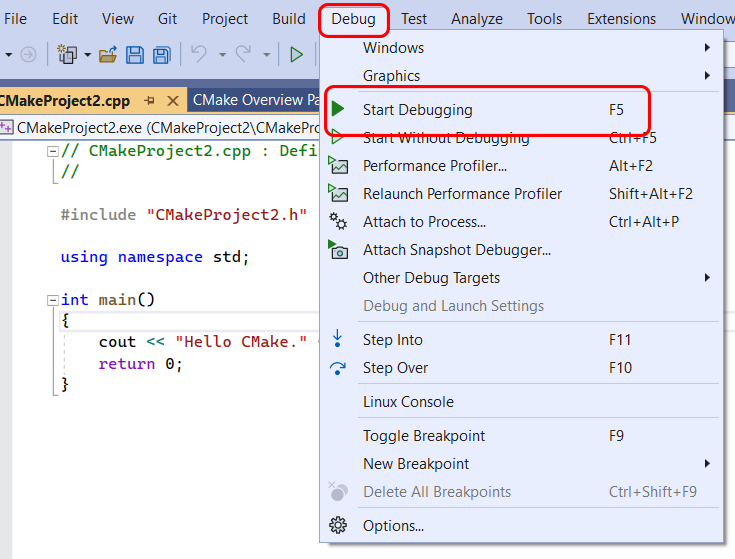
Configure and Build:
- It’s best practice to perform builds in a separate directory to keep your source tree clean.
- Create a
builddirectory and navigate into it:
bash

mkdir build

cd build
- Configure the project: This step generates the native build files.
bash

cmake .. # The '..' tells CMake to look for CMakeLists.txt in the parent directory
- If successful, you’ll see output indicating the build system generator used (e.g., “Generating Unix Makefiles” or “Generating Visual Studio 17 2022”).
- Build the project:
bash

cmake --build . # This command invokes the generated build system (e.g., make, msbuild)
-
Run the Executable:
- After a successful build, you’ll find the executable in your
builddirectory. - On Linux/macOS:
bash

./hello_cmake
- On Windows:
powershell

.Debughello_cmake.exe   # Or .Releasehello_cmake.exe depending on build type
- You should see the output:
Hello, CMake!
- After a successful build, you’ll find the executable in your
Congratulations! You’ve successfully installed CMake and used it to build your first project. This fundamental workflow forms the basis of all CMake-managed software, paving the way for more complex builds and efficient development.
Troubleshooting and Advanced Considerations
While the installation process is generally smooth, you might encounter a few common issues. Understanding these and some advanced considerations can help you maintain a robust development environment.
Common Installation Issues and Solutions
-
“cmake: command not found” or “not recognized” Error:
- Cause: CMake’s executable path is not included in your system’s
PATHenvironment variable. - Solution:
- Windows: During the
.msiinstallation, ensure “Add CMake to the system PATH” was selected. If not, you’ll need to manually addC:Program FilesCMakebin(or your chosen install path) to your system’sPATHenvironment variables. After modification, open a new command prompt. - macOS (Manual Install): Run
sudo "/Applications/CMake.app/Contents/bin/cmake-gui" --install=/usr/local/binas described in the macOS section. If using Homebrew, this should be handled automatically. - Linux (Manual Install/Source Build): Ensure the
installstep placed the binaries in a directory already in yourPATH(e.g.,/usr/local/bin). If you manually extracted a tarball, you’ll need to add thebindirectory of your CMake installation to yourPATHin your shell configuration file (e.g.,.bashrc,.zshrc). Remember tosourcethe file or open a new terminal.
- Windows: During the
- Cause: CMake’s executable path is not included in your system’s
-
Outdated CMake Version:
- Cause: Package managers on older Linux distributions sometimes provide slightly older stable versions.
- Solution:
- Use Snap (on Linux) if available, as it often provides newer releases.
- Consider building CMake from source for the absolute latest version.
- Check for third-party PPAs (Personal Package Archives) on Ubuntu/Debian that offer newer versions.
-
Permissions Issues During Installation (Linux/macOS):
- Cause: Trying to install in system directories without sufficient privileges.
- Solution: Ensure you use
sudoformake installor package manager commands (apt,dnf,brew).
-
Missing Build Tools (When Building from Source):
- Cause: When building CMake from source, or building your own project with CMake, you need a C++ compiler and other development headers.
- Solution: Install
build-essential(Debian/Ubuntu) or@development-tools(Fedora/RHEL) which provides GCC, Make, and other necessary utilities.
Updating CMake
Keeping CMake updated is important for accessing the latest features, bug fixes, and performance improvements.
- Package Managers (Recommended):
- Windows (Chocolatey):
choco upgrade cmake - macOS (Homebrew):
brew upgrade cmake - Linux (APT):
sudo apt update && sudo apt upgrade cmake - Linux (DNF):
sudo dnf upgrade cmake - Linux (Snap):
sudo snap refresh cmake
- Windows (Chocolatey):
- Official Installers: Download and run the latest installer from the CMake website. The new installation will typically overwrite the old one.
- From Source: Repeat the build-from-source steps with the latest source tarball.
Uninstalling CMake
Should you ever need to remove CMake, the process depends on how it was installed.
- Windows (Official Installer): Use “Add or remove programs” in Windows Settings, locate CMake, and click “Uninstall.”
- Windows (Chocolatey):
choco uninstall cmake - macOS (Homebrew):
brew uninstall cmake - macOS (Official Installer):
- Delete the
CMake.appfrom yourApplicationsfolder. - Remove the command-line tools:
sudo rm -rf /usr/local/bin/cmake /usr/local/bin/cpack /usr/local/bin/ctest
- Delete the
- Linux (APT):
sudo apt remove cmake - Linux (DNF):
sudo dnf remove cmake - Linux (Snap):
sudo snap remove cmake - From Source: If you still have the build directory, navigate into it and run
sudo make uninstall. If not, you’ll have to manually remove the installed files, typically from/usr/local/bin,/usr/local/share/cmake, etc. (Be careful with manual deletion.)
Conclusion: Empowering Your Development Workflow with CMake
The installation of CMake marks a significant step towards a more streamlined, efficient, and robust software development workflow. By acting as a sophisticated meta-build system, CMake elegantly bridges the gap between diverse operating systems and native build tools, offering a unified approach to project configuration that is invaluable in modern tech environments. Its ability to generate platform-specific build files from a single CMakeLists.txt is a testament to its power in fostering cross-platform compatibility and consistency – critical elements for any project aiming for wide reach and collaborative success.
We’ve covered the practical steps for installing CMake across Windows, macOS, and various Linux distributions, catering to preferences for official GUI installers, the convenience of package managers like Chocolatey and Homebrew, or the flexibility of building from source. More importantly, we’ve emphasized the verification process and walked through creating your first “Hello, CMake!” project, ensuring that your installation is not just complete, but also functional and ready for application.
Embracing CMake means investing in increased developer productivity, reduced build inconsistencies, and a higher degree of project maintainability. For anyone involved in software engineering, from individual developers working on personal projects to teams contributing to large-scale open-source or commercial applications, CMake is an essential tool. It simplifies complexity, allowing you to dedicate more time and creative energy to coding, innovating, and delivering high-quality software solutions. As you integrate CMake into your daily routine, you’ll discover its potential to transform your development experience, making it faster, smarter, and more adaptable to the ever-changing demands of the tech world. Continue exploring its advanced features and best practices to fully unlock its comprehensive benefits and elevate your craft.
aViewFromTheCave is a participant in the Amazon Services LLC Associates Program, an affiliate advertising program designed to provide a means for sites to earn advertising fees by advertising and linking to Amazon.com. Amazon, the Amazon logo, AmazonSupply, and the AmazonSupply logo are trademarks of Amazon.com, Inc. or its affiliates. As an Amazon Associate we earn affiliate commissions from qualifying purchases.