In the dynamic world of technology, flexibility often reigns supreme. While macOS offers a robust and intuitive computing experience, there are countless scenarios where access to Windows is essential. Whether it’s for playing PC-exclusive games, running specialized business software, or developing applications for different platforms, the ability to seamlessly switch between operating systems can significantly enhance your productivity and entertainment options. For Intel-based Mac users, Apple provides an elegant solution: Boot Camp.
Boot Camp is a utility built directly into macOS that allows you to install and run Microsoft Windows natively on your Intel-based Mac. Unlike virtualization software, which runs Windows within macOS, Boot Camp partitions your hard drive, allowing Windows to operate as its own independent operating system, harnessing your Mac’s full hardware potential. This means you get true Windows performance, making it ideal for graphically intensive tasks, gaming, and applications that demand dedicated system resources. This comprehensive guide will walk you through every step of installing Boot Camp on your Mac, ensuring a smooth and successful dual-boot setup.
Preparing Your Mac for a Seamless Windows Experience
Before embarking on the Boot Camp installation journey, meticulous preparation is key. Skipping these initial steps can lead to complications, data loss, or an unsuccessful installation. Taking the time now will save you headaches later.
Understanding Boot Camp Compatibility and Core Requirements
The first and most crucial step is to ensure your Mac is compatible with Boot Camp.
- Intel-based Mac Exclusivity: Boot Camp is exclusively designed for Macs powered by Intel processors. If you own a newer Mac with Apple Silicon (M1, M2, M3, etc.), Boot Camp is not supported. Apple Silicon Macs use a different architecture that cannot natively run the x86 version of Windows that Boot Camp supports. For these newer Macs, virtualization software like Parallels Desktop or VMware Fusion (which can run ARM versions of Windows) is the alternative for running Windows.
- Operating System Version: Your Mac should be running the latest version of macOS that it supports. Older versions of macOS might have limitations regarding which Windows versions they can install or might not include the most up-to-date Boot Camp Assistant. To check for updates, go to System Settings (or System Preferences) > General > Software Update.
- Sufficient Storage Space: This is perhaps the most critical hardware requirement. Windows, alongside its necessary drivers and any applications you plan to install, demands significant disk space.
- Minimum: Apple recommends at least 64GB of free storage space for a basic Windows installation.
- Recommended: For a practical and comfortable experience, especially if you plan to install multiple applications or games, we strongly recommend allocating at least 128GB, or even 200GB to 250GB. Modern Windows installations, updates, and applications quickly consume space, and running out can severely impact performance.
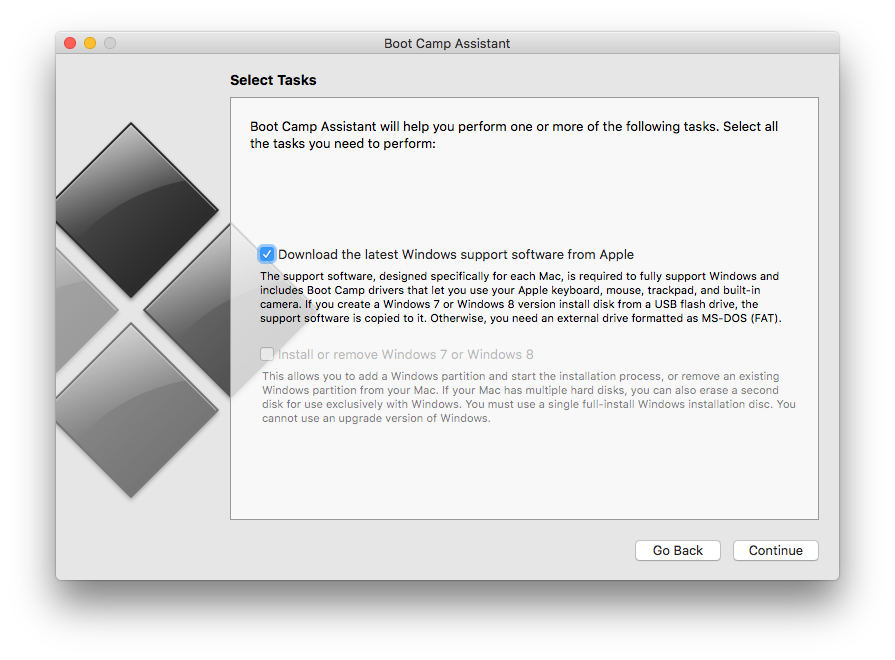
- Active Internet Connection: A stable internet connection is vital for downloading the Windows ISO file, and critically, for Boot Camp Assistant to download the necessary Windows support software (drivers) tailored for your specific Mac hardware.
- Power Source: Ensure your Mac is connected to an AC power source throughout the entire installation process. Interruptions due to power loss can corrupt partitions or lead to data loss.
- Administrator Access: You must be logged into an administrator account on your Mac to run Boot Camp Assistant and make system-level changes.
Essential Preparations: Backup, Updates, and Tools
With compatibility confirmed, it’s time to prepare your Mac and gather the necessary resources.
- Full macOS Backup (Time Machine Recommended): This step cannot be overstated. Installing Boot Camp involves partitioning your main hard drive, a process that carries an inherent, albeit small, risk of data corruption or loss. A full backup using Time Machine (or another reliable backup solution) ensures that all your important files, settings, and applications are safe. If anything goes awry, you can restore your Mac to its previous state. Connect an external hard drive and use Time Machine, found in System Settings (or System Preferences), to perform a full backup.
- Updating macOS: As mentioned, ensure your macOS is up to date. Go to System Settings > General > Software Update and install any pending updates. This ensures you have the latest version of Boot Camp Assistant and the most compatible drivers for Windows.
- Downloading the Windows ISO: You’ll need an installation image of Windows 10 or Windows 11.
- Where to get it: Visit Microsoft’s official website (e.g.,
microsoft.com/software-download/windows10ormicrosoft.com/software-download/windows11). - Which version: Download the 64-bit version of Windows 10 or 11. Most users will choose “Windows 10/11 (multi-edition ISO)” or similar, which includes both Home and Pro versions.
- Save Location: Save the
.isofile to an easily accessible location, like your Downloads folder.
- Where to get it: Visit Microsoft’s official website (e.g.,
- USB Flash Drive (Situational): For most newer Intel Macs (roughly 2015 and later), Boot Camp Assistant can create the bootable Windows installer directly on your internal drive and download the Windows support software without needing a separate USB drive. However, for older Macs (typically 2014 models and earlier), a USB 3.0 flash drive of at least 16GB (formatted as MS-DOS FAT) is required to create a bootable Windows installer. Boot Camp Assistant will prompt you if it needs one. Even if not strictly required, having one can be useful for transferring drivers manually if the automatic process fails.
The Step-by-Step Installation Process with Boot Camp Assistant
Once your Mac is prepped and your Windows ISO is ready, you can begin the installation. This process will largely be guided by Apple’s Boot Camp Assistant.
Initiating Boot Camp Assistant
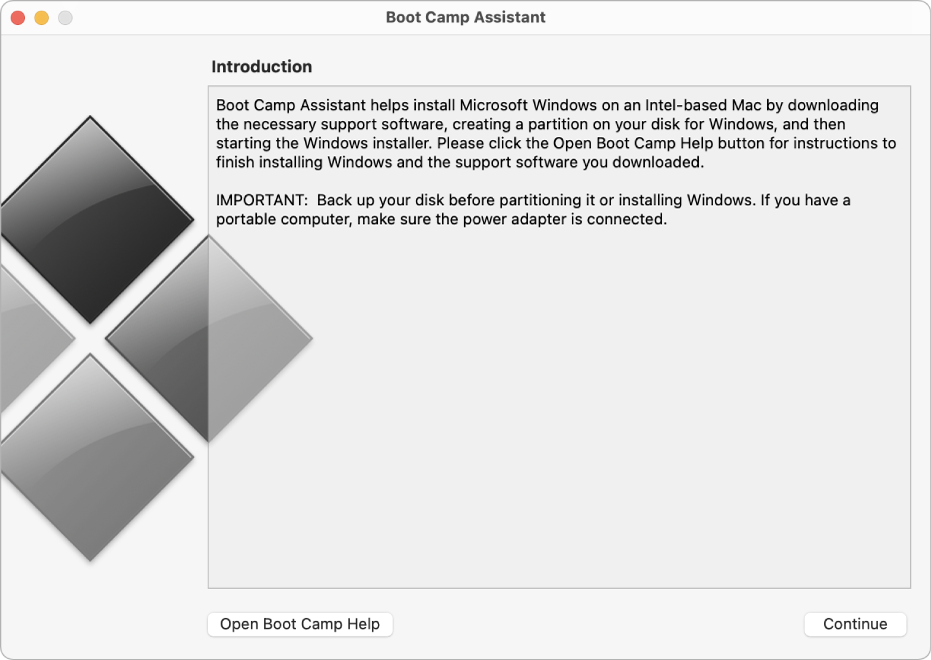
- Locate Boot Camp Assistant: Open your Applications folder, then navigate into the Utilities folder. You’ll find “Boot Camp Assistant” there. Alternatively, you can use Spotlight Search (Cmd + Space) and type “Boot Camp Assistant.”
- Introduction and Warnings: Upon launching, Boot Camp Assistant will display an introductory screen explaining what it does and reiterating the importance of backing up your data. Read through it and click “Continue.”
Partitioning Your Hard Drive for Windows
This is where you allocate space for your Windows installation.
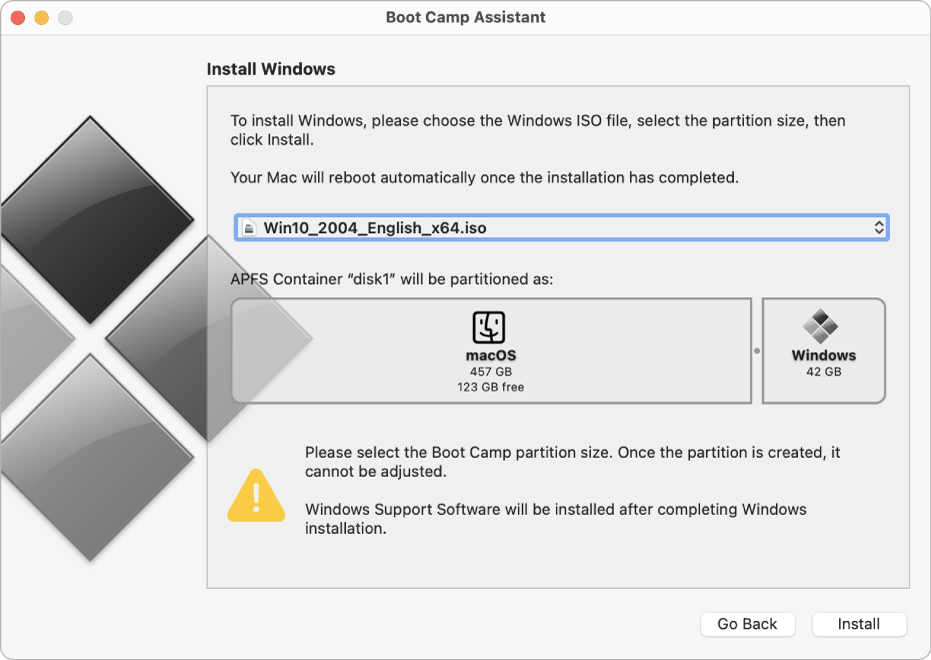
- Select the ISO File: Boot Camp Assistant will automatically detect the Windows ISO file if it’s in your Downloads folder. If not, click “Choose…” and navigate to where you saved the
.isofile. - Allocate Disk Space: You’ll see a slider that allows you to divide your Mac’s internal storage between macOS (Macintosh HD) and Windows (BOOTCAMP).
- Drag the divider to assign the desired amount of space to Windows. Remember our recommendation: at least 128GB, preferably more, for a good user experience. Do not set it too low, or Windows will struggle with updates and application installations.
- Ensure that you leave sufficient space for macOS as well, especially if you plan to install many applications on the Mac side.
- Initiate Partitioning and Software Download: Once you’ve set the partition size, click “Install.”
- Boot Camp Assistant will now create the “BOOTCAMP” partition.
- Crucially, it will also begin downloading the “Windows Support Software” (drivers) specific to your Mac model. These drivers are essential for Windows to properly recognize and utilize your Mac’s hardware, including Wi-Fi, Bluetooth, graphics, audio, trackpad, and keyboard. This download can take some time depending on your internet speed.
- After downloading and preparing the disk, your Mac will automatically restart into the Windows installer.
Navigating the Windows Installation Environment
After your Mac restarts, you’ll be greeted by the familiar Windows setup interface.
- Windows Setup Initial Prompts:
- Choose your language, time and currency format, and keyboard or input method. Click “Next.”
- Click “Install now.”
- Product Key: If you have a Windows product key, enter it here. If not, you can usually click “I don’t have a product key” and activate Windows later. You will likely still be able to use Windows with limited functionality until activated.
- Choose Operating System (if prompted): If your ISO contains multiple editions of Windows (e.g., Home, Pro), select the one you prefer.
- Accept License Terms: Read and accept the Microsoft Software License Terms, then click “Next.”
- Installation Type: Select “Custom: Install Windows only (advanced).” This is important to ensure you install it on the correct partition.
- Crucial Step: Selecting the “BOOTCAMP” Partition: You will see a list of partitions. Carefully identify the partition named “BOOTCAMP” or labeled with the size you allocated for Windows. This is usually “Drive 0 Partition X: BOOTCAMP.”
- Do NOT select “Macintosh HD” or any other partition. Installing Windows on the wrong partition will erase your macOS data.
- Once selected, click “Format” if prompted, then “Next” to begin the installation.
- Windows Installation Process: Windows will now begin copying files and installing itself. Your Mac may restart several times during this process. Do not interrupt it.
- Basic Windows Setup: After the main installation is complete, Windows will guide you through the initial setup steps:
- Region and keyboard layout.
- Connecting to a Wi-Fi network.
- Creating a local user account or logging in with a Microsoft account.
- Privacy settings.
- Cortana setup (if applicable).
- These steps are standard Windows setup procedures; follow the on-screen instructions.
Installing Essential Boot Camp Drivers (Windows Support Software)
Once Windows has completed its initial setup and you’ve reached the desktop, the final critical step is to install the Boot Camp drivers.
- Automatic Driver Installation: In most cases, immediately after Windows boots to the desktop for the first time, the Boot Camp installer will automatically launch. Follow the prompts to install all the necessary drivers. This might involve several restarts.
- Manual Driver Installation (If Auto-Launch Fails): If the installer doesn’t launch automatically, you’ll need to run it manually.
- For Newer Macs (no USB needed): The drivers are usually stored on the BOOTCAMP partition itself. Open File Explorer, navigate to “This PC,” and look for a drive labeled “OSXRESERVED” or “BOOTCAMP” that contains the
BootCampfolder. Inside, findsetup.exeand run it. - For Older Macs (USB needed): Insert the USB drive you used earlier. Open File Explorer, navigate to “This PC,” and open the USB drive. Find the
BootCampfolder, and inside it, runsetup.exe.
- For Newer Macs (no USB needed): The drivers are usually stored on the BOOTCAMP partition itself. Open File Explorer, navigate to “This PC,” and look for a drive labeled “OSXRESERVED” or “BOOTCAMP” that contains the
- Complete the Installation: Follow the on-screen instructions to install all the drivers. This typically involves clicking “Next,” accepting license agreements, and allowing the installation to proceed. You will likely be prompted to restart your computer several times to finalize driver installations.
- Verify Functionality: After all drivers are installed and your Mac has restarted, check that everything is working: Wi-Fi, Bluetooth, audio, trackpad gestures, keyboard backlight, and screen resolution. If anything isn’t working, check Device Manager in Windows for missing drivers.
Mastering Dual-Booting: Switching Between macOS and Windows
One of the greatest advantages of Boot Camp is the ability to easily switch between your two operating systems. This flexibility allows you to leverage the best of both worlds whenever you need it.
Seamless Transitions from macOS to Windows
There are two primary ways to boot into Windows from macOS:
- Using Startup Disk Preferences:
- In macOS, go to System Settings (or System Preferences) > General > Startup Disk.
- Click the lock icon (if needed) and enter your administrator password.
- Select the “BOOTCAMP” drive (usually labeled “Windows”) and click “Restart…”
- Your Mac will restart directly into Windows.
- Holding the Option Key During Startup:
- Shut down your Mac completely.
- Press the power button and immediately hold down the Option (Alt) key on your keyboard. Keep holding it until you see a screen displaying bootable drives.
- Select the “BOOTCAMP” drive (usually labeled “Windows”) using your arrow keys or trackpad, then press Enter or click the arrow.
- Your Mac will boot into Windows.
Effortless Switching from Windows to macOS
Switching back to macOS from Windows is equally straightforward:
- Using the Boot Camp System Tray Icon:
- In Windows, locate the Boot Camp icon in the system tray (usually near the clock, you might need to click the up arrow to show hidden icons).
- Right-click the Boot Camp icon.
- Select “Restart in macOS…”
- Windows will prompt you to confirm the restart. Click “OK.”
- Your Mac will restart directly into macOS.
- Holding the Option Key During Startup:
- Shut down your Windows installation completely.
- Press the power button and immediately hold down the Option (Alt) key on your keyboard until the bootable drive selection screen appears.
- Select “Macintosh HD” (your macOS volume) and press Enter or click the arrow.
- Your Mac will boot into macOS.
Troubleshooting Common Boot Camp Installation and Usage Issues
While Boot Camp installation is generally smooth, issues can arise. Knowing how to troubleshoot common problems can save you a lot of frustration.
Resolving Partitioning and Installation Errors
- “Could not partition startup disk” or Disk Utility Errors:
- Not Enough Free Space: Ensure you have well over the minimum required free space. Windows needs room for temporary files during installation.
- Disk Errors: Open Disk Utility in macOS (Applications > Utilities). Select your main Macintosh HD volume in the sidebar, click “First Aid,” and run it. This can fix minor disk corruption that prevents partitioning. Restart your Mac and try Boot Camp Assistant again.
- Encrypted Drives (FileVault): If your macOS drive is encrypted with FileVault, Boot Camp can still work, but sometimes it might interfere. Ensure your Mac is fully decrypted before partitioning, then re-enable FileVault if desired after Windows is installed.
- Corrupted Windows ISO or USB Issues:
- Corrupted ISO: If Windows installation fails repeatedly with file errors, your Windows ISO file might be corrupted. Download it again from Microsoft’s official site.
- Faulty USB Drive (if applicable): If you’re using a USB drive for installation and encounter errors, try a different USB drive or reformat it (MS-DOS FAT) and try creating the bootable installer again.
- Windows Installation Fails to Boot/Black Screen:
- Ensure you selected and formatted the “BOOTCAMP” partition correctly during the Windows setup. If you accidentally chose the wrong partition, you might need to erase and restart the entire Boot Camp process from macOS.
- Try holding the Option key at startup and explicitly selecting the Windows drive.
Addressing Driver and Performance Challenges
- Missing Hardware Functionality (Wi-Fi, Trackpad, Audio, Graphics):
- This is almost always due to incomplete or missing Boot Camp drivers. Re-run the Boot Camp Windows Support Software installer (from the USB or the
BootCampfolder on your hard drive). - Make sure your Windows installation is fully updated via Windows Update. Sometimes, crucial drivers are delivered this way.
- If automatic installation fails, you can sometimes download the specific Boot Camp drivers for your Mac model directly from Apple’s support website by searching for “Windows Support Software” and your Mac model.
- This is almost always due to incomplete or missing Boot Camp drivers. Re-run the Boot Camp Windows Support Software installer (from the USB or the
- Poor Performance in Windows:
- Ensure All Drivers Are Installed: Graphics drivers are particularly important for performance. Check Device Manager (search for it in Windows) to see if any devices have exclamation marks, indicating missing drivers.
- Power Settings: In Windows, go to Control Panel > Power Options and select a “High performance” power plan, especially for demanding tasks like gaming.
- Windows Updates: Keep Windows fully updated. Performance improvements and bug fixes are often delivered through Windows Update.
- Background Applications: Close unnecessary background applications in Windows that consume CPU or RAM.
Managing Storage and Removing Boot Camp
- Optimizing Disk Space: Windows, like macOS, can accumulate junk files. Regularly use Windows Disk Cleanup utility (search for “Disk Cleanup”) to remove temporary files, old Windows updates, and more. Consider uninstalling applications you don’t use.
- Completely Removing Boot Camp (Uninstalling Windows): If you no longer need Windows or want to reclaim the disk space for macOS, Boot Camp Assistant can easily reverse the process:
- Boot into macOS.
- Open Boot Camp Assistant (Applications > Utilities).
- Click “Continue” until you see the option “Remove Windows 10 or a later version.”
- Select this option and click “Restore.”
- Boot Camp Assistant will remove the Windows partition and restore your entire disk to a single macOS partition. This process is safe and will not affect your macOS data.
Conclusion
Installing Boot Camp on your Mac opens up a world of possibilities, seamlessly blending the robust security and user-friendliness of macOS with the extensive software compatibility and gaming prowess of Windows. By following this comprehensive guide, you’ve gained the power to transform your Intel-based Mac into a dual-boot powerhouse, ready to tackle any task, whether it requires Apple’s ecosystem or Microsoft’s.
From careful preparation and understanding compatibility requirements to navigating the installation wizard and troubleshooting potential hurdles, you now possess the knowledge to confidently manage your dual-boot system. Embrace the flexibility, enjoy the expanded software options, and truly unlock the full potential of your Mac. The ability to switch between operating systems at will ensures that your technology serves your needs, providing the ultimate computing experience tailored to your demands.
aViewFromTheCave is a participant in the Amazon Services LLC Associates Program, an affiliate advertising program designed to provide a means for sites to earn advertising fees by advertising and linking to Amazon.com. Amazon, the Amazon logo, AmazonSupply, and the AmazonSupply logo are trademarks of Amazon.com, Inc. or its affiliates. As an Amazon Associate we earn affiliate commissions from qualifying purchases.