In today’s digitally driven world, your online presence is often the first, and sometimes only, impression potential customers, clients, or readers will have of your brand. At the heart of a successful website, particularly one built on the ubiquitous WordPress platform, lies its theme. More than just a cosmetic skin, a WordPress theme dictates the entire aesthetic and much of the functionality of your site, acting as the primary interface between your content and your audience. It’s a critical piece of software that profoundly impacts user experience, search engine optimization, and ultimately, your brand perception and bottom line.
Whether you’re launching a new venture, revamping an existing brand, or simply setting up a personal blog, knowing how to install a WordPress theme correctly is a fundamental skill. This guide will walk you through the essential steps, from understanding what themes are and why they matter, to the various installation methods, and crucial post-installation best practices. We’ll delve into how this seemingly technical process intertwines with broader strategic considerations across technology, branding, and even your financial success.
The Foundation of Your Digital Presence: Understanding WordPress Themes
A WordPress theme is a collection of files (templates, stylesheets, images, and sometimes JavaScript) that work together to produce the graphical interface with an underlying unifying design for your website. Think of WordPress itself as the engine and framework, while the theme is the bodywork, interior, and paint job – it makes your vehicle look good, drive smoothly, and appeal to its target audience. Without a theme, a WordPress site would be a plain, unstyled collection of text and links.
From a Tech perspective, themes are sophisticated software components. They dictate layout, color schemes, typography, and often integrate with plugins to add advanced features like e-commerce capabilities, portfolio displays, or contact forms. A well-coded theme is responsive, meaning it adapts seamlessly to various screen sizes (desktops, tablets, smartphones), which is crucial for modern web design and SEO. It should also be optimized for speed, as slow-loading sites frustrate users and penalize search rankings.
From a Brand perspective, your theme is the visual embodiment of your identity. It communicates your values, professionalism, and aesthetic. A modern, clean, and intuitive theme reinforces trust and credibility, aligning with your corporate identity and personal branding efforts. Conversely, an outdated, cluttered, or broken theme can severely damage your reputation, regardless of the quality of your content or products. It’s an integral part of your brand strategy, influencing how your audience perceives and interacts with you.
In terms of Money, the choice and proper installation of a theme can have direct financial implications. A highly functional, user-friendly theme can lead to higher conversion rates for e-commerce sites, more leads for service-based businesses, and increased engagement for content creators, all contributing to online income. Investing in a premium theme (often a few tens to hundreds of dollars) can save you thousands in custom development costs, providing robust features and dedicated support. Conversely, a poorly chosen or installed theme can lead to ongoing maintenance headaches, security vulnerabilities, and missed business opportunities, costing you time and money in the long run.
Why Your Theme Matters: Tech, Brand, and Money Synergy
The synergy between technology, branding, and financial outcomes is particularly evident when it comes to WordPress themes.
- Technological Robustness for Brand Consistency: A theme built with robust, modern code (Tech) ensures your brand message is delivered consistently across all devices and browsers (Brand). This includes proper display of logos, brand colors, and interactive elements.
- User Experience (UX) Driving Financial Success: A theme that offers an intuitive and enjoyable user experience (Tech) directly impacts how long visitors stay on your site, how many pages they view, and whether they complete a desired action (e.g., purchase, signup) (Money). Smooth navigation and fast loading times reduce bounce rates and improve conversions.
- Security and Performance Safeguarding Your Investment: A regularly updated, well-maintained theme (Tech) minimizes security risks, protecting your site from vulnerabilities that could lead to data breaches or downtime. Downtime means lost revenue and damaged reputation (Money, Brand). Performance optimization keeps your site fast, improving SEO and user satisfaction, which are vital for sustained online income.
Understanding these interconnected aspects underscores why the process of installing a WordPress theme is more than just a technical task; it’s a strategic decision that lays the groundwork for your digital future.
Preparing for Theme Installation: Essential Prerequisites
Before you dive into the installation process, a little preparation can save you a lot of headaches down the line. Ensuring you have the right setup and a clear understanding of your choices will make the entire procedure smoother and more secure.
The absolute first prerequisite is a working WordPress installation. This means you have a domain name, web hosting, and WordPress itself installed on your server. You’ll also need administrative access to your WordPress dashboard.
Choosing the Right Theme: A Strategic Decision
Selecting the right theme is perhaps the most crucial preparatory step. This decision is a powerful blend of brand strategy, technological assessment, and financial planning.
-
Define Your Brand Needs (Brand):
- Purpose: What is the primary goal of your website? Is it an e-commerce store, a portfolio, a blog, a corporate site, or a community forum? The theme you choose must align with this purpose.
- Aesthetics: What is your desired look and feel? Do you prefer minimalist, bold, playful, or corporate? Consider your brand colors, typography, and imagery.
- Target Audience: Who are you trying to reach? A theme appealing to tech-savvy millennials might be very different from one targeting retirees.
- Required Features: Do you need specific functionalities out-of-the-box (e.g., booking system, advanced gallery, specific page builder integration)?
-
Evaluate Technical Aspects (Tech):
- Responsiveness: Absolutely critical. Ensure the theme is fully responsive and displays well on all devices.
- Speed Optimization: Check reviews or use demo sites to gauge loading speed. A fast theme contributes to better SEO and user experience.
- Compatibility: Ensure the theme is compatible with the latest version of WordPress and popular plugins you might use (e.g., WooCommerce, Yoast SEO, Elementor).
- Customization Options: How easy is it to customize without coding? Does it integrate with a page builder you prefer?
- Updates and Support: A good theme developer provides regular updates for security and compatibility, along with reliable customer support. This is a key indicator of a quality product.
-
Consider Financial Implications (Money):
- Free vs. Premium:
- Free Themes: Available directly through the WordPress.org theme directory. They are great for beginners or personal blogs, but often have limited features, customization options, and support. While free upfront, they might require more time or additional plugins (and their costs) to achieve desired functionality.
- Premium Themes: Purchased from marketplaces like ThemeForest or directly from developers. They offer extensive features, advanced customization, dedicated support, and often bundled premium plugins. This is an investment, but the robust features, professional design, and support can offer a significant return on investment (ROI) in terms of time saved, enhanced functionality, and better user experience.
- Budget: Set a realistic budget for your theme. Remember that a premium theme can be a strategic investment that saves you money on custom development and improves your site’s performance.
- Free vs. Premium:
Once you’ve made a well-informed decision, you’ll either download a zipped theme file (for premium themes or themes downloaded from third-party sites) or have the name of the theme ready for a direct search in the WordPress dashboard.
Step-by-Step Theme Installation Methods
WordPress offers several straightforward methods to install a theme, catering to different scenarios and user comfort levels.

Method 1: Installing via the WordPress Theme Search (Dashboard)
This is the easiest and most common method, especially for free themes available in the official WordPress.org theme directory. It’s highly recommended for beginners due to its simplicity and direct integration.
- Access Your WordPress Dashboard: Log in to your WordPress admin area (typically
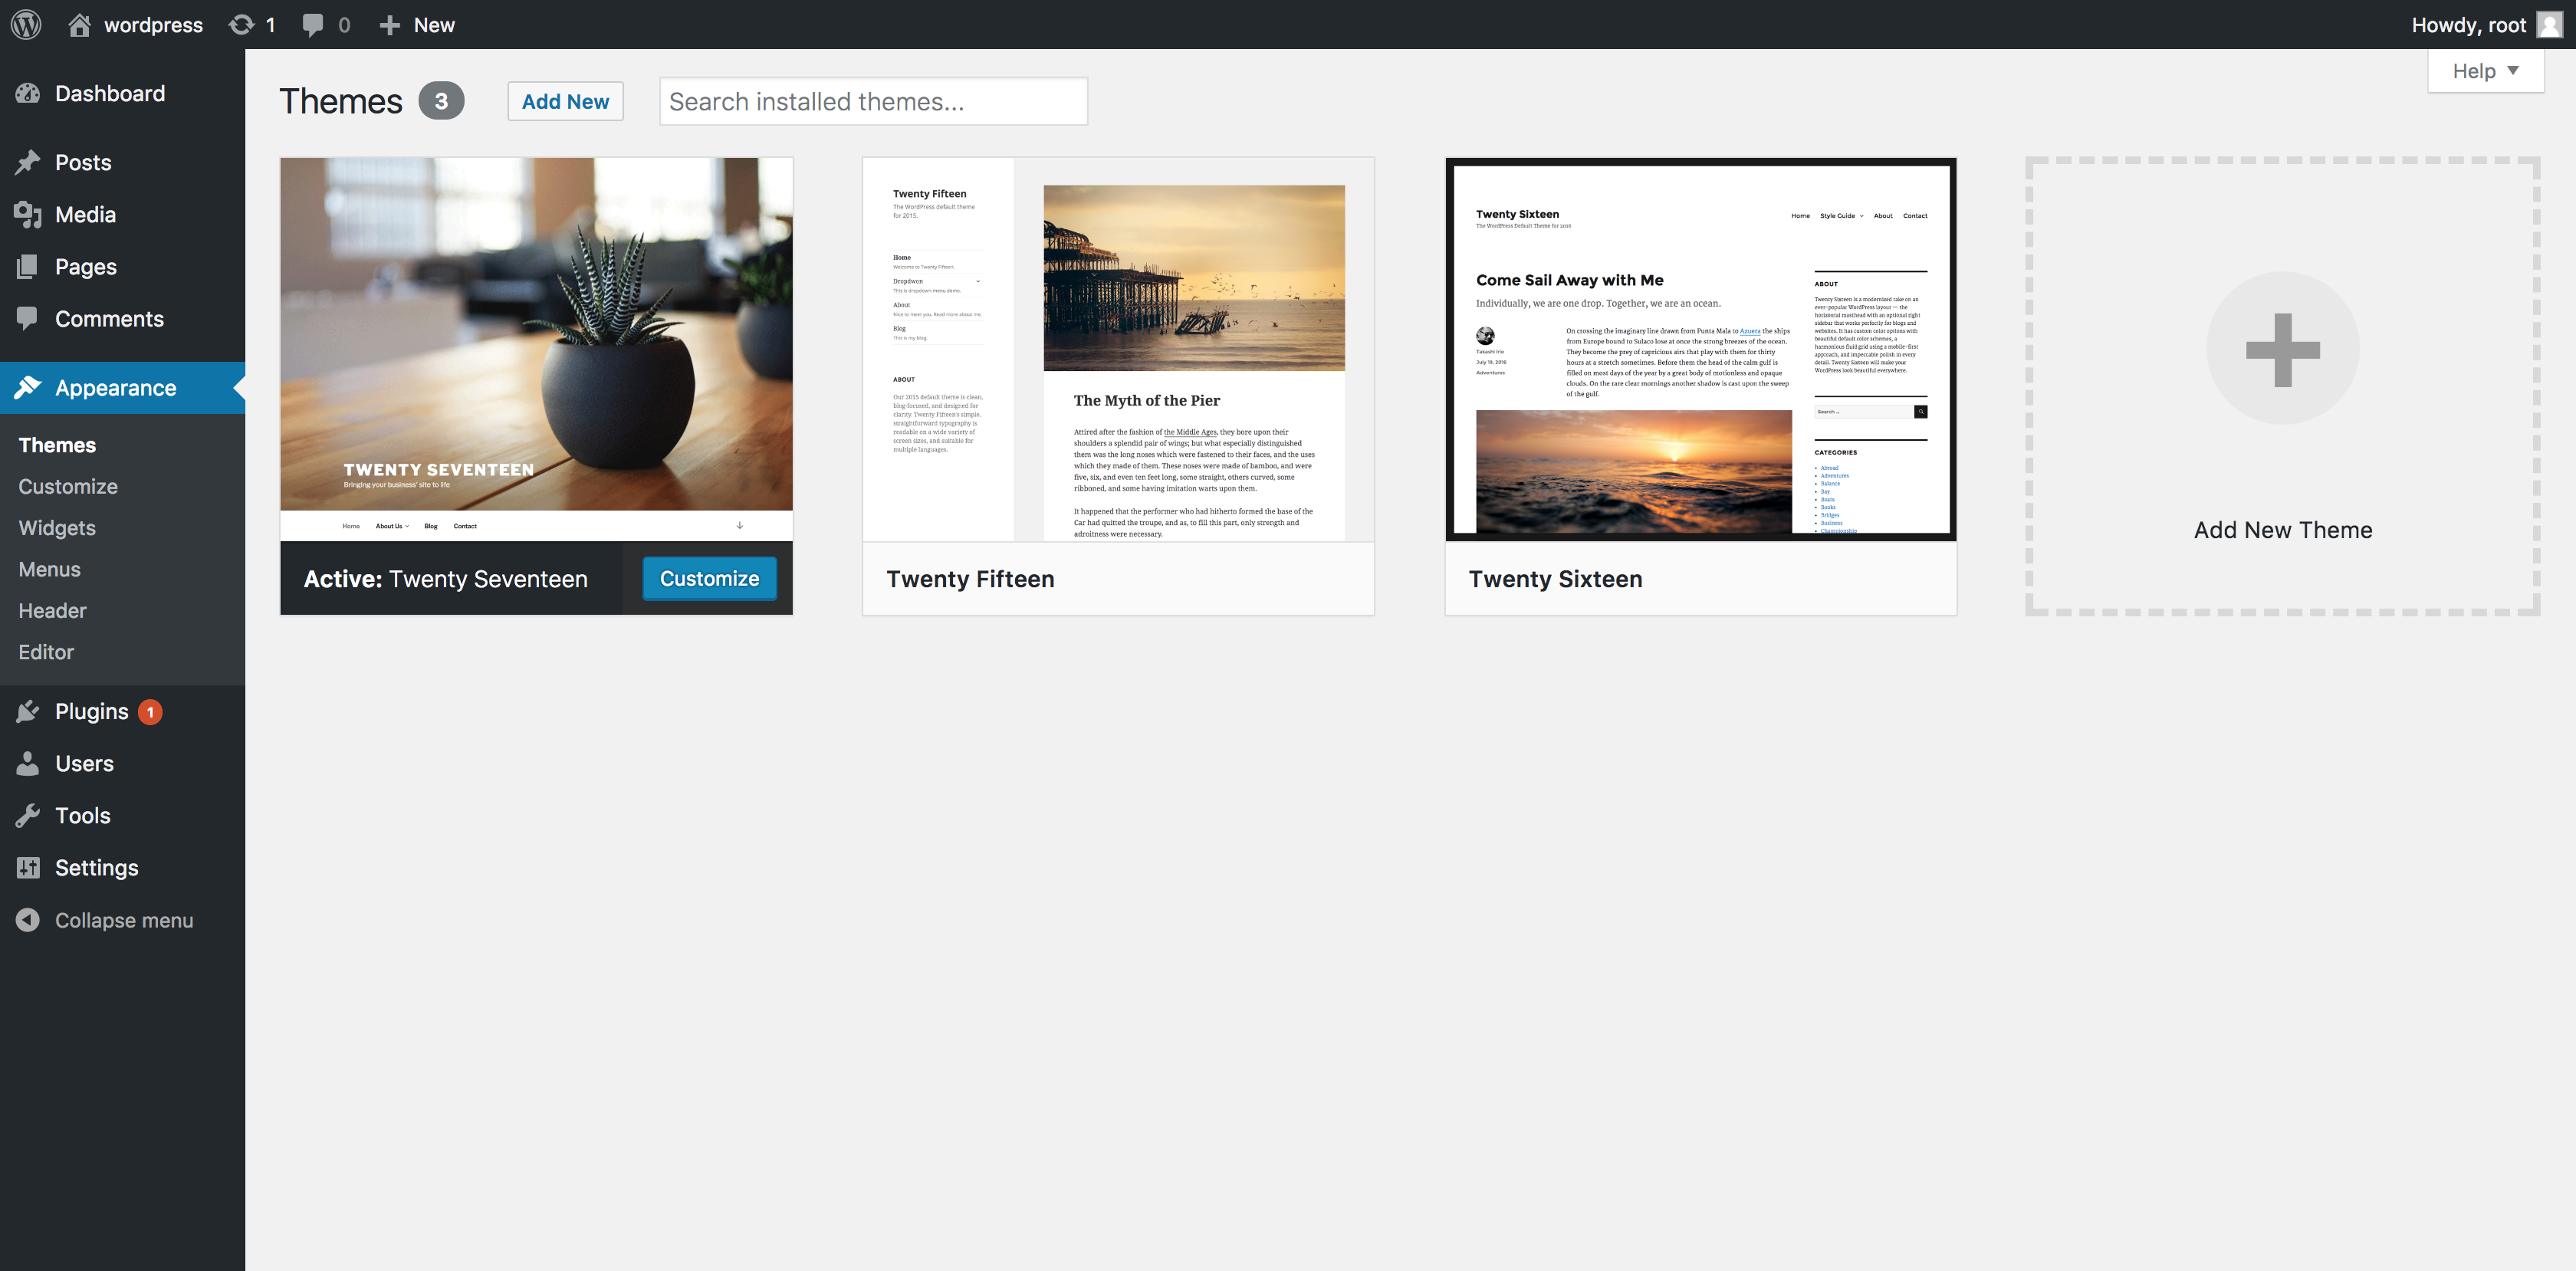
yourdomain.com/wp-admin). - Navigate to Themes: In the left-hand sidebar, hover over “Appearance” and click on “Themes.”
- Add New Theme: At the top of the Themes page, click the “Add New” button.
- Search for Your Theme: You’ll see a selection of featured, popular, and latest themes. If you have a specific theme in mind, use the search bar on the right (e.g., “Astra,” “OceanWP,” “Neve”). You can also filter by features, layout, and subject.
- Preview and Install: Once you find your desired theme, hover over it. You’ll see options for “Details & Preview” and “Install.” Click “Install” to download and install the theme onto your WordPress site.
- Activate: After the installation is complete (which usually takes a few seconds), the “Install” button will change to “Activate.” Click “Activate” to make the theme live on your site.
This method is highly efficient and secure, as themes from the official directory are vetted by WordPress for quality and security. It boosts productivity by streamlining the process and ensures you’re using reliable software.
Method 2: Uploading a Theme from Your Computer (Dashboard)
This method is used when you’ve purchased a premium theme from a marketplace or a developer, or when you’ve downloaded a free theme from a third-party website outside of the WordPress.org directory. You’ll need the theme file in a .zip format. Crucially, ensure you obtain themes from reputable sources to maintain digital security. Unverified themes can contain malicious code.
- Access Your WordPress Dashboard: Log in to
yourdomain.com/wp-admin. - Navigate to Themes: Hover over “Appearance” and click on “Themes.”
- Add New Theme: Click the “Add New” button at the top.
- Upload Theme: At the top of the “Add Themes” page, click the “Upload Theme” button.
- Choose File: Click “Choose File” and navigate to the
.zipfile of your theme on your computer. Select the file and click “Open.” - Install Now: Click the “Install Now” button. WordPress will upload the theme file from your computer and install it.
- Activate: Once installed, click “Activate” to apply the theme to your website.
This method provides flexibility for using a wider range of themes, often premium options that offer superior features and support, representing a key investment for your brand and potential online income.
Method 3: Manual Installation via FTP (Advanced Users)
This method is less common for beginners but can be essential in specific situations, such as:
- Your web host has file size upload limits that prevent dashboard uploads.
- You’re troubleshooting an issue with the dashboard upload.
- You prefer working directly with server files.
This method requires familiarity with FTP (File Transfer Protocol) clients like FileZilla and knowledge of your web hosting environment.
- Download Your Theme: Make sure you have the theme’s
.zipfile on your computer. - Unzip the Theme File: Before uploading, you must unzip the theme file. This will create a folder with the theme’s name (e.g.,
astra,oceanwp). This folder is what you will upload. - Connect to Your Server via FTP:
- Open your FTP client.
- Enter your host, username, password, and port (usually 21). Your web host provides these credentials.
- Navigate to your WordPress installation directory, typically
public_htmlorwww.
- Locate the Themes Folder: Inside your WordPress installation, go to
wp-content/themes/. - Upload the Theme Folder: Drag and drop the unzipped theme folder (e.g.,
astra) from your local computer into thewp-content/themes/directory on your server. Ensure all files and subfolders are uploaded correctly. - Activate the Theme:
- Log in to your WordPress dashboard.
- Go to “Appearance” > “Themes.”
- You should now see the manually uploaded theme listed. Hover over it and click “Activate.”
This manual method gives you granular control over your website’s files (Tech) but comes with a higher risk if done incorrectly. Always back up your site before performing FTP operations.
Activating and Customizing Your New Theme
Once your theme is installed and activated, your site’s appearance will immediately change. However, installation is just the first step. The true power of a theme, especially a premium one, lies in its customization options. This is where you truly align the technical framework with your brand strategy.
Initial Setup and Customization for Brand Alignment
Most modern themes come with a dedicated “Customizer” (accessible via “Appearance > Customize”) or a theme options panel. This is your primary tool for shaping your brand’s digital identity.
- Explore the Customizer: The WordPress Customizer offers a live preview of your site as you make changes. Here, you can typically:
- Upload Your Logo: This is critical for brand recognition.
- Set Brand Colors: Apply your brand’s primary and secondary color palettes.
- Choose Typography: Select fonts that reflect your brand personality and enhance readability.
- Configure Header & Footer: Customize menus, widgets, and copyright information.
- Adjust Layouts: Set default layouts for pages, posts, and archives.
- Import Demo Content (Optional): Many premium themes offer demo content imports. This is a fantastic way to quickly set up a professional-looking site that matches the theme’s demo, giving you a strong starting point for customization. Just remember to replace the demo content with your own as soon as possible.
- Install Required/Recommended Plugins: Some themes recommend or even require specific plugins to function fully (e.g., page builders, sliders, custom post types). Install these as prompted to unlock the theme’s full potential.
- Configure Menus and Widgets: Go to “Appearance > Menus” to create and assign navigation menus, and “Appearance > Widgets” to add content blocks to your sidebar, footer, or other widgetized areas.
Thoughtful customization is where your initial investment in a theme truly pays off. By meticulously aligning the theme’s design elements with your brand guidelines, you create a cohesive and professional online presence that reinforces your brand strategy and aids in building a strong reputation.
Post-Installation Best Practices and Security Considerations
After successful installation and initial customization, adhering to best practices is vital for maintaining your website’s performance, security, and longevity. This ties directly into digital security, productivity, and safeguarding your financial investment.
- Create a Child Theme: If you plan to make any custom code modifications (CSS, PHP), always create a child theme. A child theme inherits the functionality and styling of a parent theme. When the parent theme updates, your customizations in the child theme remain intact, preventing your work from being overwritten. This is a crucial Tech best practice for long-term site stability and Productivity (avoiding rework).
- Regular Backups: Before making any major changes or updates, always perform a full backup of your website (files and database). This is your primary line of defense against unforeseen issues and a critical aspect of Digital Security.
- Keep Theme and WordPress Updated: Developers regularly release updates for themes and WordPress itself. These updates often include new features, bug fixes, and, critically, security patches. Failing to update leaves your site vulnerable. Always update your theme, WordPress core, and plugins promptly. This is paramount for Tech and Digital Security.
- Performance Optimization: Even a fast theme can be slowed down by heavy images, excessive plugins, or poor hosting.
- Optimize Images: Use image optimization plugins or tools before uploading.
- Caching: Implement a caching plugin (e.g., WP Super Cache, LiteSpeed Cache) to serve cached versions of your pages, significantly speeding up loading times.
- Minify Resources: Combine and minify CSS and JavaScript files to reduce HTTP requests.
These optimizations improve user experience, SEO (Tech), and ultimately contribute to higher conversions and Online Income (Money).
- Monitor Your Site: Regularly check your site for broken links, display issues, or error messages. Use Google Analytics or other tracking tools to monitor performance and user behavior. This proactive approach helps maintain your Brand reputation and ensures your Money investments are yielding results.
- Source Credibility: Always download themes and plugins from reputable sources. The official WordPress.org directory, well-known theme marketplaces (like ThemeForest, Elegant Themes), or direct developer websites are generally safe. Avoid Nulled or pirated themes, as they often contain malicious code that can compromise your site’s security and damage your brand. This is a fundamental aspect of Digital Security.
By carefully selecting, installing, and maintaining your WordPress theme, you’re not just building a website; you’re constructing a robust, secure, and visually appealing digital asset that effectively represents your brand, delivers value to your audience, and supports your financial objectives. The journey from installation to a fully optimized site is continuous, but with these guidelines, you’re well-equipped to navigate it successfully.
aViewFromTheCave is a participant in the Amazon Services LLC Associates Program, an affiliate advertising program designed to provide a means for sites to earn advertising fees by advertising and linking to Amazon.com. Amazon, the Amazon logo, AmazonSupply, and the AmazonSupply logo are trademarks of Amazon.com, Inc. or its affiliates. As an Amazon Associate we earn affiliate commissions from qualifying purchases.