In the ever-evolving world of technology, our reliance on computers for work, entertainment, and communication continues to grow. With this increased usage comes a perpetual demand for more speed, more storage, and better performance. One of the most impactful upgrades you can make to an aging or underperforming PC, or even a new one needing more space, is installing a new hard drive. Whether you’re replacing a failing drive, adding more storage for your ever-expanding digital library, or transitioning from a traditional HDD to a blazing-fast Solid State Drive (SSD), this guide will walk you through every step, ensuring a smooth and successful installation.
This tutorial is designed to empower you with the knowledge to confidently perform this crucial tech upgrade yourself, saving you money and enhancing your digital experience. We’ll delve into the nuances of different drive types, essential preparation steps, the physical installation process, and the necessary software configuration to get your new drive up and running.
Why Upgrade Your Storage? Performance, Capacity, and Modernization
The decision to install a new hard drive often stems from one of several key motivations, each offering distinct benefits to your computing experience. Understanding these drivers will help you choose the right type of drive and approach for your specific needs. This isn’t just a technical task; it’s an investment in your productivity and digital future, making it highly relevant to our “Tech” and “Money” categories.
Performance Boost vs. Storage Expansion: Defining Your Needs
One of the most common reasons for a hard drive upgrade is to dramatically improve system performance. Traditional Hard Disk Drives (HDDs) rely on spinning platters and read/write heads, making them inherently slower than their modern counterparts. If your computer takes an eternity to boot up, applications load sluggishly, or multitasking feels like wading through treacle, upgrading to an SSD is often the single most effective solution. SSDs (Solid State Drives) use flash memory, offering significantly faster boot times, application loading, and overall system responsiveness. This is a game-changer for anyone seeking a more fluid and efficient computing experience.
Alternatively, you might simply be running out of space. As digital files—photos, videos, games, and software—grow in size, even large drives can quickly fill up. Installing a new, higher-capacity drive, whether an HDD for bulk storage or a larger SSD for frequently accessed files, provides the much-needed room to breathe. This expansion is crucial for content creators, gamers, and anyone with extensive media libraries.
HDD vs. SSD: Choosing Your Weapon in the Storage Wars
The landscape of computer storage is primarily dominated by two technologies: HDDs and SSDs. Each has its strengths and ideal use cases, and choosing between them (or combining them) is a critical decision.
- Hard Disk Drives (HDDs): These are the traditional storage devices, offering a high capacity at a lower cost per gigabyte. They are excellent for mass storage of files that don’t require lightning-fast access, such as document archives, large video libraries, or backups. However, their mechanical nature means they are slower, more susceptible to physical shock, and generate more heat and noise. From a “Money” perspective, HDDs offer the best value for sheer volume of storage.
- Solid State Drives (SSDs): SSDs represent a significant leap in storage technology. With no moving parts, they are incredibly fast, durable, silent, and consume less power. They come in various form factors, including the traditional 2.5-inch SATA form factor (which looks similar to a laptop HDD) and the even faster M.2 form factor, which can utilize the NVMe protocol for unparalleled speeds.
- SATA SSDs: These drives connect via the standard SATA III interface, offering speeds typically up to 550 MB/s. They are a significant upgrade over HDDs and are often the most cost-effective entry point into SSD technology.
- NVMe M.2 SSDs: These compact drives plug directly into a dedicated M.2 slot on your motherboard and leverage the PCIe interface and NVMe (Non-Volatile Memory Express) protocol. This combination allows for mind-boggling speeds, often reaching several thousand MB/s, making them ideal for operating systems, demanding applications, and high-performance gaming. From a “Tech” standpoint, NVMe SSDs are the pinnacle of consumer storage speed.
When making your choice, consider your budget (“Money”), performance requirements (“Tech”), and the physical compatibility with your existing system. Many users opt for a hybrid approach: a smaller NVMe or SATA SSD for the operating system and critical applications for speed, coupled with a larger, more affordable HDD for mass data storage.
Before You Begin: Essential Preparations for a Smooth Installation
A successful hard drive installation isn’t just about plugging in cables; it’s about meticulous preparation. Skipping these crucial preliminary steps can lead to data loss, frustration, or even damage to your system. This phase ensures you’re ready for the physical and software aspects of the upgrade, aligning with digital security and productivity best practices under our “Tech” umbrella.
Gathering Your Tools and Supplies
Before you open your computer, ensure you have the necessary tools at hand. This prevents interruptions and makes the process more efficient.
- Screwdrivers: A Philips head screwdriver is usually sufficient for most PC cases and drive mounts. Some newer cases or components might require a Torx screwdriver.
- Anti-static Wrist Strap: Crucial for protecting sensitive electronic components from electrostatic discharge (ESD). Even a small static shock can permanently damage parts. If you don’t have one, regularly touch a bare metal part of your PC case (while it’s plugged into a grounded outlet but turned off) to discharge static electricity from your body.
- SATA Data Cable (if installing a SATA drive): Your new SATA drive may or may not come with one. Ensure you have an extra if needed.
- Power Supply Unit (PSU) SATA Power Cable: Most PSUs have multiple SATA power connectors. Ensure you have an available one.
- M.2 Standoff and Screw (if installing an M.2 NVMe drive): These tiny components are usually included with your motherboard or the M.2 SSD itself. They are critical for securing the drive.
- Headlamp or Flashlight: Computer interiors can be dark, and extra illumination is always helpful.
- Small Container or Magnetic Mat: To keep track of tiny screws and prevent them from rolling away.
- Compressed Air (optional but recommended): A good opportunity to clean out dust from your case while it’s open.
- USB Drive or External Hard Drive: For backing up your existing data.
Backing Up Your Data: Non-Negotiable Digital Security
This is arguably the single most important step. Never proceed with a hardware upgrade without a full backup of your critical data. Accidents happen—power surges, incorrect connections, or even just human error. Losing irreplaceable photos, documents, or project files is a catastrophic outcome that can be entirely avoided with a proper backup.
- Identify Critical Data: Photos, videos, documents, important emails, browser bookmarks, saved game data, and any work-related files.
- Choose a Backup Method:
- External Hard Drive: A reliable and straightforward method for local backups.
- Cloud Storage: Services like Google Drive, OneDrive, Dropbox, or iCloud offer off-site backup and easy synchronization.
- System Image Backup: For Windows users, creating a system image allows you to restore your entire operating system, programs, and files to a new drive if needed.
- Cloning Software: If you’re replacing your primary drive and want to migrate your OS and data directly to the new drive, cloning software (often provided by SSD manufacturers or third-party tools) can create an exact copy.
Checking Compatibility and Drive Types
Before purchasing or installing, confirm that your new hard drive is compatible with your motherboard and power supply.
- Motherboard Compatibility:
- SATA Drives: Most modern motherboards have multiple SATA III ports. Check your motherboard manual for the number and location of these ports.
- M.2 NVMe Drives: This is crucial. Your motherboard must have an M.2 slot that supports NVMe. Some M.2 slots only support SATA M.2 drives, not NVMe. Check your motherboard’s specifications carefully. Look for terms like “PCIe Gen3 x4” or “PCIe Gen4 x4” for NVMe support. Also, note if installing an M.2 drive disables any SATA ports (this is common).
- Power Supply Unit (PSU): Ensure your PSU has enough available SATA power connectors for any new SATA drives. M.2 NVMe drives draw power directly from the motherboard.
- Physical Space: For 2.5-inch SATA SSDs or 3.5-inch HDDs, ensure your PC case has available drive bays or mounting brackets. For 2.5-inch drives, you might need a 3.5-inch to 2.5-inch adapter bracket if your case only has 3.5-inch bays.
The Physical Installation: A Step-by-Step Guide
With your preparations complete, it’s time to get hands-on. This section details the process of physically installing your new hard drive, covering both SATA and M.2 NVMe drive types. Precision and caution are key here.
Opening the Case and Accessing the Interior
- Power Down and Unplug: Completely shut down your computer. Unplug the power cable from the wall outlet and from the back of your PC.
- Disconnect Peripherals: Disconnect all external peripherals (monitor, keyboard, mouse, USB devices).
- Move to a Clean, Static-Free Workspace: Work on a flat, stable surface, preferably not carpeted.
- Open the Case: Typically, two thumbscrews or Philips head screws secure the side panel (usually the left side when looking at the front of the PC). Remove these screws and slide the panel backward, then lift it away. Some cases have latch mechanisms.
Locating Drive Bays/Slots
- For 2.5-inch SSDs/3.5-inch HDDs: Look for drive cages or mounting brackets. These are usually located at the front or bottom of the case. They might be tool-less (with clips or trays) or require screws.
- For M.2 NVMe SSDs: Locate the M.2 slot(s) on your motherboard. They are typically horizontal slots, often near the CPU socket, under the GPU, or near the bottom edge of the motherboard. They are usually labeled “M.2” or “NVMe.” Some motherboards come with M.2 heatsinks; you’ll need to remove these first.
Connecting SATA Drives (2.5-inch SSDs / 3.5-inch HDDs)
- Mount the Drive:
- 3.5-inch HDD: Slide the HDD into an available 3.5-inch drive bay. Secure it with screws (four on the sides or two on the bottom) or use the case’s tool-less mechanism.
- 2.5-inch SSD: If your case has dedicated 2.5-inch bays, mount the SSD there. If not, use a 3.5-inch to 2.5-inch adapter bracket and mount it in a 3.5-inch bay. Secure it with screws.
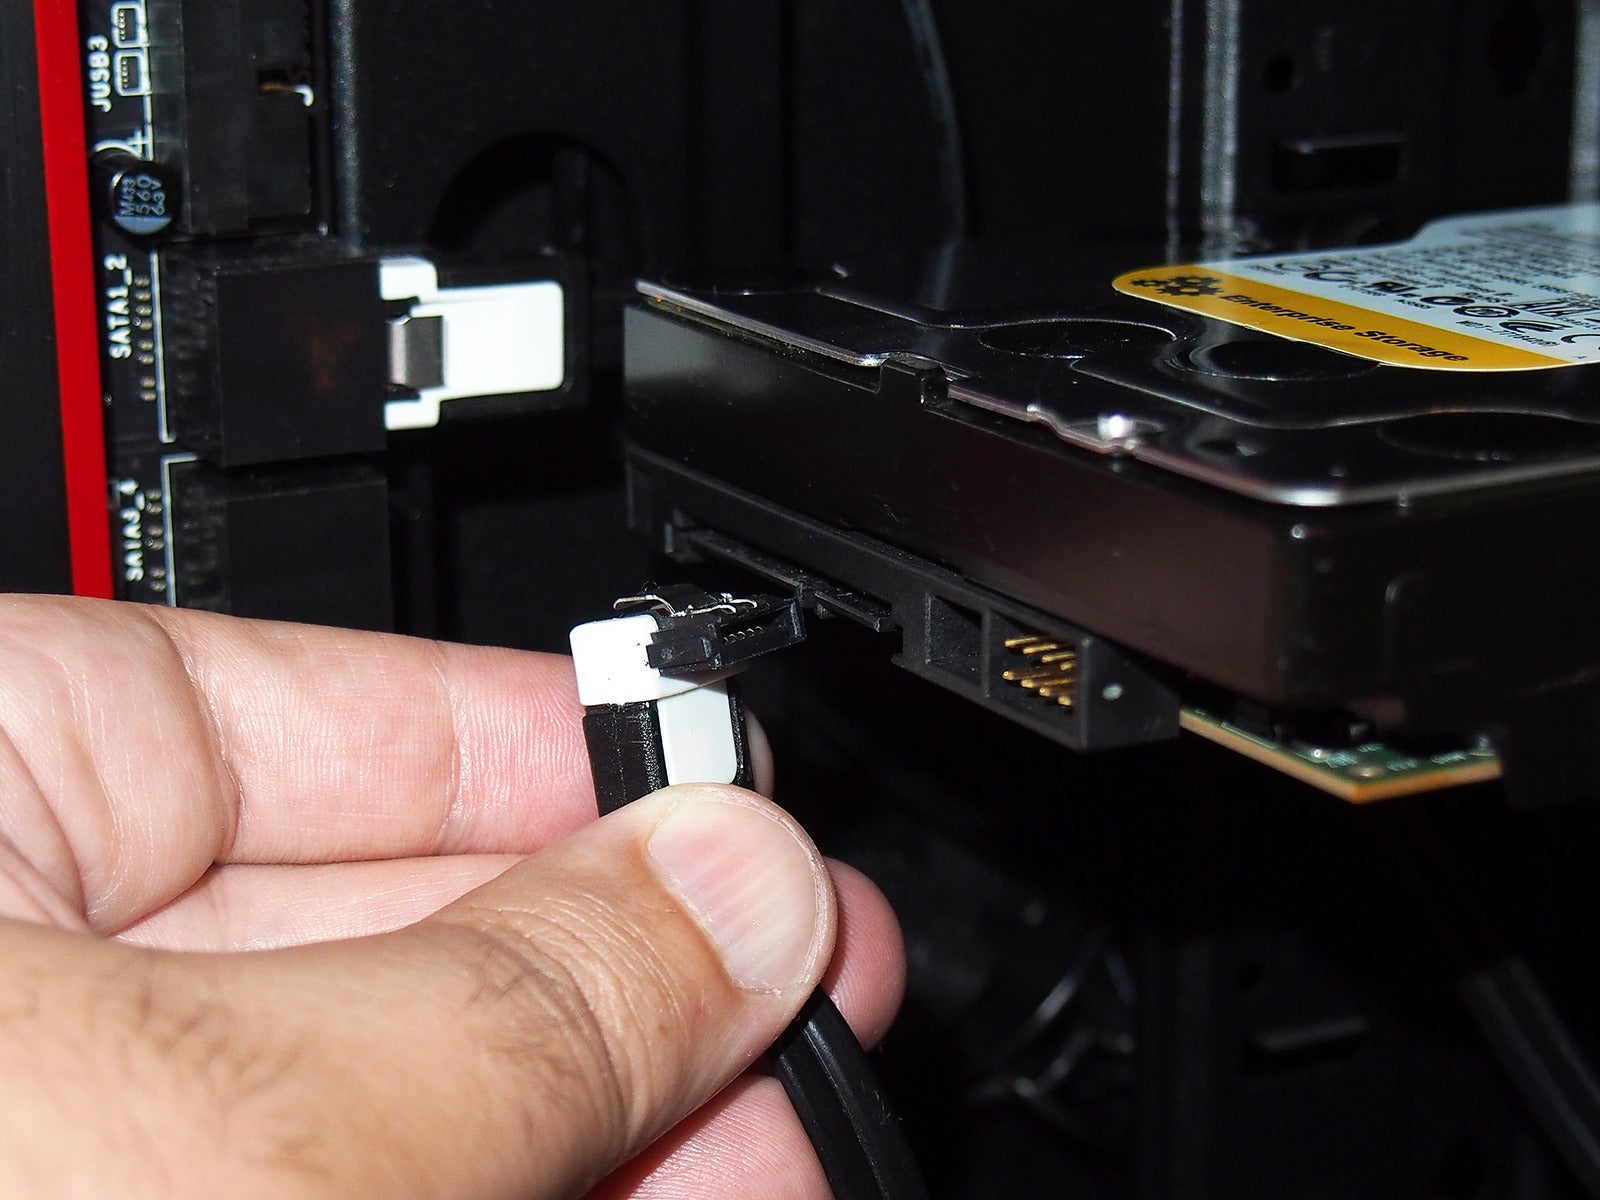
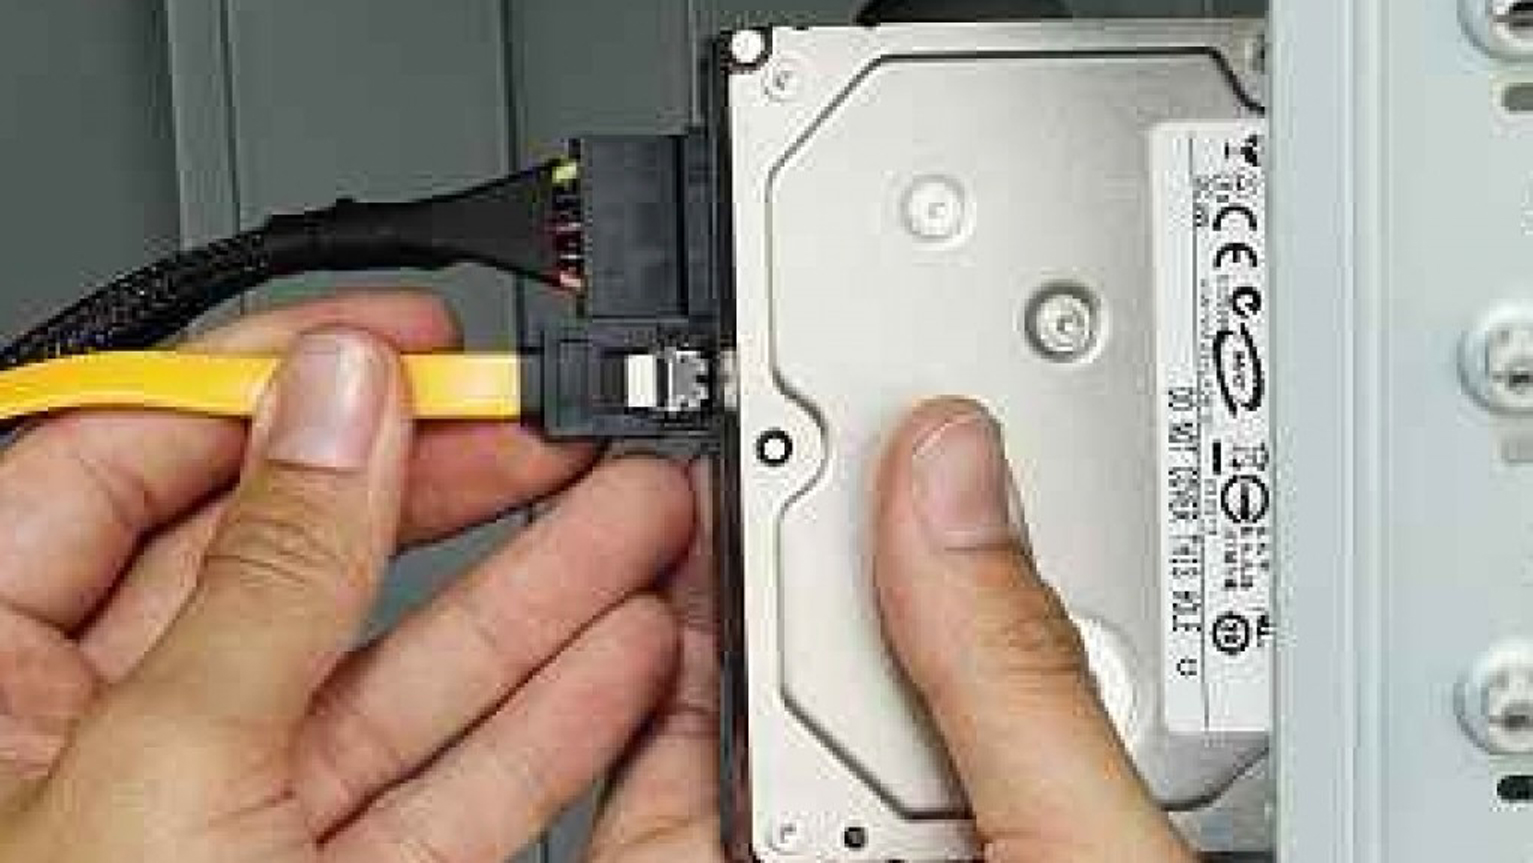
- Connect SATA Data Cable: Plug one end of the SATA data cable into the back of your new drive and the other end into an available SATA port on your motherboard. Motherboard SATA ports are usually clearly labeled and often grouped together.
- Connect SATA Power Cable: Connect an available SATA power connector from your PSU to the power port on the back of your new drive. These are wider, flat connectors.
Installing M.2 NVMe Drives
- Remove Heatsink (if applicable): If your M.2 slot has a heatsink, unscrew it and carefully lift it off. Remove any plastic film from the thermal pad on the heatsink.
- Install Standoff: Ensure the small metal standoff (a tiny screw-like pillar) is screwed into the correct hole for your M.2 drive’s length (2280 is most common). Your motherboard manual will indicate which hole to use.
- Insert the M.2 Drive: Hold the M.2 SSD at a slight angle (about 30 degrees) and gently slide its gold contacts into the M.2 slot. It should slide in without excessive force.
- Secure the Drive: Once fully inserted, push the drive down gently until it’s parallel with the motherboard. Secure it with the small screw into the standoff.
- Reattach Heatsink (if applicable): If your motherboard came with an M.2 heatsink, reattach it over the drive, ensuring proper contact with the thermal pad.
Securing the Drive & Closing Up
- Double-Check Connections: Ensure all cables are firmly seated for both power and data. Wiggle them gently to confirm they don’t easily come loose.
- Cable Management (Optional but Recommended): Route cables neatly to improve airflow and aesthetics.
- Replace the Side Panel: Carefully align the side panel and slide it back into place. Reinsert and tighten the screws.
- Reconnect Peripherals: Plug your monitor, keyboard, mouse, and other devices back into the PC.
- Reconnect Power: Finally, plug the power cable back into your PC and the wall outlet.
Post-Installation: Setting Up Your New Drive for Use
Physical installation is only half the battle. Once your new drive is securely in place, you’ll need to configure it within your operating system before you can use it. This involves initialization, formatting, and potentially migrating your data, bringing us back to critical “Tech” functions.
Booting Up and Accessing BIOS/UEFI
- First Boot: Power on your computer. It should ideally boot normally into your existing operating system (if you’re adding a secondary drive) or display a message prompting you to install an OS (if you’re replacing the primary boot drive).
- Access BIOS/UEFI: If you plan to install a fresh operating system or verify the drive’s detection, you might need to enter your computer’s BIOS/UEFI settings. This is typically done by repeatedly pressing a specific key (e.g., Delete, F2, F10, F12) immediately after powering on. Look for “Storage Configuration,” “SATA Configuration,” or “M.2 Settings” to confirm your new drive is recognized. Ensure your SATA mode is set to AHCI for optimal SSD performance (if applicable).
Initializing and Formatting Your Drive (Windows/macOS)
Your operating system won’t automatically recognize a brand new, unformatted drive as usable storage. You need to initialize it and create a file system.
For Windows Users:
- Open Disk Management: Right-click on the “Start” button (or press
Win + X) and select “Disk Management.” - Initialize Disk: A “Initialize Disk” window should pop up automatically for new drives. If not, find your new drive (it will likely show as “Unknown,” “Not Initialized,” or “Unallocated Space”) and right-click on it. Select “Initialize Disk.”
- Choose Partition Style:
- GPT (GUID Partition Table): Recommended for modern systems and drives larger than 2TB. Essential for UEFI boot.
- MBR (Master Boot Record): Older standard, limited to 2TB partitions and legacy BIOS boot.
- Choose GPT unless you have a specific reason for MBR. Click “OK.”
- Create Simple Volume: Right-click on the “Unallocated Space” of your new drive. Select “New Simple Volume.”
- Follow the Wizard:
- Click “Next” on the Welcome screen.
- Specify the volume size (usually max for a single partition).
- Assign a drive letter.
- Format Partition:
- File System: NTFS (recommended for Windows).
- Allocation Unit Size: Default.
- Volume Label: Give your drive a descriptive name (e.g., “Data Drive,” “Games SSD”).
- Perform a “Quick format.”
- Click “Next,” then “Finish.”
- Your new drive should now appear in “This PC” (or “My Computer”) and be ready for use.
For macOS Users:
- Open Disk Utility: Go to “Applications” > “Utilities” > “Disk Utility.”
- Show All Devices: In the Disk Utility sidebar, click “View” > “Show All Devices.”
- Select Your New Drive: You’ll see your new drive listed as an uninitialized volume. Select the top-level entry for the physical drive (not any sub-volumes).
- Erase the Drive: Click the “Erase” button in the toolbar.
- Configure Erase Settings:
- Name: Give your drive a name (e.g., “Macintosh HD 2,” “Data Drive”).
- Format:
- APFS: Recommended for macOS High Sierra and later (for SSDs).
- Mac OS Extended (Journaled): HFS+ (for HDDs or older macOS versions).
- Scheme: “GUID Partition Map” (essential for booting a Mac).
- Click “Erase”: Confirm the action. Your new drive will be formatted and mounted, ready for use.
Partitioning for Organization (Optional)
You can choose to divide your new hard drive into multiple partitions (logical drives). For example, you might create one partition for general data and another for specific projects or backups. This can aid in organization and disaster recovery. The process is similar to creating a simple volume but you would specify a smaller size and repeat the process for additional partitions.
Migrating Your Operating System (OS)
If you’re replacing your primary boot drive, you have two main options:
- Fresh OS Install: This is often the cleanest approach, as it eliminates any existing software bloat or system corruption. You’ll need a Windows installation media (USB drive) or a macOS installer. During the installation process, you’ll select your new drive as the target.
- Cloning Your Existing Drive: If you want to transfer your entire operating system, applications, and files exactly as they are from your old drive to the new one, you can use disk cloning software. Many SSD manufacturers provide their own cloning utilities (e.g., Samsung Data Migration, Acronis True Image for Crucial). This process typically involves connecting both the old and new drives to your PC, running the software, and then setting the new drive as the boot drive in BIOS/UEFI after the cloning is complete.
Troubleshooting Common Issues & Final Thoughts
Even with careful planning, sometimes things don’t go exactly as expected. Here are some common issues and how to address them, ensuring your investment in a new drive pays off.
Drive Not Detected
- Check Physical Connections: Re-seat the SATA data and power cables (for SATA drives) or the M.2 NVMe drive in its slot. Ensure they are firmly connected.
- Check BIOS/UEFI: Enter BIOS/UEFI to confirm the drive is recognized by the motherboard. If not, try a different SATA port or M.2 slot if available. Ensure SATA mode is set correctly (AHCI).
- Power Supply: Verify the power supply is adequate and the SATA power cable is functional.
- Driver Issues (NVMe): For some older motherboards or specific NVMe drives, you might need to install an NVMe driver during OS installation or after booting into your existing OS.
Boot Issues
- Wrong Boot Order: If you cloned your drive or performed a fresh OS install, ensure your computer is set to boot from the correct drive in BIOS/UEFI.
- Corrupted OS: If a fresh install fails or a cloned drive won’t boot, the OS installation media might be corrupted, or the cloning process was incomplete. Try reinstalling or re-cloning.
Performance Problems
- SATA vs. NVMe: Ensure your NVMe drive is actually running at PCIe speeds. If it’s performing like a SATA drive, check your motherboard manual for M.2 slot limitations (some M.2 slots are SATA-only, even if they look like NVMe slots) or ensure NVMe drivers are installed.
- AHCI Mode: For SATA SSDs, ensure your BIOS/UEFI is set to AHCI mode, not IDE mode, for optimal performance.
- Full Drive: SSDs can slow down significantly when nearly full. Try to keep some free space.
- Overheating: Ensure your drive (especially NVMe) has adequate cooling. Motherboard M.2 heatsinks are designed to prevent throttling.
The Value of a Modern Storage Solution
Installing a new hard drive, particularly an SSD, is one of the most impactful upgrades you can make to your computer. It breathes new life into older systems, dramatically improving responsiveness and user experience. For new builds, choosing the right storage is foundational to overall performance.
Beyond the immediate technical benefits, this upgrade aligns perfectly with several key themes of our website. From a “Tech” perspective, it embodies the spirit of leveraging modern advancements for better computing. In terms of “Money,” a strategic hard drive upgrade can be a far more cost-effective solution than buying an entirely new PC, extending the lifespan and utility of your existing hardware. And while less direct, choosing reputable “Brand” drives (like Samsung, Western Digital, Crucial, Seagate) ensures reliability, performance, and peace of mind through good warranties and customer support.
By following this comprehensive guide, you’ve not only gained valuable technical skills but also optimized your digital life for speed, capacity, and efficiency. Enjoy your newly upgraded, faster, and more spacious computer!
aViewFromTheCave is a participant in the Amazon Services LLC Associates Program, an affiliate advertising program designed to provide a means for sites to earn advertising fees by advertising and linking to Amazon.com. Amazon, the Amazon logo, AmazonSupply, and the AmazonSupply logo are trademarks of Amazon.com, Inc. or its affiliates. As an Amazon Associate we earn affiliate commissions from qualifying purchases.