Ubuntu, renowned for its user-friendly interface and robust open-source foundation, stands as a popular choice among desktop Linux users. A core aspect of managing software on Ubuntu, and its parent distribution Debian, revolves around .deb files. These specialized package files are the standard format for distributing and installing applications, libraries, and system components. For anyone looking to extend their Ubuntu system’s capabilities beyond the readily available software in the official repositories, understanding how to handle .deb files is an essential skill.
This comprehensive guide will demystify the process of installing .deb files, covering both graphical and command-line methods. We’ll delve into the underlying mechanisms, discuss best practices for security and stability, and touch upon how this knowledge empowers users in their digital journey, aligning with broader themes of technology, productivity, and digital security that define a modern computing experience. Whether you’re a newcomer to Linux or an experienced user seeking to refine your knowledge, this article will equip you with the expertise to confidently manage .deb packages.

Understanding .deb Packages and Ubuntu’s Ecosystem
Before diving into the “how-to,” it’s crucial to grasp what a .deb file is and why it holds such significance within the Debian and Ubuntu ecosystem. This understanding not only clarifies the installation process but also highlights the underlying principles of software management on these systems.
The Anatomy of a .deb File
A .deb file is essentially an archive file, much like a .zip or .tar.gz archive, specifically designed for Debian-based distributions. It contains all the necessary components for a piece of software to run on your system. This includes:
- Compiled Binaries: The executable programs themselves.
- Libraries: Shared code modules that the program depends on.
- Configuration Files: Settings and parameters specific to the application.
- Documentation: User manuals, READMEs, and other helpful information.
- Pre-installation and Post-installation Scripts: Instructions for the system to follow before and after installing the package, such as creating user accounts, setting permissions, or registering services.
- Metadata: Information about the package, including its name, version, description, and, critically, its dependencies.
Dependency management is a cornerstone of the .deb packaging system. Most complex software relies on other software components (libraries, utilities, etc.) to function correctly. A .deb package explicitly lists these dependencies. When you attempt to install a .deb file, the package manager checks if all required dependencies are already present on your system. If not, it will typically try to install them or notify you of the missing components. This systematic approach ensures software compatibility and system stability, preventing issues that might arise from incomplete installations.
Why .deb Files are Different from Snap, Flatpak, or AppImage
In the ever-evolving landscape of Linux software distribution, you might encounter other packaging formats like Snap, Flatpak, and AppImage. While these newer formats offer advantages such as sandboxing and cross-distribution compatibility, .deb files remain the native, deeply integrated packaging system for Ubuntu.
- Native System Integration:
.debpackages are designed to integrate directly with your system’s core libraries and directory structure. This often results in smaller package sizes, faster startup times, and a more “native” feel, as applications leverage existing system resources. - Dependency Resolution: While Snap and Flatpak bundle most of their dependencies, leading to larger package sizes but fewer dependency conflicts on the user’s end,
.debpackages rely on the system’s package manager to resolve dependencies, making for a leaner installation if those dependencies are already met by other software. - Performance and Resources: Because
.debapplications can share system libraries, they often consume fewer system resources and can be more performant than their containerized counterparts, which carry their own versions of libraries. - Legacy and Ubiquity: For decades,
.debhas been the standard for Debian and Ubuntu. A vast repository of software is available in this format, and many developers continue to release their Linux software primarily as.debpackages for these popular distributions. This makes understanding.debinstallation a fundamental skill for any Ubuntu user looking to access the full spectrum of available software.
The choice between .deb, Snap, Flatpak, or AppImage often depends on the specific software, the user’s preference for isolation versus integration, and the desired level of system control. However, for direct, system-level software installation, .deb files are indispensable.
Graphical Methods: User-Friendly Installation
For many Ubuntu users, especially those coming from Windows or macOS backgrounds, graphical interfaces offer the most intuitive way to interact with their system. Ubuntu provides excellent tools that make installing .deb files a straightforward, click-based process, minimizing the need for command-line interaction.
Installing via Ubuntu Software Center
The Ubuntu Software Center is your gateway to thousands of applications, both free and proprietary. While primarily designed for installing software from official repositories and Snap packages, it also provides a simple interface for installing local .deb files. This is often the first method new users encounter due to its simplicity.
Step-by-Step Guide:
- Locate the .deb File: Navigate to the folder where you have downloaded the
.debfile using your file manager (e.g., “Files”). - Double-Click the File: Simply double-click on the
.debfile. Ubuntu is configured by default to open.debfiles with the Software Center. - Review Package Information: The Software Center will open, displaying details about the package, including its name, version, description, and sometimes screenshots. It will also indicate if the software is already installed or if it’s new.
- Click “Install”: If the package is new, you will see an “Install” button. Click this button.
- Authenticate: The system will prompt you for your user password to authorize the installation. This is a standard security measure to prevent unauthorized software installations.
- Monitor Installation: The Software Center will show a progress bar as it downloads any necessary dependencies and installs the package.
- Launch the Application: Once the installation is complete, the “Install” button might change to “Remove” or you can simply close the Software Center. The new application should now be available in your applications menu.
When it’s the Preferred Method:
The Ubuntu Software Center is ideal for users who prefer a visual, guided experience and for .deb files that are well-behaved and have all their dependencies readily available in the official Ubuntu repositories. It’s a great starting point for straightforward installations and for maintaining a consistent user experience.
Utilizing GDebi Package Installer
While the Software Center is convenient, it sometimes struggles with complex dependency resolutions for local .deb files, or it might offer less clear error messages. This is where GDebi Package Installer shines. GDebi is a lightweight, dedicated tool specifically designed for installing .deb files and is often preferred by experienced users for its superior dependency handling and clearer output. It intelligently checks and resolves dependencies from the Ubuntu repositories before attempting to install your local .deb package.
Installation of GDebi Itself:
Before you can use GDebi, you might need to install it, as it’s not always pre-installed in newer Ubuntu versions.
- Open Terminal: Press
Ctrl+Alt+Tto open a terminal. - Install GDebi: Type the following command and press Enter:
bash

sudo apt install gdebi
- Authenticate: Enter your user password when prompted. GDebi will be installed along with any of its own dependencies.
Step-by-Step Usage with GDebi:
- Locate the .deb File: As before, navigate to the folder containing your
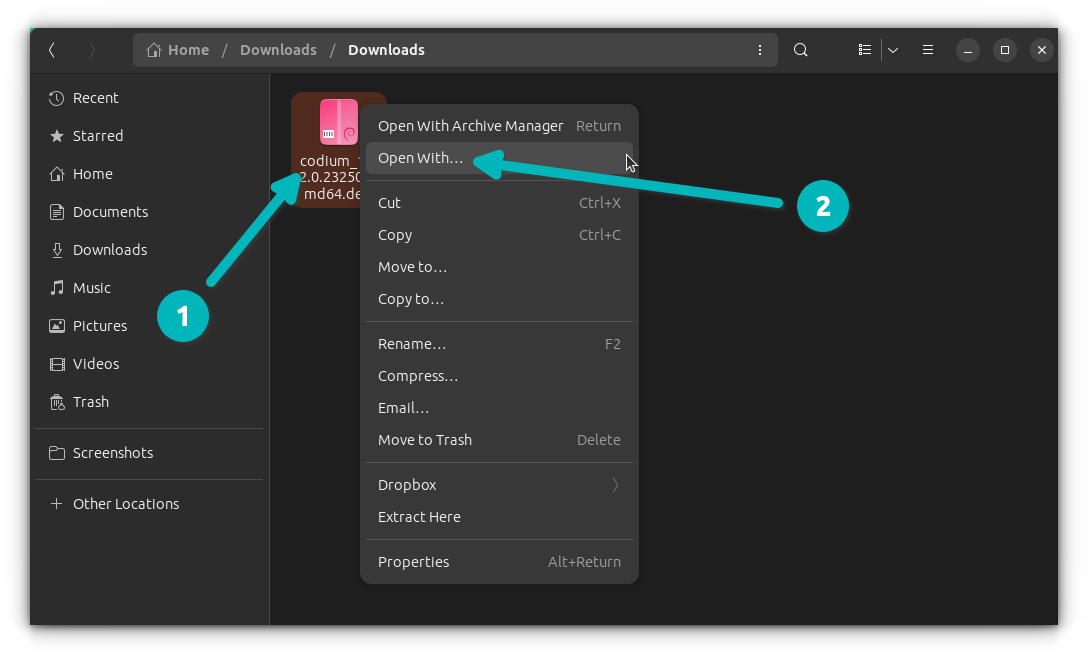
.debfile. - Right-Click and Open With: Right-click on the
.debfile. From the context menu, select “Open With Other Application.” - Choose GDebi: In the list of applications, select “GDebi Package Installer” and click “Select.” If GDebi isn’t listed, you might need to click “View All Applications” or ensure it was installed correctly.
- Review Package Information: GDebi will open, presenting a clean interface with detailed information about the package, including its size, description, and, crucially, a clear status on its dependencies (“All dependencies are satisfied” or a list of missing ones).
- Click “Install Package”: If all dependencies are met, click the “Install Package” button.
- Authenticate: Enter your password when prompted.
- Monitor Installation: GDebi will display the installation progress and messages, often providing more verbose feedback than the Software Center.
- Installation Complete: Once finished, the button will change to “Reinstall Package” or “Remove Package.” Close GDebi. Your application is now installed.
GDebi’s directness and efficient dependency resolution make it an invaluable tool for ensuring smooth installations of .deb files downloaded from third-party sources. It’s a prime example of a specialized tool enhancing user productivity by streamlining a common technical task.
Command-Line Methods: Power and Precision
For users who seek more control, detailed feedback, or are working in a server environment without a graphical interface, the command line offers robust and efficient methods for installing .deb files. Mastering these commands provides a deeper understanding of Ubuntu’s package management system and offers solutions when graphical tools fall short.
Using dpkg: The Fundamental Package Manager
dpkg (Debian Package) is the low-level package management system at the heart of Debian and Ubuntu. It’s responsible for installing, removing, and providing information about .deb packages. While powerful, dpkg itself does not handle dependencies automatically; it will simply inform you if an installation fails due to missing prerequisites.
Installation Command:
To install a .deb file using dpkg, you use the -i (or --install) option:
sudo dpkg -i /path/to/your/package-name.deb
sudo: This prefix grants administrative privileges, which are necessary for installing system-wide software. You’ll be prompted for your password.dpkg -i: The command to install a.debpackage./path/to/your/package-name.deb: Replace this with the actual path and filename of your.debfile. A common practice is to navigate to the directory where the.debfile is located (e.g.,cd ~/Downloads) and then usesudo dpkg -i ./package-name.deb(where./refers to the current directory).
Explanation of dpkg‘s Role:
dpkg directly extracts the contents of the .deb file and places them into the appropriate system directories, runs pre/post-installation scripts, and registers the package with the dpkg database. If the package has unmet dependencies, dpkg will fail the installation and report the missing packages.
Dealing with Dependency Issues Manually with dpkg:
If dpkg reports dependency errors, you could theoretically try to find and install each missing dependency’s .deb file manually using dpkg. However, this quickly becomes cumbersome, especially for packages with many nested dependencies. This is why apt (which we’ll discuss next) is generally preferred for its automatic dependency resolution.
If you find yourself in a situation where dpkg fails due to dependencies, a common next step is to use apt to fix the broken state:
sudo apt --fix-broken install
This command will attempt to download and install all missing dependencies for any partially installed packages on your system. It’s a lifesaver when dpkg has left packages in a “broken” state.
Leveraging apt: The Smarter Approach
apt (Advanced Package Tool) is the higher-level, more user-friendly interface to dpkg. It’s the command-line equivalent of the Software Center and is designed to manage packages, including their dependencies, from repositories and local .deb files. apt handles downloading, installing, updating, and removing packages, intelligently resolving dependencies and managing conflicts.
Installation Command for Local .deb Files:
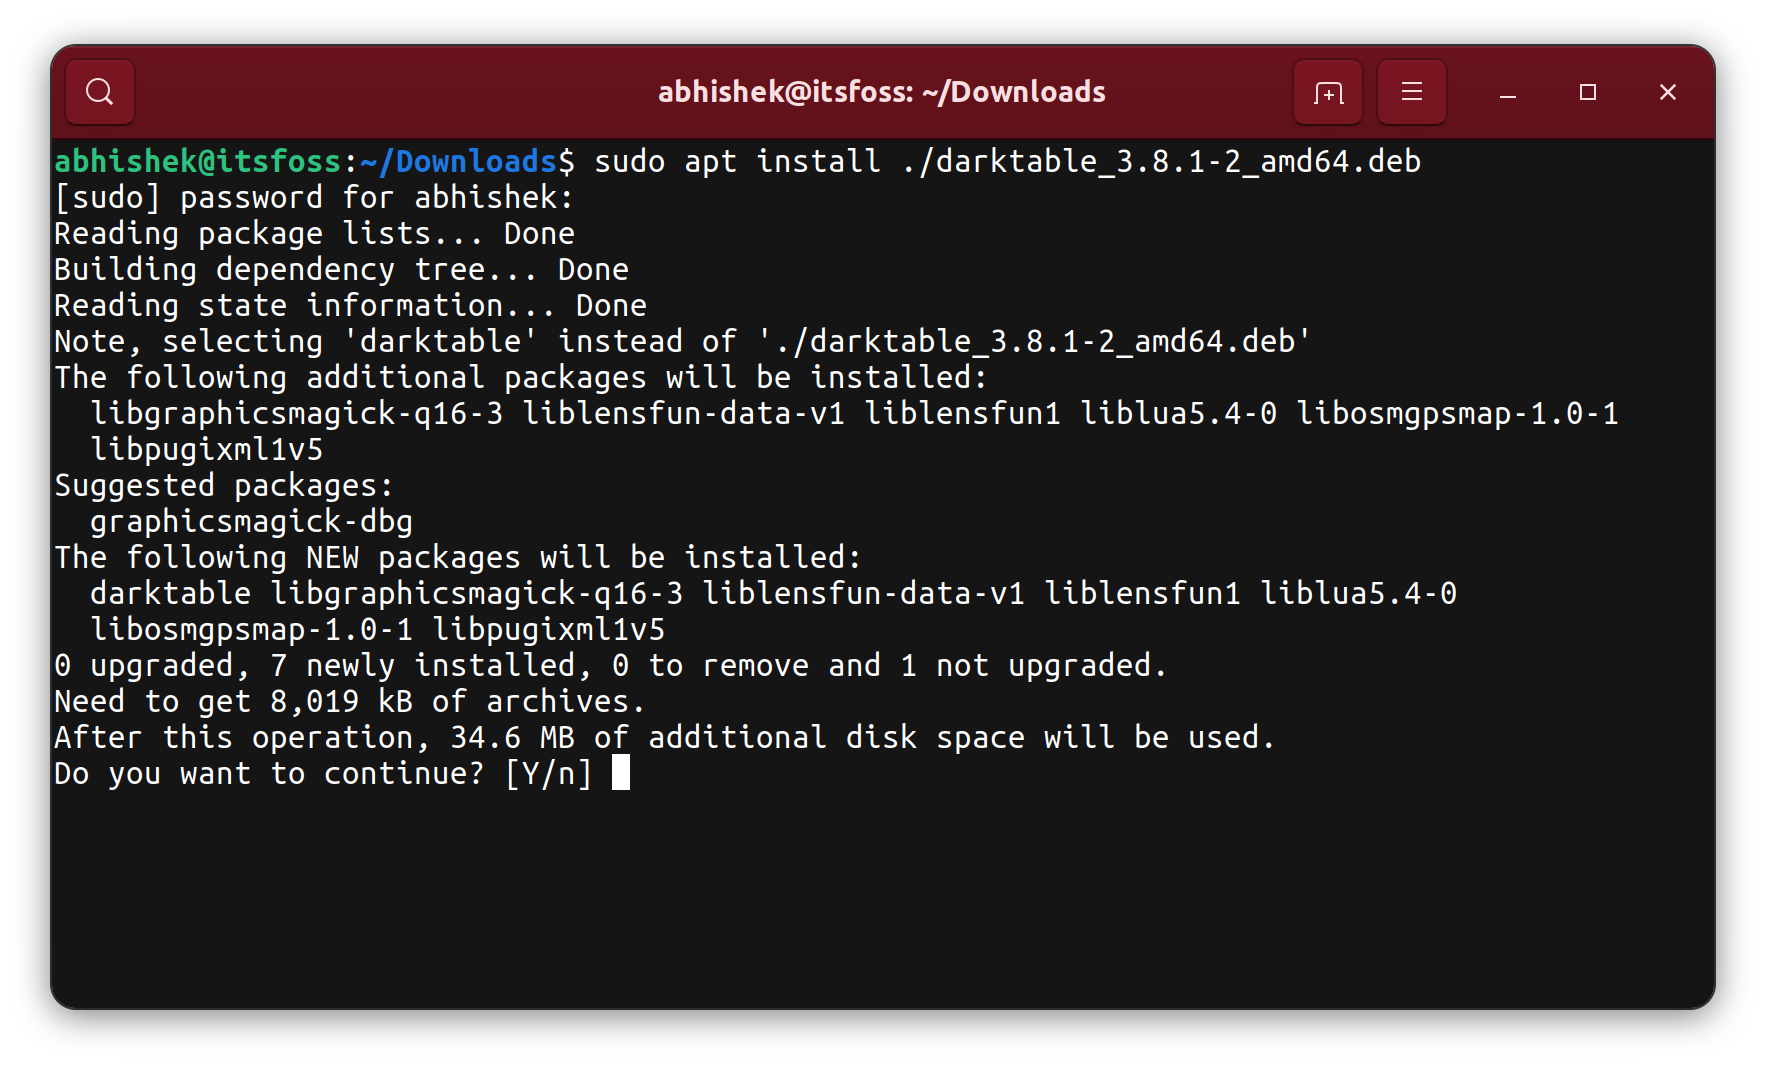
To install a local .deb file using apt, you use the install command with a local path:
sudo apt install ./package-name.deb
sudo apt install: The command to install software../package-name.deb: The.before the slash is crucial here. It tellsaptthatpackage-name.debis a local file, not a package to be searched in the online repositories. Omitting the.would makeaptlook for a package namedpackage-name.debin its configured repositories, which it likely wouldn’t find.
How apt Resolves Dependencies Automatically:
When you use apt install ./package-name.deb, apt does the following:
- Examines the .deb File: It reads the metadata of your local
.debfile, including its listed dependencies. - Checks Repositories: It then searches its configured software repositories (Ubuntu’s official ones, and any PPAs or third-party repos you’ve added) for those missing dependencies.
- Prompts for Confirmation: If dependencies are found and need to be installed,
aptwill list them and ask for your confirmation (e.g., “Do you want to continue? [Y/n]”). - Downloads and Installs: Upon confirmation,
aptdownloads all required dependency packages and then proceeds to install the local.debfile, ensuring a complete and functional installation.
The Evolution of apt from apt-get:
Historically, apt-get was the primary command-line tool for package management. While apt-get is still fully functional, apt (introduced later as a front-end) was designed to offer a more unified and user-friendly experience, combining commonly used apt-get and apt-cache commands into a single, intuitive interface with improved progress bars and clearer output. For installing local .deb files, both apt-get install ./package-name.deb and apt install ./package-name.deb technically work, but apt is the recommended modern approach.
Subtle Productivity Integration: The automatic dependency resolution offered by apt is a massive productivity booster. Instead of manually tracking down and installing numerous prerequisite packages, apt handles this complex task autonomously. This saves significant time and effort, allowing users to focus on utilizing their software rather than struggling with installation mechanics. For businesses and individuals alike, streamlined software deployment translates directly into enhanced efficiency and reduced operational overhead.
Troubleshooting Common Issues and Best Practices
While installing .deb files is generally straightforward, users might occasionally encounter issues. Knowing how to troubleshoot and adhere to best practices is crucial for maintaining a stable and secure Ubuntu system. This section covers common problems and vital advice for responsible package management.
Resolving Dependency Problems
Dependency issues are by far the most frequent hurdle when installing .deb files, especially those from unofficial or older sources. If a .deb package requires a specific version of a library that isn’t available on your system or conflicts with an existing one, the installation will fail.
Identifying Missing Dependencies:
Both dpkg and apt will usually output error messages indicating missing dependencies. For example, dpkg might say:
dpkg: dependency problems prevent configuration of package-name:
 package-name depends on libxyz (>= 1.2); however:
  Package libxyz is not installed.
Using sudo apt --fix-broken install:
This is the golden command for resolving most dependency issues after a failed dpkg installation or a partially installed package.
- Attempt
dpkg(and let it fail): If you trieddpkg -i package.deband it failed due to dependencies, the system is now in a “broken” state regarding that package. - Run
apt --fix-broken install:
bash

sudo apt --fix-broken install
This command tellsaptto scan your system for any packages that are in an incomplete or broken state due to unmet dependencies. It then attempts to download and install all the missing dependencies from the configured repositories to fix these packages. - Retry Installation (if necessary): In some cases, after
apt --fix-broken installcompletes, the original.debpackage might still need to be explicitly installed again usingsudo apt install ./package.deb.
When to Avoid Force-Installing:
You might come across advice or commands to “force install” packages (e.g., dpkg --force-depends -i package.deb). While this can sometimes bypass dependency checks, it is highly discouraged for several reasons:
- System Instability: Forcing an installation when dependencies are unmet almost guarantees that the software will not work correctly, and it can even break other parts of your system that rely on those dependencies.
- Security Vulnerabilities: You might bypass crucial updates or security patches for underlying components.
- Difficulty in Removal: Broken, force-installed packages can be notoriously difficult to remove cleanly, leading to persistent system clutter and potential future conflicts.
Always strive to resolve dependencies properly. If apt --fix-broken install doesn’t work, it often indicates a deeper incompatibility or a poorly constructed .deb package. In such cases, seeking an alternative installation method (e.g., Snap, Flatpak, or compiling from source) or a different version of the software is usually a safer bet.
Removing Installed .deb Packages
Just as important as installing software is knowing how to remove it cleanly. Ubuntu provides commands to remove applications installed from .deb files, offering different levels of removal.
-
Listing Installed Packages: If you don’t remember the exact package name, you can list all installed
.debpackages usingdpkg:dpkg -l | grep package-nameReplace
package-namewith a keyword related to the software you installed. -
sudo dpkg -r package-name(Remove):sudo dpkg -r software-package-nameThis command removes the installed binaries and common configuration files of the specified package. It leaves behind user-specific configuration files (often in your home directory, like
~/.config/app-name/or~/app-name/) and might leave some system-wide configuration files in/etc. -
sudo apt remove package-name(Remove with dependency check):sudo apt remove software-package-nameThis is generally preferred over
dpkg -r.apt removeremoves the package and also attempts to remove any dependencies that were installed solely for that package and are no longer needed by any other software. It also leaves behind user configuration files. -
sudo apt purge package-name(Remove completely):sudo apt purge software-package-nameThis is the most thorough removal.
apt purgeremoves the package and its system-wide configuration files. It’s useful when you want to completely erase all traces of an application, perhaps to reinstall it fresh or because you’re permanently discarding it. It still typically leaves user-specific configuration files in your home directory, which are generally safe to delete manually if desired. -
sudo apt autoremove(Clean up unused dependencies):
bash

sudo apt autoremove
After removing software, many packages might have “auto-installed” dependencies that are no longer needed. This command identifies and removes such orphaned packages, helping to keep your system lean and tidy. It’s a good practice to run this regularly.
Security Considerations and Best Practices
Digital security is paramount, and installing software from various sources requires a cautious approach. Adhering to these best practices will significantly reduce your risk.
-
Downloading from Trusted Sources Only: This is the most critical rule. Only download
.debfiles from:- Official Project Websites: Websites of reputable software developers.
- Verified Launchpad PPAs (Personal Package Archives): While PPAs offer newer software, ensure they are from trusted maintainers.
- Known and Respected Repositories: Third-party repositories that have a good reputation in the Linux community.
- Avoid Unknown or Suspicious Websites: Never download
.debfiles from random forums, file-sharing sites, or untrusted links, as they could contain malicious code.
-
Verifying Package Integrity (Checksums): Some reputable sources provide checksums (like MD5, SHA256) alongside their
.debfiles. A checksum is a unique alphanumeric string generated from the file’s content.- Download the
.debfile and the checksum file (or note the checksum). - Open a terminal in the directory where the
.debfile is located. - Generate the checksum of your downloaded file:
- For MD5:
md5sum package-name.deb - For SHA256:
sha256sum package-name.deb
- For MD5:
- Compare the output with the checksum provided by the source. If they match, the file has not been altered during download. If they don’t, do not install the package, as it might be corrupted or tampered with.
- Download the
-
Regular System Updates (
sudo apt update && sudo apt upgrade): Keeping your Ubuntu system updated is crucial for security.sudo apt update: Refreshes the list of available packages from your configured repositories.sudo apt upgrade: Installs the latest versions of all installed packages, including security patches and bug fixes.
This ensures that your system’s core components and libraries are up-to-date, reducing vulnerabilities that malicious.debpackages might try to exploit.
-
Understanding Permissions: Linux’s robust permission system provides a layer of security. Always be mindful that installing
.debfiles typically requiressudoprivileges, meaning the installation process runs with root (administrator) permissions. This grants the package full control over your system. This is why trusting the source is paramount – a malicious.debfile executed withsudocan severely compromise your system.
By diligently following these security practices, you can confidently explore and install a vast array of software on your Ubuntu system, maintaining both its functionality and its integrity.
Conclusion
Mastering the art of installing .deb files is a fundamental skill for any Ubuntu user. This guide has taken you through the various methods, from the user-friendly graphical interfaces of the Ubuntu Software Center and GDebi to the powerful and precise command-line tools dpkg and apt. Each method offers distinct advantages, catering to different user preferences and technical scenarios.
We’ve explored the intricate anatomy of a .deb package, highlighting its role in dependency management and its unique position within the Linux software ecosystem compared to newer containerized formats. Understanding these nuances empowers you to make informed decisions about your software installations.
Furthermore, we’ve emphasized the importance of troubleshooting common issues like dependency conflicts and provided clear instructions for resolving them effectively with apt --fix-broken install. Crucially, we’ve outlined a robust set of best practices concerning digital security, underscoring the necessity of downloading from trusted sources, verifying package integrity, and maintaining regular system updates. These practices are not just technical steps; they are safeguards for your digital environment, protecting your data and ensuring the stability of your system.
In an era defined by rapid technological advancements, the ability to customize and extend your operating system’s capabilities is more valuable than ever. By confidently managing .deb packages, you unlock a world of open-source and proprietary software, significantly enhancing your productivity and enabling you to tailor Ubuntu precisely to your needs. This knowledge is not merely about installing a file; it’s about taking control of your computing experience, leveraging the flexibility of Linux, and navigating the digital landscape with greater autonomy and security.