
The journey into the world of programming often begins with C. Renowned for its efficiency, low-level memory management, and foundational role in the development of operating systems, embedded systems, and even other programming languages, C remains an indispensable tool for serious developers. Whether you’re a budding programmer seeking to understand the bare metal of computing, or an experienced engineer looking to optimize performance-critical applications, setting up a C development environment is the crucial first step.
This guide aims to demystify the installation process across major operating systems, providing clear, step-by-step instructions. We’ll cover everything from selecting the right compiler to writing and executing your very first C program, ensuring you have a robust environment ready for your coding endeavors. By the end of this article, you’ll not only have C installed but also a deeper appreciation for its ecosystem and continued relevance in the tech landscape.

Understanding the C Programming Ecosystem
Before diving into the installation specifics, it’s vital to grasp what exactly “installing C” entails and why this foundational language continues to hold such sway in an era dominated by high-level languages and AI tools. C isn’t a single monolithic application but rather a language that relies on a specific ecosystem to function.
The Core Components: Compiler, Linker, and Text Editor/IDE
At its heart, developing in C requires a few key tools:
- Compiler: This is the most crucial component. C is a compiled language, meaning human-readable source code (written in C) must be translated into machine code that the computer’s processor can understand and execute. Popular C compilers include GCC (GNU Compiler Collection), Clang, and Microsoft Visual C++ Compiler (MSVC). These compilers not only translate your code but also often include a linker, which combines compiled object files and necessary libraries into a single executable program.
- Text Editor or Integrated Development Environment (IDE): You need a place to write your C code. A simple text editor like VS Code, Sublime Text, or Notepad++ (on Windows) is sufficient, offering syntax highlighting and basic coding features. For more advanced development, an IDE like Visual Studio, Code::Blocks, or CLion provides a comprehensive suite of tools, including a code editor, debugger, and build automation features, all integrated into a single application. While an IDE can streamline your workflow, it’s often recommended for beginners to start with a text editor and command-line compilation to better understand the underlying processes.
- Build System (Optional but often useful): For larger projects, a build system like Make or CMake helps automate the compilation process, managing dependencies and ensuring that only necessary files are recompiled when changes are made.
Why C Still Matters in Modern Development
Despite its age, C remains incredibly relevant across various tech domains:
- Operating Systems and System Programming: The vast majority of operating systems (Windows, macOS, Linux kernels) are written in C. Its low-level memory access and control make it ideal for interacting directly with hardware.
- Embedded Systems and IoT: From microcontrollers in smart devices to complex automotive systems, C’s efficiency and minimal resource footprint are paramount.
- Performance-Critical Applications: Game engines, databases, high-frequency trading platforms, and scientific simulations often leverage C (or C++) for their core components to achieve maximum speed.
- Other Languages’ Foundations: Interpreters and runtimes for languages like Python, PHP, and JavaScript are often implemented in C, showcasing its role as a bedrock of modern computing.
- Educational Value: Learning C provides a deep understanding of computer architecture, memory management, and how programs interact with hardware, fostering fundamental skills invaluable for any programmer. For those looking to master algorithms or understand data structures, C offers an unvarnished view of how these concepts truly work at a machine level.
Preparing Your System: Choosing the Right Tools
The first practical step in installing C involves making a few key decisions about the tools you’ll use. These choices can significantly influence your development experience, from the command-line arguments you’ll type to the overall workflow.
Selecting Your C Compiler: GCC, Clang, and MSVC
Your choice of compiler is paramount. Each has its strengths and preferred environments:
- GCC (GNU Compiler Collection): This is the most widely used and open-source compiler, available across Linux, macOS, and Windows (via MinGW or WSL). It’s robust, well-maintained, and produces highly optimized code. For most cross-platform development, GCC is the de facto standard.
- Clang: An alternative open-source compiler, Clang is part of the LLVM project. It’s known for its faster compilation times, superior error messages, and excellent integration with various development tools. On macOS, Clang is often the default compiler shipped with Xcode Command Line Tools. It’s also gaining popularity on Linux and can be used on Windows.
- MSVC (Microsoft Visual C++ Compiler): This is Microsoft’s proprietary compiler, primarily used for developing applications on Windows. It’s tightly integrated with Visual Studio IDE and is essential for projects targeting the Windows API or using specific Microsoft libraries. While its name suggests C++, it fully supports the C standard.
For beginners, especially those looking for cross-platform compatibility and a strong community, GCC or Clang are excellent choices. If you plan to focus solely on Windows development and leverage Microsoft’s ecosystem, MSVC with Visual Studio is a powerful option.
Integrated Development Environments (IDEs) vs. Text Editors
While the compiler is essential, how you write and manage your code is equally important:
- Text Editors (e.g., VS Code, Sublime Text, Vim, Emacs): These are lightweight programs focused on text editing. They offer syntax highlighting, code completion (with extensions), and often integrated terminals, allowing you to manually compile and run code using the command line.
- Pros: Minimalistic, fast, highly customizable, fosters a deeper understanding of the compilation process.
- Cons: Less integrated debugging, refactoring, and project management tools out-of-the-box.
- Integrated Development Environments (IDEs) (e.g., Visual Studio, Code::Blocks, CLion, Eclipse CDT): These provide a comprehensive environment for software development. They typically include a code editor, compiler, debugger, build automation tools, and sometimes version control integration, all within a single application.
- Pros: Streamlined workflow, powerful debugging tools, advanced project management, helpful for larger projects.
- Cons: Can be resource-intensive, steeper learning curve due to feature richness, can obscure the underlying compilation steps for beginners.
For your initial setup, we recommend installing a compiler and then using a versatile text editor like VS Code for coding. This approach provides a good balance between ease of use and understanding the fundamental development cycle.
Step-by-Step Installation Guides for Major Operating Systems
The installation process varies significantly depending on your operating system. Below, we provide detailed instructions for Windows, macOS, and Linux, covering the most common and recommended methods.
Installing C on Windows
Windows users have several viable options for setting up a C development environment.
Option 1: MinGW-w64 (Recommended for standalone GCC)
MinGW-w64 (Minimalist GNU for Windows) provides a complete GCC toolchain for Windows, allowing you to compile C programs directly from the command prompt without needing a full Linux environment.
- Download MinGW-w64:
- Go to the MinGW-w64 official download page on SourceForge:
https://sourceforge.net/projects/mingw-w64/files/ - Navigate to
MinGW-W64 GCC-8.1.0(or the latest stable version) ->x86_64-posix-seh(for 64-bit Windows, recommended) ori686-posix-dwarf(for 32-bit). - Download the
.ziparchive.
- Go to the MinGW-w64 official download page on SourceForge:
- Extract MinGW-w64:
- Extract the contents of the downloaded
.zipfile to a simple path, such asC:MinGW. Ensure themingw64folder (or similar, containingbin,lib, etc.) is directly insideC:MinGW. So, the path tobinshould beC:MinGWmingw64bin.
- Extract the contents of the downloaded
- Add MinGW to System PATH: This step is crucial for running
gcccommands from any directory in your command prompt.- Search for “Environment Variables” in the Windows search bar and select “Edit the system environment variables.”
- Click “Environment Variables…”
- Under “System variables,” find the
Pathvariable, select it, and click “Edit…” - Click “New” and add the path to the
bindirectory of your MinGW installation (e.g.,C:MinGWmingw64bin). - Click “OK” on all windows to save the changes.
- Verify Installation:
- Open a new Command Prompt or PowerShell window.
- Type
gcc --versionand press Enter. You should see information about the GCC compiler if the installation and PATH configuration were successful.
Option 2: Windows Subsystem for Linux (WSL)
WSL allows you to run a full Linux distribution directly on Windows, providing a native Linux environment with easy access to GCC/Clang. This is an excellent option if you also plan to develop for Linux or prefer a Linux-like terminal experience.
- Enable WSL:
- Open PowerShell as Administrator.
- Run:
wsl --install - This command will enable the necessary features, download the latest Linux kernel, and install Ubuntu by default. You may need to restart your computer.
- Set Up Linux Distribution:
- After restarting, a Linux console window will open, prompting you to create a username and password for your Linux distribution.
- Install Build Essentials (GCC):
- Once your Linux distribution is set up, open its terminal.
- Update package lists:
sudo apt update - Install the
build-essentialpackage, which includes GCC, G++, and Make:sudo apt install build-essential
- Verify Installation:
- In the WSL terminal, type
gcc --versionand press Enter.
- In the WSL terminal, type
Option 3: Visual Studio with C++ Desktop Development (for MSVC)
If you intend to use Microsoft’s proprietary compiler and IDE, Visual Studio is the way to go.
- Download Visual Studio:
- Go to the Visual Studio website:
https://visualstudio.microsoft.com/downloads/ - Download the “Community” edition, which is free for individual developers, open-source projects, and academic research.
- Go to the Visual Studio website:
- Install Visual Studio:
- Run the downloaded installer.
- When prompted to “Choose workloads,” select the “Desktop development with C++” workload. This includes the MSVC compiler, necessary SDKs, and Visual Studio IDE features for C/C++ development.
- Click “Install.” This might take a while depending on your internet speed and selected components.
- Verify Installation:
- Launch Visual Studio.
- Create a new C++ project (you can choose a “Console App” template). Even though it says C++, it fully supports C.
- Write a simple C program (e.g.,
main.c) and try to compile and run it within the IDE.
Installing C on macOS
macOS development primarily relies on Apple’s Xcode Command Line Tools, which provide the Clang compiler.
Xcode Command Line Tools
- Open Terminal:
- You can find Terminal in
Applications/Utilities/or search for it using Spotlight (Cmd + Space).
- You can find Terminal in
- Install Command Line Tools:
- Type
xcode-select --installand press Enter. - A dialog box will appear asking if you want to install the tools. Click “Install” and agree to the terms.
- The download and installation process may take some time.
- Type
- Verify Installation:
- Once the installation is complete, type
clang --versionandgcc --versionin the terminal. - Both commands should output version information. On macOS,
gccis typically an alias that points toclang.
- Once the installation is complete, type
Homebrew for GCC/Clang (Optional)
If you prefer to install a specific version of GCC or Clang not provided by the Command Line Tools, Homebrew is a popular package manager for macOS.
- Install Homebrew:
- If you don’t have Homebrew, install it by running the command from its official website:
https://brew.sh/ /bin/bash -c "$(curl -fsSL https://raw.githubusercontent.com/Homebrew/install/HEAD/install.sh)"
- If you don’t have Homebrew, install it by running the command from its official website:
- Install GCC/Clang via Homebrew:
- To install GCC:
brew install gcc - To install Clang:
brew install llvm(LLVM includes Clang)
- To install GCC:
- Verify Installation:
- Run
gcc --versionorclang --version. Note that Homebrew-installed compilers might have different names (e.g.,gcc-12for GCC 12) or require specific paths if not symlinked to the default.
- Run
Installing C on Linux (Ubuntu/Debian, Fedora/RHEL)
Linux distributions typically make installing C compilers straightforward using their respective package managers.
Using apt (for Debian, Ubuntu, Mint)
- Open Terminal:
- Use
Ctrl+Alt+Tor find “Terminal” in your applications menu.
- Use
- Update Package Lists:
sudo apt update
- Install Build Essentials:
- The
build-essentialpackage includes GCC, G++, and Make, which are fundamental for C/C++ development. sudo apt install build-essential
- The
- Verify Installation:
gcc --versiong++ --version(for C++, but useful to confirm the package)
Using dnf or yum (for Fedora, RHEL, CentOS)
- Open Terminal:
- Find “Terminal” in your applications menu.
- Install Development Tools:
- On Fedora (using
dnf):sudo dnf groupinstall "Development Tools" - On RHEL/CentOS (using
yumfor older versions,dnffor newer):sudo yum groupinstall "Development Tools"orsudo dnf groupinstall "Development Tools" - This command installs GCC, G++, Make, and other common development utilities.
- On Fedora (using
- Verify Installation:
gcc --versiong++ --version
Verifying Your C Installation and Running Your First Program
After completing the installation steps for your chosen operating system, it’s crucial to verify that everything is set up correctly. The best way to do this is by compiling and running a simple “Hello World” program.
Checking Compiler Version
Before writing code, confirm your compiler is accessible from your command line.
- For GCC/Clang: Open your terminal (Command Prompt/PowerShell on Windows, Terminal on macOS/Linux) and type:
gcc --version
or
clang --version
You should see output similar to:
gcc (MinGW-W64 x86_64-posix-seh, built by Brecht Sanders) 8.1.0

Copyright (C) 2018 Free Software Foundation, Inc.

This is free software; see the source for copying conditions. There is NO

warranty; not even for MERCHANTABILITY or FITNESS FOR A PARTICULAR PURPOSE.
- For MSVC (Visual Studio): This is usually verified within the Visual Studio IDE. When you create a C++ console project and build it, if there are no errors, the compiler is working. If you need to check the compiler version from the command line, you’d typically open a “Developer Command Prompt for VS” and type
cl.
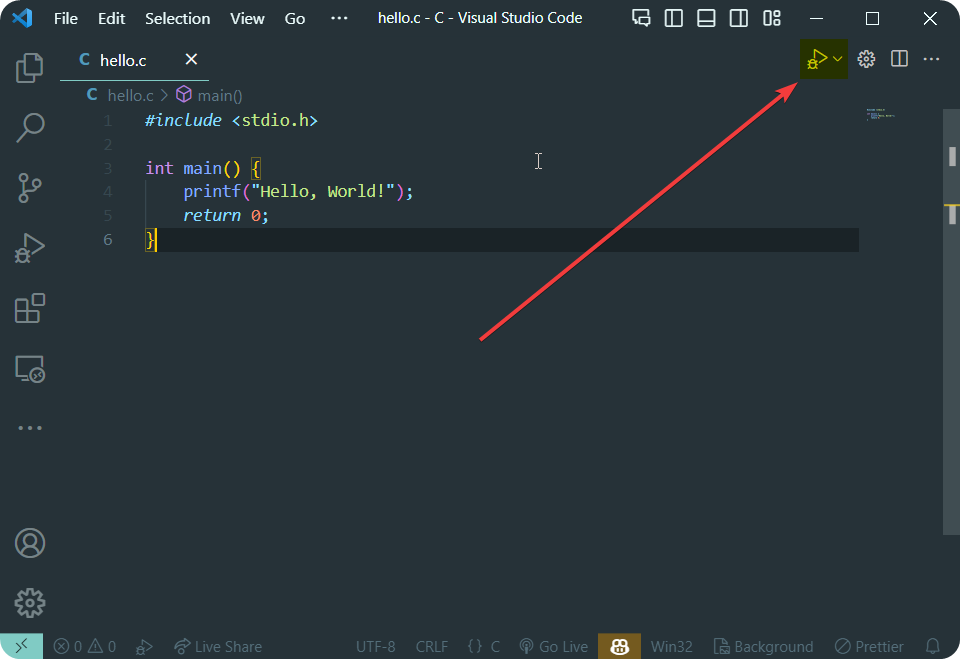
Writing and Compiling a Simple “Hello World” Program
Let’s create the quintessential first program.
-
Create a File:
- Open your chosen text editor (VS Code, Sublime Text, etc.).
- Create a new file and save it as
hello.cin an easily accessible directory (e.g.,C:UsersYourUserDocumentsC_Projectson Windows, or~/Projects/Con macOS/Linux).
-
Enter the Code:
- Type (or copy-paste) the following C code into
hello.c:
#include <stdio.h> int main() { printf("Hello, World!n"); return 0; }- Explanation:
#include <stdio.h>: This line includes the standard input/output library, which contains functions likeprintffor printing output to the console.int main(): This is the main function, the entry point of every C program.printf("Hello, World!n");: This line calls theprintffunction to display the string “Hello, World!” followed by a newline character (n) to move the cursor to the next line.return 0;: This indicates that the program executed successfully.
- Type (or copy-paste) the following C code into
-
Compile the Program:
- Open your terminal/command prompt and navigate to the directory where you saved
hello.c. For example:cd C:UsersYourUserDocumentsC_Projects(Windows)cd ~/Projects/C(macOS/Linux)
- Compile the program using your compiler (GCC is used in this example):
gcc hello.c -o hellogcc: Invokes the GCC compiler.hello.c: Specifies the source code file to compile.-o hello: Specifies the output executable file name. If omitted, the default executable name isa.outon Linux/macOS ora.exeon Windows.
- If there are no error messages, the compilation was successful, and an executable file named
hello(orhello.exeon Windows) will be created in the same directory.
- Open your terminal/command prompt and navigate to the directory where you saved
Executing Your C Program
Now that your program is compiled, you can run it.
- In the same terminal/command prompt:
- On Windows:
.hello.exe(orhelloif the.exeextension is in your PATH environment variable or omitted in compilation) - On macOS/Linux:
./hello
- On Windows:
- You should see the output:
Hello, World!
Congratulations! You have successfully installed C, compiled your first program, and executed it. This signifies that your development environment is fully operational.
Troubleshooting Common Installation Issues
Even with clear instructions, you might encounter issues during installation. Here are some common problems and their solutions:
Path Variable Configuration Problems
- Symptom: “gcc is not recognized as an internal or external command,” or “command not found.”
- Cause: The directory containing your compiler’s executable (e.g.,
C:MinGWmingw64binfor MinGW, or/usr/binfor Linux) is not included in your system’sPATHenvironment variable, or you didn’t open a new terminal window after modifying PATH. - Solution:
- Windows: Double-check the “Add MinGW to System PATH” steps. Ensure there are no typos, and that you’ve added the correct path to the
binfolder. After modifying, close and reopen your Command Prompt/PowerShell. - macOS/Linux: For custom installations (like Homebrew), ensure the
PATHvariable in your.bashrc,.zshrc, or.profilefile is correctly configured to include the compiler’s directory. Runsource ~/.bashrc(or your relevant shell config file) or open a new terminal.
- Windows: Double-check the “Add MinGW to System PATH” steps. Ensure there are no typos, and that you’ve added the correct path to the
Compiler Not Found Errors
- Symptom: Compilation fails with messages like “fatal error: no input files” or “cannot find -lc” (linker error for C standard library).
- Cause: The compiler itself might not be installed correctly, or its internal components are missing.
- Solution:
- Re-run Installation: Revisit the installation steps for your OS and chosen compiler. Ensure no steps were skipped and all downloads completed successfully.
- Check Disk Space: Insufficient disk space can cause incomplete installations.
- Reinstall Build Essentials (Linux/WSL): Sometimes packages get corrupted. Try
sudo apt reinstall build-essentialorsudo dnf reinstall "Development Tools".

Dependency Issues
- Symptom: Errors related to missing libraries (e.g., “fatal error: ‘math.h’ not found”).
- Cause: While rare for basic C, more complex projects might require additional libraries or development headers that aren’t included in the base compiler installation.
- Solution:
- Install Development Headers: On Linux, packages like
libssl-devorlibcurl4-openssl-devprovide necessary headers for specific functionalities. Usesudo apt install <package-name>-devorsudo dnf install <package-name>-devel. - Verify Compiler Installation: Ensure your compiler is fully installed as per the instructions, as core library headers are usually part of the standard installation.
- Install Development Headers: On Linux, packages like
Remember to always restart your terminal or IDE after making significant environment changes. If you encounter persistent issues, refer to the official documentation for your chosen compiler or operating system, or search online forums with the specific error message you’re receiving.
The journey of a thousand programs begins with a single, correctly installed compiler. By diligently following these steps, you’ve laid a solid foundation for your C programming adventures, opening doors to low-level system understanding, high-performance computing, and a deeper grasp of how technology truly works. Happy coding!
aViewFromTheCave is a participant in the Amazon Services LLC Associates Program, an affiliate advertising program designed to provide a means for sites to earn advertising fees by advertising and linking to Amazon.com. Amazon, the Amazon logo, AmazonSupply, and the AmazonSupply logo are trademarks of Amazon.com, Inc. or its affiliates. As an Amazon Associate we earn affiliate commissions from qualifying purchases.