The motherboard is the silent architect of any computing system. Often referred to as the “backbone” or the “central nervous system,” it facilitates communication between the processor, memory, storage, and peripheral devices. Despite its critical role, the specific model and manufacturer of a motherboard are frequently unknown to the average user. Whether you are looking to upgrade your RAM, ensure compatibility for a new CPU, or download the latest BIOS updates for system stability, knowing exactly what type of motherboard you have is a foundational technical skill.
In this guide, we will explore the diverse methodologies available for identifying motherboard specifications, ranging from simple software-based queries to physical hardware inspection.
Leveraging Built-in Windows Utilities for Hardware Identification
For the vast majority of PC users, opening the chassis is unnecessary. Windows provides several integrated tools that can extract hardware metadata directly from the BIOS/UEFI. These methods are efficient, non-invasive, and provide accurate results without requiring third-party installations.
The System Information (msinfo32) Method
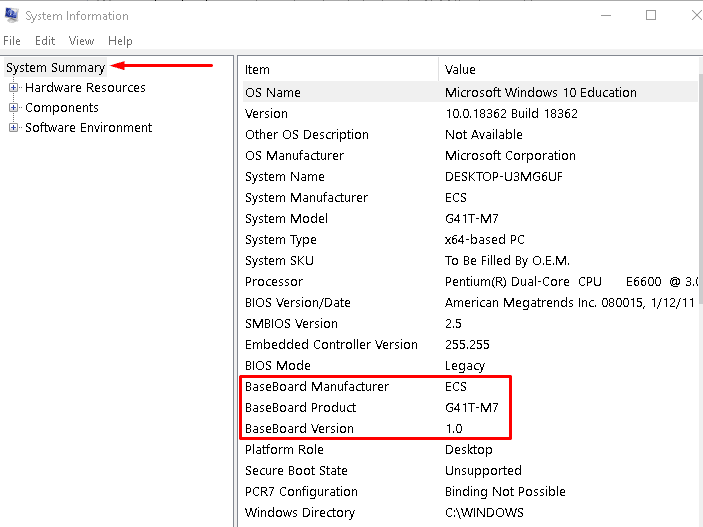
The most straightforward way to identify your motherboard is through the System Information tool. This utility aggregates data from the Windows Registry and the system’s hardware configuration files.
To access this, simply type “System Information” into the Windows search bar or press Win + R and type msinfo32. Once the window opens, ensure “System Summary” is selected in the left pane. On the right, look for three specific entries:
- BaseBoard Manufacturer: This identifies the brand (e.g., ASUS, MSI, Gigabyte).
- BaseBoard Product: This is the specific model name or number.
- BaseBoard Version: This provides the hardware revision level.
While this is the easiest method, it is worth noting that some pre-built systems (like those from Dell or HP) may list the manufacturer as the PC brand rather than the internal board manufacturer, and custom-built rigs may occasionally show “To be filled by O.E.M.” if the vendor did not populate the string.
Command Prompt (CMD) and WMIC
For users who prefer a more streamlined, text-based approach, the Windows Management Instrumentation Command-line (WMIC) is a powerful tool. It allows you to query the system for specific hardware attributes directly.
Open the Command Prompt by typing cmd in the search bar. Once the terminal is open, input the following command:
wmic baseboard get product,Manufacturer,version,serialnumber
The terminal will return a clean table showing the manufacturer, the model (Product), the version, and the serial number. This method is particularly useful for tech professionals who need to document system specs quickly across multiple machines or via remote access.
Utilizing Windows PowerShell
PowerShell is a more advanced task-based command-line shell and scripting language. It offers deeper access to the Windows Management Instrumentation (WMI) than the standard Command Prompt. To find your motherboard information, right-click the Start button and select “Windows PowerShell” (or Terminal). Type the following:
Get-WmiObject -Class Win32_BaseBoard | Select-Object Manufacturer, Product, Model, SerialNumber
PowerShell is often more reliable than the standard System Information GUI when dealing with modern UEFI-based systems, as it pulls data directly from the WMI object classes that represent physical hardware.
Third-Party Diagnostic Software for Detailed Hardware Analysis
While built-in tools are excellent for quick checks, third-party diagnostic utilities often provide a deeper level of insight. These tools are preferred by enthusiasts and power users who need to know not just the model, but also the chipset details, bus speeds, and current firmware versions.
CPU-Z: The Industry Standard for Quick Specs
CPU-Z is a lightweight, freeware utility that has been a staple in the tech community for decades. While its name suggests a focus on the processor, its “Mainboard” tab is exceptionally detailed.
After downloading and running CPU-Z, navigate to the Mainboard tab. Here, you will find the motherboard manufacturer, model name, and chipset information (e.g., Intel Z790 or AMD B650). More importantly, CPU-Z displays the current BIOS version and date. This is crucial for troubleshooting, as many modern hardware issues can be solved by verifying if your BIOS is outdated.
Speccy: A Visual Overview of Your System
Developed by Piriform (the creators of CCleaner), Speccy is designed for users who want a high-level, easy-to-read overview of their entire system. Unlike the clinical look of CPU-Z, Speccy offers a clean interface with color-coded temperature readings.
Clicking on the “Motherboard” section in Speccy provides a wealth of information, including the number of available PCI-Express slots and their current lane configurations. This is particularly helpful for users planning to install multiple GPUs or NVMe expansion cards.
HWiNFO64: Professional-Grade Monitoring
For the most comprehensive technical breakdown possible, HWiNFO64 is the gold standard. It provides real-time monitoring of every sensor on the motherboard, including VRM (Voltage Regulator Module) temperatures and fan speeds.
When you launch HWiNFO, you can choose “Summary-only” mode for a quick snapshot or the full report for a deep dive. The motherboard section in HWiNFO is incredibly precise, often revealing details about the Super I/O chip and the specific power phases used on the board—information that is rarely found in other software.
Physical Inspection: Manual Identification Techniques
There are scenarios where software methods are unavailable—for instance, if the computer fails to POST (Power-On Self-Test) or if you are dealing with a loose motherboard not installed in a case. In these instances, physical inspection is the only path forward.
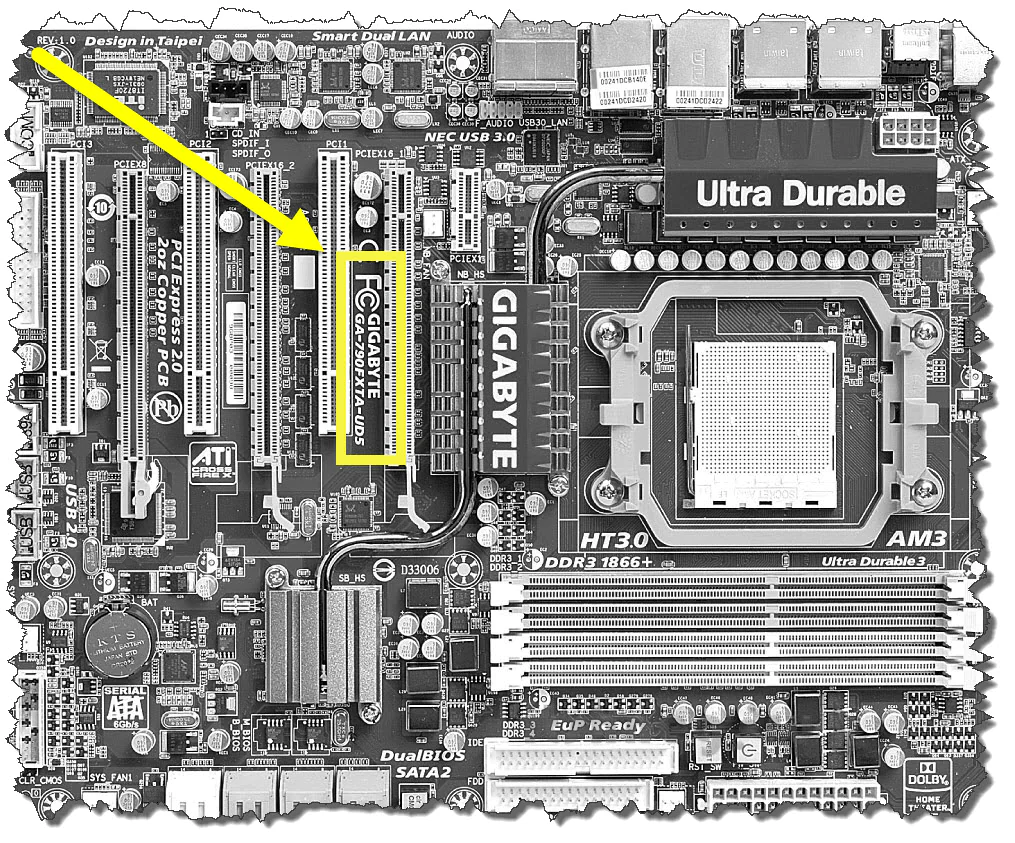
Locating Model Numbers on the PCB
Motherboard manufacturers always print the model name directly onto the Printed Circuit Board (PCB). However, due to the density of modern components, these labels can sometimes be obscured by large CPU coolers or massive graphics cards.
Common locations for the model name include:
- Between the CPU Socket and the RAM slots: Often printed in bold, white lettering.
- Between the PCI-Express slots: This is the most common location for full-sized ATX boards.
- Near the edge of the board: Usually found along the top or right side.
The model name usually looks like a series of alphanumeric characters, such as “ROG STRIX Z790-E GAMING WIFI” or “B550M DS3H.”
Deciphering Revision Numbers
One critical detail often overlooked during physical inspection is the “Revision Number.” Manufacturers frequently release multiple versions of the same motherboard model (e.g., Rev 1.0, Rev 2.0). These revisions may feature different VRM components, updated Wi-Fi chips, or even different BIOS requirements.
The revision number is usually located in one of the corners of the motherboard—frequently the bottom-left corner near the audio capacitors. Knowing your revision number is vital if you are downloading drivers or BIOS updates, as using the wrong revision’s software can occasionally lead to system instability.
Using Serial Numbers and QR Codes
On modern motherboards, you will often find small stickers with barcodes or QR codes. These stickers contain the serial number (S/N) and the Part Number (P/N). If the printed model name is unreadable, you can enter the serial number into the manufacturer’s support website (ASUS, MSI, Gigabyte, etc.) to pull up the exact specifications and warranty status of that specific unit.
Identification on Alternative Operating Systems: macOS and Linux
While Windows dominates the desktop market, knowing how to identify hardware on macOS (for “Hackintosh” builders or Mac Pro users) and Linux (for server administrators) is equally important.
Finding Logic Board Info on macOS
Apple refers to motherboards as “Logic Boards.” To find information about your board, click the Apple menu and select “About This Mac,” then click “System Report.” Under the “Hardware” section, look for the “Model Identifier” and “Board ID.” While Apple does not use standard consumer motherboard models, these IDs allow you to cross-reference the board specifications in databases like EveryMac.
Linux Terminal Commands for Hardware Detection
Linux users have access to several powerful tools for hardware probing. The most common is dmidecode, which dumps the computer’s DMI (Desktop Management Interface) table into a readable format.
Run the following command with root privileges:
sudo dmidecode -t baseboard
This will provide the manufacturer, product name, and version. Alternatively, the lscpu or lshw commands can be used to view the overall system architecture, though dmidecode remains the most specific tool for motherboard identification.
The Practical Application of Motherboard Identification
Identifying your motherboard is not merely an academic exercise; it has real-world implications for the longevity and performance of your computer system.
Facilitating BIOS/UEFI Updates
The BIOS (Basic Input/Output System) is the low-level software that initializes your hardware. Manufacturers release BIOS updates to improve stability, patch security vulnerabilities, and, most importantly, add support for newer CPUs. To update your BIOS, you must know your exact motherboard model and revision. Installing the wrong BIOS file can “brick” your motherboard, rendering it completely inoperable.
Ensuring Hardware Compatibility for Upgrades
If you are planning to upgrade your RAM, you need to know if your motherboard supports DDR4 or DDR5, and what the maximum supported frequency is. Similarly, if you are upgrading your storage, you need to know if your M.2 slots support NVMe Gen 4 or Gen 5 speeds. Identifying your motherboard allows you to consult the “Qualified Vendor List” (QVL) provided by the manufacturer, which lists exactly which hardware components have been tested and verified to work with your board.
Locating Correct Drivers for System Optimization
When you perform a clean installation of Windows, you may find that the internet doesn’t work or the audio sounds distorted. This is because generic Windows drivers are not always optimized for your specific hardware. By knowing your motherboard type, you can visit the manufacturer’s support page to download the specific Chipset, LAN, Wi-Fi, and Audio drivers designed for your hardware, ensuring peak performance and minimal latency.
In conclusion, understanding how to identify your motherboard—whether through the Windows command line, specialized diagnostic software, or physical inspection—is a vital part of maintaining a healthy and upgradeable PC. It bridges the gap between the software you use every day and the physical hardware that makes it all possible.
aViewFromTheCave is a participant in the Amazon Services LLC Associates Program, an affiliate advertising program designed to provide a means for sites to earn advertising fees by advertising and linking to Amazon.com. Amazon, the Amazon logo, AmazonSupply, and the AmazonSupply logo are trademarks of Amazon.com, Inc. or its affiliates. As an Amazon Associate we earn affiliate commissions from qualifying purchases.