Superheat is a critical concept in the operation of an HVAC (Heating, Ventilation, and Air Conditioning) system, particularly within the refrigeration cycle. Understanding superheat is essential for technicians to properly diagnose issues, ensure optimal system performance, and prevent costly damage. While the term might sound complex, its underlying principle is quite straightforward. At its core, superheat refers to the amount of heat a refrigerant absorbs after it has completely boiled into a vapor. This might seem like a minor detail, but it plays a significant role in the efficiency and longevity of an air conditioning or refrigeration unit.
The refrigeration cycle itself is a closed-loop system that moves heat from one location to another. In an air conditioner, it moves heat from inside your home to the outside. This process involves several key components: the compressor, the condenser, the expansion valve (or metering device), and the evaporator. Each component plays a specific role, and the state of the refrigerant – whether it’s a liquid, a vapor, or a mixture of both – is crucial at each stage. Superheat is directly related to the refrigerant’s behavior as it transitions from a liquid to a gas in the evaporator coil.
Understanding the Refrigeration Cycle and Superheat’s Role
To truly grasp superheat, we need to first understand the fundamental principles of the refrigeration cycle. This cycle is a continuous process of phase changes and pressure adjustments that allow for the transfer of thermal energy.
The Four Key Components of the Refrigeration Cycle
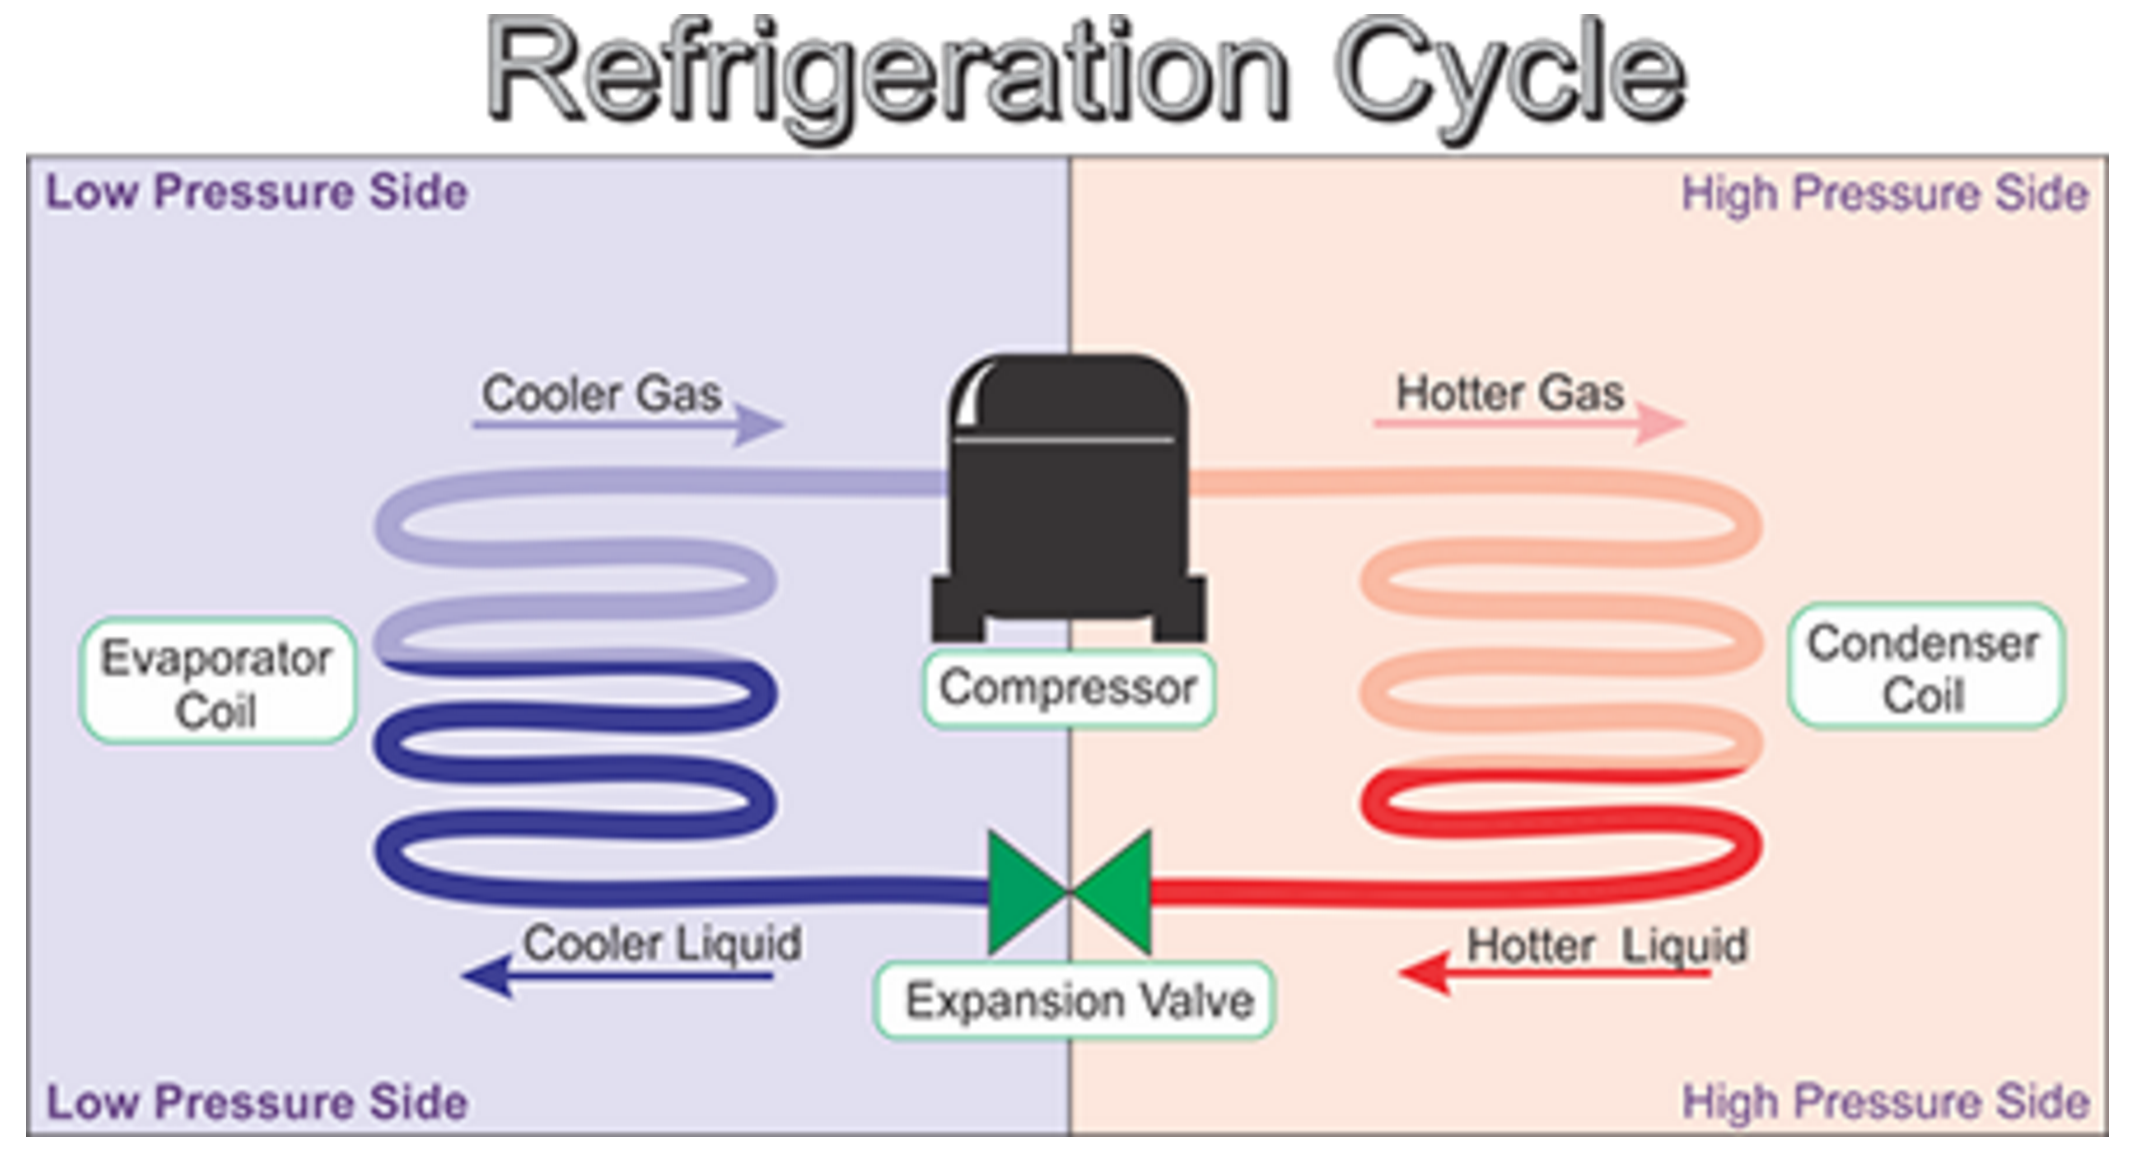
The refrigeration cycle, the heart of any air conditioning or refrigeration system, consists of four primary components, each contributing to the movement of heat.
The Compressor: The Engine of the Cycle
The compressor, often referred to as the “heart” of the HVAC system, is responsible for increasing the pressure and temperature of the refrigerant vapor. It draws in low-pressure, low-temperature refrigerant vapor from the evaporator and compresses it into a high-pressure, high-temperature vapor. This compression is a vital step, as it prepares the refrigerant to release its heat in the next stage. Without the compressor, the refrigerant would not be able to circulate effectively through the system, and the heat transfer process would cease. The work done by the compressor is what drives the entire cycle.
The Condenser: Releasing Heat to the Environment
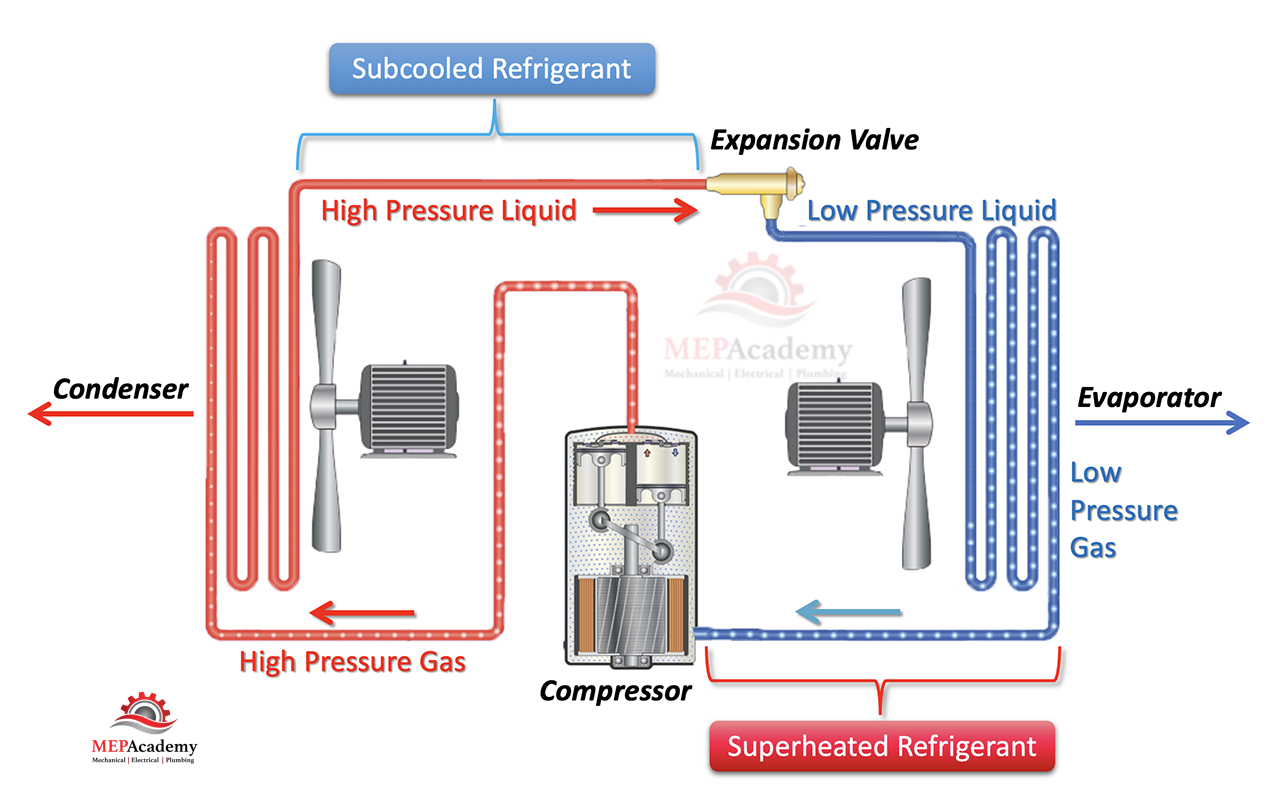
The high-pressure, high-temperature refrigerant vapor then flows to the condenser coil, typically located outdoors in an air conditioning unit. Here, the refrigerant releases its heat to the surrounding outdoor air. As it loses heat, the refrigerant condenses from a high-pressure gas into a high-pressure liquid. This is a crucial phase change, where the refrigerant gives up the heat it absorbed from the indoor environment. The efficiency of the condenser is paramount; if it cannot effectively dissipate heat, the system’s cooling capacity will be significantly reduced.
The Expansion Valve (Metering Device): Preparing for Evaporation
The high-pressure liquid refrigerant then moves to the expansion valve, also known as a metering device. This component acts as a restriction, causing a significant drop in both the pressure and temperature of the refrigerant. As the liquid refrigerant passes through this restriction, it partially flashes into a vapor, creating a cold, low-pressure mixture of liquid and vapor. This sudden reduction in pressure and temperature is what enables the refrigerant to absorb heat effectively in the next stage. Different types of expansion valves exist, such as thermostatic expansion valves (TXVs) and capillary tubes, each with its own control mechanisms.
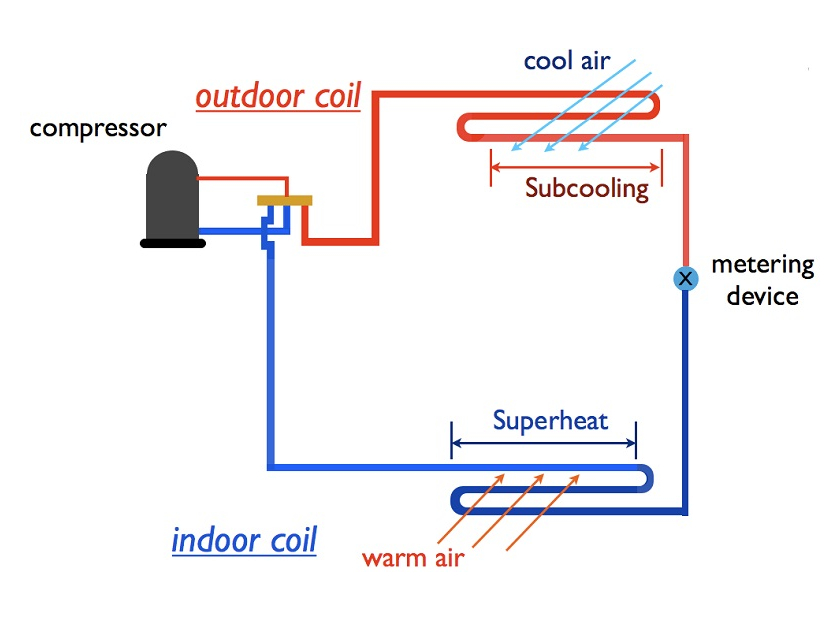
The Evaporator: Absorbing Heat from the Indoor Air
Finally, the cold, low-pressure mixture of liquid and vapor refrigerant enters the evaporator coil, typically located indoors. As warm indoor air is blown across the evaporator fins by the indoor fan, the refrigerant absorbs heat from this air. This absorption of heat causes the remaining liquid refrigerant to boil and completely transform into a low-pressure vapor. This is the point where the cooling effect is generated, as heat is removed from the indoor air. The superheat concept becomes directly relevant within this component.
The Concept of Saturation Point and Superheat
Within the evaporator, the refrigerant undergoes a phase change from liquid to vapor. This transition occurs at a specific temperature and pressure, known as the saturation point. Below this saturation point, the refrigerant is a liquid or a mixture of liquid and vapor. Above it, it is a vapor.
Saturation Point: The Boiling Point of Refrigerant
The saturation point is the temperature at which a substance will change from a liquid to a gas (boiling) or from a gas to a liquid (condensing) at a given pressure. In the context of the evaporator coil, the refrigerant enters as a low-pressure mixture of liquid and vapor and is designed to boil completely into a vapor by the time it reaches the end of the coil. The saturation temperature is determined by the pressure within the evaporator.
What Happens After Boiling? The Birth of Superheat
Once all the liquid refrigerant has completely vaporized within the evaporator, it continues to absorb heat from the indoor air. This additional heat absorbed by the refrigerant after it has fully turned into a vapor is what defines superheat. Essentially, it’s the temperature increase of the refrigerant vapor above its saturation temperature.
Imagine a pot of boiling water on a stove. The water boils at 212°F (100°C) at standard atmospheric pressure. If you continue to heat the pot after all the water has turned to steam, the steam’s temperature will rise above 212°F. That extra heat added to the steam is analogous to superheat in the HVAC system.
The purpose of superheat is to ensure that no liquid refrigerant reaches the compressor. Liquid refrigerant is incompressible, and if it enters the compressor, it can cause significant damage, leading to what is known as “liquid slugging,” a potentially catastrophic event for the compressor. Therefore, a certain amount of superheat is not only desirable but necessary for the safe and efficient operation of the system.
Measuring and Calculating Superheat: The Technician’s Toolkit
For HVAC technicians, accurately measuring and calculating superheat is a fundamental diagnostic procedure. It provides crucial insights into the system’s performance and helps identify potential problems.
The Tools of the Trade: Gauges and Thermometers
To measure superheat, technicians rely on a combination of specialized tools.
Pressure Gauges: Reading System Pressures
Pressure gauges are connected to specific service ports on the HVAC system to read the operating pressures of the refrigerant. For superheat calculations, the low-side pressure gauge (connected to the suction line between the evaporator and the compressor) is particularly important, as it indicates the pressure within the evaporator. This pressure can then be used to determine the saturation temperature of the refrigerant.
Temperature Clamps/Probes: Measuring Refrigerant Line Temperature
Accurate temperature readings are taken using temperature clamps or probes. These devices are attached to the suction line at two key points:
- At the outlet of the evaporator: This is where the refrigerant is expected to have just completed its boiling process and started to superheat.
- At the inlet to the compressor: This is the temperature of the refrigerant vapor as it enters the compressor.
The Superheat Calculation Formula
The calculation of superheat is straightforward once the necessary measurements are obtained. The formula is:
Superheat = Refrigerant Temperature at the Suction Line (near compressor) – Refrigerant Saturation Temperature (corresponding to evaporator pressure)
Let’s break down how this is applied:
-
Measure the Evaporator Pressure: Connect the low-side pressure gauge to the suction service port. Read the pressure.
-
Determine the Saturation Temperature: Using a pressure-temperature (P-T) chart specific to the type of refrigerant being used (e.g., R-410A, R-22), find the saturation temperature that corresponds to the measured evaporator pressure. For example, if the evaporator pressure is 60 psi and the refrigerant is R-410A, the saturation temperature might be 37°F. This is the temperature at which the refrigerant is boiling.
-
Measure the Refrigerant Temperature at the Suction Line: Attach a temperature clamp or probe to the suction line just before it enters the compressor. Record this temperature.
-
Calculate Superheat: Subtract the saturation temperature (from step 2) from the suction line temperature (from step 3).
- Example: If the suction line temperature is 55°F and the saturation temperature is 37°F, then the superheat is 55°F – 37°F = 18°F.
This 18°F represents the amount of heat the refrigerant vapor has absorbed above its boiling point as it traveled from the evaporator to the compressor.
Why Superheat Matters: Diagnosing System Health and Efficiency
The measurement of superheat is not just an academic exercise; it’s a critical diagnostic tool that directly impacts the performance, efficiency, and lifespan of an HVAC system. An incorrect superheat value can indicate a variety of problems, from low refrigerant charge to airflow issues.
Ideal Superheat Ranges: The Sweet Spot for Performance
Every HVAC system is designed to operate within a specific superheat range, which is typically provided by the manufacturer. This range is crucial for optimal performance.
Too Little Superheat: The Threat of Liquid Slugging
If the superheat is too low, it means the refrigerant is not absorbing enough heat in the evaporator, or it’s reaching the compressor too soon after boiling. This can be a sign of:
- Overcharged system: Too much refrigerant in the system can lead to less complete evaporation in the evaporator.
- Restricted airflow over the evaporator coil: If the indoor fan is not moving enough air, or the coil is dirty, the refrigerant won’t be able to absorb heat efficiently.
- Faulty expansion valve: An expansion valve that is stuck open or not throttling correctly can allow too much liquid refrigerant into the evaporator.
The primary concern with low superheat is the risk of liquid refrigerant reaching the compressor. Compressors are designed to compress gas, not liquid. Liquids are incompressible, and attempting to compress them can lead to catastrophic mechanical failure, often referred to as “liquid slugging.” This can result in bent valves, broken rods, or severely damaged bearings, necessitating expensive compressor replacement.
Too Much Superheat: Inefficiency and Potential for Overheating
Conversely, if the superheat is too high, it indicates that the refrigerant is absorbing too much heat after it has already vaporized. This can signal:
- Low refrigerant charge: Not enough refrigerant circulating means that what is present is getting “overheated” by the time it reaches the compressor.
- Restricted refrigerant flow: A partially blocked line or a malfunctioning expansion valve can limit the amount of refrigerant entering the evaporator, leading to excessive heat absorption by the remaining vapor.
- Overheating of the compressor: While the superheat is a measure of the refrigerant’s temperature above saturation, excessive superheat can also lead to higher operating temperatures for the compressor itself, potentially reducing its lifespan.
- Reduced cooling capacity: If the refrigerant is already fully vaporized and then continues to absorb heat, it’s not effectively absorbing the heat that would otherwise be removed from the indoor air.
The Importance of Manufacturer Specifications
It’s crucial to emphasize that “ideal” superheat values are not universal. They depend heavily on the specific HVAC system, the refrigerant type, the outdoor and indoor conditions (temperature and humidity), and the design of the equipment. HVAC technicians must always refer to the manufacturer’s installation and service manuals for the correct superheat settings for a particular unit. These specifications are developed through rigorous testing to ensure optimal performance and longevity.
Superheat as a Diagnostic Indicator
By monitoring superheat, technicians can diagnose a range of potential problems without necessarily having to disassemble the unit. It’s a non-invasive way to get a clear picture of the system’s internal dynamics.
- Low Refrigerant Charge: A common cause of high superheat. As refrigerant is lost, there’s less to evaporate, causing the existing vapor to get hotter.
- Dirty Evaporator Coil or Restricted Airflow: Similar to low charge, this prevents efficient heat transfer in the evaporator, leading to increased superheat.
- Blocked Filter Drier: A clogged filter drier can restrict refrigerant flow, leading to insufficient refrigerant in the evaporator and thus high superheat.
- Undersized Evaporator Coil: If the evaporator is too small for the system’s capacity, it may not be able to evaporate all the refrigerant, leading to low superheat.
In essence, superheat is a vital sign for the health of an HVAC system. Consistent monitoring and accurate diagnosis based on superheat readings allow for timely maintenance and repair, preventing minor issues from escalating into major, costly failures. It’s a testament to how understanding seemingly complex thermodynamic principles can directly translate into practical, beneficial outcomes for system reliability and efficiency.
aViewFromTheCave is a participant in the Amazon Services LLC Associates Program, an affiliate advertising program designed to provide a means for sites to earn advertising fees by advertising and linking to Amazon.com. Amazon, the Amazon logo, AmazonSupply, and the AmazonSupply logo are trademarks of Amazon.com, Inc. or its affiliates. As an Amazon Associate we earn affiliate commissions from qualifying purchases.