
In the complex ecosystem that is your personal computer, the motherboard serves as the central nervous system, dictating what components can communicate with each other, how fast they operate, and ultimately, the overall capabilities of your system. Whether you’re a seasoned PC builder, a casual user, or someone looking to breathe new life into an aging machine, knowing the specific model of your motherboard is a fundamental piece of information. This knowledge becomes even more critical in the age of Windows 11, with its specific hardware requirements like TPM 2.0 and Secure Boot, which are often tied directly to your motherboard’s capabilities and BIOS/UEFI settings.
Understanding your motherboard isn’t just about satisfying a tech curiosity; it’s a strategic move that touches upon vital aspects of technology management, brand value, and financial prudence. It empowers you to make informed decisions about upgrades, troubleshoot issues effectively, ensure compatibility with new software, and even assess the potential resale value of your components. This guide will walk you through various methods to identify your motherboard on a Windows 11 system, delving into why this information is so valuable and how it can impact your digital life and wallet.
Why Your Motherboard Matters (Beyond the Basics)
At its core, the motherboard is the printed circuit board that connects all the hardware components of your computer. But its influence extends far beyond mere connectivity. It’s the foundation upon which your entire system’s performance, upgradeability, and even security posture are built. For a Windows 11 user, this understanding takes on added significance.
The Tech Core: Understanding Compatibility and Performance
Your motherboard determines the type of CPU it can host (via the socket type, e.g., LGA 1700 for Intel or AM5 for AMD), the generation and speed of RAM it supports (DDR4 vs. DDR5), the number and type of expansion slots available (PCIe for graphics cards, NVMe SSDs), and the number of SATA ports for traditional hard drives or SSDs. The onboard chipset, integrated into the motherboard, manages data flow between these components, impacting overall system performance and the availability of features like USB 3.2 or Thunderbolt.
For Windows 11, specifically, your motherboard’s capabilities are paramount. The requirement for TPM 2.0 (Trusted Platform Module) and Secure Boot are often features supported by modern motherboards, but they might need to be enabled in the UEFI/BIOS settings. An older motherboard might lack TPM 2.0 entirely, making it incompatible with Windows 11 unless an unsupported workaround is used, which carries its own risks. Knowing your motherboard model allows you to quickly check its official specifications and support for these crucial technologies, saving you time and potential frustration.
The Brand Factor: Quality, Features, and Ecosystems
Just as you might choose a specific car brand for its reliability or features, motherboard brands like ASUS, MSI, Gigabyte, and ASRock have established their own reputations and ecosystems. Each brand offers different lineups, catering to various user segments from budget-conscious builders to high-end enthusiasts. For instance, an ASUS ROG (Republic of Gamers) board is known for its gaming-centric features, robust power delivery, and extensive RGB lighting customization, while a Gigabyte AORUS board might appeal for its competitive pricing and often excellent VRM designs.
The brand of your motherboard can influence the quality of its components, the sophistication of its BIOS/UEFI interface, the robustness of its accompanying software utilities (for fan control, overclocking, or RGB synchronization), and the level of customer support you can expect. For pre-built systems from brands like Dell, HP, or Lenovo, the motherboard is custom-designed, often limiting upgrade options and necessitating proprietary drivers or parts. Understanding these brand nuances is crucial for making informed purchasing decisions, troubleshooting, and even for projecting a certain level of technical acumen if you’re showcasing your build or providing advice.
The Money Angle: Smart Upgrades and Investment Protection
From a financial perspective, identifying your motherboard is a cornerstone of smart resource management. If you’re considering an upgrade—say, a faster CPU or more RAM—your motherboard is the first bottleneck you need to evaluate. A new CPU might require a different socket type, making your existing motherboard incompatible. Similarly, upgrading from DDR4 to DDR5 RAM would necessitate a new motherboard. Knowing your motherboard model allows you to consult its official QVL (Qualified Vendor List) for compatible RAM or its CPU support list, preventing costly mistakes and unnecessary purchases.
Furthermore, knowing your motherboard contributes to the accurate valuation of your system components, whether you’re planning to sell an old PC or individual parts. A high-end motherboard from a reputable brand with desirable features can significantly increase the resale value of your system. Conversely, a budget or proprietary OEM board might limit its market appeal. For those involved in side hustles like PC repair or building custom systems for clients, this knowledge is fundamental to pricing services accurately, sourcing compatible parts efficiently, and maintaining profitability. It’s an investment in knowledge that directly translates to financial savings and opportunities.
Method 1: The Quick & Easy Ways (No Software Required)
Sometimes, the simplest solutions are the best. Before diving into software-based diagnostics, there are several straightforward ways to identify your motherboard using only your eyes and built-in Windows tools.
Visual Inspection (If Accessible)
This is often the most direct method, assuming you have physical access to your computer’s interior.
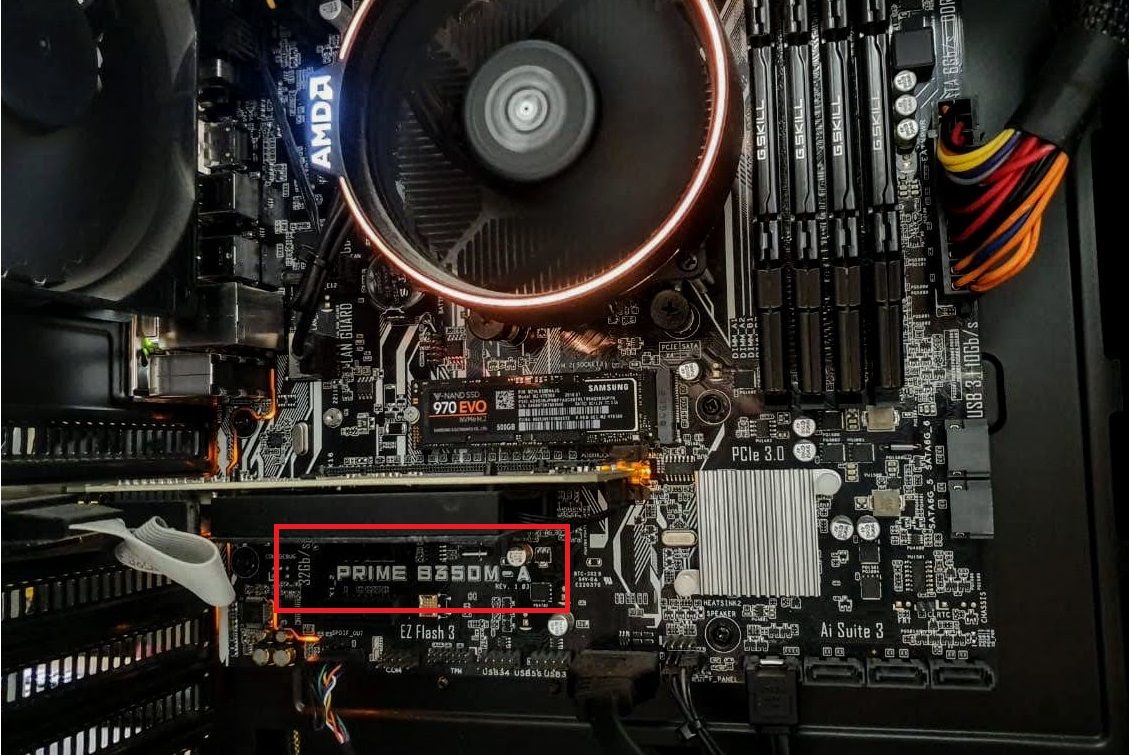
- Power Down and Unplug: Ensure your PC is completely turned off and disconnected from the power source for safety.
- Open the Case: Remove the side panel of your computer case. This usually involves unscrewing two thumb screws at the back or sliding a latch.
- Locate the Motherboard: The motherboard is the largest circuit board inside your PC, to which everything else is connected.
- Look for Branding and Model Number:
- Major Brands: You’ll typically see prominent branding from manufacturers like ASUS, MSI, Gigabyte, ASRock, or EVGA. This logo is often near the CPU socket, on the chipset heatsink, or around the PCIe slots.
- Model Name: Close to the brand logo, or sometimes near the RAM slots, CPU, or on the edge of the board, you should find the specific model name (e.g., “ASUS ROG Strix Z690-F Gaming WiFi,” “MSI B550 Tomahawk,” “Gigabyte AORUS Elite AX”). It might be printed in white ink on the black or brown PCB.
- Pre-Built Systems: If you have a pre-built PC (Dell, HP, Lenovo, Acer, etc.), the motherboard might have their brand name and a specific, often less descriptive, model number (e.g., “Dell 0KM9MG,” “HP 8767”). These motherboards are usually proprietary and may not have all the features or upgrade paths of aftermarket boards.
- Take a Photo: If you can’t immediately decipher it, take a clear photo with your phone and zoom in later.
This method gives you immediate, undeniable proof of your motherboard’s identity, along with its physical characteristics.
Checking System Information (Windows Built-in Tools)
Windows 11 comes with several utilities that can provide detailed hardware information without needing to open your PC case.
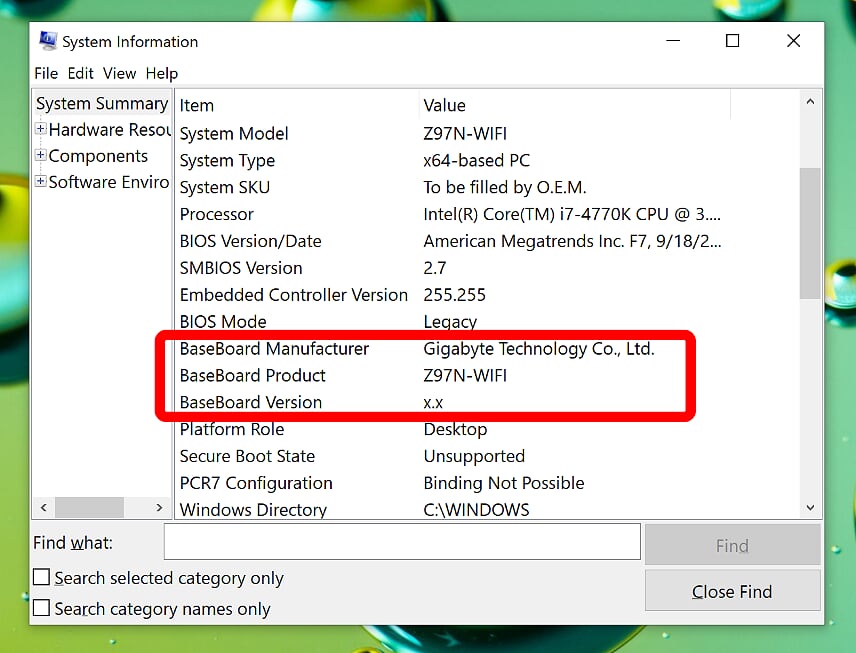
Using System Information (msinfo32)
This is arguably the most reliable built-in tool for motherboard identification.
- Open Run Dialog: Press
Windows Key + Rto open the Run dialog. - Type
msinfo32: In the Run dialog, typemsinfo32and press Enter. This will open the System Information window. - Locate Motherboard Details: In the left pane, ensure “System Summary” is selected. In the right pane, look for the following entries:
- BaseBoard Manufacturer: This tells you the brand (e.g., “ASUS,” “Micro-Star International Co. Ltd.”).
- BaseBoard Product: This is your motherboard’s model name (e.g., “ROG STRIX Z690-F GAMING WIFI,” “B550 TOMAHAWK (MS-7C91)”).
- BaseBoard Version: This might indicate a revision number or other specific version details.
This method is quick, easy, and generally accurate for most systems.
Using Command Prompt (WMIC)
For those who prefer a command-line interface, Windows Management Instrumentation Command-line (WMIC) can retrieve this information.
- Open Command Prompt: Press
Windows Key + R, typecmd, and press Enter. Alternatively, search for “cmd” in the Start menu and select “Run as administrator” for potentially more comprehensive results. - Enter the Command: Type the following command and press Enter:
wmic baseboard get product,Manufacturer,version,serialnumber - View Output: You’ll see the Manufacturer, Product (model name), Version, and SerialNumber listed.
This method provides concise information, especially useful for scripting or remote diagnostics.

Using DirectX Diagnostic Tool (dxdiag)
While primarily for graphics and sound information, dxdiag can also offer basic system details.
- Open Run Dialog: Press
Windows Key + R. - Type
dxdiag: Typedxdiagand press Enter. Click “Yes” if prompted about checking for digital signatures. - View System Information: On the “System” tab, look for:
- System Manufacturer: This often lists the motherboard manufacturer or the PC brand (e.g., “ASUS,” “Dell Inc.”).
- System Model: This might show the motherboard model or the overall PC model name.
Dxdiag is less specific than msinfo32 for motherboard details but can serve as a quick check.
Method 2: Leveraging Software for Detailed Insights
While Windows’ built-in tools are good, third-party software often provides a more granular and user-friendly display of your system’s hardware, including comprehensive motherboard information.
Third-Party System Information Tools
These utilities are designed to gather and present detailed specifications about every component in your PC.
CPU-Z
CPU-Z is a lightweight, free utility that is indispensable for anyone wanting to know their system’s specifics.
- Download and Install: Go to the official CPU-Z website (cpuid.com) and download the latest version. Install it.
- Launch CPU-Z: Open the CPU-Z application.
- Navigate to the “Mainboard” Tab: You’ll see several tabs. Click on “Mainboard.”
- Identify Details: This tab will clearly display:
- Manufacturer: The brand of your motherboard.
- Model: The precise model number.
- Chipset: The motherboard chipset (e.g., Intel Z690, AMD B550).
- BIOS: BIOS brand and version, which is crucial for updates.
- Graphic Interface: Information about your PCIe slot and GPU.
CPU-Z is highly recommended due to its accuracy and the wealth of information it provides beyond just the motherboard, including CPU, RAM (memory and SPD tabs), and graphics card details.
Speccy
Speccy, developed by Piriform (the creators of CCleaner), offers a more extensive overview of your entire system, presented in an easy-to-read format.
- Download and Install: Get Speccy from its official website (ccleaner.com/speccy). Install the free version.
- Launch Speccy: Open the application. It will take a moment to scan your system.
- Locate “Motherboard” Section: Once the scan is complete, you’ll see a summary. On the left-hand navigation pane, click on “Motherboard.”
- Detailed Information: The Motherboard section will provide:
- Manufacturer: Motherboard brand.
- Model: Specific model name, often with chipset information.
- Chipset: Detailed chipset information.
- BIOS: Brand, version, and date.
- PCIe Slots: Information on occupied and available slots.
- Voltage, Temperature: Some motherboards allow Speccy to read sensor data.
Speccy is excellent for getting a holistic view of your system’s health and specifications, making it a valuable tool for diagnostics and planning.
HWMonitor
While primarily known for real-time sensor monitoring (temperatures, voltages, fan speeds), HWMonitor from CPUID (the same developers as CPU-Z) also lists fundamental hardware details.
- Download and Install: Obtain HWMonitor from cpuid.com.
- Launch HWMonitor: Open the application.
- Identify Motherboard: Scroll through the list of detected hardware. Under the “Motherboard” section (often identified by its manufacturer and model), you’ll see details like voltages and temperatures, but the header itself will identify your motherboard.
HWMonitor is more about real-time data but can quickly confirm your motherboard model if you already have it installed.
Device Manager for Driver-Specific Information
The Device Manager, while not explicitly designed to show the motherboard model, can sometimes indirectly hint at the chipset or specific system devices associated with your motherboard.
- Open Device Manager: Right-click the Start button and select “Device Manager.”
- Look under “System devices”: Expand the “System devices” category. You might find entries related to your chipset (e.g., “Intel Z690 Chipset Family,” “AMD SMBus,” “AMD PMF (Platform Management Framework) Driver”). This won’t give you the exact motherboard model but can confirm the chipset, which is a key component of the motherboard. This method is less direct but can be useful for verifying chipset drivers.
What to Do Once You Know Your Motherboard Model
Identifying your motherboard is not the end goal; it’s the gateway to a multitude of benefits that enhance your computing experience, protect your investment, and bolster your digital security.
Driver Updates and Software Downloads
Once you have your exact motherboard model, the first thing you should do is visit the official support page on the manufacturer’s website (e.g., ASUS support, MSI support). Here, you can find:
- Latest Drivers: Download and install the most up-to-date chipset drivers, LAN drivers, audio drivers, and any other specific drivers for your motherboard’s integrated components. Keeping drivers current ensures optimal performance and stability for Windows 11.
- BIOS/UEFI Updates: Crucially, check for the latest BIOS (Basic Input/Output System) or UEFI (Unified Extensible Firmware Interface) firmware updates. BIOS updates often include performance enhancements, bug fixes, improved hardware compatibility, and, most importantly for Windows 11 users, crucial security patches and better support for features like TPM 2.0 and Secure Boot. Updating your BIOS is a delicate process, so follow the manufacturer’s instructions precisely.
- Utility Software: Many manufacturers offer proprietary software for fan control, RGB lighting synchronization, overclocking, and system monitoring. These tools can help you customize and optimize your PC’s performance and aesthetics, contributing to a better “Brand” experience.
Planning Future Upgrades
Knowing your motherboard’s model is essential for any future hardware upgrade.
- CPU Compatibility: Check the CPU support list on the motherboard’s product page to see which processors are compatible. This will prevent you from buying a CPU that doesn’t fit your socket or isn’t supported by your chipset.
- RAM Compatibility: Consult the motherboard’s Qualified Vendor List (QVL) for RAM. This list details specific RAM modules tested and guaranteed to work with your board, helping you choose compatible and performant memory. Pay attention to the maximum supported RAM capacity and speed.
- Storage Expansion: Understand how many M.2 NVMe slots and SATA ports are available, and what PCIe generation they support. This is vital for expanding your storage with fast SSDs or additional hard drives.
- GPU Compatibility: While most modern GPUs are backward compatible with PCIe slots, knowing your motherboard’s PCIe generation (e.g., PCIe 4.0, PCIe 5.0) can inform your GPU upgrade choices for maximizing performance.
- Windows 11 Readiness: If your goal is to upgrade to Windows 11, confirm that your motherboard supports TPM 2.0 and Secure Boot, and if they are enabled in the BIOS. If not, the manufacturer’s website or a BIOS update might provide the necessary steps to enable them or confirm their absence.
This foresight prevents costly mispurchases and ensures that your “Money” is invested wisely into compatible and performant components.
Troubleshooting and Diagnostics
When issues arise, your motherboard model becomes a critical piece of information for troubleshooting.
- Error Codes and Manuals: If your system fails to boot or displays specific error codes, knowing your motherboard model allows you to quickly search for its manual online. Manuals contain detailed explanations of error codes, jumper settings, and troubleshooting steps specific to your board.
- Component Isolation: For instance, if you suspect a faulty RAM slot, knowing your motherboard model helps you identify specific slots for testing or replacement.
- Digital Security Implications: Keeping your motherboard’s firmware updated is a key part of maintaining digital security. Vulnerabilities can exist in BIOS/UEFI firmware, and manufacturers regularly release updates to patch these. Being able to identify your board allows you to proactively apply these critical security updates, protecting your system from potential exploits.
Conclusion
Identifying your motherboard on a Windows 11 system is more than just a technical exercise; it’s a foundational step towards greater control over your computing experience. By employing the straightforward methods outlined above—whether through a quick visual inspection, Windows’ built-in tools like msinfo32 and wmic, or comprehensive third-party utilities like CPU-Z and Speccy—you gain crucial insights into the heart of your PC.
This understanding translates directly into tangible benefits across the Tech, Brand, and Money spectrums. From ensuring compatibility with Windows 11 and optimizing performance through driver updates (Tech), to making informed decisions based on motherboard brand reputations and features (Brand), and finally, to making smart financial choices for upgrades, maintenance, and potential resale (Money), knowing your motherboard empowers you. So, take a moment to explore your system. The knowledge you gain will pay dividends in managing your digital life efficiently, securely, and economically. Go ahead, check what motherboard you have – it’s a wise investment in your PC’s future.
aViewFromTheCave is a participant in the Amazon Services LLC Associates Program, an affiliate advertising program designed to provide a means for sites to earn advertising fees by advertising and linking to Amazon.com. Amazon, the Amazon logo, AmazonSupply, and the AmazonSupply logo are trademarks of Amazon.com, Inc. or its affiliates. As an Amazon Associate we earn affiliate commissions from qualifying purchases.