
In an era defined by ever-accelerating technological advancements, the demand for robust and responsive computing systems has never been higher. Whether you’re a gamer seeking lightning-fast load times, a creative professional managing vast media libraries, or simply a power user striving for peak productivity, the performance of your internal storage solution plays a pivotal role. Upgrading or adding an internal hard drive is one of the most impactful and cost-effective ways to revitalize an aging system, expand your digital horizons, or even build a custom PC from the ground up.
This comprehensive guide will demystify the process of installing an internal hard drive, empowering you to undertake this essential tech upgrade with confidence. We’ll navigate the intricacies of modern storage technologies, walk you through meticulous preparation steps, detail the physical installation process, and ensure your new drive is fully operational and optimized for peak performance. From selecting the right drive to optimizing its settings, get ready to unlock your computer’s full potential and secure your digital assets for years to come.
Understanding Your Storage Needs and Choices
Before diving into the mechanics of installation, it’s crucial to understand why you’re upgrading and what type of storage best suits your specific requirements. The landscape of internal storage has evolved dramatically, offering a spectrum of options that cater to different budgets, performance demands, and use cases.
Why Upgrade or Add an Internal Hard Drive?
The motivations for installing a new internal hard drive are diverse, often stemming from the universal desire for more speed, space, or reliability.
- Running Out of Space: This is perhaps the most common reason. As our digital lives expand, so do our files – high-resolution photos, 4K videos, extensive software libraries, and increasingly large game installations quickly consume available storage. Adding a new drive is the simplest solution to prevent your system from grinding to a halt due to lack of space, directly impacting your daily productivity.
- Improving Performance: If your operating system (OS) and frequently used applications are still running on a traditional Hard Disk Drive (HDD), upgrading to a Solid State Drive (SSD) can revolutionize your user experience. Boot times will shrink from minutes to seconds, applications will launch almost instantly, and overall system responsiveness will see a dramatic improvement. This performance boost is particularly noticeable in demanding tasks and benefits from the advancements in modern software and AI tools which often require rapid data access.
- Replacing a Failing Drive: Hard drives, like all electronic components, have a finite lifespan. A failing drive can manifest through slow performance, frequent crashes, or alarming noises. Replacing it proactively prevents data loss and ensures the continued reliability of your system – a critical aspect of digital security.
- Building a New System or Custom PC: For enthusiasts and professionals building their own “gadgets,” installing internal drives is a fundamental step. Choosing the right blend of speed and capacity from the outset is key to a robust and future-proof build.
- Digital Security and Data Redundancy: For critical data, maintaining multiple copies or implementing RAID (Redundant Array of Independent Disks) configurations provides an additional layer of digital security. Installing a second drive for backups or a RAID setup can protect against unforeseen drive failures and ensure business continuity or personal data integrity.
Navigating the Landscape of Internal Storage
The world of internal drives primarily revolves around two main technologies: Hard Disk Drives (HDDs) and Solid State Drives (SSDs), each with distinct advantages. Understanding these differences, along with their various form factors, is essential for making an informed choice.
-
HDDs (Hard Disk Drives): The Workhorse of Bulk Storage
HDDs have been the standard for decades, offering the lowest cost per gigabyte. They store data on spinning platters accessed by read/write heads. While slower and more susceptible to physical shock than SSDs, they are ideal for mass storage where raw speed isn’t the paramount concern. Think large media archives, infrequent backups, or secondary game libraries. When considering an HDD, look at capacity (TB) and rotational speed (RPM, typically 7200 RPM for performance, 5400 RPM for energy efficiency). Many “reviews” highlight specific brands known for reliability and longevity in this segment. -
SSDs (Solid State Drives): The Speed Demon of Modern Computing
SSDs represent a significant leap in storage technology, using flash memory to store data. With no moving parts, they are dramatically faster, more durable, silent, and consume less power than HDDs. SSDs are the go-to choice for your operating system, frequently used applications, and demanding workloads, offering unparalleled gains in productivity.- SATA SSDs: These drives typically come in a 2.5-inch form factor, making them a direct replacement or easy addition for laptops and desktops that support 2.5-inch drives and SATA connections. They connect via a SATA data cable and a SATA power cable. While significantly faster than HDDs, they are limited by the SATA 3.0 interface’s theoretical bandwidth of 6 Gbps (approximately 550 MB/s real-world).
- NVMe M.2 SSDs: The pinnacle of consumer storage performance, NVMe (Non-Volatile Memory Express) SSDs utilize the PCIe interface, offering bandwidth several times greater than SATA. They come in a compact M.2 form factor, which resembles a stick of RAM, plugging directly into a dedicated M.2 slot on your motherboard. NVMe drives are cutting-edge, delivering sequential read/write speeds that can exceed 7,000 MB/s, making them perfect for high-performance computing, large data transfers, and applications that benefit immensely from rapid data access – crucial for advanced “software,” “AI tools,” and “apps.”
-
Compatibility: Regardless of your choice, ensuring compatibility with your existing system is paramount.
- SATA Ports: Most modern motherboards have multiple SATA 3.0 ports for SATA HDDs and SSDs.
- M.2 Slots: For NVMe drives, your motherboard must have a compatible M.2 slot. Check your motherboard manual to confirm if the slot supports PCIe NVMe (and which generation, PCIe Gen3, Gen4, or Gen5) or just SATA M.2, and its physical length (e.g., 2280 is common).
- Power Connectors: Your Power Supply Unit (PSU) must have available SATA power connectors for SATA drives.
By carefully assessing your needs and understanding these options, you can select the optimal internal hard drive that will deliver the performance and capacity required for your digital endeavors.
Essential Preparations Before You Begin
A successful hard drive installation hinges on thorough preparation. Skipping these crucial preliminary steps can lead to data loss, component damage, or unnecessary frustration. Think of this stage as laying the groundwork for a smooth and efficient tech tutorial.
Gathering Your Toolkit and Software
Having the right tools at hand will streamline the installation process and ensure the safety of your components.
- Screwdrivers: A good set of Phillips-head screwdrivers (PH1 and PH2 sizes are most common) will be indispensable for opening your PC case and securing drives. Some cases or drive trays might require Torx screws.
- Anti-static Wrist Strap: This is not optional for safe hardware handling. An anti-static wrist strap, connected to an unpainted metal part of your PC case, safely grounds you, preventing electrostatic discharge (ESD) from damaging sensitive internal components. This is a vital aspect of digital security for your hardware.
- Flashlight (Optional but Recommended): A small flashlight can be incredibly helpful for illuminating dark corners inside your PC case, making it easier to locate ports and connect cables.
- Zip Ties or Velcro Cable Straps (Optional): For neat cable management, which improves airflow and aesthetics within your case.
- Backup Software/Cloning Tools: If you’re replacing an existing drive and want to migrate your operating system and data, cloning software (e.g., Macrium Reflect, EaseUS Todo Backup) will be essential. This saves immense amounts of time and effort compared to a fresh installation and re-downloading applications, boosting your productivity significantly.
- Operating System Installation Media: For a fresh OS install, you’ll need a bootable USB drive or DVD with your preferred operating system (Windows, Linux, macOS).
- Drivers: Have your motherboard chipset drivers and potentially any specific storage drivers (especially for older NVMe controllers) ready on a separate USB drive. While modern OS installations often include basic drivers, installing the latest ones ensures optimal performance and compatibility, a core tenet of good “tech” practice.
Crucial Pre-Installation Steps
These preparatory actions are non-negotiable for safeguarding your data and ensuring a seamless upgrade experience.
-
Data Backup: The Absolute Necessity
Before you even think about opening your computer, back up all critical data from your existing drive. This cannot be overstated. Hardware failures, human error, or unforeseen complications during installation can lead to irreversible data loss. Use external hard drives, cloud storage, or network-attached storage (NAS) to create comprehensive backups. This simple step is the ultimate safeguard for your personal and professional productivity, preventing countless hours of lost work and potential heartbreak. -
Power Down and Disconnect:
Completely shut down your computer. Do not simply put it to sleep. Once powered off, disconnect the main power cable from the wall outlet and from the back of your PC. Also, unplug all peripherals (monitor, keyboard, mouse, USB devices, Ethernet cables). This eliminates any risk of electrical shock or accidental component damage during the installation process. -
Grounding Yourself: Preventing Electrostatic Discharge (ESD)
ESD is the silent killer of electronic components. Even a small, unnoticeable static discharge can permanently damage delicate parts like RAM, the motherboard, or your new hard drive.- Wear an anti-static wrist strap, ensuring it’s securely connected to an unpainted metal part of your PC case.
- Alternatively, if you don’t have a strap, frequently touch an unpainted metal surface of the PC case (after it’s unplugged from the wall) to discharge any static electricity from your body. Avoid working on carpeted floors.
-
Consult Your Manuals:
Your PC case manual and, more importantly, your motherboard manual are invaluable resources. They will provide specific details on:- How to open your particular PC case.
- The location and type of drive bays (3.5-inch, 2.5-inch).
- The location of SATA ports and M.2 slots, along with any specific installation instructions for these components.
- Power connector types and locations.
- Any specific BIOS/UEFI settings related to storage.
Ignoring these “tutorials” can lead to confusion and potential damage. Take a few minutes to review them; it’s a mark of a diligent tech professional.
With these preparations meticulously completed, you’re now ready to safely proceed with the physical installation of your new internal hard drive.
The Step-by-Step Installation Process
This is where your meticulous planning pays off. Follow these steps carefully to ensure a secure and functional installation of your new internal hard drive.
Accessing Your Computer’s Interior
The first physical step is to open up your PC case, revealing its internal architecture.
- Opening the PC Case: Most desktop PC cases have a removable side panel, typically secured by two or more thumbscrews or standard Phillips-head screws at the rear. Loosen and remove these screws, then slide the panel backward and lift it away. Some cases might have a latch mechanism. Refer to your case manual if you encounter difficulty. Lay the case on its side on a clean, stable surface, with the motherboard facing upwards.
- Locating Drive Bays or M.2 Slots:
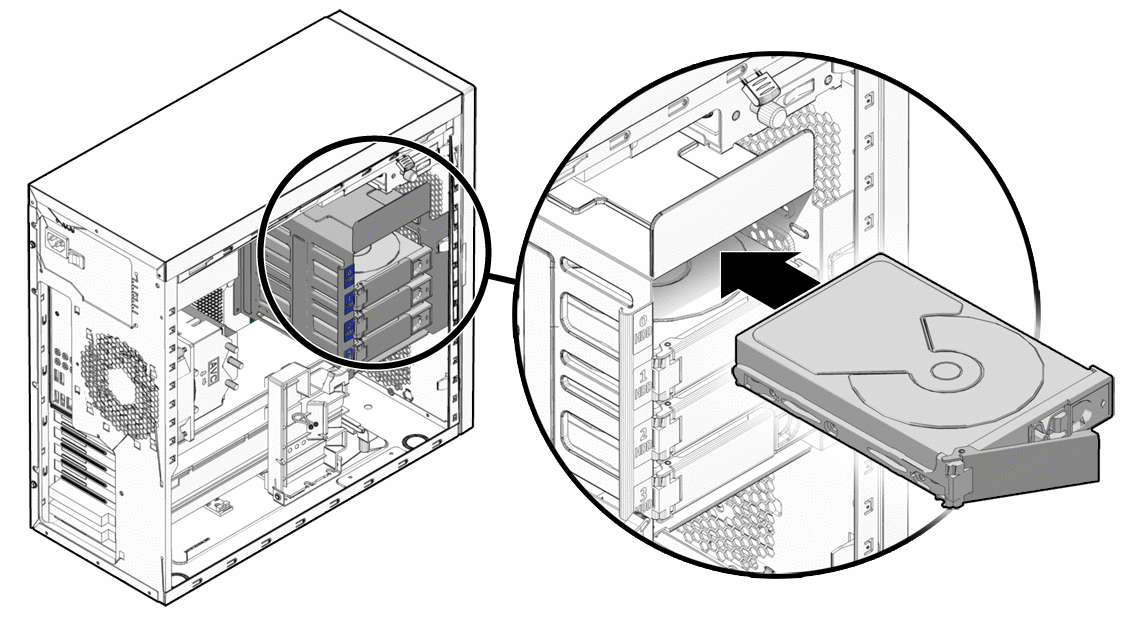
- For SATA Drives (HDDs/SSDs): Look for dedicated drive bays, often cages located at the front or bottom of the case. These are typically designed for 3.5-inch drives (HDDs), and many cases also have 2.5-inch slots or adapters for smaller SSDs.
- For M.2 NVMe SSDs: Locate the M.2 slot directly on your motherboard. It’s usually a small horizontal slot, often labeled “M.2” or “PCIe GenX NVMe,” and might be beneath a heatsink or near the CPU socket. There will be a small standoff screw at the end of the slot.
Mounting the New Drive
The mounting process varies depending on the type and form factor of your drive. Handle all components with care, touching only the edges of circuit boards and connectors.
- For 3.5-inch HDDs:
- Slide the HDD into an available 3.5-inch drive bay. Many modern cases feature tool-less drive trays that simply clip into place.
- If using traditional screw-in bays, align the screw holes on the drive with those on the bay and secure the drive with four screws (two on each side). Ensure it’s firmly seated.
- For 2.5-inch SSDs/HDDs:
- If your case has dedicated 2.5-inch drive mounts, slide the drive in and secure it with screws.
- If you’re using a 3.5-inch bay, you’ll likely need a 2.5-inch to 3.5-inch adapter bracket. Mount the 2.5-inch drive to this bracket, then install the bracket into the 3.5-inch bay as you would a regular HDD. SSDs are very light, so they don’t require as much physical securing, but it’s good practice to mount them firmly.
- For M.2 NVMe SSDs:
- Gently insert the M.2 drive into the M.2 slot on your motherboard at a slight angle (approximately 30 degrees).
- Push down the end of the drive until it lies flat, aligning the half-circle notch on the drive with the standoff screw on the motherboard.
- Secure the drive with the small M.2 screw provided with your motherboard or drive. Be careful not to overtighten. Some motherboards have tool-less latch mechanisms for M.2 drives. If your motherboard has an M.2 heatsink, remove it before installation, then reattach it over the drive after it’s secured. This heatsink is vital for maintaining optimal performance, especially under heavy workloads which are common in tasks involving “AI tools” or intensive software.
Connecting Power and Data Cables
This step ensures your drive receives power and can communicate with your motherboard.
- For SATA Drives (HDD/SSD):
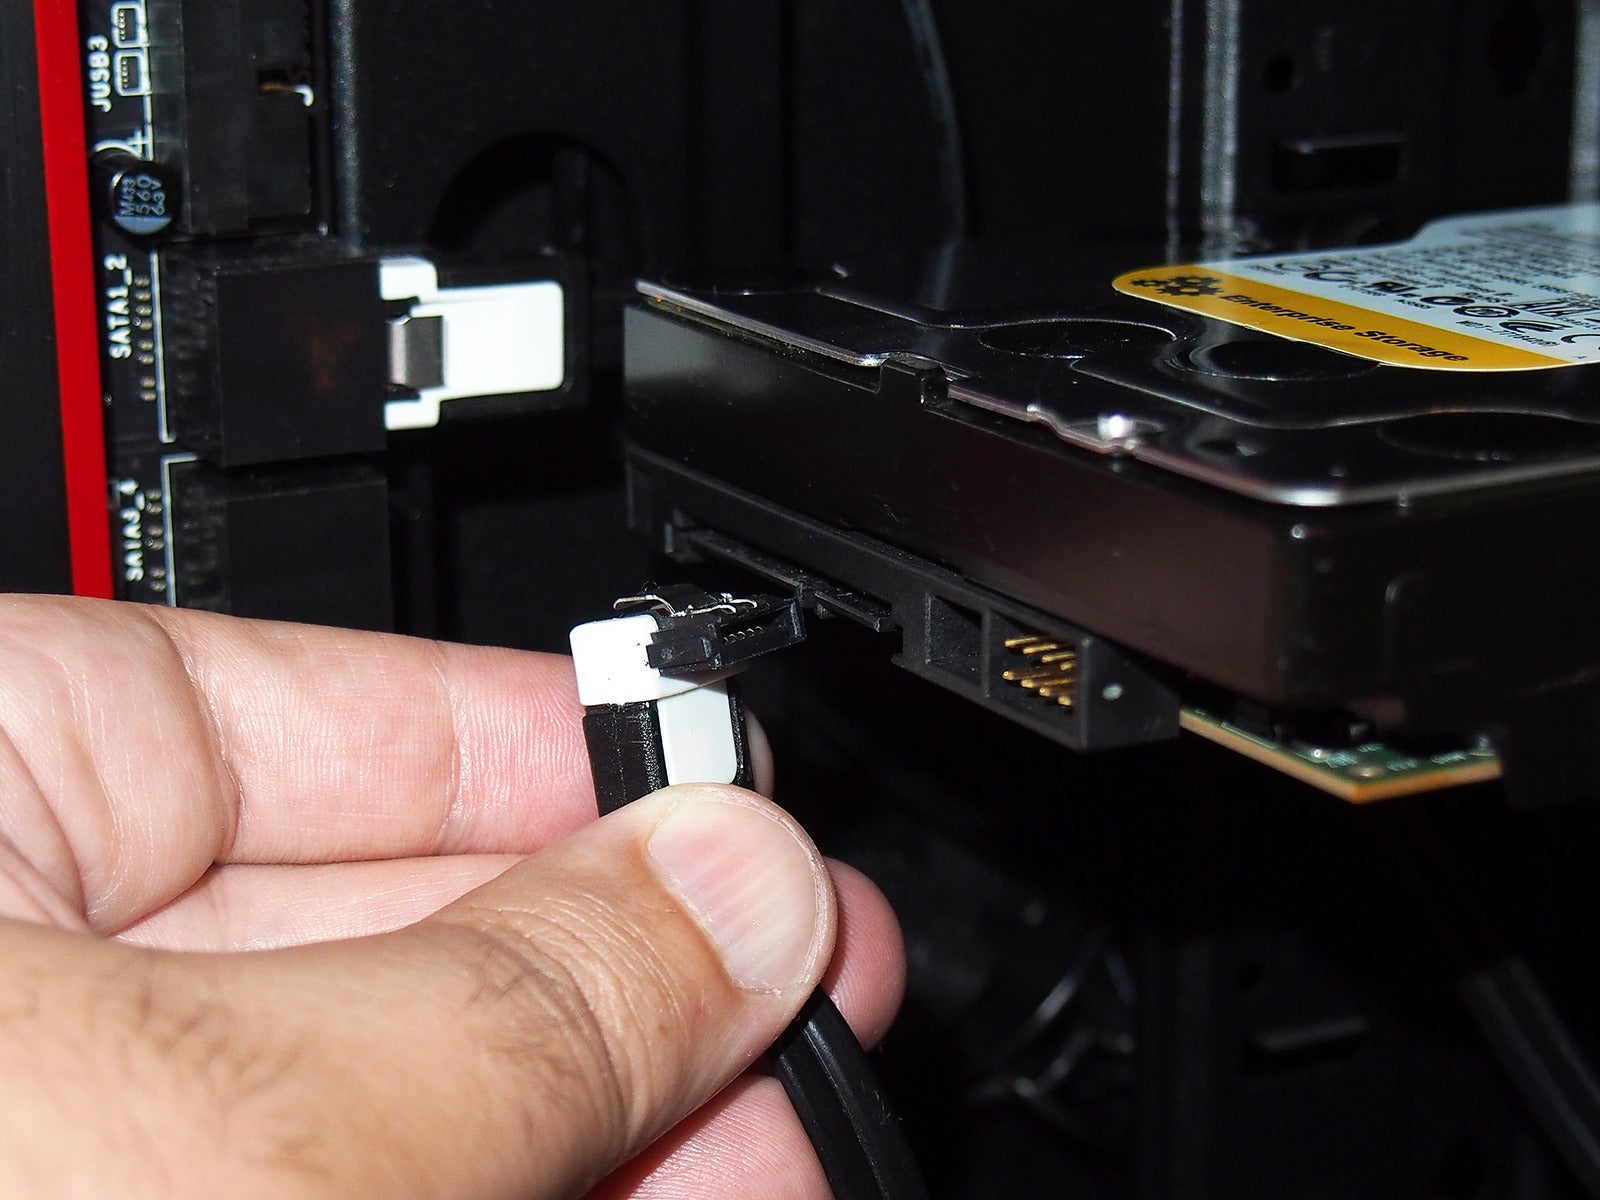
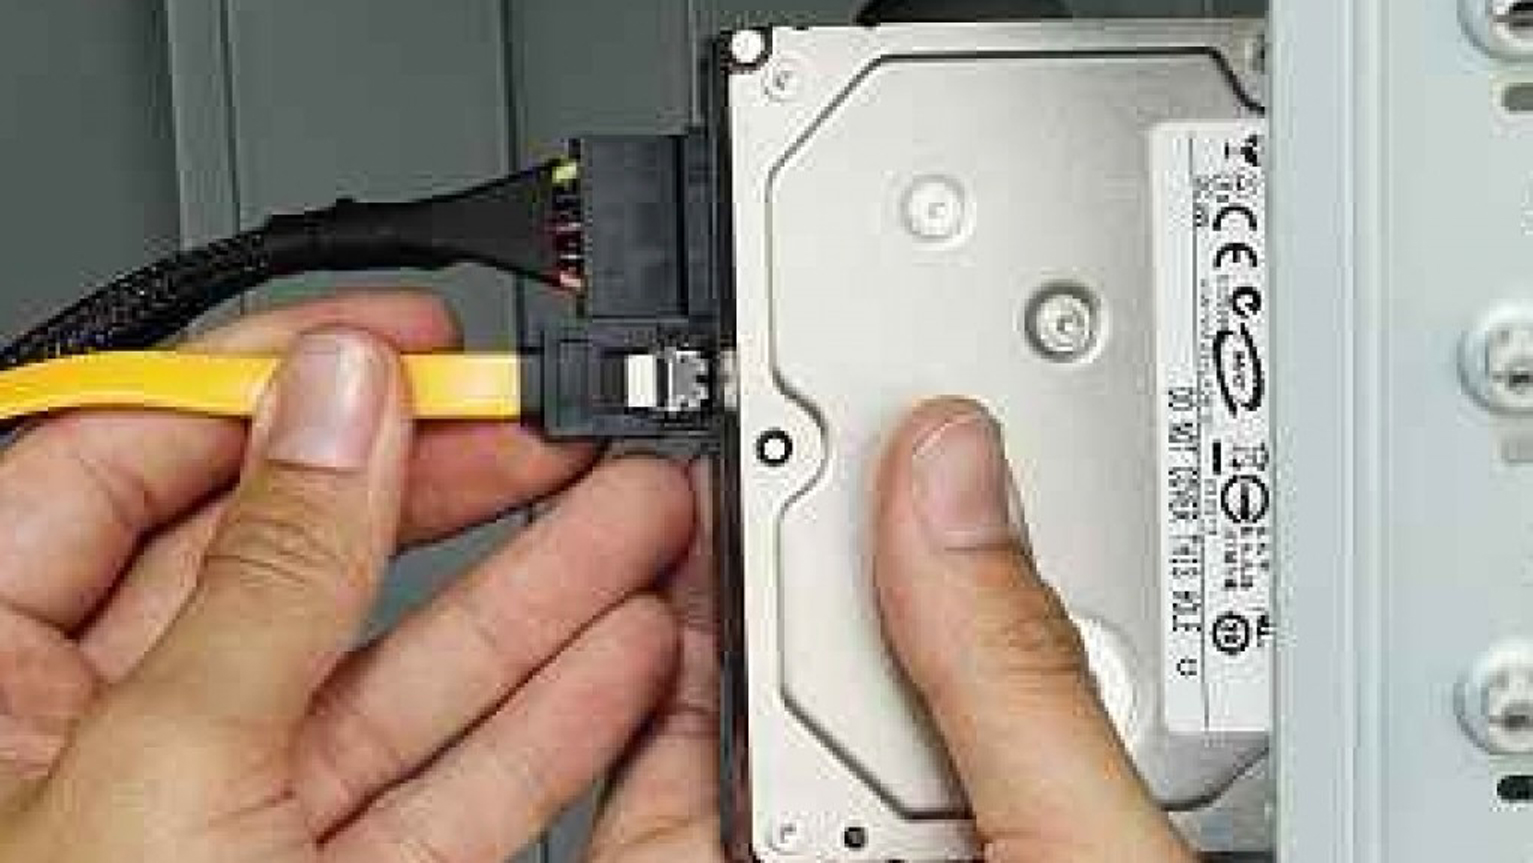
- SATA Data Cable: Connect one end of a SATA data cable (the thinner, L-shaped cable) to the SATA data port on your new drive. Connect the other end to an available SATA data port on your motherboard. Motherboard SATA ports are typically numbered; using the lowest available number (e.g., SATA0 or SATA1) is often recommended, especially for boot drives.
- SATA Power Cable: Connect an available SATA power cable (a wider, L-shaped cable) from your Power Supply Unit (PSU) to the power port on your new drive. Ensure both data and power cables are fully seated and clicked into place.
- For M.2 NVMe Drives:
No cables are needed! The M.2 NVMe drive draws power and communicates directly through the motherboard slot. This is one of the advantages of its compact and high-performance design, simplifying the installation process significantly. - Cable Management Tips: Once all cables are connected, take a moment to tidy them up. Use zip ties or Velcro straps to bundle cables and route them behind the motherboard tray or along the case frame. Good cable management not only improves the aesthetics of your build but also enhances airflow, contributing to cooler component temperatures and better overall system stability and longevity. This attention to detail is a hallmark of a well-maintained system, impacting both performance and future ease of maintenance.
With your new drive physically installed and cabled, it’s time to bring it to life through software configuration.
Post-Installation: Bringing Your New Drive to Life
Physical installation is only half the battle. To leverage your new internal hard drive, it needs to be recognized, formatted, and configured by your operating system. This phase ensures optimal functionality and allows you to integrate the new storage into your workflow, enhancing overall system productivity.
Initializing and Formatting Your Drive
For your operating system to use the new drive, it must first be initialized and formatted. This process prepares the drive for data storage.
-
Booting into BIOS/UEFI:
After installing the drive, close your PC case and reconnect all peripherals and power cables. Boot your computer. As it starts, repeatedly press the key designated by your motherboard manufacturer to enter the BIOS/UEFI setup (commonly Del, F2, F10, or F12). In the BIOS/UEFI, navigate to the storage or boot section. Verify that your new hard drive is detected. If it’s not visible, double-check your cable connections and ensure the drive is securely seated. For NVMe drives, sometimes a specific PCIe mode needs to be enabled, though this is less common with modern motherboards. -
Using Disk Management (Windows) or Disk Utility (macOS) to Initialize and Format:
- Windows:
- Once Windows boots, right-click on the Start button and select “Disk Management.”
- You should see your new drive listed as “Unknown,” “Not Initialized,” or “Unallocated Space.”
- Right-click on the drive (the main disk, not the unallocated space) and select “Initialize Disk.” Choose either MBR (Master Boot Record) or GPT (GUID Partition Table). For drives larger than 2TB or for systems using UEFI firmware, GPT is recommended.
- Once initialized, right-click on the “Unallocated Space” on the new drive and select “New Simple Volume.”
- Follow the wizard: assign a drive letter, choose a file system (NTFS is standard for Windows), and optionally give it a volume label. Perform a “Quick format” for speed.
- Click “Finish” to format the drive. It will now appear as a usable drive in “This PC.”
- macOS:
- Go to Applications > Utilities > Disk Utility.
- In the sidebar, select your new drive (ensure you select the entire disk, not just a volume).
- Click the “Erase” button in the toolbar.
- Choose a name for the drive, select a format (APFS for SSDs in macOS High Sierra and later, macOS Extended (Journaled) for older systems or HDDs), and a scheme (GUID Partition Map is recommended).
- Click “Erase” again to confirm.
- Windows:
-
Partitioning Considerations: You can choose to partition your drive into multiple volumes during the formatting process. For instance, you might create one small partition for the OS and a larger one for data, games, or specific applications. This can help with organization and potentially improve “productivity” by isolating different types of data.
Operating System Installation or Data Migration
With the drive formatted, you can now populate it with data, whether through a fresh OS installation or by migrating existing content.
- Fresh OS Install:
If this is a brand new build or you’re seeking a completely clean system, boot your computer from your OS installation media (USB drive or DVD). Follow the on-screen prompts to install the operating system onto your newly formatted drive. Ensure you select the correct drive to avoid overwriting your existing OS (if any). This is often the best approach for maximizing performance on a new SSD, as it ensures a clean slate without any accumulated software cruft. - Cloning/Migration:
If you’re upgrading an existing drive (e.g., moving from an HDD to an SSD) and want to keep your current OS, applications, and settings intact, data cloning is the way to go.- Install the new drive as a secondary drive (as detailed in the previous section).
- Boot into your existing OS.
- Use your chosen cloning software (often provided by SSD manufacturers or third-party tools).
- Select your old drive as the source and your new drive as the destination.
- Start the cloning process. This can take several hours depending on the amount of data.
- Once complete, shut down your PC. You might need to disconnect the old drive or change the boot order in BIOS/UEFI to ensure your system boots from the new drive. This method is a massive “productivity” booster, saving countless hours of reinstallation and configuration.
Driver Installation and Optimization
Even after the OS is installed, a few final steps can ensure your drive performs at its best.
- Motherboard Chipset Drivers: Install the latest chipset drivers from your motherboard manufacturer’s website. These drivers are crucial for the motherboard to communicate optimally with all its components, including storage controllers. This is especially important for NVMe drives to achieve their advertised speeds.
- Updating Firmware (SSD Optimization): Many SSD manufacturers release firmware updates that can improve performance, stability, and longevity. Use the manufacturer’s utility software (e.g., Samsung Magician, Crucial Storage Executive) to check for and apply any available firmware updates.
- Enabling TRIM for SSDs: TRIM is a command that helps SSDs maintain their performance over time by allowing the operating system to inform the SSD which data blocks are no longer in use and can be wiped. Windows and macOS generally enable TRIM by default for SSDs, but it’s worth verifying, particularly for older systems or custom OS installations. Proper TRIM implementation directly contributes to the drive’s performance and longevity, a key aspect of long-term “tech” efficiency.
Troubleshooting and Best Practices for Longevity
Even with careful preparation, issues can sometimes arise. Knowing how to troubleshoot common problems and adopting best practices will ensure your new drive provides years of reliable, high-performance service.
Common Installation Issues and Solutions
Encountering a snag is part of the DIY tech journey. Here are some frequent problems and their fixes:
- Drive Not Detected:
- Check Cables: The most common culprit. Ensure all SATA data and power cables are firmly seated on both the drive and the motherboard/PSU. For M.2 drives, confirm it’s fully inserted and secured with the screw.
- BIOS/UEFI Settings: Enter BIOS/UEFI and check the storage configuration. Ensure the SATA port is enabled (if applicable) and the drive is listed. For NVMe drives, confirm the M.2 slot is configured correctly (e.g., PCIe mode enabled if your motherboard has switchable modes).
- Power Supply: Verify your PSU has enough wattage to power all components. Also, try a different SATA power cable or connector from your PSU.
- Driver Issues: For NVMe drives, ensure you have the latest motherboard chipset drivers installed. Sometimes, Windows needs specific NVMe drivers for initial detection, though this is rare on modern systems.
- Faulty Component: If all else fails, try the drive in another system or a different SATA/M.2 port. The drive itself, or a cable, could be faulty.
- Slow Performance:
- Incorrect Port: For SATA drives, ensure it’s connected to a SATA 3.0 (6Gbps) port, not an older SATA 2.0 (3Gbps) port, which would bottleneck speed. For NVMe, ensure it’s in a PCIe NVMe M.2 slot and running at the correct PCIe generation (Gen3, Gen4, Gen5) as supported by your drive and motherboard.
- Driver Issues: Again, ensure the latest chipset and storage controller drivers are installed.
- TRIM Not Enabled (SSDs): Verify TRIM is enabled for your SSD (Windows automatically handles this for most modern SSDs).
- Fragmentation (HDDs): HDDs can suffer from fragmentation, which slows them down. Run the built-in Windows Defragment and Optimize Drives tool. SSDs should never be defragmented.
- Overheating: Check drive temperatures using monitoring software. Poor case airflow or a missing M.2 heatsink can cause thermal throttling, reducing performance.
- Boot Problems/OS Not Loading:
- Boot Order: Enter BIOS/UEFI and ensure the correct drive (the one with your operating system) is set as the primary boot device.
- OS Installation Issues: If it’s a fresh install, the OS might not have installed correctly. Re-attempt the installation.
- Corrupted Data: If you cloned your drive, the cloning process might have introduced errors. Try cloning again or perform a fresh OS install.
Maximizing Your Drive’s Lifespan and Performance
Investing in a new drive means you want it to last. Adopting these best practices will contribute to its longevity and ensure consistent performance.
- Regular Backups: This is worth reiterating. Regular backups are your ultimate “digital security” net, protecting against drive failure, accidental deletion, or cyber threats. Implement a 3-2-1 backup strategy: three copies of your data, on two different media types, with one copy offsite.
- Monitoring Drive Health: Use SMART (Self-Monitoring, Analysis, and Reporting Technology) data tools (e.g., CrystalDiskInfo for Windows, Disk Utility for macOS, or manufacturer-specific utilities) to monitor your drive’s health status. Early warnings can give you time to back up data before a complete failure.
- Maintaining Good Airflow Within the Case: Good cable management (as discussed earlier) and clean case fans ensure optimal airflow, preventing components from overheating. Excessive heat is detrimental to the lifespan of all electronic components, including hard drives and SSDs.
- Keeping Software Updated: Regularly update your operating system, motherboard drivers, and SSD firmware. These updates often include performance enhancements, bug fixes, and security patches that contribute to a more stable and efficient system.
- Avoid Filling Drives to Capacity: While tempting to use every last gigabyte, leaving some free space (ideally 15-20%) on your primary drive, especially SSDs, helps maintain optimal performance and allows for temporary files, system updates, and swap file usage. For SSDs, it also allows the controller to perform background maintenance tasks like wear leveling more efficiently.
In today’s fast-paced digital world, where “Technology Trends” constantly push the boundaries of computing, having adequate and high-performance storage is not just a luxury—it’s a necessity. Installing an internal hard drive is a foundational skill for any tech enthusiast, a practical “tutorial” that empowers you to take control of your system’s capabilities. Whether you’re chasing the latest “AI Tools” and “Software” for enhanced “productivity,” expanding your digital empire with more storage, or simply breathing new life into a beloved machine, this guide provides the knowledge you need.
By understanding your options, preparing diligently, executing the physical installation with precision, and configuring your drive correctly, you’ve not only performed a critical upgrade but also deepened your understanding of the intricate “gadgets” that power our digital lives. Remember to prioritize “digital security” through regular backups and maintain your system with best practices to ensure longevity and optimal performance. The ability to manage and upgrade your own hardware is a significant step towards mastering your personal tech landscape, ultimately enhancing your efficiency and enjoyment in the digital realm.
aViewFromTheCave is a participant in the Amazon Services LLC Associates Program, an affiliate advertising program designed to provide a means for sites to earn advertising fees by advertising and linking to Amazon.com. Amazon, the Amazon logo, AmazonSupply, and the AmazonSupply logo are trademarks of Amazon.com, Inc. or its affiliates. As an Amazon Associate we earn affiliate commissions from qualifying purchases.