Upgrading your car’s audio system is one of the most rewarding modifications you can make, transforming your daily commute into a concert hall on wheels. While many factors contribute to stellar sound, the amplifier is often the unsung hero, providing the clean, robust power that your speakers and subwoofers truly need to shine. If you’ve been grappling with weak bass, distorted highs, or simply a lack of overall volume and clarity, then learning how to install an amplifier yourself is a fantastic project. It not only saves you money but also gives you a deeper understanding of your vehicle’s electrical system and audio setup.
This comprehensive guide will walk you through every step of installing an amplifier, from gathering your tools to fine-tuning your system for optimal performance. Whether you’re a seasoned DIY enthusiast or a newcomer to car audio, we’ll ensure you have the knowledge and confidence to achieve professional-grade results.
Why Upgrade Your Audio with an Amplifier?
Before diving into the nuts and bolts of installation, it’s worth understanding why an amplifier is so crucial for a high-quality audio experience. Many people assume that their factory or aftermarket head unit (car radio) provides enough power, but this is rarely the case for anything beyond basic listening.
An amplifier’s primary role is to take the low-level audio signal from your head unit and boost it to a much higher power output, sufficient to drive your speakers and subwoofers effectively. Here’s why that matters:
- Unleashed Clarity and Detail: Most head units provide only a few watts per channel, often with significant distortion at higher volumes. An external amplifier delivers clean, undistorted power, allowing your speakers to reproduce sound with far greater clarity, detail, and dynamic range. You’ll hear nuances in your music you never knew existed.
- Powerful Bass and Punch: Subwoofers, in particular, demand a tremendous amount of power to produce deep, impactful bass. A dedicated monoblock or multi-channel amplifier designed for subwoofers can provide the raw wattage needed to make your bass truly resonate, adding an exciting dimension to your music.
- Overcoming Road Noise: Cars are noisy environments. An amplifier helps your audio system cut through road noise, engine hum, and traffic, allowing you to enjoy your music at a comfortable volume without cranking it up to distorted levels.
- Protection for Speakers: Surprisingly, underpowering speakers can be just as damaging as overpowering them. When a head unit struggles to produce enough power, it often “clips” the audio signal, sending a square wave to the speakers instead of a smooth sine wave. This clipping generates excessive heat and can quickly fry voice coils. An amplifier, properly matched and tuned, provides clean power, safeguarding your speakers.
- Future-Proofing Your System: An amplifier acts as the central hub for your audio system, making it easier to integrate additional components like new speakers, subwoofers, or even digital sound processors down the line. It offers flexibility for future upgrades and customization.
In essence, an amplifier is the muscle behind your audio system’s brain (the head unit), allowing it to perform at its full potential and deliver an immersive, high-fidelity sound experience.
Essential Preparations Before You Begin
A successful amplifier installation hinges on meticulous preparation. Rushing this stage can lead to frustration, faulty connections, or even damage to your vehicle’s electrical system. Take your time to gather everything you need and plan your approach carefully.
Gathering Your Arsenal: Tools and Materials
Before you even think about disconnecting your battery, ensure you have all the necessary tools and materials at hand. A well-equipped workspace will make the process smoother and safer.
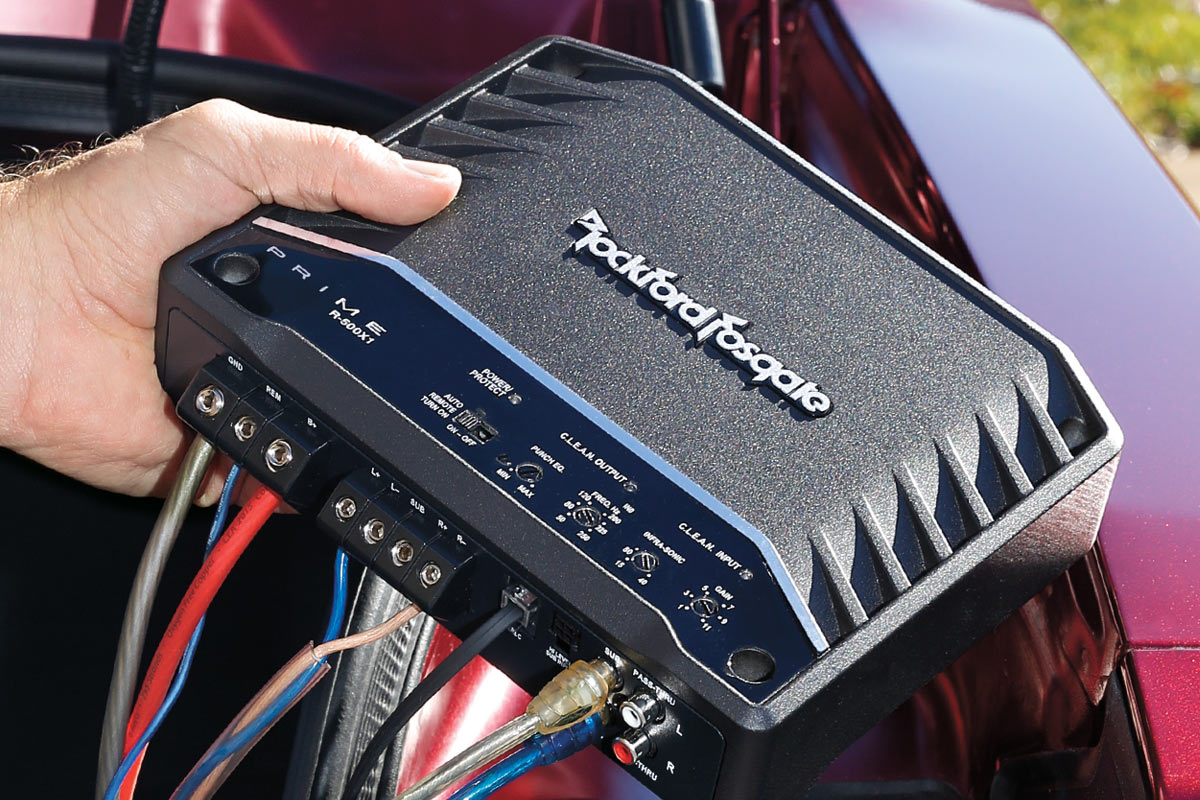
- The Amplifier: Naturally, you’ll need the amplifier itself. Ensure it’s appropriately sized and powered for the speakers or subwoofers you plan to connect.
- Amplifier Wiring Kit: This is crucial. Don’t skimp on this! A good quality kit will include:
- Power Wire: Heavy gauge (e.g., 4-gauge, 8-gauge) oxygen-free copper (OFC) wire to deliver power from your car’s battery to the amp. The gauge depends on the amplifier’s power output and the length of the run.
- Ground Wire: Same gauge as the power wire, for connecting the amp to the vehicle’s chassis.
- Remote Turn-On Wire: A thin wire (e.g., 18-gauge) that tells the amplifier to turn on when your head unit does.
- Inline Fuse Holder and Fuse: Essential for protecting your vehicle’s electrical system from short circuits. This must be installed as close to the battery as possible.
- RCA Cables: (Also known as patch cables) These carry the low-level audio signal from your head unit to the amplifier. Invest in good quality, shielded RCAs to prevent noise.
- Speaker Wire: The correct gauge for connecting your amplifier outputs to your speakers or subwoofer.
- Terminals and Connectors: Ring terminals for power and ground, spade connectors for speakers (if applicable).
- Wire Strippers and Crimpers: For cleanly stripping wire insulation and securely crimping terminals.
- Screwdrivers: Philips and flathead, for various screws in your car and amplifier terminals.
- Socket Wrench Set: For disconnecting the battery and mounting brackets.
- Multimeter: Invaluable for testing voltage, continuity, and diagnosing issues.
- Drill with Various Bits: For mounting the amplifier and potentially drilling a firewall hole (with extreme caution).
- Wire Loom/Conduit: To protect wires from abrasion and give a clean, professional look.
- Electrical Tape and Zip Ties: For securing connections and routing wires neatly.
- Utility Knife/Box Cutter: For cutting loom or trim.
- Safety Glasses and Gloves: Always protect your eyes and hands.
- Panel Removal Tools: Non-marring plastic tools are ideal for prying open interior panels without damage.
- Shop Towels/Rags: For cleaning surfaces.
- Battery Terminal Cleaner/Wire Brush: For ensuring good electrical contact.
Safety First: A Non-Negotiable Step
Working with a car’s electrical system carries inherent risks. Prioritizing safety is paramount to prevent injury, electrical shorts, or damage to your vehicle.
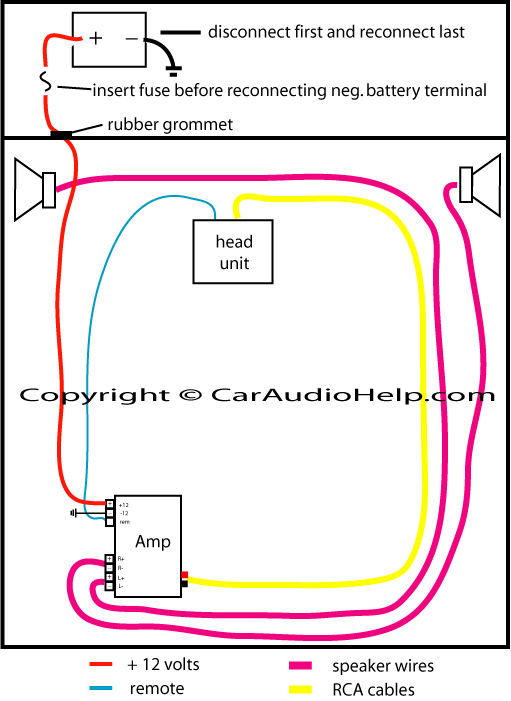
- Disconnect the Battery: This is the absolute first and most critical step. Disconnect the negative (-) terminal first, then the positive (+) terminal. This prevents accidental shorts while you’re working.
- Wear Safety Glasses: Protect your eyes from flying debris when drilling or sparks if something goes wrong.
- Work in a Well-Ventilated Area: Especially if you’re using adhesives or cleaners.
- Clear Your Workspace: Remove clutter and ensure you have enough room to move freely.
- Be Aware of Hot Surfaces: Exhaust systems and engine components can get very hot.
- Insulate All Connections: Use electrical tape or heat shrink tubing on any exposed wire connections to prevent short circuits.
- Never Exceed Fuse Ratings: The fuse in your amplifier wiring kit is there for protection. Do not replace it with a higher-rated fuse.
Strategic Planning: Choosing a Location and Routing Wires
Before you start pulling wires, visualize the entire installation process. A little planning goes a long way.
- Amplifier Mounting Location:
- Trunk: The most common location, offering plenty of space and often good ventilation. Consider mounting it to the back of a rear seat, the floor (if securely fastened), or to a custom amp rack.
- Under a Seat: Can be discreet, but ensure there’s adequate airflow around the amplifier to prevent overheating, and that it won’t interfere with seat movement or occupant comfort.
- Behind a Panel: Less common due to space and ventilation constraints but possible for smaller amps.
- Considerations:
- Ventilation: Amplifiers generate heat. Ensure the chosen spot allows for proper airflow.
- Security: Mount the amplifier securely to prevent it from moving during driving or in an accident.
- Accessibility: You’ll need access to its terminals and controls for wiring and tuning.
- Wire Lengths: Keep wire runs as short as reasonably possible, especially power and ground.
- Wire Routing Strategy:
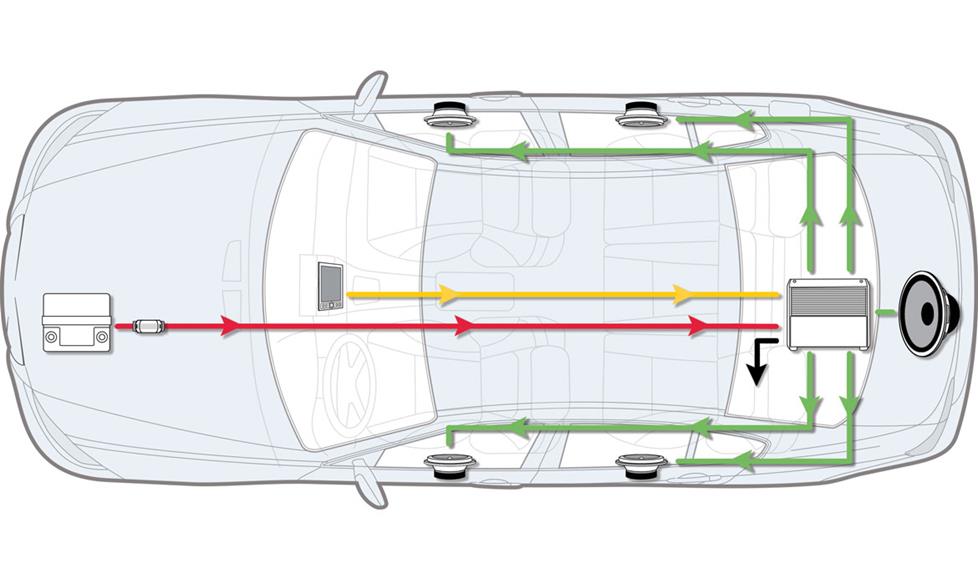
- Separate Power and Signal Wires: This is CRITICAL for preventing noise (e.g., engine whine). Run the power cable down one side of the vehicle (e.g., driver’s side) and the RCA cables down the opposite side (e.g., passenger’s side).
- Avoid Pinch Points: Route wires through existing wire channels or behind panels, away from moving parts, sharp edges, or areas where they could be pinched.
- Use Grommets: When passing wires through the firewall or other metal panels, always use rubber grommets to prevent the wire insulation from being chafed and shorting out.
- Neatness and Security: Use zip ties and wire loom to bundle and secure wires, preventing rattles and creating a professional appearance.
Step-by-Step Amplifier Installation Guide
With preparations complete, it’s time to get hands-on. Follow these steps carefully for a smooth installation.
Securing the Amplifier and Initial Wiring
- Mount the Amplifier:
- Place the amplifier in your chosen location.
- Mark the mounting screw holes.
- If drilling into the car’s chassis, ensure you know what’s on the other side to avoid drilling into fuel lines, brake lines, or electrical harnesses. Use a pilot bit first, then the appropriate drill bit.
- Secure the amplifier firmly with self-tapping screws or bolts.
- Run the Power Cable:
- From the Battery: Locate a suitable entry point through the firewall. This is often an existing grommet for other wires or cables. If you must drill, be extremely cautious.
- Feed the power wire through the firewall, ensuring it’s protected by a grommet.
- Route the power wire along one side of the car, under door sills, carpets, or behind panels, toward your amplifier’s location.
- Install the Inline Fuse Holder: This is a crucial safety step. The fuse holder MUST be installed on the power wire within 18 inches of the battery. Cut the power wire, crimp terminals, and connect it to the fuse holder. DO NOT insert the fuse yet!
- Connect the power wire to the positive terminal of your amplifier. Crimp a ring terminal onto the end of the wire and securely fasten it to the “BATT +” or “12V” terminal.
- Connect the Ground Cable:
- Identify a suitable grounding point on the vehicle’s chassis, close to the amplifier (ideally 18 inches or less). A seatbelt bolt or a bare metal part of the frame is usually a good option.
- Clean the chosen grounding point thoroughly. Sand away any paint, rust, or grime to expose bare metal. A poor ground connection is a common cause of system noise.
- Crimp a ring terminal onto one end of the ground wire.
- Securely fasten the ground wire to the bare metal chassis point.
- Connect the other end of the ground wire to the “GND” or “Ground” terminal on your amplifier.
Connecting Signal and Remote Wires
- Run the RCA Cables:
- Route the RCA cables from the back of your head unit (or line output converter) along the opposite side of the car from where you ran the power wire. This separation helps prevent alternator whine and other electrical noise from interfering with your audio signal.
- Carefully tuck them under carpets, door sills, and panels.
- Connect the RCA cables to the appropriate “INPUT” jacks on your amplifier (e.g., Front L/R, Rear L/R, or Sub).
- Connect the Remote Turn-On Wire:
- This thin wire signals your amplifier to turn on when your head unit is powered on.
- Locate the “REMOTE,” “REM,” or “ACC” wire on your aftermarket head unit’s wiring harness (it’s usually blue or blue with a white stripe). For factory head units, you might need an aftermarket interface or to tap into a switched 12V source.
- Run this wire along the same side of the car as the RCA cables, back to your amplifier.
- Connect the remote wire to the “REMOTE” or “REM” terminal on your amplifier.
Wiring Speakers and Final Connections
- Run Speaker Wires:
- Route the speaker wires from your amplifier’s “SPEAKER OUT” terminals to each of your speakers or your subwoofer.
- Ensure you maintain correct polarity (+ to + and – to -) at both the amplifier and the speaker ends. Incorrect polarity can cause speakers to be out of phase, leading to weak or canceled bass.
- Use appropriate gauge speaker wire for the power output and length of the run.
- Make All Connections at the Amplifier:
- Double-check all connections at the amplifier: power, ground, remote, RCAs, and speaker wires. Ensure they are secure and tight. Tug gently on each wire to confirm it won’t pull out.
- Use electrical tape or heat shrink tubing on any exposed speaker wire ends to prevent shorts.
- Once all connections are verified, insert the fuse into the inline fuse holder near the battery.
Powering Up, Tuning, and Troubleshooting
The hard part is over! Now it’s time for the moment of truth: powering up your new amplifier and making it sing.
Initial Power-Up and Basic Sound Test
- Reconnect the Battery: Reconnect the positive (+) terminal first, then the negative (-) terminal.
- Turn On Your Head Unit: With your head unit on, check if the amplifier’s power indicator light illuminates. If it does, that’s a good sign! If not, immediately check your remote wire, fuse, and power/ground connections.
- Initial Sound Test (Low Volume):
- Before playing music, ensure all amplifier gain controls are turned all the way down (minimum).
- Set your head unit’s volume to a very low level.
- Play some familiar music. Gradually increase the head unit’s volume.
- Listen carefully for sound from your newly amplified speakers/subwoofer. If you hear sound, congratulations!
- If you hear distortion, static, or no sound at all, turn everything off and revisit the troubleshooting section below.
Fine-Tuning Your Audio System
Once you have sound, the next critical step is to properly tune your amplifier. This isn’t just about making it loud; it’s about optimizing sound quality and protecting your components.
- Setting Gain Levels (CRUCIAL):
- The gain knob on your amplifier is NOT a volume knob. It adjusts the input sensitivity of the amplifier to match the output voltage of your head unit.
- Incorrectly setting gain is the most common cause of distortion and blown speakers.
- Method 1 (Recommended – with Multimeter):
- Turn all amplifier gains to minimum.
- Disconnect your speakers/sub from the amplifier (optional but safest).
- Play a test tone (e.g., a 0 dB, 50 Hz sine wave for subwoofers, or a 1000 Hz tone for full-range speakers) at around 75-80% of your head unit’s maximum volume.
- Using a multimeter, measure the AC voltage output at the amplifier’s speaker terminals.
- Slowly turn up the amplifier’s gain until the measured AC voltage matches the target voltage for your speaker’s RMS power (Voltage = sqrt(Power * Resistance)). For example, for a 300W RMS speaker at 4 ohms, target voltage = sqrt(300 * 4) = 34.6V.
- Once the correct voltage is reached, stop turning the gain.
- Reconnect your speakers/sub.
- Method 2 (By Ear – Less Precise):
- Turn head unit volume to 75-80% of max.
- Slowly increase the amplifier’s gain until you start to hear audible distortion.
- Once distortion is present, back off the gain slightly until the sound is clean again.
- This method is less accurate and higher risk, but often used by enthusiasts.
- Utilizing Crossovers and Filters:
- Most amplifiers have built-in crossovers (HPF/LPF).
- High-Pass Filter (HPF): Allows only frequencies above a set point to pass through. Use this for full-range speakers to remove bass they can’t reproduce, preventing distortion and allowing them to play louder and cleaner. Set typically around 80-100 Hz.
- Low-Pass Filter (LPF): Allows only frequencies below a set point to pass through. Use this for subwoofers to ensure they only reproduce bass frequencies. Set typically around 60-100 Hz, often overlapping slightly with the HPF of your main speakers for a smoother transition.
- Bass Boost: Use sparingly, if at all. Excessive bass boost can easily lead to distortion and damage, especially if gains are already high.
- Adjust these filters to achieve a balanced sound between your front speakers, rear speakers, and subwoofer.
Common Issues and Quick Fixes
Even with careful installation, issues can arise. Here are some common problems and troubleshooting tips:
- No Power to Amplifier:
- Check the inline fuse near the battery.
- Verify the ground connection (clean, secure, bare metal).
- Ensure the remote turn-on wire is receiving 12V from the head unit (use a multimeter).
- Check all power and ground connections at the amplifier.
- No Sound from Speakers/Subwoofer:
- Check RCA connections at both the head unit and the amplifier.
- Verify speaker wire connections at both the amplifier and the speakers (check for shorts or loose wires).
- Ensure amplifier gains are not at minimum.
- Check if the amplifier is in “protect” mode (usually a red LED). This indicates a short, overheating, or impedance mismatch.
- Test speakers directly if possible.
- Engine Whine or Hissing Noise:
- This is often caused by ground loops or insufficient separation of power and signal wires.
- Ensure power and RCA cables are routed on opposite sides of the vehicle.
- Check for a clean, solid ground connection.
- Consider a ground loop isolator on the RCA lines (as a last resort).
- Distortion at High Volume:
- Most likely, your gain is set too high. Re-adjust it carefully.
- Ensure your speakers or subwoofer can handle the power from the amplifier.
- Check your head unit’s output for clipping (lower its volume if necessary).
Installing an amplifier can seem daunting at first, but by following these detailed steps, you’ll be well on your way to enjoying crystal-clear, powerful audio in your vehicle. Remember to prioritize safety, take your time with each step, and be patient with the tuning process. The reward of a meticulously installed and tuned system is an unparalleled listening experience on every drive.
aViewFromTheCave is a participant in the Amazon Services LLC Associates Program, an affiliate advertising program designed to provide a means for sites to earn advertising fees by advertising and linking to Amazon.com. Amazon, the Amazon logo, AmazonSupply, and the AmazonSupply logo are trademarks of Amazon.com, Inc. or its affiliates. As an Amazon Associate we earn affiliate commissions from qualifying purchases.