Enhancing your vehicle’s lighting system isn’t just about aesthetics; it’s a critical upgrade for safety and visibility, especially in challenging weather conditions. Fog lights, specifically designed to cut through dense fog, heavy rain, or snow, illuminate the road surface directly in front of your car, reducing glare and improving your ability to see and be seen. While many modern vehicles come equipped with integrated fog lights, installing aftermarket options offers a superior blend of performance, customization, and often, a more robust build quality than factory-standard offerings. This comprehensive guide will walk you through the entire process of installing aftermarket fog lights, transforming your driving experience and boosting your vehicle’s tech capabilities.

The journey of installing aftermarket fog lights touches upon various technical aspects, from understanding basic electrical circuits to precise mechanical mounting. It’s a rewarding DIY project that empowers you to take control of your vehicle’s enhancements, ensuring both functional improvement and a personalized touch. Before diving into the specifics, it’s crucial to approach this task with careful planning, the right tools, and an unwavering commitment to safety.
1. Why Upgrade to Aftermarket Fog Lights?
Before you even think about reaching for a wrench, it’s worth understanding the compelling reasons why countless vehicle owners opt for aftermarket fog lights. It’s more than just adding extra light; it’s about strategic illumination and vehicle personalization.
Enhanced Visibility and Safety
The primary function of fog lights is to improve visibility in adverse conditions. Unlike headlights, which aim straight ahead and can reflect off fog or rain, fog lights are mounted low on the vehicle and emit a wide, flat beam that is angled downwards. This design minimizes upward scatter, which causes glare, and instead illuminates the road surface and verges directly in front of the vehicle.
Aftermarket fog lights often utilize more advanced lighting technologies, such as powerful LEDs (Light Emitting Diodes) or high-intensity discharge (HID) lamps, which provide a brighter, crisper, and more focused light output compared to many OEM (Original Equipment Manufacturer) halogen bulbs. This superior illumination can significantly reduce driver fatigue during long drives in poor weather and, more importantly, give you precious extra seconds to react to road hazards. For anyone who frequently drives in areas prone to inclement weather, an aftermarket fog light upgrade is an investment in safety that pays dividends.
Aesthetic Appeal and Customization
Beyond their practical benefits, aftermarket fog lights offer an undeniable boost to your vehicle’s aesthetic appeal. Many kits are designed to integrate seamlessly into existing bumper openings or offer unique housing designs that give your car a more aggressive, modern, or sophisticated look. This element of customization allows owners to differentiate their vehicle from stock models, expressing their personal style.
With a vast array of designs, beam patterns, and light temperatures (from cool white to warmer yellow hues), you can select fog lights that perfectly complement your vehicle’s existing lighting or create a completely new visual signature. This level of personalization is a key draw for enthusiasts who view their vehicle as an extension of their personality and appreciate the blend of advanced technology with striking design.
Cost-Effectiveness and Performance
While factory-installed fog lights might seem convenient, aftermarket solutions often provide a better balance of cost and performance. OEMs might charge a premium for a basic fog light package, whereas the aftermarket offers a competitive landscape with a wide range of products catering to different budgets and performance needs.
You can often find aftermarket kits that surpass the light output and durability of factory options at a comparable or even lower price point. Furthermore, many aftermarket fog lights are designed with user-friendly installation in mind, making them an accessible DIY project. This empowers vehicle owners to take control of their upgrades, saving on labor costs that would typically be incurred at a dealership or garage. The long-term durability and energy efficiency of modern LED fog lights also contribute to their cost-effectiveness, requiring less frequent replacement and drawing less power from your vehicle’s electrical system.
2. Essential Preparations Before You Begin
A successful installation hinges on thorough preparation. Gathering the right tools, understanding your vehicle, and prioritizing safety are non-negotiable steps that will save you time, frustration, and potential hazards down the line.
Gathering Your Tools and Materials
Having everything you need within reach before you start is crucial. This not only streamlines the process but also prevents interruptions.
The Right Aftermarket Kit
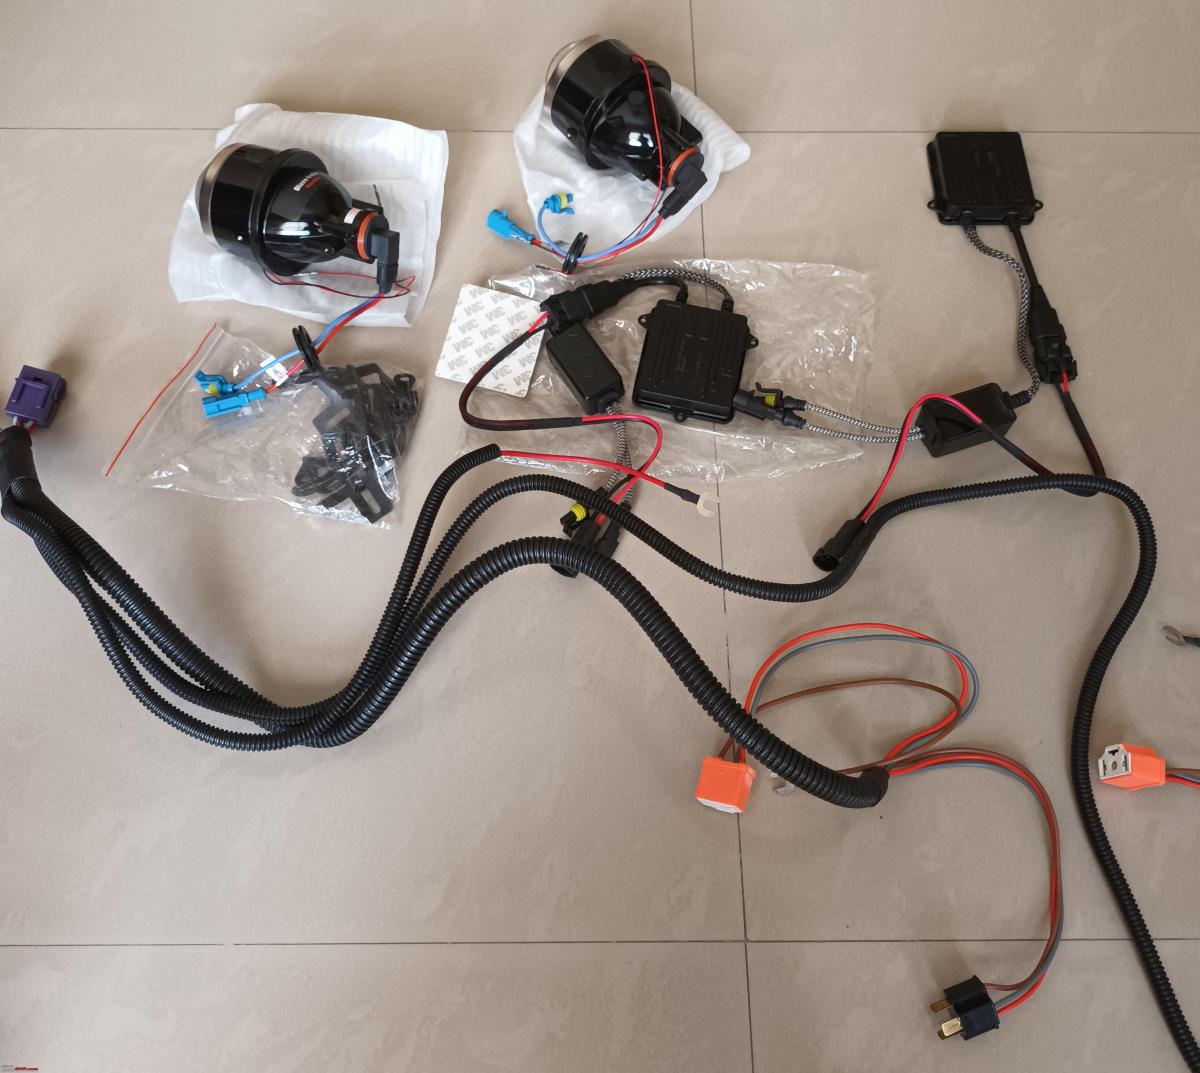
Ensure your chosen fog light kit is specifically designed for your vehicle’s make, model, and year. Compatibility is key for proper fitment and wiring. Most kits come with the light assemblies, mounting brackets, a wiring harness (including a relay and fuse), and a switch. Review the kit’s instructions carefully, as they often contain vehicle-specific details.
Basic Hand Tools
You’ll need a standard set of tools that most DIYers already own:
- Socket Set and Wrenches: For removing bumper components, mounting brackets, and securing hardware.
- Screwdrivers: Philips head and flathead for various fasteners.
- Wire Strippers/Crimpers: Essential for preparing wires and attaching connectors.
- Pliers: Needle-nose and standard pliers for manipulating wires and small parts.
- Zip Ties or Wire Loom: For neatly securing wiring and protecting it from abrasion.
- Electrical Tape: For insulating connections.
- Heat Shrink Tubing and Heat Gun (Optional but Recommended): For professional-grade, waterproof connections.
Electrical Testing Equipment
Even if your kit is plug-and-play, a few electrical tools are invaluable:
- Multimeter: To test voltage, continuity, and identify power sources. This is your best friend for troubleshooting electrical issues and verifying connections.
- Test Light: A simpler tool for checking for power.
- Wire Taps/Connectors: For splicing into existing wiring if your kit doesn’t provide specific connectors or if you’re customizing. Choose high-quality, weather-resistant types.
Understanding Your Vehicle’s Electrical System
Modern vehicles have complex electrical systems. While installing fog lights typically involves a relatively simple circuit, a basic understanding can prevent mistakes and ensure proper function.
Battery Disconnection Protocol
Always disconnect your vehicle’s negative battery terminal before starting any electrical work. This prevents accidental short circuits, protects your vehicle’s sensitive electronics, and safeguards you from electrical shock. Keep the terminal safely away from the battery post to avoid accidental contact.
Identifying Key Wiring Points
You’ll need to identify a few key locations for wiring:
- Power Source: Typically, you’ll connect to a constant 12V power source that’s only active when the ignition is on, or directly to the battery via a fused connection for continuous power (though the former is usually preferred for fog lights to prevent battery drain).
- Ground Point: A clean metal surface on the vehicle’s chassis or frame.
- Switch Location: An accessible spot on your dashboard or near the steering column for the new fog light switch.
- Existing Fog Light Wiring (If Applicable): Some vehicles have pre-wired connectors for fog lights, even if they didn’t come with them from the factory. A quick check of your owner’s manual or an online forum for your specific model might reveal this.
Safety First: Crucial Precautions
Your safety is paramount. Never underestimate the potential hazards of working on a vehicle.
Eye Protection and Gloves
Wear safety glasses or goggles at all times to protect your eyes from debris, chemicals, or accidental wire sparks. Work gloves will protect your hands from sharp edges, dirt, and potential cuts.
Securing the Vehicle
If you need to lift the vehicle for better access (e.g., to reach under the bumper), use sturdy jack stands on a flat, level surface. Never rely solely on a jack. Ensure the parking brake is engaged and the wheels are chocked. Work in a well-lit and well-ventilated area. Take your time, and if you’re unsure about any step, consult a professional or experienced mechanic.
3. Step-by-Step Aftermarket Fog Light Installation
With preparations complete, you’re ready to dive into the installation process. This section breaks down the physical mounting and the crucial electrical connections.
Mounting the Fog Light Assemblies
The first physical step involves integrating the lights into your vehicle’s body.
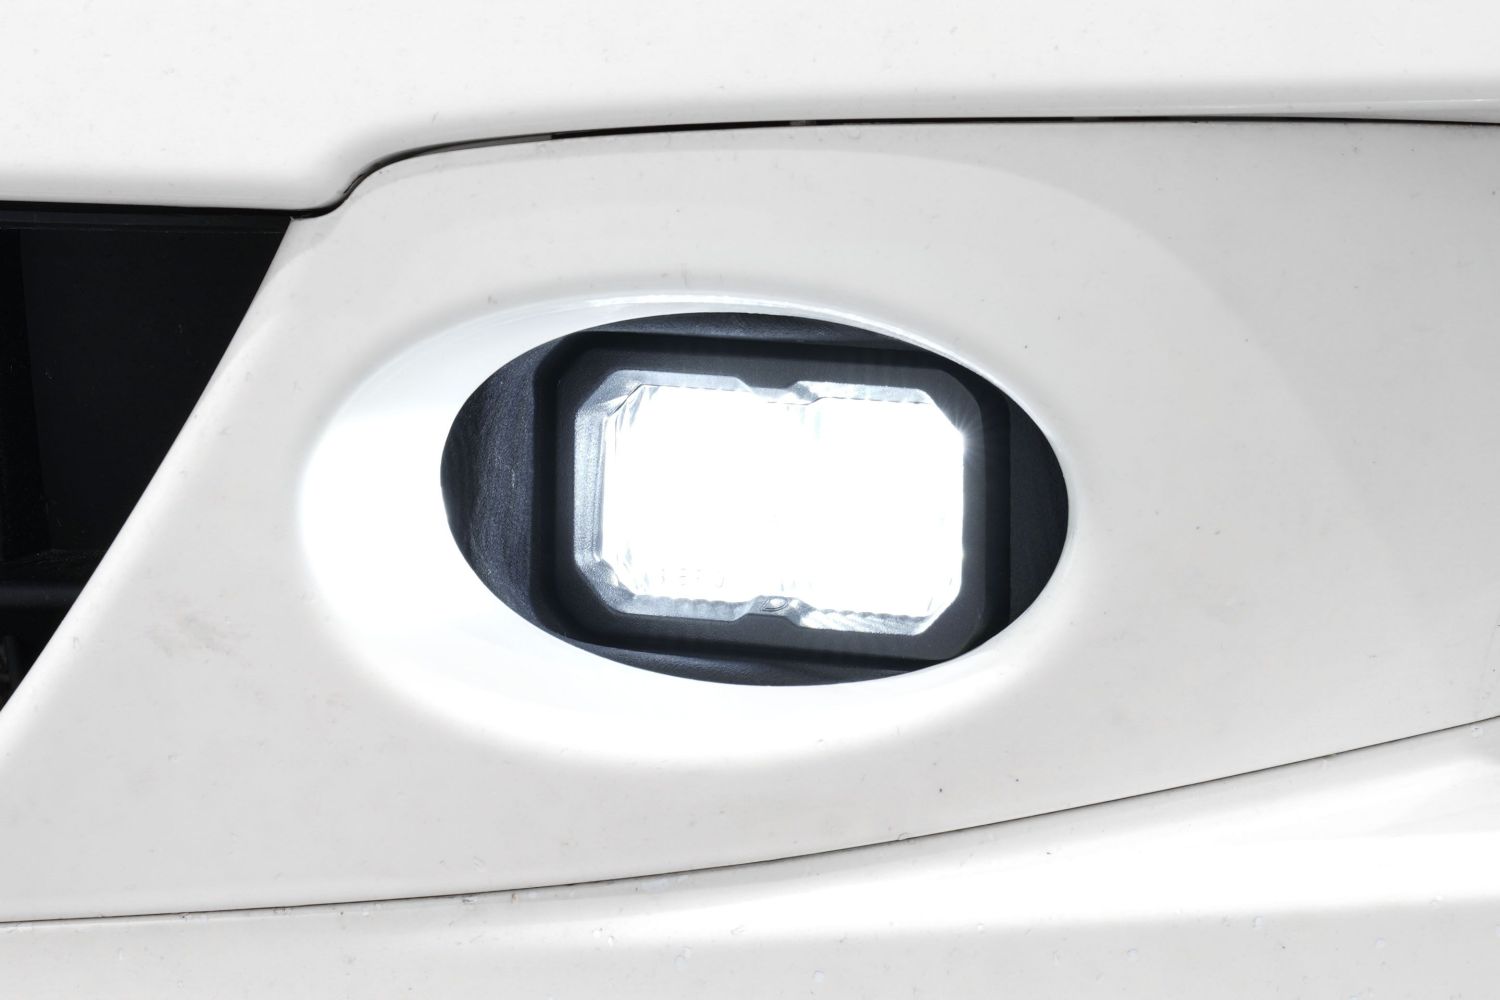
Identifying Mounting Locations
Most aftermarket fog lights are designed to fit into existing openings in your vehicle’s front bumper. If your car came with factory fog lights, you might simply remove the old ones and install the new. If not, you might need to remove plastic covers or, in some cases, carefully cut out sections of the bumper for a custom fit. Always refer to your kit’s instructions and your vehicle’s service manual for exact guidance. This might require temporarily removing the front bumper or wheel well liners for better access. Be gentle with plastic clips and fasteners to avoid breakage.
Securing the Brackets and Lights
Once the mounting locations are clear, attach the provided brackets (if separate) to the fog light assemblies, then secure them to the vehicle. Use all provided hardware (bolts, nuts, washers) and tighten them securely, but don’t overtighten, especially on plastic components. Ensure the lights are stable and properly oriented. A common mistake is not ensuring both lights are symmetrical in their mounting. Take a step back and visually confirm their alignment.
The Art of Wiring: Connecting Your Lights
This is where your understanding of basic electrical circuits comes into play. Most aftermarket fog light kits include a pre-wired harness designed to simplify this process.
Powering the Lights: The Relay and Fuse
A relay is a small electrical switch that allows a low-current signal (from your dashboard switch) to control a high-current circuit (the fog lights). This protects your dashboard switch from handling the full current draw of the lights, preventing overheating and damage. The wiring harness will have a relay integrated into it.
- Relay Connection: Typically, the harness will have wires for the relay: one for constant 12V power (from the battery or a fused ignition source), one for ground, one for the switch input, and one for the output to the fog lights.
- Fuse Protection: A fuse is a critical safety device that protects your wiring and vehicle from overcurrents. The harness will include an in-line fuse holder. Ensure the fuse’s amperage rating matches the specifications provided by the fog light kit manufacturer. Connect the fused wire (usually red or positive) to your chosen 12V power source.
Grounding for Safety and Functionality
Proper grounding is essential for any electrical circuit. Locate a clean, unpainted metal surface on the vehicle’s chassis or frame within reach of your harness’s ground wire (usually black). Scrape away any paint or rust to ensure a good metal-to-metal connection. Secure the ground wire with a self-tapping screw or by using an existing bolt that connects to the chassis. A poor ground connection is a common cause of flickering or non-functional lights.
Integrating the Switch into Your Dashboard
Your kit will include a switch, often designed to fit into a blank switch panel on your dashboard.
- Location: Choose a location that is easily accessible and aesthetically pleasing. You may need to pop out a blank switch cover or drill a hole (if no suitable blank exists).
- Wiring the Switch: The switch will typically have a power input (often tied to an ignition-on circuit or directly from the relay signal wire), a ground, and an output to trigger the relay. Route the wires neatly from the relay to your chosen switch location, tucking them behind trim panels using a trim removal tool. Secure them with zip ties to prevent rattling and ensure they don’t interfere with moving parts.
Connecting to the Vehicle’s Power Source
This step involves making the final power connections.
Tapping into an Existing Circuit
While some prefer to run a dedicated power wire directly to the battery, it’s often cleaner to tap into an existing ignition-switched 12V power source in your vehicle’s fuse box. This ensures the fog lights only operate when the ignition is on, preventing accidental battery drain.
- Identify a Suitable Fuse: Use your multimeter to find a fuse in your interior or under-hood fuse box that provides 12V when the ignition is on and has enough capacity to handle the additional load of the fog lights. An “add-a-circuit” fuse tap is an excellent tool for this, allowing you to add a new circuit without cutting into existing wiring.
- Connect the Relay Trigger: One wire from your relay will typically connect to this ignition-switched power source or directly to the switch itself. This signal tells the relay to switch on and send power to your fog lights.
Running Wires Safely and Neatly
Proper wire routing is critical for longevity and safety.
- Under the Hood: Route wires away from hot engine components (exhaust manifolds, turbochargers) and moving parts (belts, pulleys). Use zip ties to secure the harness to existing wiring looms or frame components.
- Through the Firewall: If you need to route wires from the engine bay to the interior for the switch, find an existing grommet in the firewall. If no suitable grommet exists, you may need to drill a hole, but ensure you seal it properly with a rubber grommet and silicone sealant to prevent water ingress.
- Protection: Use split loom tubing or electrical tape to protect wires from abrasion and the elements.
4. Testing, Adjusting, and Final Touches
You’re almost there! Once all connections are made, it’s time to test your work and ensure everything is functioning optimally.
Initial Functionality Check
Reconnect the negative battery terminal. Turn your ignition key to the “on” position (engine off for now). Activate your newly installed fog light switch. The lights should illuminate.
- Check both lights: Ensure both left and right fog lights are working.
- Check switch function: Verify that the switch turns them on and off reliably.
- Look for any warning lights: On your dashboard, check for any new warning lights that might indicate an electrical fault. If any appear, disconnect the battery and re-check your wiring.
Aiming Your Fog Lights for Optimal Performance
Proper aiming is crucial. Unlike high beams or low beams, fog lights are designed to illuminate the road directly in front of the vehicle, just below the headlight beam.
- Level Surface: Park your vehicle on a flat, level surface, ideally facing a wall about 10-25 feet away.
- Markings: The top of the fog light beam should typically fall no higher than the center of the fog light itself when projected onto the wall. Some regulations suggest the top of the beam should be no higher than 4 inches below the center of the headlight.
- Adjustment Screws: Most fog lights have adjustment screws (usually on the back or side) that allow you to tilt them up or down. Adjust them so they provide a wide, low beam that doesn’t blind oncoming traffic or reflect excessively off fog. The goal is to illuminate the road and shoulders, not the fog itself.
Securing Wires and Reassembling Components
Once satisfied with the functionality and aiming, take the time to tidy up your work.
- Secure All Wires: Use zip ties to secure all wiring harnesses, ensuring they are taut but not stressed. This prevents them from sagging, rattling, or coming into contact with moving parts or hot components.
- Weather Protection: Ensure all connections are properly insulated with electrical tape or, ideally, heat shrink tubing for a waterproof seal.
- Reassemble: Reinstall any bumper covers, wheel well liners, or interior trim pieces that were removed. Double-check that all fasteners are tightened.
Post-Installation Maintenance and Tips
- Regular Checks: Periodically check your fog lights for proper function and aiming.
- Clean Lenses: Keep the lenses clean to ensure maximum light output.
- Inspect Wiring: Every few months, quickly inspect the visible wiring for any signs of wear, fraying, or loose connections.
- Bulb Replacement: If using halogen bulbs, be prepared for eventual replacement. LED lights are much more durable but are typically sealed units requiring full replacement if they fail.
5. Troubleshooting Common Issues and Legal Considerations
Even with careful installation, issues can arise. Knowing how to troubleshoot and understanding the legal landscape is important.
Addressing Wiring Problems
- No Power: Check the fuse first. If the fuse is blown, replace it with one of the correct amperage. If it blows again immediately, you likely have a short circuit somewhere in your wiring. Use your multimeter to check continuity and voltage at various points in the circuit.
- Flickering Lights: This often indicates a loose connection, a poor ground connection, or an insufficient power supply. Re-check all connections, especially the ground point, ensuring it’s clean and secure.
- Lights On Constantly: The relay might be stuck, or the switch wiring might be incorrect, providing constant power to the relay trigger.
- Lights Not Turning Off: Similar to lights on constantly, this usually points to an issue with the switch, relay, or their connections.
Dealing with Flickering or Non-Functional Lights
- Check the Ground: A surprising number of electrical issues stem from a bad ground connection. Ensure the ground wire is securely attached to a clean, unpainted metal surface on the chassis.
- Verify Voltage: Use your multimeter to check for 12V at the light connectors when the switch is on. If there’s no voltage, trace back through the circuit (relay, fuse, switch) to find where the power flow stops.
- Test the Bulbs: While unlikely with new kits, sometimes bulbs can be faulty. Temporarily test them with a known 12V source.
Understanding Local Regulations for Auxiliary Lighting
This is a critical, often overlooked aspect. Laws regarding auxiliary lighting, including fog lights, vary significantly by region, state, or country.
- Usage Restrictions: Many jurisdictions prohibit the use of fog lights in clear weather or require them to be switched off when headlights are on (especially high beams). Their purpose is for reduced visibility only.
- Color and Brightness: There might be restrictions on the color of light (usually white or amber only) and the maximum allowable brightness (lumens).
- Mounting Height: Some areas have regulations on the minimum and maximum mounting height for fog lights.
- Number of Lights: There may be limits on the number of auxiliary lights permitted on a vehicle.
Always research your local and national laws before installing and using aftermarket fog lights to avoid fines and ensure your vehicle remains road-legal. This often involves a quick search on your local Department of Motor Vehicles or equivalent website.
Installing aftermarket fog lights is a rewarding project that significantly upgrades your vehicle’s safety, aesthetics, and technological capability. By following these detailed steps, prioritizing safety, and understanding the nuances of electrical wiring, you can confidently enhance your driving experience. Drive safely, and enjoy the improved visibility your new fog lights provide!
aViewFromTheCave is a participant in the Amazon Services LLC Associates Program, an affiliate advertising program designed to provide a means for sites to earn advertising fees by advertising and linking to Amazon.com. Amazon, the Amazon logo, AmazonSupply, and the AmazonSupply logo are trademarks of Amazon.com, Inc. or its affiliates. As an Amazon Associate we earn affiliate commissions from qualifying purchases.