In today’s digitally saturated world, a reliable and speedy internet connection is no longer a luxury, it’s a necessity. Whether you’re streaming high-definition movies, participating in video conferences, gaming online, or simply browsing the web, your router acts as the central nervous system of your home network. If you’ve been experiencing sluggish speeds, dropped connections, or the dreaded buffering wheel, it might be time for an upgrade. Installing a new router might seem daunting, but with this comprehensive guide, you’ll be up and running in no time, unlocking a smoother, faster, and more secure online experience.
This guide is designed to demystify the process of setting up your new router, drawing upon the core tenets of technology and practical implementation. We’ll cover everything from unboxing to configuring your settings, ensuring you can confidently tackle this essential home tech upgrade.
1. The Foundation: Preparing for Your New Router
Before you even think about plugging in your new device, a little preparation goes a long way. This phase ensures a smooth transition and prevents potential headaches down the line.
1.1 Assessing Your Needs and Choosing the Right Router
The sheer variety of routers available can be overwhelming, but understanding your specific needs will help you make an informed decision.
- Internet Speed: Your router needs to be capable of handling the speeds provided by your Internet Service Provider (ISP). If your ISP offers gigabit speeds, a budget router might become a bottleneck, limiting your actual performance. Check your current internet plan or consider upgrading if your current speed isn’t sufficient for your online activities.
- Home Size and Layout: For larger homes or those with thick walls, a single router might not provide adequate coverage. Consider routers with mesh Wi-Fi capabilities, which use multiple nodes to create a seamless network throughout your entire property. For smaller apartments, a standard router might suffice.
- Number of Devices: The more devices you have connected to your network simultaneously (smartphones, laptops, smart TVs, gaming consoles, smart home devices), the more demanding it is on your router. Ensure your chosen router can handle the traffic from all your connected devices without performance degradation.
- Wi-Fi Standards: Look for routers that support the latest Wi-Fi standards, such as Wi-Fi 6 (802.11ax) or Wi-Fi 6E. These offer significant improvements in speed, efficiency, and capacity compared to older standards like Wi-Fi 5 (802.11ac). Wi-Fi 6E further expands into the 6 GHz band, offering even less interference and higher potential speeds.
- Features: Consider additional features like Quality of Service (QoS) for prioritizing certain types of traffic (e.g., gaming or video streaming), parental controls, guest network capabilities, and built-in security features.
1.2 Gathering Your Tools and Information
Once you’ve selected your router, it’s time to gather what you’ll need for the installation:
- Your New Router: Of course!
- Power Adapter: This should come with your new router.
- Ethernet Cables: You’ll likely need at least two: one to connect your modem to the router, and potentially another if you need to connect a computer directly for initial setup or for wired network access. It’s a good idea to have a spare on hand. Ensure you have the correct type of Ethernet cable (Cat 5e, Cat 6, or Cat 6a are common and suitable for most home networks).
- Your Modem: You’ll need to disconnect and reconnect your existing modem.
- Your ISP Account Information: In some cases, you might need your ISP account number or specific login credentials. Check your ISP’s documentation or your welcome packet.
- Your Computer or Mobile Device: This will be used to access the router’s configuration interface.
- A Pen and Paper (or a Digital Note-Taking App): To record important information like your new Wi-Fi network name (SSID) and password.
2. The Installation Process: Connecting and Powering Up
With your preparations complete, it’s time to get hands-on with your new router. This section will guide you through the physical connections and initial power-up.
2.1 Disconnecting Your Old Router and Modem
Before you connect the new equipment, it’s crucial to properly disconnect your old setup.
- Power Down Everything: Turn off your old router and your modem. Unplug both devices from their power outlets. This prevents any potential electrical surges or data conflicts.
- Unplug Cables: Carefully disconnect all cables connected to your old router, including the Ethernet cable connecting it to the modem, any other Ethernet cables connected to devices, and the power adapter.
- Unplug Modem Cables: Disconnect the coaxial cable (for cable internet) or the Ethernet cable (for DSL or fiber optic internet) from your modem, as well as the power adapter.
2.2 Connecting Your Modem to the New Router
This is the most critical physical connection, establishing the link between your internet service and your home network.
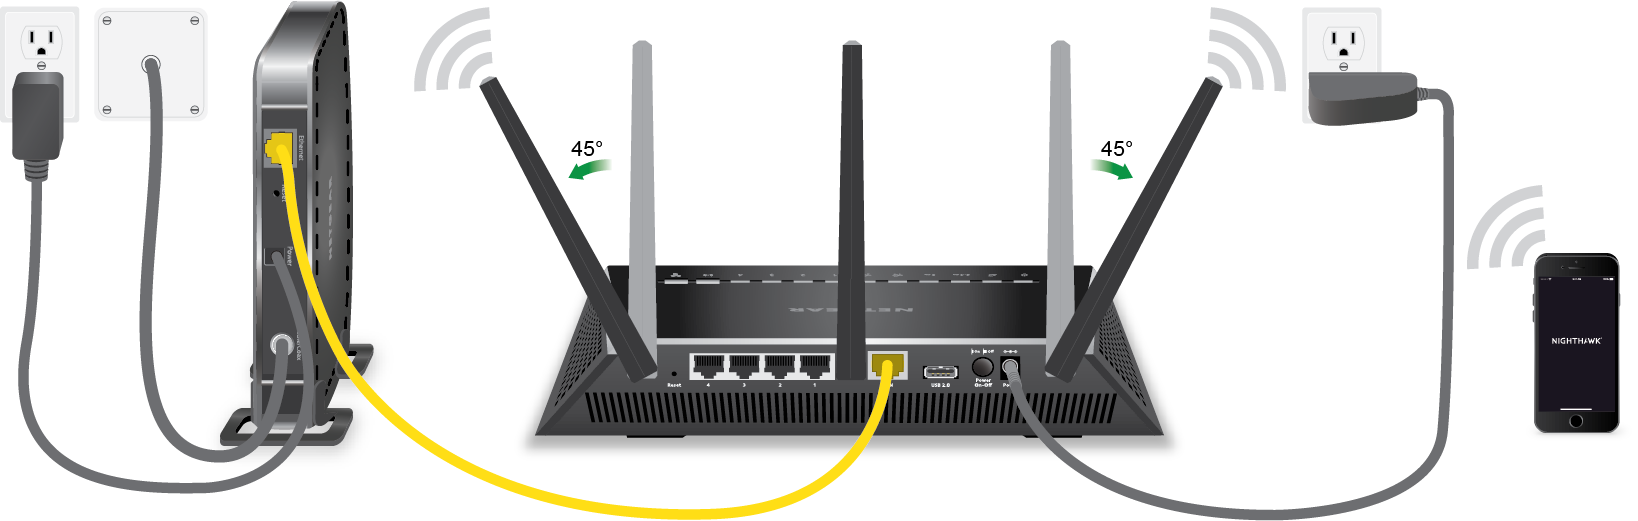
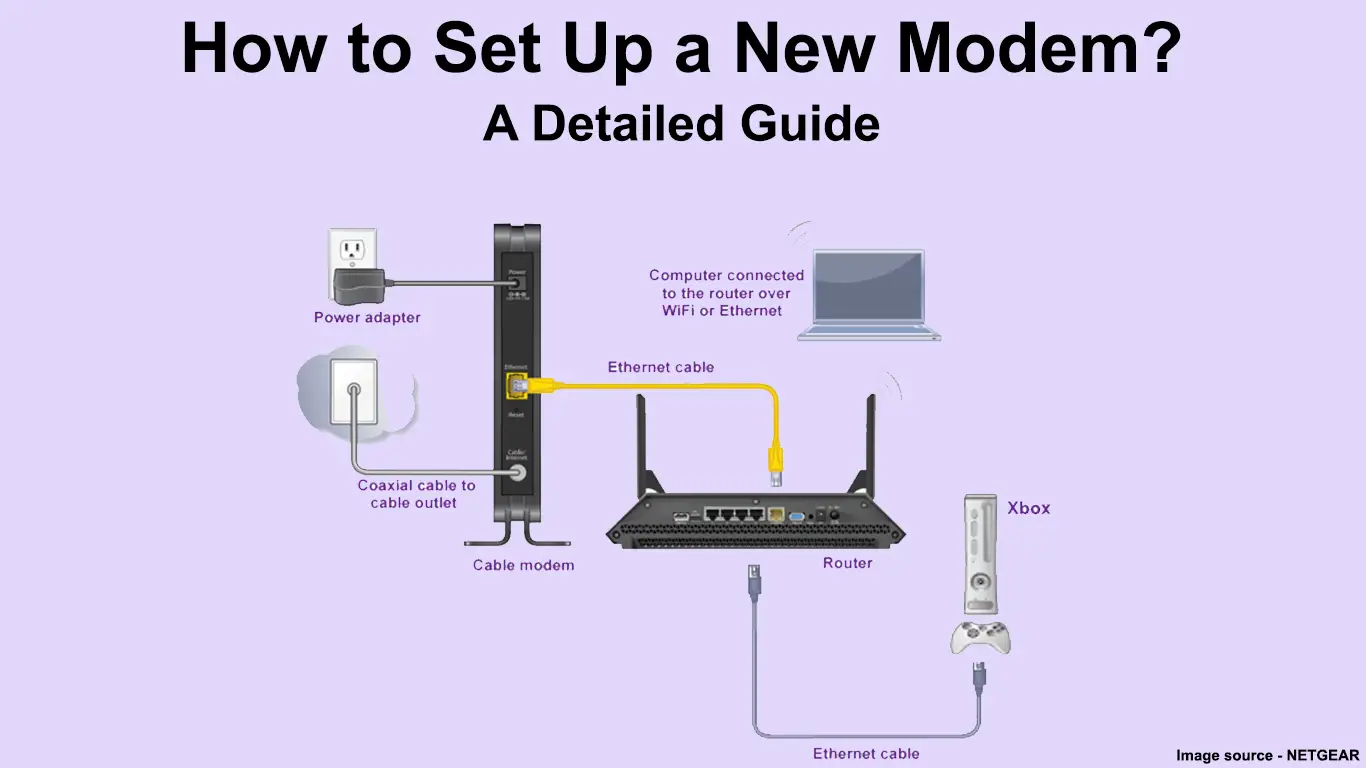
- Connect the Modem: Reconnect your modem to its power source and to your internet line (coaxial, Ethernet, or fiber optic cable). Allow your modem to fully boot up. You’ll typically see indicator lights on the modem turn solid, signifying a stable internet connection. This process can take a few minutes.
- Connect Router to Modem: Take an Ethernet cable and plug one end into the designated “Internet,” “WAN,” or “Uplink” port on your new router. This port is usually a different color from the other Ethernet ports on the router. Plug the other end of this Ethernet cable into the Ethernet port on your modem.
2.3 Powering Up Your New Router

Once the physical connections are made, it’s time to bring your new router to life.
- Connect Router Power: Plug the power adapter into your new router and then into a power outlet.
- Wait for Boot-Up: Your router will now begin its boot-up sequence. This can take a few minutes. Observe the indicator lights on the router. Typically, you’ll see a power light, an internet light (which should eventually turn solid or blink to indicate a connection), and Wi-Fi indicator lights. Consult your router’s manual if you’re unsure about the meaning of specific lights.
3. Configuration: Setting Up Your Network and Security
With your hardware in place, the next step is to configure your router’s settings to create your personalized home network and ensure its security. This is where the “Tech” aspect of your website truly shines, focusing on practical digital security and productivity.
3.1 Accessing the Router’s Administration Interface
Most routers can be configured through a web-based interface.
- Connect a Device: You can connect a computer or a mobile device to your new router. For the initial setup, it’s often easiest to use a wired Ethernet connection from your computer to one of the LAN ports on the router. Alternatively, you can connect wirelessly using the router’s default Wi-Fi network, the details of which are usually found on a sticker on the router itself or in its quick start guide.
- Open a Web Browser: On your connected device, open any web browser (Chrome, Firefox, Safari, Edge).
- Enter the Router’s IP Address: In the address bar, type the router’s default IP address. Common default IP addresses include
192.168.1.1or192.168.0.1. You can find this information in your router’s manual or on the sticker on the device. - Log In: You’ll be prompted to enter a username and password. The default credentials are also usually found in the manual or on the router’s sticker. It is crucial to change these defaults immediately for security.
3.2 Initial Setup and Essential Settings
Once you’re logged into the router’s interface, you’ll typically be guided through an initial setup wizard. Even if not, here are the key settings you’ll want to configure:
- Change Default Login Credentials: This is paramount for your digital security. Choose a strong, unique password that you won’t easily forget.
- Set Up Your Wi-Fi Network Name (SSID): This is the name your wireless network will broadcast. Choose something recognizable but avoid using personal information.
- Create a Strong Wi-Fi Password (WPA2/WPA3): This is the key to keeping your network secure from unauthorized access. Use a combination of uppercase and lowercase letters, numbers, and symbols. Ensure you select WPA2 or WPA3 encryption, which are the most secure options. Avoid older, less secure protocols like WEP or WPA.
- Firmware Update: Most modern routers will prompt you to check for and install firmware updates. This is incredibly important as firmware updates often include security patches and performance improvements. Always keep your router’s firmware up to date.
3.3 Advanced Configuration (Optional but Recommended)
Depending on your technical comfort level and needs, you might want to explore these advanced settings:
- Quality of Service (QoS): If you have multiple devices or bandwidth-intensive applications, QoS allows you to prioritize certain traffic. For example, you can give your gaming console or work laptop higher priority than a smart TV streaming in the background. This helps ensure a smoother experience for your most critical activities.
- Guest Network: Creating a separate guest network allows visitors to access your internet without having access to your main network and its connected devices. This enhances security and keeps your personal files and devices isolated.
- Parental Controls: If you have children, parental controls can help you restrict access to certain websites or set time limits for internet usage.
- Port Forwarding/UPnP: For certain applications like online gaming or running servers, you might need to configure port forwarding or ensure Universal Plug and Play (UPnP) is enabled. However, be cautious with these settings, as they can introduce security risks if not configured correctly.
4. Troubleshooting and Optimization: Ensuring Peak Performance
Even with a successful installation, you might encounter minor issues or want to fine-tune your network for optimal performance.
4.1 Common Installation Issues and Solutions
- No Internet Connection:
- Check Lights: Ensure the modem and router lights indicate a proper connection.
- Reboot Everything: Try power cycling your modem and router in the correct order (modem first, then router).
- Cable Connections: Verify all Ethernet cables are securely plugged into the correct ports.
- ISP Outage: Check with your ISP to see if there’s an ongoing service outage in your area.
- Slow Wi-Fi Speeds:
- Router Placement: Ensure your router is in a central, open location, away from obstructions like thick walls, metal objects, and other electronics that can cause interference.
- Device Proximity: The closer your devices are to the router, the stronger the signal will be.
- Too Many Devices: If you have a large number of devices, your router might be struggling. Consider upgrading to a more powerful router or a mesh system.
- Firmware Update: Ensure your router’s firmware is up to date.
- Interference: Other Wi-Fi networks in your vicinity or household appliances can cause interference. You might be able to change the Wi-Fi channel in your router’s settings to a less congested one.
- Wi-Fi Dropping:
- Signal Strength: This often points to signal strength issues, similar to slow speeds. Re-evaluate router placement.
- Overheating: Ensure your router has adequate ventilation and isn’t overheating.
- Hardware Issue: In rare cases, the router itself might be faulty.
4.2 Optimizing Your Wi-Fi Network
- Dual-Band or Tri-Band Routers: Most modern routers offer dual-band (2.4 GHz and 5 GHz) or tri-band (2.4 GHz, 5 GHz, and another 5 GHz or 6 GHz) Wi-Fi. The 2.4 GHz band offers a wider range but slower speeds, while the 5 GHz and 6 GHz bands offer faster speeds but a shorter range. Use the 5 GHz or 6 GHz bands for devices close to the router that require high bandwidth (e.g., streaming devices, gaming consoles).
- Wi-Fi Channel Selection: Within your router’s settings, you can often choose the Wi-Fi channel. Use a Wi-Fi analyzer app on your smartphone to identify the least congested channels in your area and manually select one.
- Guest Network Usage: By offloading guest devices to a separate network, you reduce congestion on your primary network, leading to better performance for your own devices.
- Regular Reboots: Periodically rebooting your router (e.g., once a week) can help clear out any temporary glitches and maintain optimal performance.
By following these steps, you’ve successfully installed and configured your new router, setting the stage for a faster, more stable, and secure digital life. Enjoy the benefits of your upgraded home network!
aViewFromTheCave is a participant in the Amazon Services LLC Associates Program, an affiliate advertising program designed to provide a means for sites to earn advertising fees by advertising and linking to Amazon.com. Amazon, the Amazon logo, AmazonSupply, and the AmazonSupply logo are trademarks of Amazon.com, Inc. or its affiliates. As an Amazon Associate we earn affiliate commissions from qualifying purchases.