In an increasingly visual and digital world, the aesthetic appeal of your content can significantly impact its effectiveness. Whether you’re a professional designer, a marketer crafting compelling brand narratives, a business owner building a unique identity, or simply someone who appreciates a personalized digital experience, the fonts you use play a pivotal role. On a Mac, the process of installing new fonts is straightforward, yet it unlocks a world of creative possibilities, transforming everything from your presentations and documents to your personal projects.
This guide delves into the essential steps of adding new fonts to your macOS system, ensuring you can harness the full power of typography. We’ll cover everything from understanding font formats and sourcing reputable font libraries to the practical installation methods and crucial considerations for managing your font collection. By the end of this article, you’ll not only know how to install any font on your Mac but also appreciate the strategic importance of typography in an age where digital presence is paramount.
Why New Fonts Matter: Enhancing Your Digital Presence and Beyond
Before we dive into the “how-to,” it’s essential to understand the “why.” Fonts are more than just decorative elements; they are powerful communication tools that convey mood, professionalism, and personality. Integrating new fonts into your Mac’s repertoire is not merely a technical task; it’s a strategic move to enhance your digital presence, boost productivity, and express your unique vision.
The Power of Typography in Branding and Marketing
For businesses, entrepreneurs, and personal brands, typography is a cornerstone of visual identity. A carefully chosen font can instantly communicate your brand’s values, tone, and target audience. Think about iconic brands – their logos and marketing materials are inextricably linked to specific typefaces that evoke trust, innovation, luxury, or approachability.
- Brand Recognition and Consistency: A distinctive font helps your brand stand out and become memorable. Consistent use across all platforms – website, social media, marketing collateral, and internal documents – reinforces brand identity and fosters recognition. In a competitive marketplace, a unique typographical voice can be a significant differentiator, crucial for tech startups aiming for sleek innovation or established businesses seeking to convey reliability.
- Conveying Professionalism and Credibility: Using high-quality, legible fonts projects an image of professionalism and attention to detail. Conversely, using generic, overused, or poorly chosen fonts can inadvertently undermine your credibility, especially in fields where precision and aesthetics are highly valued, like financial reporting or app design. For those building a personal brand, selecting a signature typeface can elevate your perceived expertise and authority.
- Emotional Connection and Engagement: Typography has a profound psychological impact. Elegant serifs can evoke tradition and sophistication, while clean sans-serifs suggest modernity and clarity. Playful scripts can convey creativity and warmth. By selecting fonts that align with the emotional resonance you wish to create, you can better connect with your audience and enhance engagement, influencing everything from conversion rates on an e-commerce site to reader retention on a blog.
Personal Expression, Productivity, and Digital Storytelling
Beyond commercial applications, new fonts offer immense value for individual users. For content creators, writers, students, or anyone who frequently interacts with digital documents, the right font can make a significant difference.
- Personalization and Aesthetics: Your Mac is an extension of your personality. Customizing your font library allows you to tailor your digital environment to your aesthetic preferences, making your daily computing experience more enjoyable and visually appealing.
- Enhanced Readability and Focus: For tasks involving extensive reading or writing, choosing a font optimized for readability can reduce eye strain and improve focus. Whether it’s a specific font for coding, academic papers, or long-form articles, a well-selected typeface can boost your productivity and comfort.
- Creative Storytelling: Designers and digital artists leverage diverse fonts to tell richer stories. Each typeface brings its own narrative and character, allowing for more nuanced visual communication in presentations, digital art, social media graphics, and personal projects. This ability to layer meaning through typography is a key asset in today’s visually-driven digital landscape.
Understanding Font Formats: OTF, TTF, and Web Fonts
Before you start downloading, it’s helpful to understand the common font formats you’ll encounter. Each has its characteristics and ideal use cases.
- OpenType Font (OTF): Developed by Adobe and Microsoft, OTF is widely considered the most versatile and advanced font format. It supports a vast character set, including ligatures, stylistic alternates, and small caps, offering designers extensive typographical control. OTF fonts are cross-platform compatible (Mac and Windows) and are the preferred choice for professional print and graphic design work due to their superior rendering quality and feature richness.
- TrueType Font (TTF): An older but still widely used format, TrueType was originally developed by Apple in the late 1980s and later adopted by Microsoft. TTF fonts are known for their strong on-screen readability, making them excellent for general document use and desktop publishing. While they may not offer the advanced features of OTF, they are highly compatible and work reliably across virtually all operating systems and applications.
- Web Fonts (WOFF, WOFF2, EOT, SVG): These formats are specifically designed for use on websites. While you won’t directly install these on your Mac for system-wide use, understanding them is crucial if you’re involved in web development or managing a brand’s online presence. Web fonts allow designers to use custom typography on websites without requiring users to have the font installed locally, ensuring consistent branding across browsers. WOFF (Web Open Font Format) and WOFF2 are the most common and efficient web font formats today, offering excellent compression and performance.
For general use and installation on your Mac, you’ll primarily be dealing with OTF and TTF files. Most font providers will offer both, giving you flexibility.
Sourcing Your Next Favorite Font: Where to Find and What to Consider
With an understanding of why fonts are important and the different formats, the next step is finding them. The internet abounds with font libraries, both free and paid, but discerning reputable sources and understanding licensing is paramount, especially when brand integrity and potential financial implications are at stake.
Reputable Free Font Libraries
The appeal of free fonts is undeniable, particularly for hobbyists, students, or those testing new concepts without a large budget. However, quality and licensing can vary widely.
- Google Fonts: This is arguably the most popular and reliable source for free, high-quality fonts. All fonts on Google Fonts are open source, meaning they can be used freely for personal and commercial projects. They are well-designed, optimized for web use, and come with excellent cross-browser compatibility. This makes them a fantastic starting point for website design, digital marketing, and even print projects.
- DaFont and Font Squirrel: These platforms host vast collections of fonts from various designers. While they offer a wide range of styles, it’s crucial to always check the licensing information for each individual font. Many fonts on DaFont are “for personal use only,” while Font Squirrel specifically curates fonts that are 100% free for commercial use. Always verify before using any font for business-related ventures.
- Adobe Fonts (Included with Creative Cloud): If you’re an Adobe Creative Cloud subscriber, you already have access to a massive library of high-quality fonts included in your subscription. These fonts are professionally designed, reliable, and come with clear licensing for commercial use. Integrating them with your Creative Cloud applications is seamless, making it a powerful resource for designers and content creators.
When exploring free options, prioritize sources known for quality control. A poorly designed free font, even if legal to use, can detract from your message and brand image, potentially costing you more in terms of lost credibility than a paid font would have initially.
Investing in Premium Fonts for Professional Use
While free fonts offer a great entry point, investing in premium fonts is often a non-negotiable step for businesses, agencies, and serious designers. Premium fonts offer unparalleled quality, unique designs, comprehensive character sets, and dedicated support, providing a significant competitive edge.
- Exclusive Design and Superior Craftsmanship: Paid fonts are typically designed by professional type foundries and designers who spend countless hours refining every character, kerning pair, and weight. This results in fonts that are aesthetically superior, highly legible across various sizes, and technically flawless. This attention to detail reflects positively on your brand’s commitment to quality.
- Extensive Character Sets and OpenType Features: Premium fonts often come with a broader range of weights, styles (italic, bold, condensed), and extended character sets that support multiple languages. They also frequently leverage advanced OpenType features like ligatures, stylistic alternates, and small caps, giving designers immense flexibility and creative control.
- Dedicated Support and Updates: Purchasing from reputable foundries usually means access to customer support and updates, ensuring your fonts remain compatible with future operating system updates and software versions. This technical reliability is a critical consideration for continuous brand operations.
- Differentiation and Brand Identity: In a crowded digital space, using a unique, well-crafted premium font can be a powerful differentiator. It helps establish a distinct visual identity that sets your brand apart from competitors who might rely on more common, free alternatives. This exclusivity contributes directly to a stronger brand asset.
Top sources for premium fonts include MyFonts, Fontspring, Adobe Fonts (as part of Creative Cloud subscriptions), and independent type foundries like Commercial Type, Hoefler&Co, and Grilli Type. These platforms offer robust search filters, trials, and clear licensing information, simplifying the selection process for designers and businesses.
Licensing and Usage Rights: Protecting Your Brand and Your Money
This is perhaps the most critical aspect of font selection, especially for commercial use. Misunderstanding font licenses can lead to legal issues, costly fines, and damage to your brand’s reputation. For any business or professional using fonts, this is a direct “Money” and “Brand” concern.
- Personal Use vs. Commercial Use: Many free fonts are licensed only for “personal use,” meaning you can use them for non-profit projects, school assignments, or personal hobbies. Using them for anything that generates revenue (even indirectly, like marketing materials for a business) is a violation of the license.
- Desktop License: This is the most common type of license, allowing you to install the font on your computer (desktop) and use it in applications like Adobe Photoshop, InDesign, Microsoft Word, etc., for print materials, logos, and static graphics. The license typically specifies the number of users or computers the font can be installed on.
- Web Font License: If you plan to use a font on a website (via
@font-faceCSS), you need a separate web font license. These are usually priced based on page views or domain usage. - App/eBook/Server Licenses: More specialized licenses exist for embedding fonts in mobile applications, e-books, or for use on servers in cloud-based applications.
- Embarking on a Side Hustle or Starting a Business: For anyone engaged in graphic design, web development, or content creation as a side hustle or burgeoning business, understanding font licensing is not just good practice – it’s fundamental to your financial and legal security. Always err on the side of caution. If unsure, contact the font vendor directly or purchase a commercial license to cover all potential uses.
Always read the End User License Agreement (EULA) carefully before acquiring and using any font, free or paid. Investing a little time in understanding licensing can save significant financial and legal headaches down the line, safeguarding your brand’s integrity and your financial well-being.
Step-by-Step: Installing Fonts on macOS
Now that you’ve selected your desired fonts and reviewed their licensing, it’s time to bring them to life on your Mac. macOS makes font installation incredibly user-friendly, offering several methods to suit your preference.
The Easiest Method: Double-Click and Install
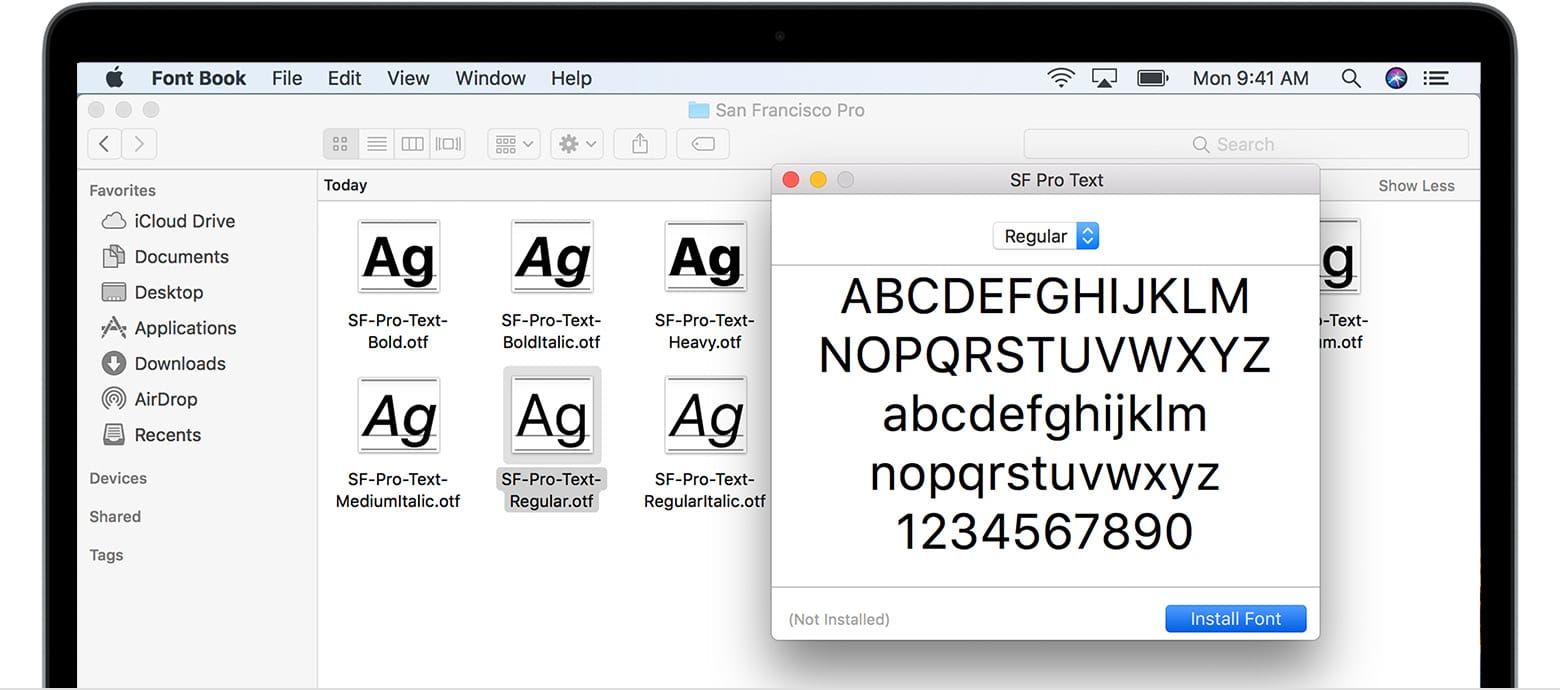
For most users, the simplest and most common method involves a quick double-click. This process is intuitive and works for the vast majority of OTF and TTF files.
- Locate Your Font File(s): After downloading your font, it will typically be in a compressed
.zipfile. Navigate to your Downloads folder (or wherever you saved it) and double-click the.zipfile to extract its contents. You should then see the font files, usually ending in.otfor.ttf. Some font packages might contain multiple files for different weights (e.g., “MyFont-Regular.otf”, “MyFont-Bold.otf”, “MyFont-Italic.otf”). - Double-Click the Font File: Select the font file (or files, you can install them one by one or select multiple and double-click one of them) and double-click it.
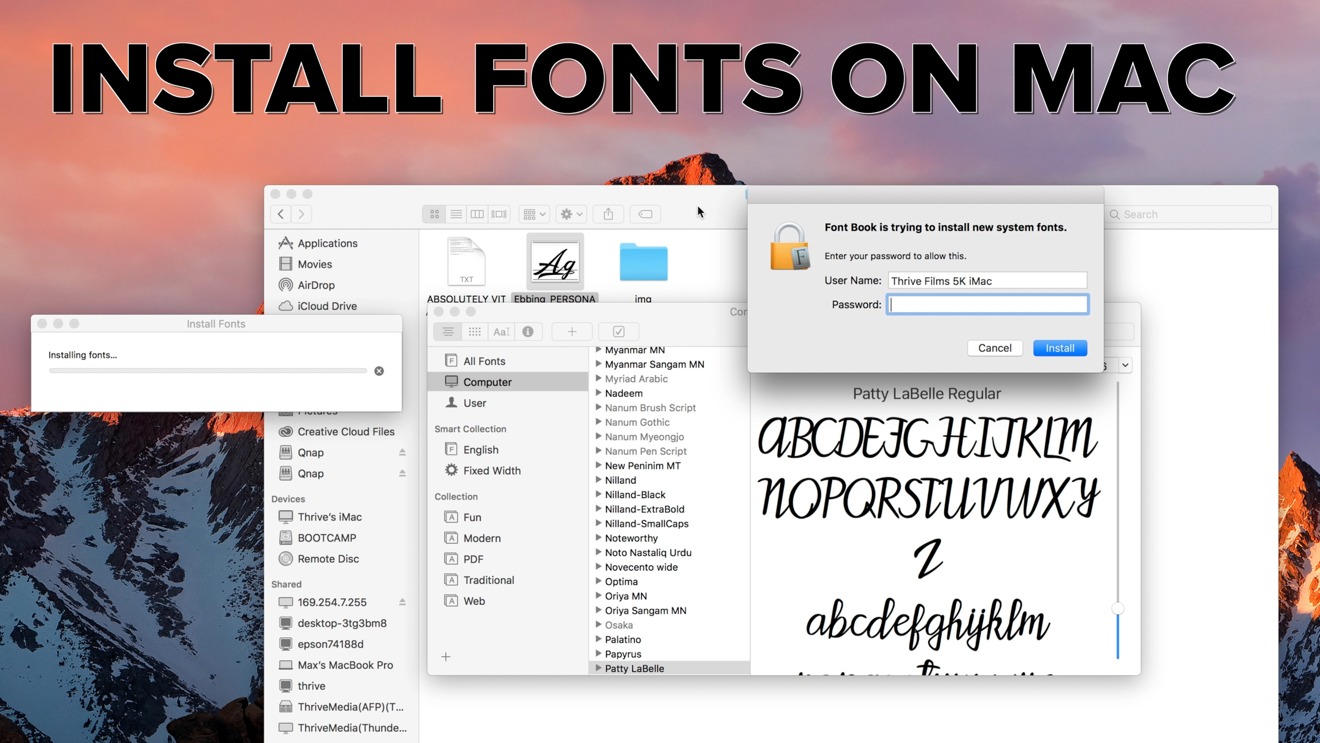
- Preview and Install: This action will automatically open Apple’s built-in Font Book application. Font Book will display a preview of the font. In the bottom-right corner of the preview window, you’ll see an “Install Font” button.
- Click “Install Font”: Click this button. Font Book will validate the font to check for common issues and then install it, making it available system-wide across almost all your applications (e.g., Pages, Keynote, Microsoft Word, Adobe Creative Suite apps, Google Docs in offline mode, etc.).
If you’ve downloaded a family with multiple weights, repeat this process for each font file. Font Book is intelligent enough to group them under a single family name once installed.
Leveraging Font Book for Comprehensive Management
Font Book is macOS’s dedicated application for managing your font library. Beyond simple installation, it offers robust features for organizing, previewing, disabling, and removing fonts, making it an indispensable tool for designers and power users.
To open Font Book:
- Navigate to
Applications/Font Book.app. - Search for “Font Book” using Spotlight (Command + Spacebar) and hit Enter.
Installing Fonts via Font Book:
- Open Font Book: Launch the application.
- Add Fonts: You can install fonts in a few ways:
- Go to
File > Add Fonts...from the menu bar. A Finder window will open, allowing you to browse to your font files and select them. - Drag and drop font files (from your Finder window) directly onto the Font Book application icon in the Dock, or into the main “All Fonts” or a specific “Collection” sidebar within the Font Book window.
- Go to
- Validation and Installation: Font Book will automatically validate the selected fonts. If any issues are found (e.g., duplicate fonts or corrupted files), it will notify you. Proceed with the installation.
Key Features of Font Book:
- Collections: Organize your fonts into custom collections (e.g., “Brand Fonts,” “Project X Fonts,” “Script Fonts”). This is invaluable for designers working on multiple projects or brands, ensuring quick access to relevant typefaces and improving workflow efficiency.
- Validation: Font Book automatically checks for duplicate or corrupted fonts during installation. You can also manually validate fonts by selecting them and going to
File > Validate Fonts. This helps maintain system stability and prevent font-related application crashes. - Enabling/Disabling Fonts: You can temporarily disable fonts you’re not actively using. This is particularly useful for managing large font libraries, as it can improve system performance and reduce clutter in application font menus.
Manual Installation for Advanced Users and Specific Needs
While Font Book handles most installations seamlessly, there might be scenarios where you need to install fonts manually by placing them directly into specific system folders. This method is less common for everyday users but can be useful for troubleshooting or very specific IT deployments.
Understanding Font Locations on Mac:
macOS uses several locations for font files, each with a different scope:
~/Library/Fonts(User Fonts): Fonts installed here are available only to the user who installed them. This is where Font Book typically installs fonts when you use the double-click or drag-and-drop method. It’s the recommended location for personal fonts.- To access: In Finder, hold down the
Optionkey, then clickGoin the menu bar and selectLibrary. Then navigate to theFontsfolder.
- To access: In Finder, hold down the
/Library/Fonts(Local Fonts): Fonts installed in this folder are available to all users on that particular Mac. This is useful for shared workstations or when multiple user accounts need access to the same font library.- To access: In Finder, click
Go > Go to Folder...(Shift + Command + G), then type/Library/Fontsand press Enter.
- To access: In Finder, click
/System/Library/Fonts(System Fonts): These are fonts essential for macOS’s operation (e.g., system UI fonts like San Francisco). Never modify or remove fonts from this folder, as it can lead to system instability and visual issues.
How to Manually Install:
- Locate Your Font File(s): As before, extract your
.otfor.ttffiles. - Choose Your Destination Folder: Decide whether you want the font to be available only to your user account (
~/Library/Fonts) or to all users (/Library/Fonts). - Drag and Drop: Open the chosen
Fontsfolder in Finder. Then, simply drag your font files from their download location directly into thisFontsfolder. - Authenticate (if necessary): If you’re installing into
/Library/Fonts(the system-wide folder), macOS will likely prompt you for your administrator password to authorize the change. - Restart Applications: After manual installation, it’s a good practice to quit and restart any applications you intend to use the new fonts with, as they often load their font lists at startup.
Manual installation offers a bit more control but comes with a higher risk of user error. For the vast majority of situations, using Font Book’s guided installation is safer and equally effective.
Managing Your Font Library and Troubleshooting Common Issues
As your font collection grows, efficient management becomes crucial. A cluttered or poorly managed font library can lead to decreased system performance, application crashes, and difficulty finding the fonts you need. Moreover, understanding how to troubleshoot common font-related issues will save you time and frustration.
Activating, Deactivating, and Removing Fonts
Maintaining a lean and organized font library is key to a smooth workflow, especially for those in design roles or managing multiple brand identities.
- Deactivating Fonts: Within Font Book, you can easily disable fonts you don’t frequently use. Select the font (or multiple fonts) and either click the checkbox next to its name in the list (if available), or right-click and choose “Disable [Font Name]”. Disabled fonts remain on your system but are hidden from application font menus, preventing clutter and potentially improving application startup times. This is especially useful for managing “Money” considerations in a design studio where clients have specific brand fonts that are only needed for certain projects.
- Activating Fonts: To re-enable a deactivated font, simply select it in Font Book and click the checkbox or right-click and choose “Enable [Font Name]”.
- Removing Fonts: To permanently delete a font from your system, select it in Font Book, then right-click and choose “Remove [Font Name]”. Confirm the deletion when prompted. Be cautious when removing fonts; ensure you no longer need them or have a backup, especially for licensed premium fonts. Removing system fonts can cause macOS instability, though Font Book usually prevents you from doing this.
- Organizing with Collections: As mentioned, Font Book’s “Collections” feature is invaluable. Create collections for different clients, projects, font styles (e.g., “Serif for Web,” “Display Fonts”), or even by license type (e.g., “Commercial Use,” “Personal Use Only”). This makes navigating vast libraries efficient and keeps your “Tech” workflow streamlined.
Resolving Font Conflicts and Performance Issues
Font issues can sometimes manifest as application crashes, incorrect font display, or slow performance. Here’s how to address common problems:
- Duplicate Fonts: Font Book is designed to detect duplicate fonts during installation. If you encounter issues, go to
File > Resolve Duplicatesin Font Book. It will help you identify and disable redundant copies, preventing conflicts that can confuse applications. - Corrupted Fonts: A corrupted font file can cause unexpected behavior. Font Book’s
File > Validate Fontsoption can help identify corrupted files. If a font is marked as invalid, it’s best to remove it and try downloading a fresh copy from the original source. - Clearing Font Caches: Sometimes, applications or macOS itself cache font information. If a newly installed font isn’t appearing, or if you’re experiencing strange font rendering, clearing font caches can help.
- Quit all open applications.
- Open Terminal (Applications > Utilities > Terminal).
- Type
sudo atsutil databases -removeand press Enter. You’ll be prompted for your administrator password. - Restart your Mac. This will force macOS to rebuild its font caches.
- Application-Specific Issues: Some applications, particularly older ones or niche software, might have their own font management systems or be less compatible with certain font types. If issues persist in only one application, check its preferences or support documentation.
Syncing Fonts Across Devices and Cloud Services
For professionals working across multiple Macs or in teams, syncing fonts ensures consistency and efficiency. This relates to “Productivity” and “Brand” consistency.
- Cloud Storage Services: Services like Dropbox, Google Drive, or OneDrive can be used to store your font files. You can then access and install them on any Mac where you sign in. For team environments, a shared cloud folder ensures everyone has access to the approved brand fonts.
- Adobe Creative Cloud Sync: For Adobe Creative Cloud users, Adobe Fonts (formerly Typekit) offers seamless font syncing. Activating a font from the Adobe Fonts website automatically syncs it to all your Creative Cloud applications across your logged-in devices. This is a powerful feature for maintaining brand consistency across different workstations and for designers who regularly switch between personal and work Macs.
- Third-Party Font Managers: For very large or complex font libraries, advanced font management software like Extensis Suitcase Fusion, RightFont, or Universal Type Server offers more sophisticated features, including cloud-based font sharing, version control, and automated font activation. While these often come with a subscription cost (“Money”), the productivity gains and brand consistency they provide can easily justify the investment for design studios and large organizations.
Unleashing Your Creativity: Integrating New Fonts into Your Workflow
With your new fonts installed and your library well-managed, the final step is to put them to use. Integrating them seamlessly into your daily applications and understanding their impact on your creative output is where the real magic happens.
Applying New Fonts in Design Software and Productivity Apps
Once a font is installed on your Mac, it becomes available in almost all applications that support text.
- Design Software (Adobe Creative Suite, Affinity Designer, Figma, Sketch): These are the primary environments where designers leverage new fonts. Open your preferred application, select a text layer or tool, and navigate to the font dropdown menu. Your newly installed fonts will appear alongside your existing library. Experiment with different weights, styles, and OpenType features to find the perfect typographical expression for your graphics, layouts, and web mockups. The precision these tools offer means subtle font choices can have a dramatic “Brand” impact.
- Productivity Suites (Pages, Keynote, Numbers, Microsoft Word, PowerPoint, Excel): For presentations, reports, documents, and spreadsheets, custom fonts elevate professionalism and readability. Simply select text and choose your desired font from the font selector. This allows for a much more polished look than relying solely on default system fonts, reinforcing your “Personal Branding” or “Corporate Identity” even in everyday documents.
- Other Applications: Even casual apps like Mail, Notes, or various journaling apps will often allow you to customize their default fonts. This enhances your personal computing experience and allows for a truly personalized digital environment.
Financial Implications of Font Choices for Businesses
Revisiting the “Money” aspect, the choices you make about fonts can have tangible financial consequences for businesses and individuals:
- Return on Investment (ROI) of Premium Fonts: While free fonts are attractive, investing in premium typefaces for branding and marketing can offer significant ROI. A unique, high-quality font strengthens brand recognition, conveys professionalism, and can indirectly contribute to increased customer trust and sales. The cost of a good font often pales in comparison to the potential revenue it helps generate by enhancing your brand’s appeal.
- Avoiding Legal Costs: As discussed with licensing, using fonts without the appropriate commercial license can lead to legal disputes and hefty fines. Proactively purchasing the correct licenses or carefully verifying free font terms is a direct financial protection measure. For a small business or side hustler, an unexpected legal battle over font usage can be financially devastating.
- Efficiency and Productivity: For design teams, a well-organized font library and standardized font usage (perhaps enforced by font management software) can drastically improve workflow efficiency, reduce design errors, and ensure consistent brand messaging across all outputs. This translates directly into cost savings through reduced labor time and rework.

Conclusion
Installing new fonts on your Mac is a simple yet powerful way to customize your digital workspace, enhance your creative projects, and strengthen your brand identity. From the intuitive double-click method to the comprehensive management tools within Font Book, macOS makes the process accessible to everyone.
By understanding the nuances of font formats, discerning reliable sources for free and premium typefaces, and rigorously adhering to licensing agreements, you empower yourself to make informed decisions that benefit both your creative output and your financial security. Whether you’re designing the next big app, crafting a compelling marketing campaign, or simply personalizing your daily documents, the world of typography on your Mac is vast and ready for you to explore. Embrace the power of fonts, and watch your digital presence truly flourish.
aViewFromTheCave is a participant in the Amazon Services LLC Associates Program, an affiliate advertising program designed to provide a means for sites to earn advertising fees by advertising and linking to Amazon.com. Amazon, the Amazon logo, AmazonSupply, and the AmazonSupply logo are trademarks of Amazon.com, Inc. or its affiliates. As an Amazon Associate we earn affiliate commissions from qualifying purchases.