Setting up a new printer, particularly an HP model renowned for its reliability and innovative features, should be a straightforward process that enhances your digital productivity, not hinders it. Whether you’ve just unboxed a sleek new all-in-one or are integrating a robust workhorse into your home office, proper installation is key to unlocking its full potential. This guide, tailored for users seeking practical tech tutorials, will walk you through every step of installing your HP printer, from initial unboxing to advanced setup and troubleshooting, ensuring a smooth, secure, and efficient printing experience. We’ll delve into connectivity options, software essentials, and valuable tips to optimize your device within the broader context of modern technology.

1. Laying the Foundation: Pre-Installation Preparations
Before you even think about plugging anything in, a little preparation can save a lot of headaches. This initial phase focuses on ensuring you have everything you need and that your environment is ready for your new gadget.
1.1 Unboxing and Inventory Check
Carefully remove your HP printer from its packaging. It’s a good practice to keep the box and packing materials for a short period, especially during the return window. As you unbox, make sure all advertised components are present. Typically, this includes:
- The HP printer unit itself
- Power cord
- Setup ink/toner cartridges
- USB cable (though not always included with wireless models, it’s often useful)
- Installation CD/DVD (less common now, but still found with some older models)
- Setup guide and warranty information
Verify that there are no visible signs of damage from shipping. Remove all protective tapes, films, and cardboard inserts from the exterior and interior of the printer. Pay close attention to the print head area, paper tray, and cartridge access doors, as these often have orange or blue tapes that must be removed for the printer to function correctly.
1.2 Strategic Placement and Power Connection
Choosing the right location for your printer is more important than you might think. Consider factors like:
- Proximity to power: Ensure easy access to an electrical outlet. Avoid sharing an outlet with high-power appliances to prevent electrical interference.
- Connectivity: If you plan to use a wired connection (USB or Ethernet), make sure it’s within reach of your computer or router. For wireless connections, position the printer in an area with strong Wi-Fi signal reception, ideally not too far from your router and away from large metal objects or other electronics that could cause interference.
- Ventilation and space: Printers need adequate airflow to prevent overheating. Leave some space around the unit. Also, consider the space needed for paper trays, output trays, and accessing cartridges.
- Stability: Place the printer on a stable, flat surface to prevent vibrations that could affect print quality.
Once situated, connect the power cord to the printer and then to a wall outlet. Do not use surge protectors or power strips initially, as some HP printers may require a direct connection to a wall outlet during initial setup to receive stable power. Power on the printer using its power button. Follow any on-screen prompts on the printer’s control panel for language selection or initial setup.
1.3 Loading Paper and Installing Ink/Toner Cartridges
This step is critical for a successful test print.
- Load Paper: Open the input tray and load a stack of fresh, unused paper (typically standard A4 or Letter size). Adjust the paper guides to snugly fit the paper stack without bending it.
- Install Cartridges: Open the ink or toner cartridge access door. Wait for the carriage to move to the center. Carefully unwrap the setup cartridges, removing any protective tapes or caps as instructed in your printer’s manual. Insert the cartridges into their designated slots (usually color-coded) until they click into place. Close the access door. The printer will typically perform an alignment process, which might involve printing a test page. Follow any instructions on the printer’s control panel.
2. Establishing Connectivity: Wired vs. Wireless
With your printer physically ready, the next step is to connect it to your computer or network. HP offers various connection methods, each with its advantages.
2.1 Wired Connections: USB and Ethernet
2.1.1 USB Connection
This is the most direct and often the simplest method for single-computer setups.
- Prerequisites: Ensure you have a USB 2.0 or 3.0 cable (Type-A to Type-B, often referred to as a “printer cable”).
- Procedure: Do not connect the USB cable until instructed by the software installation process. Once you reach the prompt during software installation, connect one end of the USB cable to the square USB port on the back of your HP printer and the other end to an available USB port on your computer. Your computer should automatically detect the new hardware.
2.1.2 Ethernet Connection (for Networked Printers)
Ideal for office environments or when multiple users on a local network need to access the printer.
- Prerequisites: An Ethernet cable and an available port on your network router or switch.
- Procedure: Connect one end of the Ethernet cable to the Ethernet port (RJ-45) on your printer and the other end to an available LAN port on your router. Once connected, your printer will obtain an IP address from your network. You can usually find this IP address in the printer’s network settings menu on its control panel. This IP address will be useful later for adding the printer to computers on the network.
2.2 Wireless Connections: Unleashing Flexibility
Wireless connectivity offers unparalleled flexibility, allowing you to print from anywhere within your network’s range without being tethered by cables.
2.2.1 Connecting via Wi-Fi Protected Setup (WPS)
WPS is a quick and easy method for connecting to a wireless network, provided your router supports it.
- Procedure:
- Ensure your printer is in WPS connection mode (often indicated by a blinking Wi-Fi or WPS button). Refer to your printer’s manual for specific instructions on activating WPS mode.
- Within two minutes, press the WPS button on your wireless router. The printer should automatically detect and connect to your network.
- A solid blue Wi-Fi light on your printer indicates a successful connection.
2.2.2 Manual Wireless Setup
If your router doesn’t support WPS or if you prefer more control, you can connect manually.
- Procedure:
- On your printer’s control panel, navigate to the “Wireless Settings” or “Network Settings” menu.
- Select “Wireless Setup Wizard” or “Wi-Fi Setup.”
- The printer will search for available wireless networks. Select your network’s name (SSID) from the list.
- Enter your Wi-Fi password (network security key or passphrase) using the printer’s on-screen keyboard. Pay attention to case sensitivity.
- Once entered, the printer will attempt to connect. A solid blue Wi-Fi light confirms a successful connection.
2.2.3 HP Wi-Fi Direct
Many modern HP printers offer Wi-Fi Direct, allowing you to connect directly to the printer from a mobile device or computer without needing a router or existing Wi-Fi network. This is incredibly useful for guest printing or when you’re in an area without network access.
- Procedure:
- Activate Wi-Fi Direct on your printer (usually through the Wireless or Network settings). This will display a Wi-Fi Direct name (e.g., “DIRECT-HP-Print-XX”) and a password.
- On your computer or mobile device, go to your Wi-Fi settings and select the printer’s Wi-Fi Direct network name.
- Enter the displayed password when prompted.
- You are now directly connected to the printer and can print.
3. Software and Driver Installation: The Digital Brains

With your printer physically connected to your system or network, the next crucial step is installing the necessary software and drivers. These act as the communication bridge between your computer and the printer, enabling full functionality. HP provides several convenient methods for this.
3.1 The HP Smart App: Modern, Streamlined Setup
The HP Smart app is HP’s recommended and most user-friendly method for installing, setting up, and managing your printer. It’s available for Windows, macOS, Android, and iOS, integrating seamlessly with contemporary technology trends.
- Procedure:
- Download: On your computer (Windows 10/11 or macOS) or mobile device, download the HP Smart app from the Microsoft Store (Windows), Apple App Store (macOS/iOS), or Google Play Store (Android).
- Launch and Add Printer: Open the HP Smart app. If you have an HP account, sign in. If not, you can create one or proceed as a guest. The app will usually automatically detect your new HP printer on the same network.
- Follow On-Screen Prompts: Select “Add Printer” and follow the step-by-step instructions provided by the app. This typically involves connecting to the printer, downloading the full feature software, and registering your printer for warranty and services.
- Test Print: The app will guide you through printing a test page, confirming successful installation.
The HP Smart app also serves as a central hub for managing print jobs, checking ink levels, performing scans, and even ordering supplies, enhancing your overall productivity.
3.2 Manual Driver and Software Installation (HP Support Website)
If you prefer a more traditional approach, or if the HP Smart app encounters issues, downloading drivers directly from the HP support website is a reliable alternative.
- Procedure:
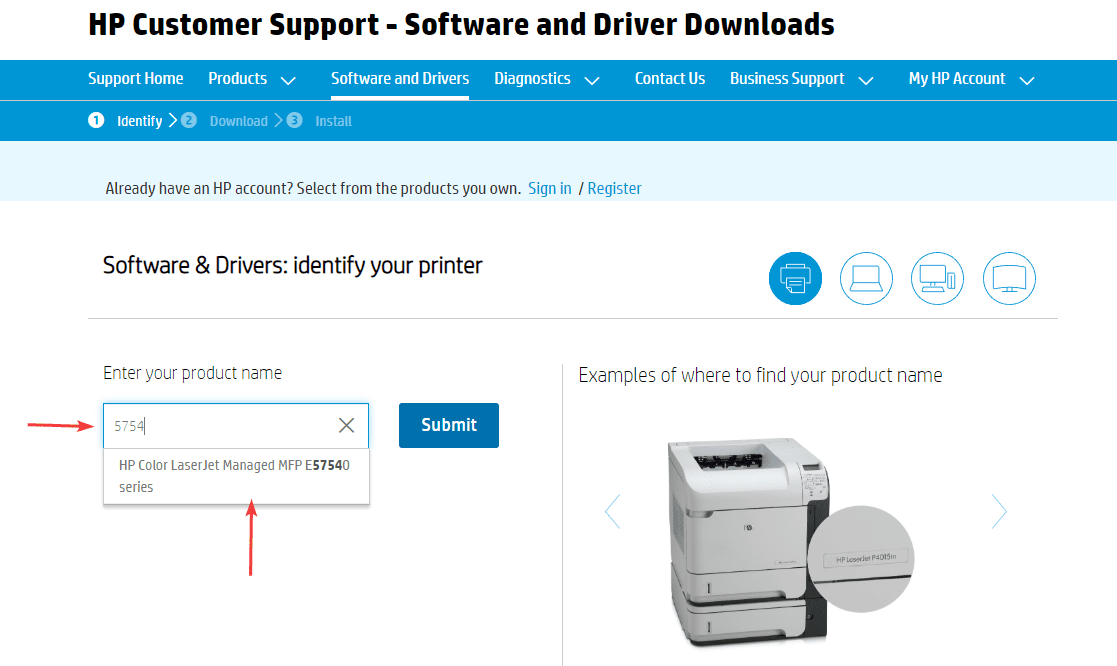
- Identify Printer Model: Locate the exact model name and number of your HP printer (usually found on a label on the printer itself).
- Visit HP Support: Open a web browser and go to support.hp.com.
- Search for Drivers: Enter your printer’s model name in the search bar. Navigate to the “Software and Driver Downloads” section for your specific model.
- Select OS and Download: Ensure the correct operating system (Windows version, macOS version) is selected. Download the “Full Feature Software and Driver” package, which includes all necessary drivers and HP utilities.
- Run Installer: Once downloaded, locate the file (usually an .exe for Windows or .dmg for macOS) and run it. Follow the on-screen instructions of the installation wizard. This wizard will guide you through connecting your printer (if using USB) or finding it on the network.
- Complete Setup: After installation, restart your computer if prompted. Perform a test print to confirm functionality.
3.3 Using an Installation CD/DVD (Legacy Method)
While less common with newer printers, some older models still ship with an installation disc.
- Procedure:
- Insert the installation CD/DVD into your computer’s optical drive.
- The setup program should launch automatically. If not, open “This PC” or “My Computer,” locate the CD/DVD drive, and double-click the setup file (e.g., “setup.exe” or “install.exe”).
- Follow the on-screen instructions. This process is similar to the manual download method but uses local media.
4. Optimizing Your HP Printer: Advanced Features and Maintenance
Once your printer is installed and operational, there are several steps you can take to enhance its performance, security, and integration into your digital workflow.
4.1 Leveraging Advanced Printing Features
Modern HP printers are more than just output devices; they are multi-functional productivity tools.
- Mobile Printing:
- HP ePrint: Assigns a unique email address to your printer, allowing you to print documents by simply emailing them to the printer from anywhere with an internet connection.
- Apple AirPrint: For iOS and macOS users, AirPrint allows direct printing to compatible HP printers over a Wi-Fi network without installing additional drivers.
- Mopria Print Service: For Android users, Mopria provides a universal print solution for various printer brands, including HP, allowing seamless mobile printing.
- Scanning Features: If you have an all-in-one printer, explore its scanning capabilities. The HP Smart app often provides excellent tools for scanning documents, converting them to PDFs, and saving them to cloud services or email.
- Duplex Printing: Save paper and reduce your environmental footprint by enabling automatic two-sided (duplex) printing in your printer settings.
- Cloud Integration: Some HP printers offer direct connectivity to cloud storage services like Google Drive or Dropbox, allowing you to print from or scan directly to these platforms.
4.2 Essential Printer Maintenance and Security
Just like any other gadget, your HP printer benefits from regular attention to maintain optimal performance and digital security.
- Firmware Updates: Periodically check for and install firmware updates for your printer. These updates often include performance enhancements, bug fixes, and crucial security patches that protect your device from vulnerabilities. You can usually do this via the HP Smart app or the printer’s web interface (accessed by typing the printer’s IP address into a browser).
- Regular Cleaning: Keep the printer clean, especially the paper path and any glass surfaces on the scanner. Use a lint-free cloth.
- Cartridge Management: Use genuine HP cartridges for the best print quality and to avoid potential issues. Recycle used cartridges responsibly.
- Network Security: If your printer is connected wirelessly, ensure your Wi-Fi network is secured with a strong password (WPA2/WPA3 encryption). Consider changing the default administrator password for your printer’s embedded web server to prevent unauthorized access to its settings.
5. Troubleshooting Common Installation Hurdles
Even with careful preparation, you might encounter minor issues during or after installation. Here are solutions to some common problems.
5.1 Printer Not Found or Offline
- Check Power and Cables: Ensure the printer is powered on and all cables (power, USB, Ethernet) are securely connected.
- Network Connectivity: For wireless printers, verify that the blue Wi-Fi light is solid, indicating a successful connection to your network. Check your router for any issues.
- Restart Everything: Power cycle your printer, computer, and router. Sometimes, a simple restart can resolve connectivity glitches.
- Firewall/Antivirus: Temporarily disable your computer’s firewall or antivirus software during installation, as they might block communication. Remember to re-enable them afterward.
- IP Address Conflict: If using an Ethernet connection, check the printer’s assigned IP address and ensure it’s unique on your network.
5.2 Driver or Software Installation Errors
- Administrator Privileges: Ensure you are logged into your computer with administrator rights when installing software.
- Corrupted Download: If you downloaded the drivers, try downloading them again from the HP support website, ensuring a stable internet connection during the download.
- Previous Installations: Uninstall any previous or partial printer driver installations from your computer before attempting a fresh installation. Use the “Add or Remove Programs” utility in Windows or “Printers & Scanners” in macOS to remove old entries.
- Operating System Compatibility: Double-check that the drivers you are installing are compatible with your specific operating system version (e.g., Windows 11 64-bit, macOS Sonoma).
5.3 Poor Print Quality
- Run Print Head Cleaning: Most HP printers have a utility (accessible via the HP Smart app or the printer’s control panel) to clean the print heads. This can resolve streaking or missing colors.
- Check Ink/Toner Levels: Low ink or toner is a common cause of poor print quality.
- Paper Type: Ensure you are using the correct paper type and that it is loaded correctly. Using incorrect paper or bent paper can affect output.
- Alignment: Run a print head alignment procedure through the printer’s utility or control panel.
- Genuine Cartridges: Using non-genuine or refilled cartridges can often lead to print quality issues and may void your warranty.
5.4 “Printer Offline” Message
- Check Status: Verify the printer is actually powered on and not in sleep mode.
- Default Printer: Ensure your HP printer is set as the default printer in your computer’s “Printers & Scanners” settings.
- Pause Printing: Check if “Pause Printing” or “Use Printer Offline” is accidentally selected in the print queue (double-click the printer icon in your system tray to access).
- Driver Reinstallation: If all else fails, a complete uninstallation and reinstallation of the printer drivers can often resolve persistent “offline” issues.
By systematically following these steps and leveraging the comprehensive features of your HP printer and its accompanying software, you can ensure a seamless installation and enjoy reliable, high-quality printing for all your personal and professional needs. Modern HP printers are designed for user-friendliness, and with this guide, you’re well-equipped to integrate yours effortlessly into your tech ecosystem.
aViewFromTheCave is a participant in the Amazon Services LLC Associates Program, an affiliate advertising program designed to provide a means for sites to earn advertising fees by advertising and linking to Amazon.com. Amazon, the Amazon logo, AmazonSupply, and the AmazonSupply logo are trademarks of Amazon.com, Inc. or its affiliates. As an Amazon Associate we earn affiliate commissions from qualifying purchases.