In the world of gaming, few things are as frustrating as running out of storage space. That dreaded notification – “Cannot download, not enough free system storage” – can halt your gaming sessions and force difficult decisions about which beloved titles to delete. For many PlayStation 4 owners, this is a familiar plight, especially with modern game installations regularly exceeding 50GB, sometimes even 100GB. But what if you didn’t have to choose? What if you could significantly expand your PS4’s capacity and even boost its performance without breaking the bank on a new console? This detailed guide will walk you through every step of upgrading your PS4’s internal hard drive, turning a common tech hurdle into an empowering DIY project. We’ll delve into the ‘why,’ the ‘what,’ and the ‘how,’ ensuring you’re equipped to give your aging console a new lease on life, enhancing your gaming experience, and subtly touching upon the financial savviness of such an upgrade.
Why Upgrade Your PS4 Hard Drive? Unlocking Enhanced Performance and Capacity
Before we dive into the nuts and bolts of the upgrade, let’s explore the compelling reasons why undertaking this project is a smart move for any dedicated PS4 gamer. It’s not just about space; it’s about extending the life of your device, optimizing your digital security, and making a financially sound decision in an ever-evolving tech landscape.
The Frustration of Full Storage: Why You Need More Space
The standard PlayStation 4 models typically came with either 500GB or 1TB hard drives. While these capacities seemed ample at launch, the sheer size of contemporary game files, coupled with numerous system updates, downloadable content (DLC), and game patches, quickly eats up available room. Consider titles like Call of Duty: Warzone, Red Dead Redemption 2, or The Last of Us Part II – each can consume over 100GB. Add a few more AAA games, some indie gems, and media apps, and your PS4’s internal storage can fill up in what feels like an instant.
Running out of space isn’t just an inconvenience; it can actively hinder your gaming experience. You might miss out on new game releases, be unable to install crucial updates, or even find that your console struggles with basic operations due to insufficient virtual memory space. Upgrading to a larger drive – say, 2TB or even 4TB – offers a dramatic increase in capacity, allowing you to keep dozens of your favorite games installed simultaneously, along with all your media and apps, without the constant digital juggling act. This liberation from storage constraints directly translates to more gaming time and less management hassle, a clear win for productivity and enjoyment within your digital ecosystem.
Beyond Capacity: Potential Performance Gains with SSDs
While the primary motivation for most is increased storage, an often-overlooked benefit of upgrading your PS4’s internal drive lies in the potential for performance enhancements. The original hard drives in PS4 consoles are traditional Hard Disk Drives (HDDs), operating at 5400 RPM. These drives, while reliable, are relatively slow by today’s standards.
Enter the Solid State Drive (SSD). Replacing your PS4’s HDD with an SSD, while a more expensive option, can significantly reduce game loading times, texture pop-in, and even system boot-up speeds. SSDs have no moving parts, relying on flash memory to store data, which allows for vastly quicker read and write speeds compared to HDDs. For a PS4, while the internal SATA II interface won’t allow an SSD to reach its full PC potential, the improvement is still noticeable, often cutting load times by 10-30% in many titles. This subtle yet impactful performance boost can elevate your gaming experience, making transitions smoother and getting you into the action faster. It’s a prime example of leveraging modern tech trends (faster storage) to enhance an existing gadget, proving that even older hardware can benefit from strategic upgrades. For the tech-savvy gamer, this is an undeniable advantage, akin to a minor console refresh without the cost of a brand new system.
A Cost-Effective Console Refresh
In an era where new console generations (like the PS5) retail for hundreds of dollars, upgrading your PS4’s hard drive represents an incredibly cost-effective way to extend the lifespan and utility of your current system. A 2TB 2.5-inch internal HDD can be purchased for a fraction of the cost of a new console, typically ranging from $60-$90. Even a 1TB or 2TB SSD, while more expensive than an HDD, still offers a compelling value proposition when weighed against the cost of an entirely new gaming machine.
This DIY upgrade saves you money not just by deferring a new console purchase, but also by empowering you with a practical tech skill. Instead of paying a technician, you gain the satisfaction and financial benefit of doing it yourself. It aligns perfectly with principles of personal finance – maximizing the value of existing assets and making smart, informed investment decisions (in this case, in your entertainment setup). Furthermore, a well-performing PS4 can maintain its resale value better, should you eventually decide to upgrade to a PS5. It’s a smart brand strategy for your personal tech portfolio: showcasing a well-maintained, high-capacity system.
Preparing for the Upgrade: Essential Pre-Installation Steps
Before you even think about opening your PS4, thorough preparation is key. This phase ensures that the process is smooth, your data is safe, and you have all the right tools for the job. Neglecting these steps can lead to data loss or unnecessary frustration.
Gathering Your Arsenal: What You’ll Need
To successfully upgrade your PS4’s hard drive, you’ll need a few specific items. Having everything ready beforehand will streamline the process and prevent interruptions.
- A New 2.5-inch SATA Hard Drive or SSD: This is the core of your upgrade. The PS4 uses a standard 2.5-inch laptop-style drive. It must be no thicker than 9.5mm. While you can opt for another HDD (up to 4TB is generally supported), a Solid State Drive (SSD) will offer performance benefits. Popular brands like Samsung, Crucial, Western Digital, and Seagate offer reliable options. Ensure you check reviews and specifications to make an informed choice that balances cost and performance.
- A USB Flash Drive (at least 1GB, formatted to FAT32 or exFAT): This will be used to transfer the PS4 system software to your new drive. It’s crucial that it’s correctly formatted.
- A Phillips-head Screwdriver: Essential for removing a single screw securing the hard drive caddy.
- Internet Connection: Required to download the latest PS4 system software (firmware) from the PlayStation website.
- Another USB Storage Device or External Hard Drive (optional, but highly recommended): For backing up your existing game saves, screenshots, and other data. Its capacity will depend on how much data you need to back up.
- Patience and Time: While not a physical tool, a calm approach and dedicating sufficient time (1-3 hours, depending on data backup/restore) will make the process much smoother.
Safeguarding Your Digital World: Backing Up Your PS4 Data
This is arguably the most critical step. Replacing your PS4’s hard drive will erase everything on the old drive. If you don’t back up your data, you will lose all your game saves, screenshots, video clips, and downloaded games. PlayStation Plus subscribers have the advantage of cloud saves, but this doesn’t cover all data.
Here’s how to back up your PS4:
- Connect an external USB storage device to one of the PS4’s USB ports. Ensure it has enough free space for your backup.
- From the PS4’s XMB (Cross Media Bar) home screen, navigate to Settings > System > Back Up and Restore > Back Up PS4.
- The system will guide you through selecting the data you wish to back up. This typically includes saved data, screenshots, video clips, and themes. You can also back up applications (installed games), but this takes significantly longer and can consume a vast amount of space. For efficiency, consider only backing up saves and media, as games can be re-downloaded later.
- Confirm your selections and start the backup process. This can take anywhere from a few minutes to several hours, depending on the amount of data.
- Once complete, safely disconnect your external drive. Store it somewhere secure.
This meticulous backup process underscores the importance of digital security. It’s a fundamental practice not just for console upgrades, but for any computing device. Protecting your data ensures continuity and prevents irreversible loss of your personal gaming history and achievements.
Choosing Your New Drive: HDD vs. SSD Considerations
The choice between a traditional HDD and a Solid State Drive (SSD) for your PS4 upgrade boils down to budget, capacity needs, and performance expectations.
- Hard Disk Drive (HDD):
- Pros: Significantly cheaper per gigabyte, allowing for much larger capacities (2TB, 4TB). Ideal if your primary concern is simply having more space for games.
- Cons: Slower loading times compared to SSDs. The mechanical nature makes them more susceptible to physical shock (though this is less of a concern once installed).
- Solid State Drive (SSD):
- Pros: Dramatically faster loading times for games and system operations. More durable due to no moving parts.
- Cons: More expensive per gigabyte, meaning you’ll get less storage for the same price as an HDD.
For the PS4, the maximum supported SATA interface is SATA II (3 Gbps), which means a high-end SATA III SSD (6 Gbps) won’t reach its full potential. However, even with the SATA II bottleneck, the inherent speed advantage of flash memory over spinning platters still yields noticeable improvements.
If budget allows and you prioritize speed, an SSD is the superior choice for a more responsive gaming experience. If sheer volume of games is your main concern, an HDD offers excellent value. Consider your gaming habits and financial goals when making this important decision – it’s a direct application of financial planning to your entertainment budget.
The Physical Transformation: Swapping Out Your PS4’s Storage Drive
With your data backed up and your new drive ready, it’s time to get hands-on. The physical replacement process is surprisingly straightforward, designed by Sony to be user-serviceable.
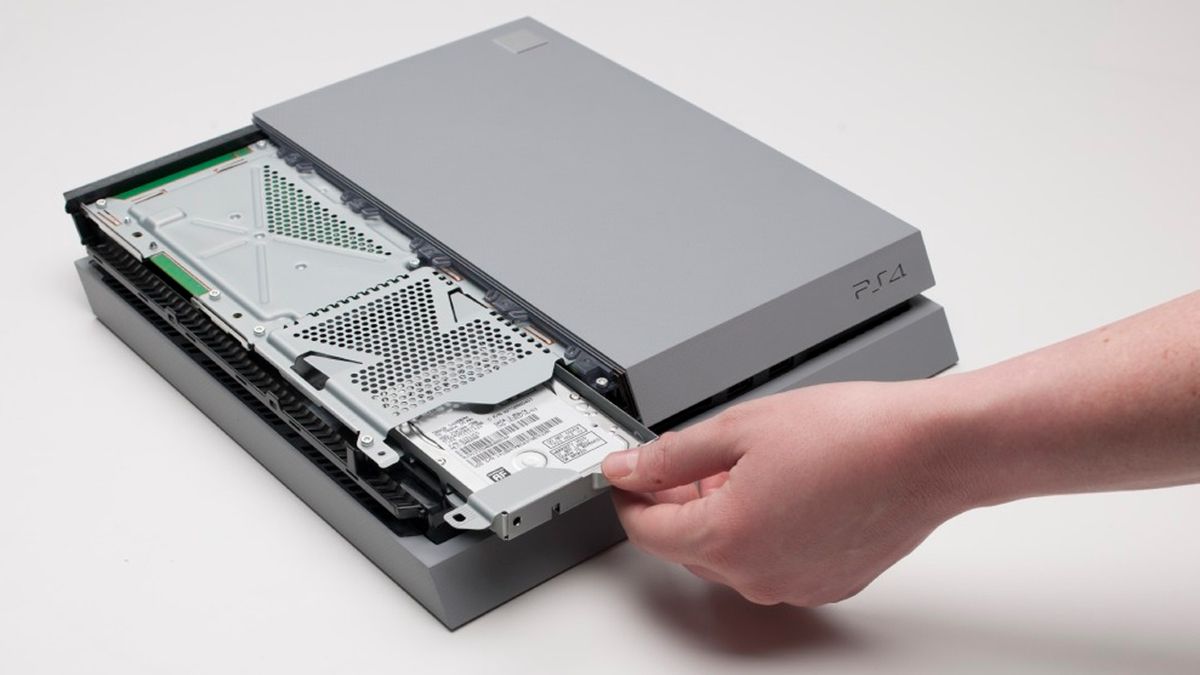
Accessing the Drive Bay: A Gentle Disassembly
The PS4 console, whether it’s the original ‘fat’ model, the Slim, or the Pro, offers relatively easy access to its hard drive bay.
- Power Down Completely: Ensure your PS4 is completely powered off, not just in Rest Mode. Unplug the power cable and any other connected cables (HDMI, Ethernet, etc.).
- Position the Console:
- Original PS4: Lay the console flat. You’ll need to slide off the glossy top panel. Locate the corner with the PlayStation logo and gently push the panel away from you. It should slide off with a click, revealing the hard drive bay.
- PS4 Slim/Pro: These models have a dedicated small panel covering the hard drive bay, usually located on the rear right side when looking at the front of the console. Simply pry open this plastic cover (there might be a small latch or clip) to expose the drive.
- Locate the Hard Drive Caddy: Once the panel is removed, you’ll see the metal hard drive caddy, typically secured by a single Phillips-head screw marked with the PlayStation symbol.
- Remove the Caddy: Unscrew the single retaining screw. Then, gently slide the caddy out of the console. It will slide out horizontally.

This step highlights the consumer-friendly design of the PS4, allowing users to perform upgrades without complex tools or deep technical knowledge. It’s a testament to the brand’s approach to user experience.
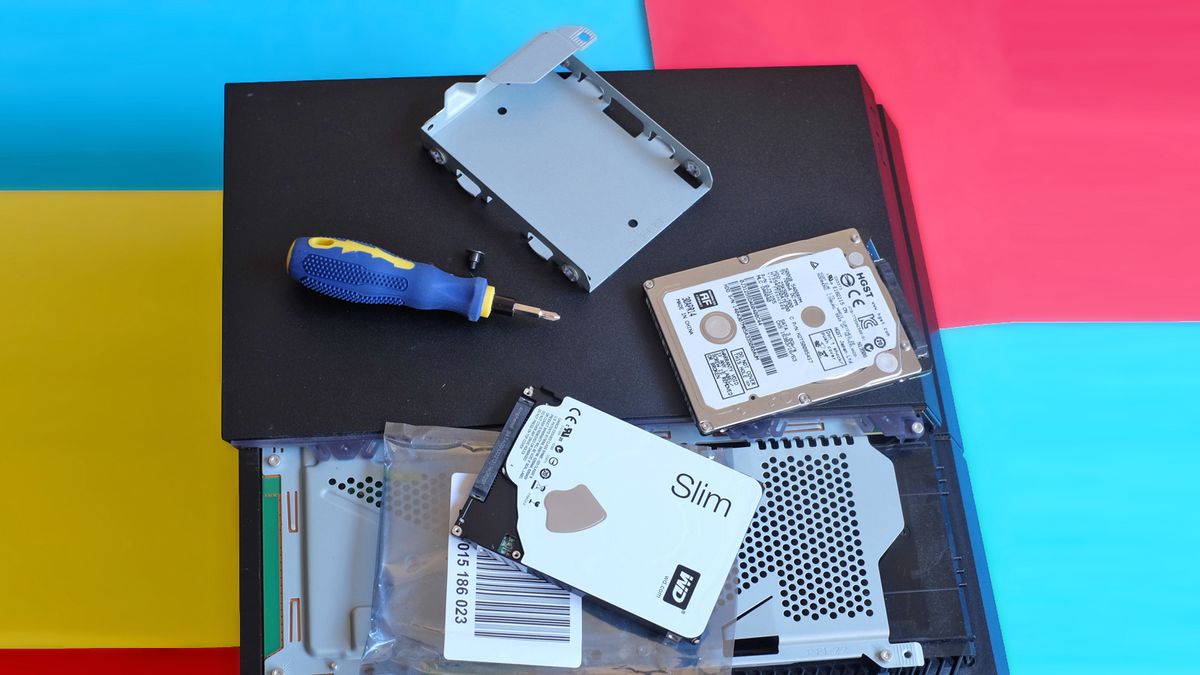
The Old Out, The New In: Securing Your Chosen Drive
Now that the caddy is free, you can remove the old hard drive and insert your new one.
- Remove the Old Drive: The old hard drive is secured to the metal caddy by four small Phillips-head screws (two on each side). Carefully unscrew these four screws. Once removed, lift the old hard drive out of the caddy.
- Insert the New Drive: Place your new 2.5-inch HDD or SSD into the caddy, ensuring that the SATA connector (the two-pronged port on the drive) is facing the correct direction to align with the caddy’s opening.
- Secure the New Drive: Screw the four small Phillips-head screws back into the sides of the caddy to secure the new drive firmly in place. Do not overtighten.
- Reinsert the Caddy: Slide the caddy, now holding your new drive, back into the PS4’s hard drive bay. Push it in until it clicks into place.
- Secure the Caddy: Re-insert and tighten the single Phillips-head screw (the one with the PlayStation symbol) that holds the caddy in the console.
- Replace the Cover: Slide the glossy top panel back onto the original PS4, or snap the hard drive cover back onto the Slim/Pro model, ensuring it’s secure.
With the physical swap complete, your PS4 now has the upgraded hardware. The next crucial step is to get the system software running on this new, blank canvas.
The Digital Rebirth: Installing the PS4 System Software
Even though your new drive is physically installed, your PS4 won’t boot up yet. It needs its operating system – the system software, or firmware – to be reinstalled on the blank drive. This involves downloading the correct software and using your prepared USB drive.
Downloading the Vital Firmware: Official PlayStation Support
It’s critical to download the correct firmware file. There are two types of PS4 firmware downloads on the PlayStation website: a small update file and a much larger full installation file. You need the full installation file, which is typically around 1GB or more.
- Visit the Official PlayStation Website: Navigate to the PlayStation support page for system software reinstallation. A quick search for “PS4 reinstallation file” should lead you there.
- Locate the Reinstallation File: Scroll down the page until you find the section specifically for “Perform a New Installation of the System Software” or “Reinstall System Software.”
- Download the File: Download the complete system software file (usually named something like
PS4UPDATE.PUP). This file will be significantly larger than a standard update file. - Verify the File Size: Double-check that the downloaded file is the larger one (e.g., over 1GB), not the smaller update file (which is typically around 400MB-500MB). Using the wrong file will result in an error during installation.
Preparing Your USB Drive: Formatting for Success
Your USB flash drive needs to be specifically formatted and structured for the PS4 to recognize the firmware file.
- Format the USB Drive: Insert your USB flash drive into your computer. Format it to either FAT32 or exFAT. On Windows, right-click the drive in “This PC,” select “Format,” and choose the appropriate file system. On Mac, use Disk Utility.
- Create the Folder Structure: On the root of your freshly formatted USB drive, create a folder named
PS4(all caps). - Create a Subfolder: Inside the
PS4folder, create another folder namedUPDATE(all caps). - Place the Firmware File: Move the downloaded
PS4UPDATE.PUPfile into theUPDATEfolder. The final path on your USB drive should look like this:USB_DRIVE:PS4UPDATEPS4UPDATE.PUP.
This precise folder structure is essential for the PS4 to detect and install the firmware. It’s a small detail that, if overlooked, can cause the entire digital reinstallation process to fail.
Initializing Your PS4: The First Boot with New Hardware
Now you’re ready to boot up your PS4 and install the new system software onto your freshly installed hard drive.
- Connect the USB Drive: With your PS4 still unplugged, insert the prepared USB flash drive into one of its USB ports.
- Reconnect Cables: Reconnect the PS4’s power cable and the HDMI cable to your TV.
- Enter Safe Mode: This is crucial. Press and hold the power button on your PS4. You’ll hear one beep immediately. Continue holding it until you hear a second beep about seven seconds later. Release the button. Your PS4 will now boot into Safe Mode.
- Connect a Controller: You will be prompted to connect a DUALSHOCK 4 controller using a USB cable and then press the PS button. Do this.
- Select Option 7: From the Safe Mode menu, select “7. Initialize PS4 (Reinstall System Software)”.
- Confirm and Install: The system will detect the
PS4UPDATE.PUPfile on your USB drive. Follow the on-screen prompts to confirm the reinstallation. Be prepared for a warning that all data will be lost (which is fine, as your new drive is empty). - Wait for Installation: The installation process will begin. This can take some time. Do not turn off your PS4 or disconnect the power during this phase. The console will restart multiple times.
- Initial Setup: Once the software is installed, your PS4 will boot into its initial setup screen, just like a brand new console. Follow the on-screen instructions to set up your language, time zone, internet connection, and log into your PlayStation Network account.
This initialization process is the digital equivalent of giving your PS4 a fresh start. It’s a clean slate, optimized for the new hardware, and ready for you to customize once more.
Restoring Your Games and Saves: Bringing Your Data Back
With the system software successfully reinstalled and your PS4 configured, the final step is to restore your backed-up data.
- Connect Your Backup Drive: Connect the external USB drive containing your backup to your PS4.
- Navigate to Restore: From the PS4’s XMB, go to Settings > System > Back Up and Restore > Restore PS4.
- Select Backup File: Choose the backup file you created earlier from the list presented.
- Confirm and Restore: The system will prompt you to confirm the restoration. Once confirmed, the PS4 will begin transferring your saved data, screenshots, and video clips back to your console. This process will take time, depending on the size of your backup.
- Re-download Games: For your actual games, you will need to re-download them from your PlayStation Library. Go to Library > Purchased, and you can queue up all your digital titles for download. Insert physical game discs to reinstall them.
This full cycle – backup, upgrade, reinstall, restore – is a robust process that ensures minimal data loss and a complete transition to your enhanced system. It reinforces excellent digital security practices and provides a practical application of data management skills.
Post-Upgrade Optimization and Troubleshooting
Congratulations! Your PS4 now boasts expanded storage and potentially faster performance. To ensure everything is running smoothly and to maximize the benefits of your upgrade, a few final checks and tips are in order.
Verifying Your New Storage: A Quick Check
Once your PS4 has fully restarted after the system software installation and you’ve logged back into your PlayStation Network account, take a moment to verify the new storage.
- Navigate to Settings > Storage.
- Here, you should see your new hard drive’s total capacity displayed. If you installed a 2TB drive, it will show approximately 1.77 TB of usable space (due to formatting and system files). This confirms your upgrade was successful.
Common Issues and Quick Fixes
While the process is generally straightforward, sometimes minor hiccups can occur.
- “Cannot start the PS4” error / Safe Mode loop:
- Cause: Incorrect
PS4UPDATE.PUPfile (using the update file instead of the full reinstallation file) or incorrect folder structure on the USB drive. - Fix: Ensure you downloaded the larger “reinstallation” file (over 1GB) and that your USB drive has the exact
PS4UPDATEfolder structure. Try re-formatting the USB drive to FAT32 or exFAT.
- Cause: Incorrect
- PS4 doesn’t recognize the new drive:
- Cause: Drive not properly seated in the caddy or caddy not properly inserted into the PS4. Drive may be faulty.
- Fix: Power down, unplug, and carefully re-seat the drive in the caddy and the caddy in the PS4. If issues persist, try connecting the drive to a PC to ensure it’s functional.
- Slow performance post-upgrade (if using HDD):
- Cause: The new HDD might be a slower model than your previous one, or fragmentation could be occurring (less common on modern systems).
- Fix: Ensure your new HDD is at least 5400 RPM. For an SSD, ensure the drive is of reasonable quality. If performance is still an issue, consider rebuilding the PS4 database via Safe Mode (Option 5).
Maximizing Your PS4’s Lifespan and Performance
Now that your PS4 is upgraded, consider these tips to maintain its longevity and peak performance:
- Regular Database Rebuilds: Periodically, booting into Safe Mode and selecting “Rebuild Database” (Option 5) can help clean up your drive, improve system responsiveness, and fix minor data corruption.
- Keep Software Updated: Always install the latest PS4 system software updates for security, stability, and new features.
- Dust Maintenance: While not directly related to the hard drive, keeping your PS4 clean of dust can prevent overheating and extend its life.
- Use Rest Mode Wisely: Rest Mode is convenient for background downloads and charging, but fully powering off the console occasionally can help with system refreshes.
By following this comprehensive guide, you’ve not only expanded your PS4’s storage but also gained valuable insights into hardware upgrades, data management, and the principles of tech self-sufficiency. This endeavor showcases that with a little effort and the right instructions, you can significantly enhance your gaming experience and extend the life of your existing tech, proving that smart upgrades are often a better investment than constant new purchases. Happy gaming with your newly empowered PlayStation 4!
aViewFromTheCave is a participant in the Amazon Services LLC Associates Program, an affiliate advertising program designed to provide a means for sites to earn advertising fees by advertising and linking to Amazon.com. Amazon, the Amazon logo, AmazonSupply, and the AmazonSupply logo are trademarks of Amazon.com, Inc. or its affiliates. As an Amazon Associate we earn affiliate commissions from qualifying purchases.