In the intricate ecosystem of your computer, every piece of hardware relies on specific software instructions to communicate effectively with the operating system. These crucial pieces of software are known as drivers. Among the myriad of components that make up a modern computer, the network adapter stands out as one of the most vital, serving as your gateway to the internet and local networks. Without a properly installed and functioning driver for your network adapter, your computer would be isolated, unable to browse the web, stream content, or connect with other devices. This comprehensive guide will walk you through the process of installing a driver for your network adapter, ensuring your digital world remains seamlessly connected.
Understanding Network Adapter Drivers: Why They Matter
Before diving into the installation process, it’s essential to grasp what a network adapter driver is and why its correct installation is paramount for your system’s functionality and your online experience.
The Role of Drivers in Your System
At its core, a driver is a software program that allows your operating system (like Windows, macOS, or Linux) to interact with a specific hardware device. Think of it as a translator. Your operating system speaks one language, and your network adapter speaks another. The driver bridges this communication gap, enabling the OS to send commands to the adapter (e.g., “connect to this Wi-Fi network”) and receive data from it (e.g., “here’s the internet data”).
For a network adapter, this translation involves facilitating data transmission and reception, managing network protocols, and ensuring stable and efficient connectivity. Without the correct driver, your network adapter might appear as an “unknown device” in your system, or it might function poorly, leading to dropped connections, slow speeds, or complete inability to connect to any network. The quality and currency of your driver can significantly impact your network performance and overall digital productivity. A well-maintained driver ensures your hardware operates at peak efficiency, enhancing your online security by supporting the latest network protocols and standards.
Common Scenarios Requiring Driver Installation
While modern operating systems often come with a vast library of generic drivers that can get basic hardware up and running, there are several common situations where you will specifically need to install or update your network adapter driver:
- New PC Build or Operating System Installation: When you assemble a new computer or perform a clean installation of Windows (or any other OS), the operating system might not have the specific driver for your network adapter. This is a common hurdle, as without network access, downloading drivers can be a challenge.
- Network Connectivity Issues: If you suddenly lose internet access, experience frequent disconnections, or encounter slow network speeds, a corrupted, outdated, or incorrect network adapter driver is often a prime suspect. Reinstalling or updating the driver can resolve these issues.
- Upgrading or Replacing a Network Adapter: Whenever you install a new Wi-Fi card, Ethernet adapter, or USB wireless dongle, it will require its specific driver to function correctly. Even if it’s from the same manufacturer, a new model might need an updated driver.
- Hardware or Driver Conflicts: Sometimes, other software or hardware installations can conflict with existing drivers, leading to instability. Reinstalling the network driver can help resolve such conflicts.
- Performance Optimization: Manufacturers frequently release updated drivers that improve performance, enhance stability, add new features, or patch security vulnerabilities. Keeping your drivers updated is a good practice, even if your network seems to be working fine.
Understanding these scenarios helps you anticipate when you might need to take action, saving you frustration and downtime.
Preparing for Driver Installation: Essential Pre-Steps
Before you embark on the driver installation journey, a few crucial preparatory steps will streamline the process and prevent potential headaches. Proper preparation is key, especially if your current network connection is non-existent or unreliable.
Identifying Your Network Adapter
This is perhaps the most critical initial step. To download the correct driver, you must know the precise make and model of your network adapter. Installing the wrong driver can lead to further complications or simply not work.
Here’s how to identify your network adapter:
- Check Device Manager (Windows):
- Press
Windows Key + Xand select “Device Manager.” - Expand the “Network adapters” section.
- You should see entries for your wired Ethernet adapter (e.g., “Realtek PCIe GbE Family Controller”) and any wireless adapters (e.g., “Intel Wireless-AC 9560”). Note down the exact names, including manufacturer and model numbers.
- If your network adapter isn’t working or its driver is missing, it might appear under “Other devices” with a yellow exclamation mark (labeled as “Ethernet Controller,” “Network Controller,” or “Wireless Controller”). Even if it’s generic, the hardware ID can help: right-click the device, go to “Properties,” then the “Details” tab, and select “Hardware Ids” from the Property dropdown. The VEN (Vendor ID) and DEV (Device ID) can be used to search for drivers online.
- Press
- Physical Inspection: If your computer is a desktop PC, you might be able to physically inspect the network card itself for model numbers. For laptops, check the manufacturer’s label on the bottom or inside the battery compartment.
- System Information Utility: In Windows, type
msinfo32in the Run dialog (Windows Key + R) and press Enter. Navigate to “Components” > “Network” > “Adapter” for detailed information. - Original Documentation/Manufacturer’s Website: If you have the original packaging or documentation for your PC or network adapter, the model number will be listed there. For pre-built systems (Dell, HP, Lenovo, ASUS, etc.), visit the manufacturer’s support website, enter your PC’s service tag or serial number, and it will list all original components and their corresponding drivers.
Gathering Necessary Tools and Information
Once you’ve identified your adapter, prepare for the download and installation:
- An Alternative Internet Connection: If your primary network connection isn’t working, you’ll need another way to access the internet to download the driver.
- Mobile Hotspot: Use your smartphone’s mobile hotspot feature to temporarily connect your computer to the internet.
- USB Tethering: Connect your smartphone to your computer via USB and enable USB tethering.
- Another Computer: Download the driver on another functional computer and transfer it to your problematic PC via a USB flash drive.
- Operating System Details: Know your exact operating system version (e.g., Windows 10, Windows 11) and whether it’s 32-bit or 64-bit. This is crucial for downloading the correct driver. To check, press
Windows Key + Pause/Breakor go toSettings > System > About. - USB Flash Drive: Essential if you need to transfer the driver from another computer or if your current PC lacks internet access.
- Administrator Privileges: You’ll need an administrator account to install drivers. Ensure you have the necessary login credentials.
- Disable Antivirus (Temporarily, if needed): In rare cases, antivirus software might interfere with driver installations. If you encounter issues, you might temporarily disable it, but remember to re-enable it immediately after installation for digital security.
With these preparations, you’re now ready to locate and install your network adapter driver confidently.
Step-by-Step Guide to Installing Your Network Adapter Driver
There are several methods for installing a network adapter driver, each suitable for different scenarios. We’ll explore the most common and effective approaches.
Method 1: Automatic Installation via Windows Update
This is often the easiest method, especially if your computer has some basic network connectivity or if Windows can detect a generic driver.
- Connect to the Internet (if possible): If your current adapter has a basic connection or you’re using a temporary one (like a mobile hotspot), connect to the internet.
- Open Windows Settings: Press
Windows Key + Ito open Settings. - Navigate to Update & Security (Windows 10) or Windows Update (Windows 11):
- Windows 10: Go to
Update & Security > Windows Update. - Windows 11: Go to
Windows Update.
- Windows 10: Go to
- Check for Updates: Click “Check for updates.” Windows will scan for available updates, which often include optional driver updates.
- Install Optional Updates: Look for a section labeled “View optional updates” or “Driver updates.” Expand it and select any network adapter drivers listed.
- Install Updates: Click “Download and install.”
- Restart Your Computer: After the installation, restart your computer to apply the changes.
Windows Update is excellent for convenience and ensures you receive digitally signed drivers, enhancing system stability and security. However, it might not always provide the absolute latest version directly from the manufacturer.
Method 2: Manual Installation from Manufacturer’s Website
This is the most reliable method, especially for optimal performance and if Windows Update fails to find the correct driver. It requires you to know your network adapter’s exact make and model.
Step 2a: Downloading the Driver
- Access the Manufacturer’s Support Website:
- For dedicated network cards (e.g., TP-Link, D-Link, Netgear), go to their respective support pages.
- For integrated adapters on a pre-built PC (Dell, HP, Lenovo, Asus, MSI), go to the PC manufacturer’s support site. Enter your specific PC model number or service tag.
- For individual component manufacturers (Intel, Realtek, Broadcom), navigate to their driver download sections.
- Locate Your Device: Use the search bar, product categories, or your device’s service tag/serial number to find the exact model of your network adapter.
- Select Your Operating System: Choose your specific Windows version (e.g., Windows 11 64-bit) from the available options. This is crucial for compatibility.
- Download the Latest Driver: Look for the most recent driver package available. It’s usually a
.exe(executable) or a.zipfile. Download it to a location you can easily find (e.g., your “Downloads” folder or a USB drive). - Transfer (if needed): If you downloaded the driver on another computer, copy the downloaded file to a USB flash drive and then transfer it to the problematic computer.
Step 2b: Installing via an Executable (.exe) File
Most drivers downloaded from manufacturer websites come as a self-extracting executable.
- Locate the Downloaded File: Navigate to where you saved the driver file.
- Extract (if it’s a .zip file): If it’s a
.zipfile, right-click and select “Extract All” to unpack its contents into a new folder. - Run the Installer: Double-click the
.exefile (e.g.,setup.exeorinstall.exe). - Follow On-Screen Prompts: The installer wizard will guide you through the process. Accept the license agreement, choose installation options (usually default is fine), and click “Next” or “Install.”
- Restart Your Computer: Once the installation is complete, the wizard will likely prompt you to restart. Do so to finalize the driver installation.
Step 2c: Installing via Device Manager (for unpacked drivers or manual updates)
This method is useful if the downloaded driver is a collection of files (not an .exe installer) or if you need to force an update.
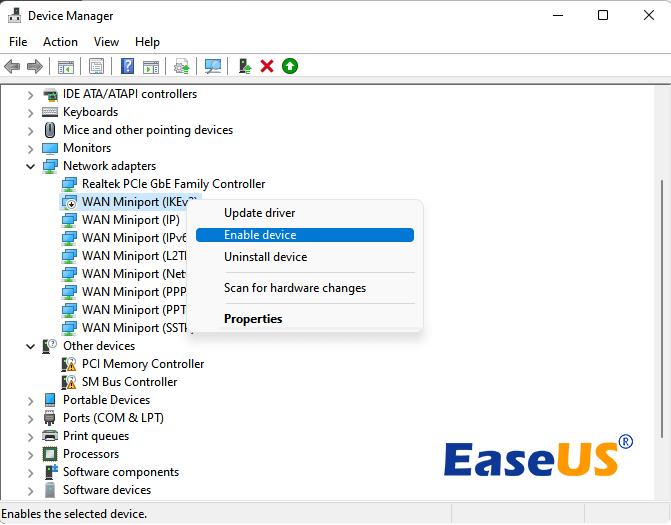
- Open Device Manager: Press
Windows Key + Xand select “Device Manager.” - Locate the Network Adapter: Expand “Network adapters.” If the driver is missing, it might be under “Other devices” with a yellow exclamation mark.
- Right-Click and Update Driver: Right-click on your network adapter and select “Update driver.”
- Choose “Browse my computer for driver software”: This option allows you to manually point Windows to the driver files you downloaded.
- Specify the Driver Location: Click “Browse” and navigate to the folder where you extracted the driver files (from the
.zippackage) or where the.exeinstaller unpacked its contents. Ensure “Include subfolders” is checked. - Install: Click “Next.” Windows will search the specified folder and its subfolders for the appropriate driver and install it.
- Restart Your Computer: After successful installation, restart your computer.
Method 3: Using a Driver Update Utility
While less recommended due to potential risks, some users turn to third-party driver update utilities. These tools scan your system, identify outdated or missing drivers, and often offer to download and install them automatically.
- Pros: Can be convenient, especially for multiple outdated drivers.
- Cons & Warnings:
- Risk of Incorrect Drivers: Some tools might install generic or incorrect drivers, leading to instability.
- Bloatware/Malware: Reputable tools exist, but many free ones bundle unwanted software or even malware, posing a significant digital security risk.
- Cost: Quality utilities are often subscription-based.
If you choose this path, exercise extreme caution. Research the utility thoroughly, read reviews, and ideally, create a system restore point before using it. For network adapters, sticking to manufacturer websites is generally the safest and most reliable approach.
Verifying Installation and Troubleshooting Common Issues
After going through the installation steps, it’s crucial to confirm that your network adapter driver is installed correctly and to know how to troubleshoot if problems persist.
Confirming Driver Installation
Several indicators will tell you if your driver installation was successful:
- Check Device Manager:
- Open Device Manager (
Windows Key + X> “Device Manager”). - Expand “Network adapters.”
- Your network adapter should now be listed without any yellow exclamation marks or red X icons. Its name should accurately reflect the manufacturer and model.
- Right-click the adapter, select “Properties,” and then the “Driver” tab. You should see driver details, including the provider, date, and version number. Compare these details to what you expected from the downloaded driver.
- Open Device Manager (
- Network Connectivity: The most obvious sign is successful internet access.
- Check the network icon in your taskbar. It should show a globe (no internet) or a disconnected symbol.
- Try connecting to your Wi-Fi network or plugging in an Ethernet cable.
- Open a web browser and try to visit a website.
- Ping Test: For a more technical verification:
- Open Command Prompt (
Windows Key + R, typecmd, press Enter). - Type
ping google.comand press Enter. If you see replies with time values, your network connection is active. If you see “Request timed out” or “Destination host unreachable,” there’s still an issue.
- Open Command Prompt (
Addressing Common Installation Problems
Even with careful steps, you might encounter issues. Here’s how to troubleshoot them:
- “Driver Not Found” or “The Best Driver is Already Installed”:
- Cause: Windows couldn’t find a compatible driver in the specified location, or it thinks its generic driver is superior.
- Solution: Double-check that you downloaded the exact driver for your specific network adapter model and operating system version (32-bit vs. 64-bit). Ensure you extracted any
.zipfiles correctly and are pointing Device Manager to the folder containing the.infdriver files, not just the parent folder. Try using the manufacturer’s executable installer instead of Device Manager.
- Installation Errors or Driver Crashing:
- Cause: Corrupted download, conflicting software, or an incompatible driver.
- Solution:
- Redownload: Delete the downloaded driver and download it again to rule out corruption.
- Temporarily Disable Antivirus: As mentioned, sometimes antivirus software can interfere. Remember to re-enable it.
- Clean Installation: In Device Manager, right-click the network adapter (or “Unknown device”), select “Uninstall device,” and check “Delete the driver software for this device.” Then restart your computer and try installing the driver again from scratch.
- Network Still Not Working After Installation:
- Cause: The driver might be installed, but other issues are preventing connectivity (e.g., physical connection, router problems, IP configuration).
- Solution:
- Check Physical Connections: Ensure Ethernet cables are securely plugged in, and for Wi-Fi, make sure the adapter’s physical switch (if any) is on.
- Restart Router/Modem: Power cycle your network equipment (unplug for 30 seconds, then plug back in).
- Network Troubleshooter: In Windows, go to
Settings > Network & Internet > Statusand run the “Network troubleshooter.” - Reset Network Settings: In Windows 10/11, go to
Settings > Network & Internet > Advanced network settingsand select “Network reset.” This will reinstall all network adapters and reset components to their default settings. You’ll need to re-enter Wi-Fi passwords. - Roll Back Driver: If the issue started after an update, in Device Manager, go to your adapter’s “Properties,” then the “Driver” tab, and click “Roll Back Driver” if available.
- Check IP Configuration: In Command Prompt, type
ipconfig /release, thenipconfig /renew, and finallyipconfig /flushdns. This refreshes your network settings.
Installing a network adapter driver might seem daunting, especially when you’re without internet access. However, by systematically identifying your hardware, securing the correct drivers, and following the outlined installation and troubleshooting steps, you can reliably restore and optimize your computer’s connection to the digital world. Regularly updating your drivers is a simple yet effective way to maintain peak performance, stability, and digital security, ensuring your tech always supports your productivity and connectivity needs.
aViewFromTheCave is a participant in the Amazon Services LLC Associates Program, an affiliate advertising program designed to provide a means for sites to earn advertising fees by advertising and linking to Amazon.com. Amazon, the Amazon logo, AmazonSupply, and the AmazonSupply logo are trademarks of Amazon.com, Inc. or its affiliates. As an Amazon Associate we earn affiliate commissions from qualifying purchases.