In an era dominated by smart technology and seamless automation, it’s easy to forget the intricate dance between hardware and software that makes our digital lives possible. At the heart of this interaction lies the device driver – a critical piece of software that enables your operating system to communicate effectively with a hardware device. While modern operating systems like Windows and macOS often handle driver installation automatically, there are crucial scenarios where understanding “how to install a device driver manually” isn’t just a technical curiosity but a vital skill.

For readers of a website focused on Tech, Brand, and Money, mastering manual driver installation holds significant value. From a Tech perspective, it grants you unparalleled control over your system, allowing for optimal performance, access to specific features, and effective troubleshooting. In terms of Brand, maintaining a high-performing, reliable system—whether for personal productivity or corporate operations—directly reflects on your efficiency and professionalism. And from a Money standpoint, the ability to self-diagnose and fix driver-related issues can save you significant costs in professional tech support, extend the lifespan of your hardware, and prevent costly downtime.
This comprehensive guide will demystify the process, empowering you to take charge of your system’s hardware, ensure peak performance, and troubleshoot common issues with confidence.
Understanding Device Drivers and When Manual Installation Becomes Essential
Before diving into the “how-to,” it’s crucial to grasp the fundamental role of device drivers and recognize the specific situations where automatic installation falls short, necessitating your manual intervention.
What Exactly is a Device Driver?
Think of a device driver as a specialized translator. Your operating system (OS) speaks one language, and a piece of hardware – be it a graphics card, printer, sound card, or webcam – speaks another. The driver’s job is to bridge this communication gap, allowing the OS to send instructions to the hardware and receive data back. Without the correct driver, your hardware might not function at all, or it might operate with limited capabilities, leading to frustration and underutilized potential.
Drivers are not universal. Each piece of hardware, and often different versions of the same hardware, requires a specific driver tailored to its unique architecture. Furthermore, drivers are OS-specific; a Windows driver won’t work on macOS, and a 64-bit driver won’t work on a 32-bit system. This specificity is why manual installation often requires careful attention to detail.
Why Bypass Automatic Updates? Key Scenarios for Manual Driver Intervention
While automatic updates (like Windows Update) are convenient, they aren’t always the optimal solution. Here are compelling reasons and scenarios where manual driver installation becomes not just an option, but often a necessity:
- New or Niche Hardware: When you install brand-new hardware, especially specialized components not widely adopted, your OS might not have the latest driver in its repository. Manual installation, typically from the manufacturer’s website, is often the first step to get it working.
- Optimal Performance and Specific Features: Generic drivers provided by the OS often prioritize basic functionality over peak performance or unique features. Gaming enthusiasts, graphic designers, and professionals relying on specific hardware capabilities will often find that manually installing the manufacturer’s latest driver unlocks full potential, improved stability, and access to advanced settings. This directly impacts productivity and the quality of your output.
- Troubleshooting Hardware Malfunctions: If a device suddenly stops working, behaves erratically, or generates error codes, a corrupted or outdated driver is a common culprit. Manually uninstalling the problematic driver and installing a fresh, verified version can resolve many such issues, saving you diagnostic fees and avoiding unnecessary hardware replacement costs.
- Older Hardware Compatibility: As operating systems evolve, support for older hardware can sometimes wane. If you’re trying to get a legacy printer or scanner to work with a newer OS, finding and manually installing an older, compatible driver (or one specifically updated for compatibility by the manufacturer) might be your only recourse.
- Beta Drivers and Advanced Functionality: For power users and early adopters, manufacturers sometimes release “beta” drivers with experimental features or performance enhancements. These are rarely pushed through automatic updates and require manual download and installation. While offering cutting-edge benefits, they also come with a higher risk of instability, so proceed with caution.
- Avoiding Driver Bloatware: Some manufacturer-provided driver packages include additional software (often called bloatware) that you may not want or need. In some cases, manual installation via the Device Manager can allow you to install just the essential driver files, maintaining a leaner, more efficient system. This attention to system hygiene contributes to a cleaner ‘digital brand’ for your personal or corporate setup.
- Digital Security and System Integrity: While less common, a faulty or compromised driver can introduce security vulnerabilities. Manually sourcing drivers from trusted manufacturer websites helps ensure you’re getting legitimate, digitally signed files, enhancing your system’s security posture. Conversely, relying solely on automatic updates means you’re accepting whatever the OS provides, which might not always be the most recent security-patched version.
Crucial Preparatory Steps Before You Begin
Approaching manual driver installation without proper preparation is akin to starting a complex project without a plan – it’s likely to lead to errors, frustration, and potential system instability. These preparatory steps are designed to safeguard your system, ensure a smooth installation, and ultimately save you time and money by preventing unforeseen complications.
Identifying Your Hardware and Sourcing the Right Driver
This is arguably the most critical step. Installing the wrong driver can cause system crashes, reduce performance, or even render a device unusable.
-
Identify the Hardware:
- Known Device: If you know the device (e.g., “NVIDIA GeForce RTX 3080,” “HP LaserJet Pro MFP M227fdn”), note down the exact manufacturer and model number.
- Unknown Device (in Device Manager):
- Press
Windows key + Xand selectDevice Manager. - Look for devices with a yellow exclamation mark (indicating a problem) or listed as “Unknown device.”
- Right-click the problematic device, select
Properties, then go to theDetailstab. - In the “Property” dropdown, select
Hardware Ids. You’ll see strings likePCIVEN_xxxx&DEV_yyyy&SUBSYS_zzzz. - The
VEN_xxxxis the Vendor ID, andDEV_yyyyis the Device ID. These codes are universal and can be used on websites likepcilookup.comordriveridentifier.comto identify the manufacturer and device model.
- Press
-
Determine Your Operating System and Architecture:
- Press
Windows key + Ito open Settings, then go toSystem > About. - Note your
Edition(e.g., Windows 10 Pro),Version, andSystem type(e.g., 64-bit Operating System). Drivers are highly specific to these details.
- Press
-
Source the Driver:
- Manufacturer’s Official Website (Recommended): This is always your first and safest option. Navigate to the “Support,” “Downloads,” or “Drivers” section of the manufacturer’s website (e.g., Dell, HP, ASUS, NVIDIA, AMD, Intel). Enter your exact device model number and select your operating system and architecture. Download the latest recommended driver package.
- Original Driver CD/DVD: If your hardware came with a driver disc, it’s a viable (though often outdated) option. Always check the manufacturer’s website for newer versions first.
- Trusted Third-Party Sites (Use with Extreme Caution): Websites like
driverscape.comordriverpack.iocan sometimes host drivers for obscure or very old hardware. However, they carry a higher risk of providing incorrect, outdated, or even malicious software. If you must use one, ensure you scan downloaded files with robust antivirus software. - Avoid Generic Driver Updaters: Many programs claim to “automatically update your drivers.” While some are legitimate, many are scareware or install unnecessary software. Stick to official sources.
Safeguarding Your System: Backup and System Restore Points
Before making significant system changes, always create a safety net. This step is about risk mitigation, directly impacting your peace of mind and potential financial outlay should something go wrong.
-
Create a System Restore Point: This allows you to revert your system to a previous working state if the new driver causes instability.
- Search for “Create a restore point” in the Windows search bar and open it.
- Ensure “Protection” is “On” for your system drive. If not, click
Configureand turn it on. - Click
Create..., give your restore point a descriptive name (e.g., “Before New Graphics Driver Install”), and clickCreate. - This simple step can save you hours of troubleshooting or even a complete OS reinstallation.
-
Backup Important Data: While a driver installation is unlikely to directly corrupt personal files, it’s always good practice to have recent backups of your critical documents, photos, and projects. This provides a complete financial and emotional safeguard against any unforeseen data loss.
Uninstalling Previous Driver Versions (If Applicable)
For certain devices, especially graphics cards, network adapters, or sound cards, performing a “clean” installation is highly recommended. This involves completely removing the old driver files to prevent conflicts with the new ones.
-
Via Device Manager:
- Open
Device Manager. - Locate the device whose driver you want to replace.
- Right-click it and select
Uninstall device. - Crucially, check the box that says
Delete the driver software for this device(if available). - Click
Uninstall. - Restart your computer if prompted. Your system might temporarily use a generic driver or no driver at all for that device.
- Open
-
Using Manufacturer Utilities: Graphics card manufacturers like NVIDIA and AMD provide dedicated driver uninstall tools (e.g., Display Driver Uninstaller – DDU, though DDU is a third-party tool, it’s widely trusted for graphics drivers). These tools are excellent for ensuring a thorough cleanup.
A clean installation minimizes the chances of driver conflicts, which can lead to system instability, crashes, and performance issues, thus optimizing your system’s reliability and productivity.
Step-by-Step Guide to Manual Driver Installation
With your preparations complete and the correct driver downloaded, you’re ready to proceed with the actual installation. There are several methods, each suited for different scenarios. We’ll cover the most common and effective approaches.
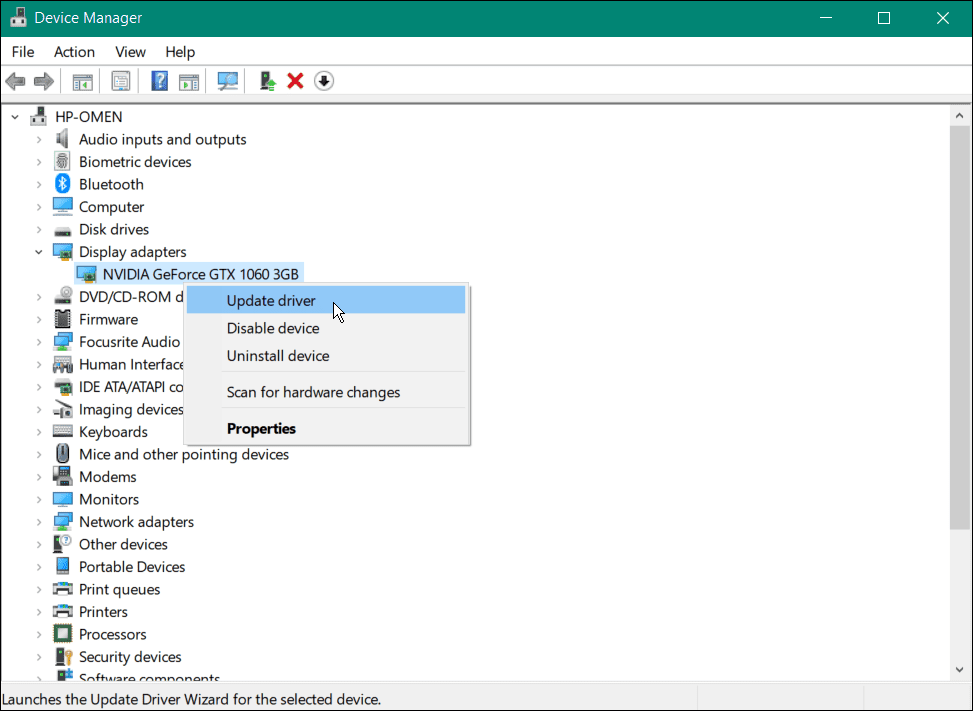
Method 1: Utilizing the Device Manager (The Primary Manual Approach)
The Device Manager is your go-to tool for managing hardware drivers in Windows. This method offers the most granular control.
- Open Device Manager: Press
Windows key + Xand selectDevice Managerfrom the power user menu.
-
Locate the Device:
- Expand the categories to find your specific hardware (e.g., “Display adapters,” “Sound, video and game controllers,” “Network adapters”).
- If you’re installing a driver for a new or problematic device, it might appear with a yellow exclamation mark or be listed under “Other devices” as an “Unknown device.”
-
Update an Existing Driver:
- Right-click on the device you want to update.
- Select
Update driver. - Choose
Browse my computer for driver software. - Click
Browse...and navigate to the folder where you extracted or saved the downloaded driver files. Make sure to point it to the main folder containing the.inffile, not necessarily subfolders unless specified by the manufacturer. - Click
Next. Windows will search the specified location for compatible drivers and install them. - Follow any on-screen prompts to complete the installation.
-
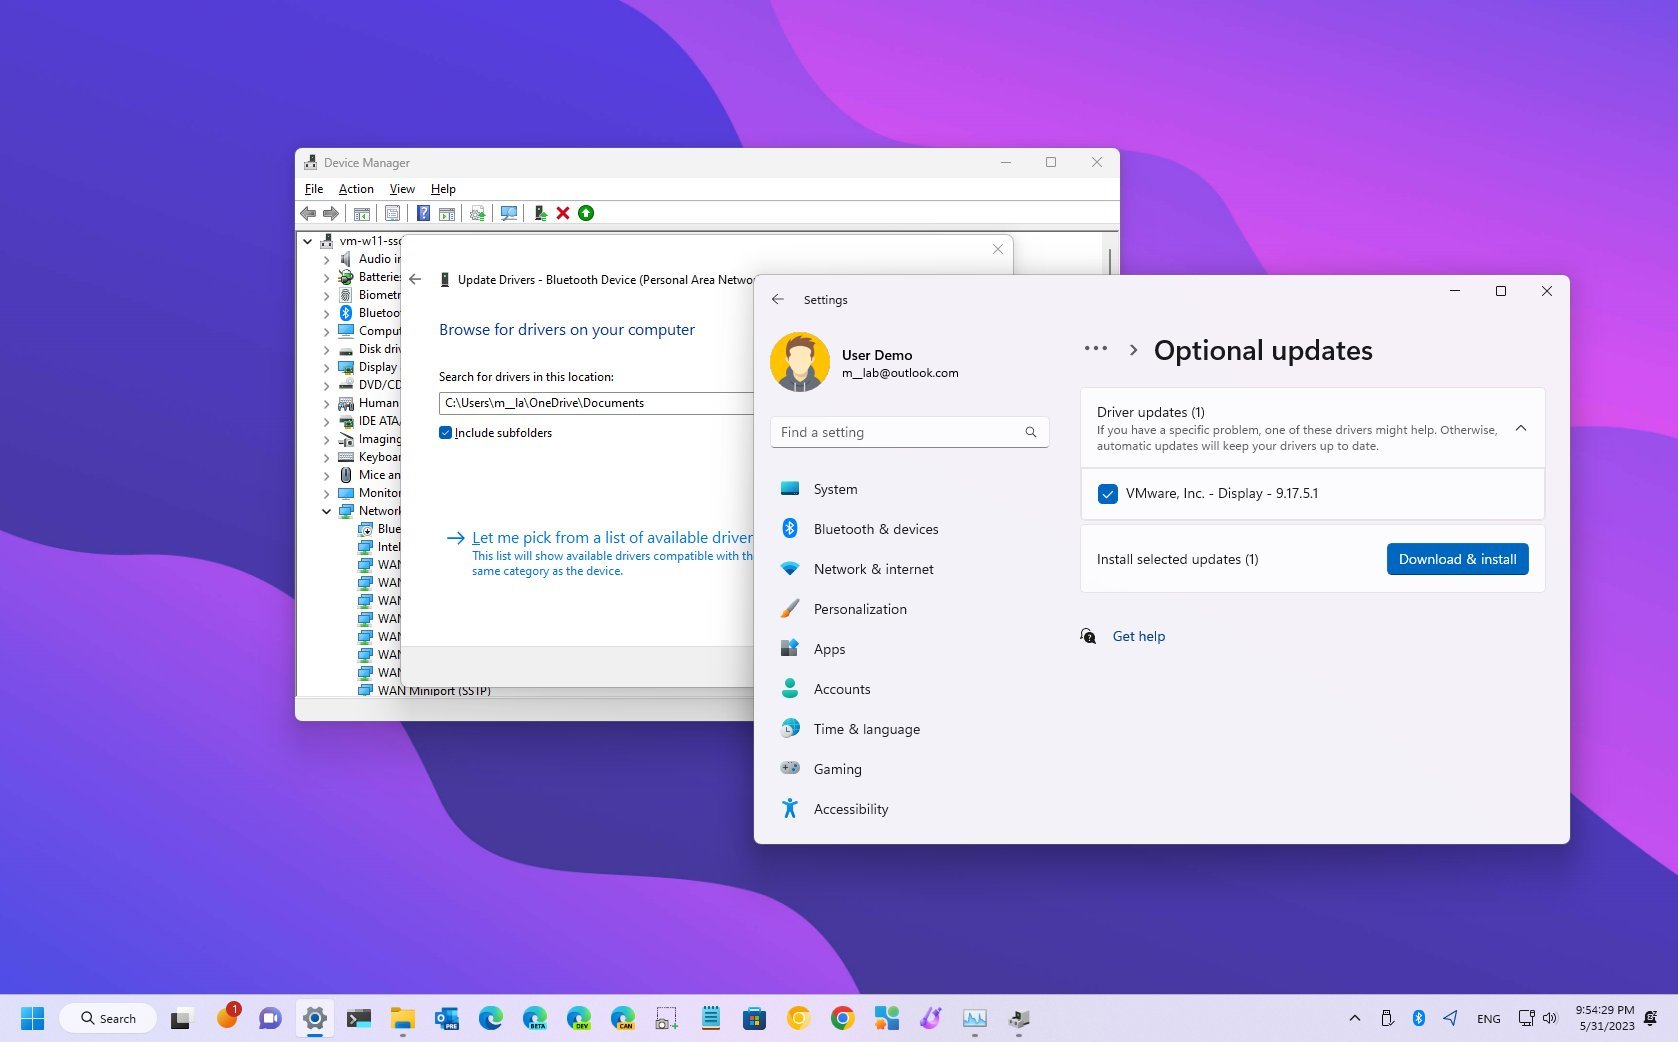
Installing a Driver for an Unknown Device / The “Have Disk” Method:
This method is particularly useful when Windows doesn’t automatically recognize an.inffile or when you have a specific driver disk (or downloaded folder) that contains multiple driver options.- Right-click the “Unknown device” or the device you’re targeting.
- Select
Update driver. - Choose
Browse my computer for driver software. - Click
Let me pick from a list of available drivers on my computer. - Click
Have Disk.... - Click
Browse...and navigate to the folder where you extracted or saved your driver files. Crucially, you need to find the specific.inffile within that folder. Sometimes it’s in the root, other times in a subfolder likeWin64,x64, orDrivers. Select the.inffile and clickOpen, thenOK. - A list of compatible devices should appear. Select your device from the list and click
Next. - Windows will install the driver. You may see a warning about unsigned drivers (which we’ll address in troubleshooting).
- Once finished, click
Close.
-
Restart Your Computer: Always restart your system after a driver installation to ensure the changes take full effect. This is vital for system stability and performance.
Method 2: Installing via an Executable (.exe) Installer
Many manufacturers package their drivers with a user-friendly installer program. While “manual” in the sense that you initiate it, this is the most straightforward method when an .exe is provided.
- Locate the Downloaded File: Navigate to the folder where you downloaded the driver. It will typically be a
.exefile (e.g.,setup.exe,NVIDIA-driver-472.12-desktop-win10-win11-64bit.exe). For compressed files (like.zipor.rar), extract the contents to a new folder first. - Run the Installer: Double-click the
.exefile. - Follow On-Screen Prompts: The installer will guide you through the process, which usually involves:
- Accepting a License Agreement.
- Choosing an installation type (e.g., “Express” for typical users, “Custom” for advanced users who want to select specific components).
- Specifying an installation directory (usually best to leave as default).
- Waiting for the files to copy and configure.
- Restart Your Computer: Most executable installers will prompt you to restart after completion. Do so to finalize the installation.
This method often streamlines the process, installing not just the driver but also any accompanying utilities or control panels (e.g., NVIDIA Control Panel, Realtek Audio Console).
Method 3: Direct Installation with an INF File (Advanced)
This method is less common for typical end-users and is generally used when a driver package only contains the raw driver files without an executable installer, and you don’t want to use the “Have Disk” method in Device Manager, or it’s simply not working.
- Extract Driver Files: Ensure your downloaded driver package is extracted to an easily accessible folder. Inside this folder, you should find at least one
.inffile (Information File),.sysfiles (System Files), and possibly.catfiles (Security Catalog). - Locate the
.infFile: Find the primary.inffile for your device within the extracted folder. - Install via Context Menu:
- Right-click directly on the
.inffile. - From the context menu, select
Install. - You might be prompted with a User Account Control (UAC) dialog. Click
Yesto proceed. - Windows will attempt to install the driver silently. You usually won’t see a progress bar or confirmation, but a brief command prompt window might flash.
- Right-click directly on the
- Verify Installation:
- Open
Device Manager. - Check the status of your device. It should no longer have an exclamation mark, and the driver version listed under
Properties > Drivertab should reflect the newly installed version.
- Open
- Restart Your Computer: A restart is crucial to ensure the driver is fully loaded and active.
This method is quick and clean, installing only the driver files without any additional software, making it ideal for maintaining a minimal system footprint.
Troubleshooting Common Driver Installation Issues
Even with careful preparation, manual driver installation can sometimes present challenges. Knowing how to troubleshoot these common issues can save you immense frustration, prevent system instability, and ultimately contribute to a more robust and reliable computing experience.
Reverting a Problematic Driver: The Roll Back Option
If a newly installed driver causes issues – such as system crashes, performance degradation, or device malfunctions – your first line of defense is to roll back to the previous working driver.
- Open Device Manager:
Windows key + Xand selectDevice Manager. - Locate the Device: Find the device that’s causing problems.
- Access Driver Properties: Right-click on the device and select
Properties. - Roll Back Driver: Go to the
Drivertab and click theRoll Back Driverbutton.- Note: If the button is greyed out, it means Windows doesn’t have a previous driver version to revert to. This often happens if you performed a clean install or if it’s a completely new device.
- Provide Reason: Select a reason for rolling back and click
Yes. - Restart: Restart your computer immediately to apply the changes.
This quick fix can often resolve immediate issues without needing to re-install anything.
Dealing with Unsigned Drivers and Security Warnings
When installing drivers manually, especially those downloaded from non-official sources or very old hardware, you might encounter a “Windows can’t verify the publisher of this driver software” or “The driver is not digitally signed” warning.
- Understanding Signed Drivers: A digitally signed driver has a cryptographic signature that verifies its authenticity and confirms it hasn’t been tampered with. This is a crucial security feature.
- Best Practice: Always prioritize digitally signed drivers from official manufacturers. If you encounter an unsigned driver, proceed with extreme caution.
- Temporarily Disabling Driver Signature Enforcement (Use Only When Necessary): If you must install an unsigned driver (e.g., for very old hardware where no signed driver exists), you can temporarily disable driver signature enforcement:
- Press
Windows key + Ito open Settings. - Go to
System > Recovery. - Under “Recovery options,” click
Restart nownext to “Advanced startup.” - After rebooting, select
Troubleshoot > Advanced options > Startup Settings. - Click
Restart. - When the
Startup Settingsscreen appears, pressF7or7to “Disable driver signature enforcement.” - Your computer will restart. You can now attempt to install the unsigned driver.
- Important: Driver signature enforcement will re-enable on the next normal reboot. If the unsigned driver isn’t properly installed or causes issues, it might not load correctly after a normal restart. This is a temporary bypass and should not be a permanent solution.
- Press
Compatibility Mode and Other Advanced Fixes
Sometimes, an older driver might refuse to install on a newer version of Windows, even if it’s theoretically compatible.
- Run in Compatibility Mode:
- Right-click on the driver’s executable (
.exe) or the folder containing the.inffile. - Select
Properties. - Go to the
Compatibilitytab. - Check
Run this program in compatibility mode for:and select an older version of Windows (e.g., Windows 7 or Windows 8) that the driver was originally designed for. - Click
ApplyandOK, then try installing the driver again.
- Right-click on the driver’s executable (
- Administrator Privileges: Always ensure you’re running driver installers (especially
.exefiles) as an administrator. Right-click the executable and selectRun as administrator. - Check Event Viewer: If a driver installation fails, check the Windows Event Viewer (
Windows key + X>Event Viewer). Look underWindows Logs > Systemfor errors related to the device or driver installation timestamp. This can provide cryptic but valuable clues. - Clean Boot: Perform a clean boot to start Windows with a minimal set of drivers and startup programs. This can help identify if another program or service is interfering with the driver installation. Search for “msconfig” to access System Configuration and disable non-Microsoft services.
When All Else Fails: System Restore and Further Assistance
If troubleshooting individual driver issues doesn’t work, and your system becomes unstable:
- Utilize Your System Restore Point: If you created a restore point as advised, now is the time to use it. Search for “Create a restore point,” open it, and click
System Restore.... Follow the prompts to revert to your chosen restore point. This will undo any system changes made since that point, including problematic driver installations. - Consult Forums and Manufacturer Support: If you’re still stuck, visit the official support forums for your hardware manufacturer or the Windows support forums. You might find others who have encountered and solved the same problem. Manufacturer support lines can also provide specific guidance for their products.
- Professional Help: As a last resort, if the issue is critical and you’ve exhausted all options, consider seeking professional IT support. However, by following this guide, you’ll significantly reduce the likelihood and frequency of needing to pay for such services, thereby saving money.
Conclusion
Mastering the art of manual device driver installation is a fundamental skill for anyone serious about optimizing their technology. It transcends mere technical know-how, offering tangible benefits across the domains of Tech, Brand, and Money.
From a Tech perspective, it grants you unparalleled control, allowing you to fine-tune performance, unlock advanced features, and effectively troubleshoot a myriad of hardware-related issues that automated systems often miss. This level of system mastery empowers you to keep your devices running at their peak, ensuring that your hardware always works for you, not against you.
For your Brand, whether personal or professional, a stable, high-performing computer system is a hallmark of reliability and efficiency. The ability to quickly resolve driver conflicts or integrate new hardware seamlessly ensures uninterrupted productivity, projecting an image of competence and professionalism. Downtime due to easily fixable driver issues is both an opportunity cost and a blow to your perceived reliability.
Financially, the self-sufficiency gained from understanding manual driver installation translates directly into Money saved. Avoiding costly technical support fees, extending the life of your hardware through proper maintenance, and minimizing productivity losses due to system malfunctions are all direct financial benefits. It’s an investment in your own technical acumen that pays dividends.
By carefully identifying your hardware, sourcing drivers from official channels, preparing your system with restore points, and following the detailed installation steps outlined in this guide, you equip yourself with the confidence to tackle common tech challenges. Remember the power of the rollback option and the security implications of unsigned drivers. Embrace these practices, and you’ll not only enhance your computing experience but also elevate your digital prowess in an increasingly connected world.
aViewFromTheCave is a participant in the Amazon Services LLC Associates Program, an affiliate advertising program designed to provide a means for sites to earn advertising fees by advertising and linking to Amazon.com. Amazon, the Amazon logo, AmazonSupply, and the AmazonSupply logo are trademarks of Amazon.com, Inc. or its affiliates. As an Amazon Associate we earn affiliate commissions from qualifying purchases.